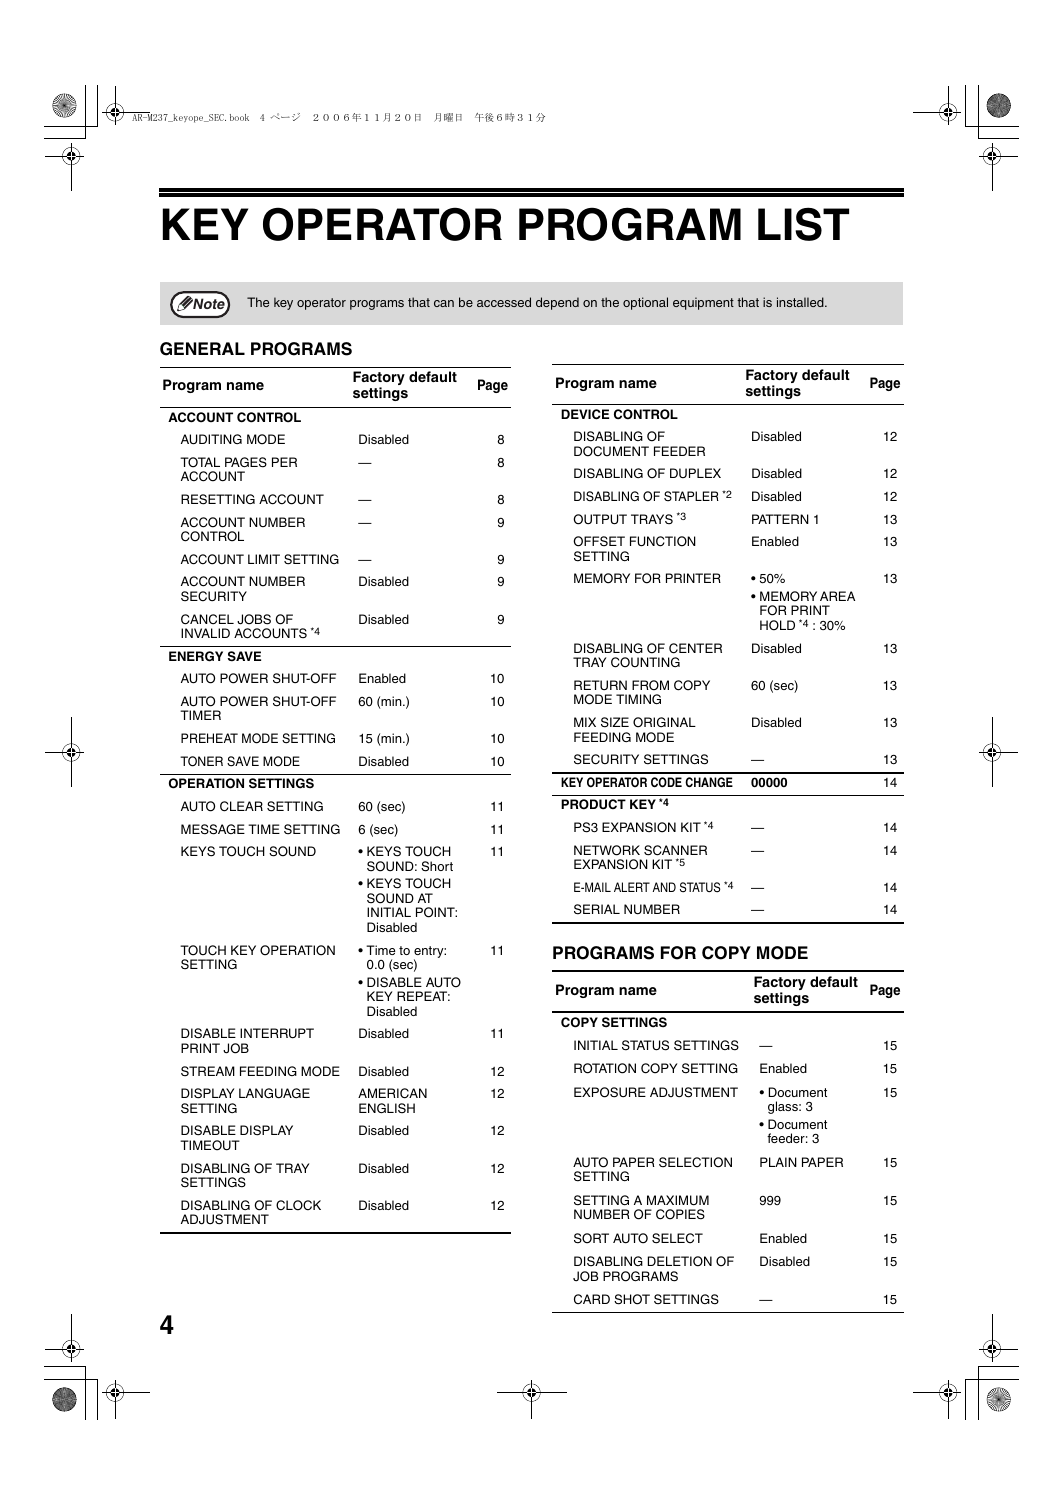
The key operator code is initially set to "00000" at the factory.
The key operator programs are used by the key operator (administrator of the machine) to customize certain features of the machine to better meet the needs of users.
This guide explains key operator programs that are common to all functions of the multifunction system (copy function, fax funct...
. Fax function "AR-FX7 Operation manual" (Chapter 8)
In order to access the key operator programs, the key operator code must be entered.
The key operator code is a 5-digit number that must be entered in order to access the key operator programs. The key operator (a...
To change the key operator code, see "USING THE KEY OPERATOR PROGRAMS" on the following page.
The key operator code is initially set to "00000" at the factory.
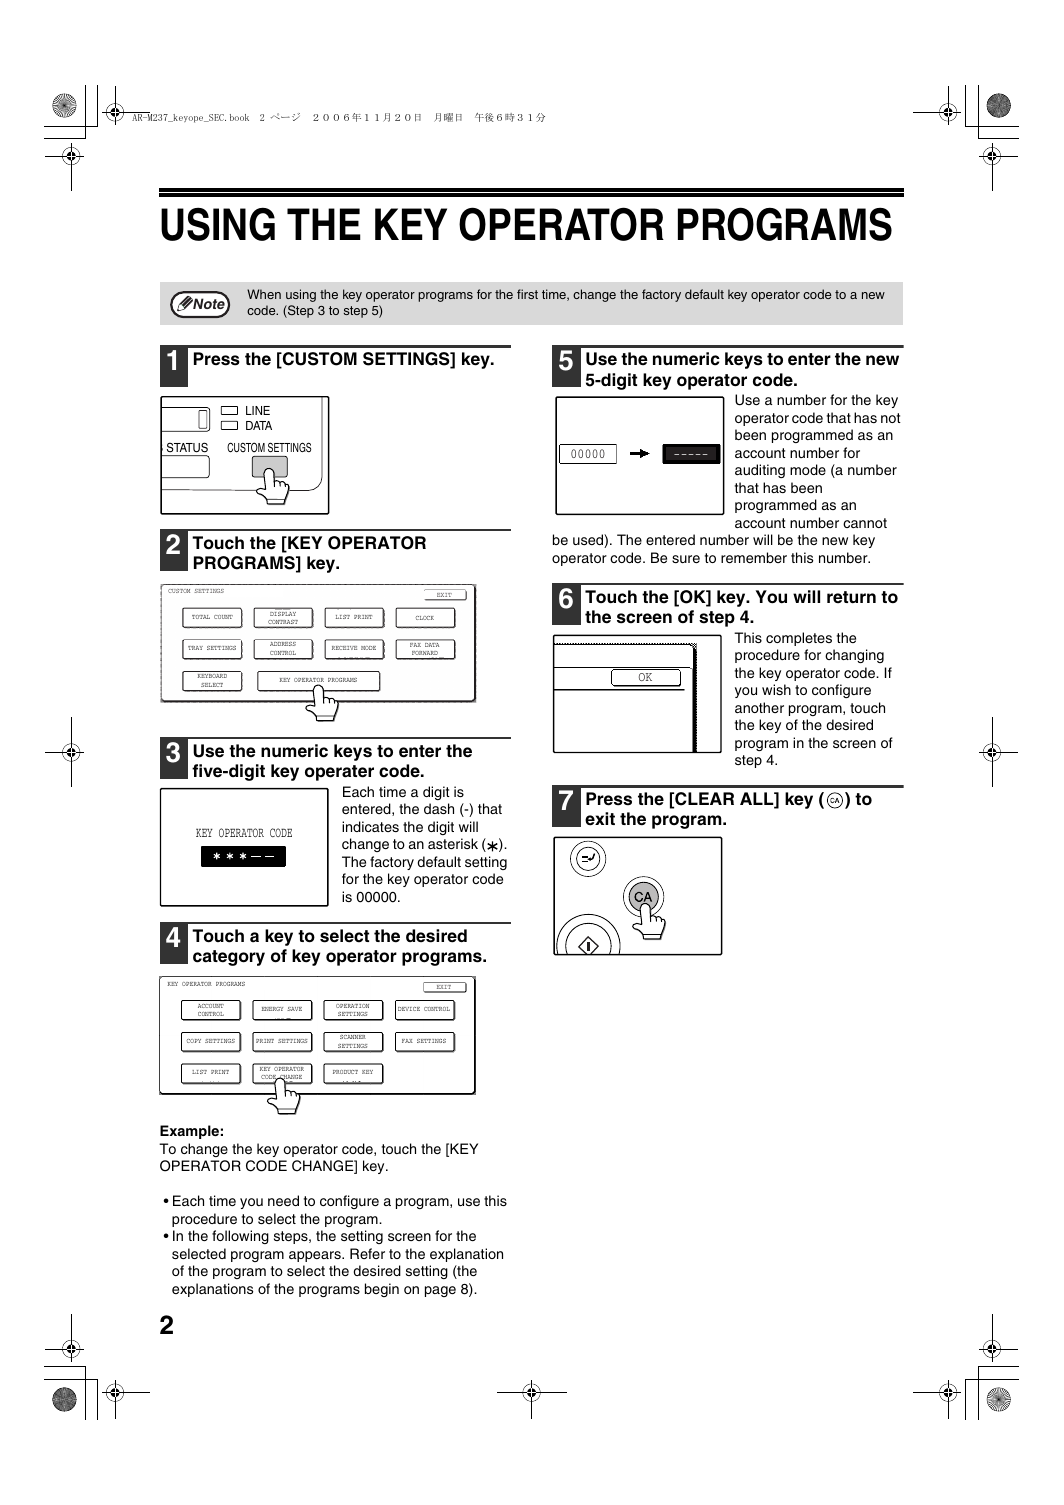
Press the [CUSTOM SETTINGS] key.
Touch the [KEY OPERATOR PROGRAMS] key.
Use the numeric keys to enter the five-digit key operater code.
Touch a key to select the desired category of key operator programs.
Use the numeric keys to enter the new 5-digit key operator code.
Touch the [OK] key. You will return to the screen of step 4.
Press the [CLEAR ALL] key () to exit the program.
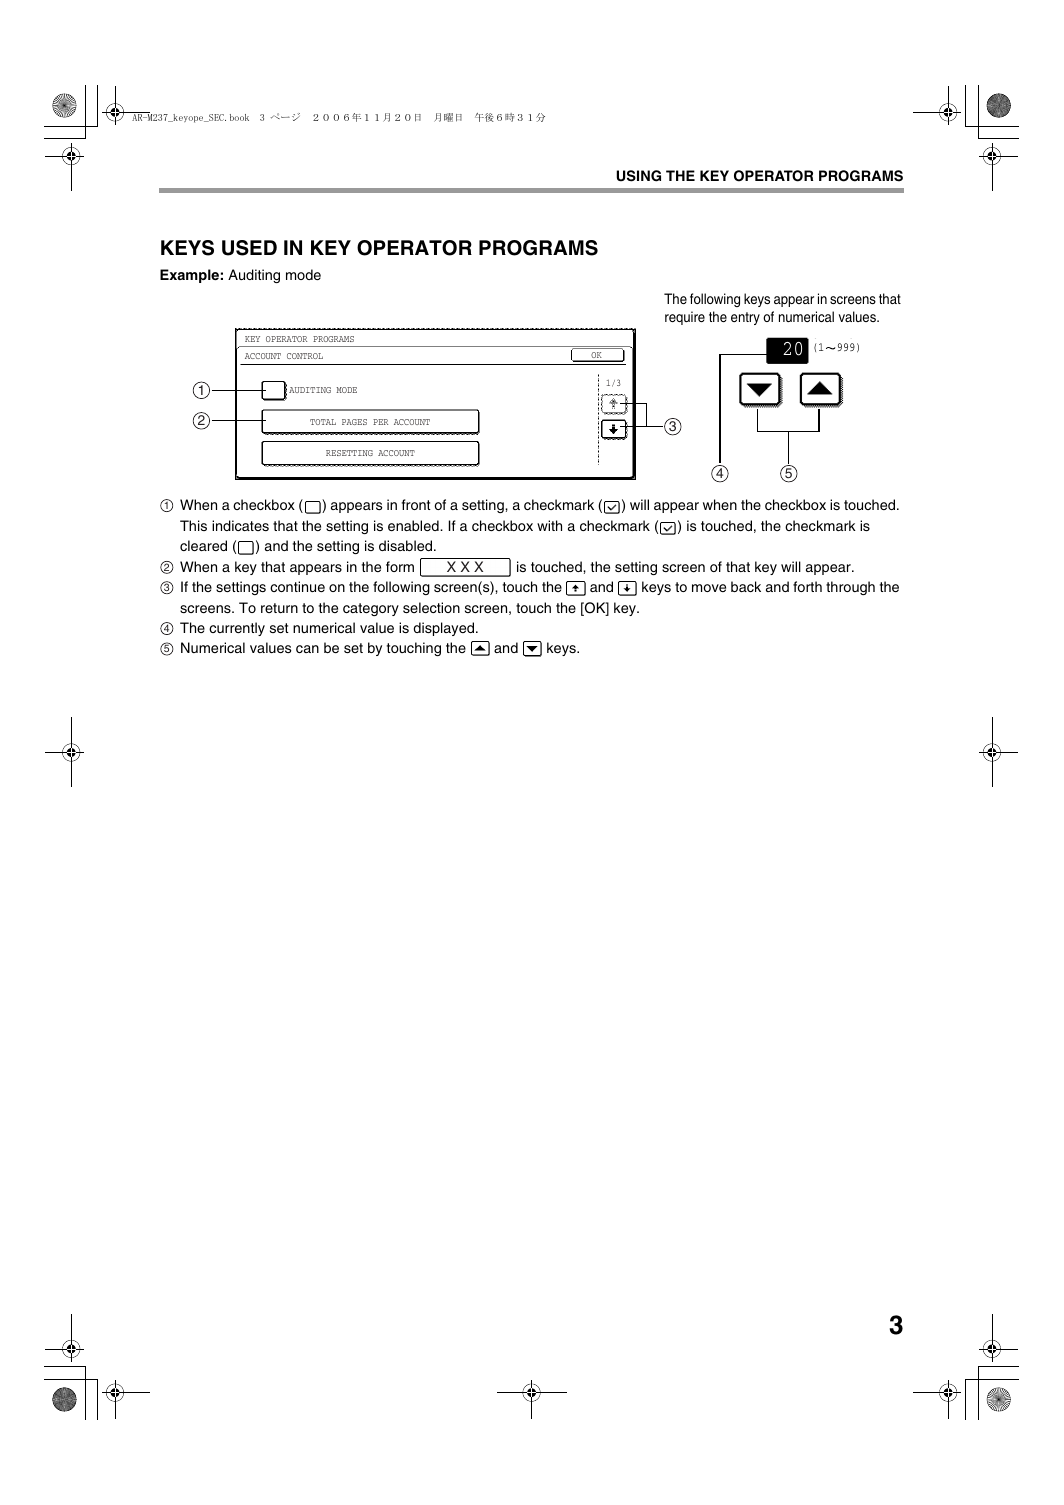
KEYS USED IN KEY OPERATOR PROGRAMS
Example: Auditing mode
The following keys appear in screens that require the entry of numerical values.
When a checkbox () appears in front of a setting, a checkmark () will appear when the checkbox is touched. This indicates that the setting is enabled. If a checkbox with a checkmark () is touched, the checkmark is cleared () and the setting is disabled.
When a key that appears in the form is touched, the setting screen of that key will appear.
If the settings continue on the following screen(s), touch the and keys to move back and forth through the screens. To return to the category selection screen, touch the [OK] key.
The currently set numerical value is displayed.
Numerical values can be set by touching the and keys.
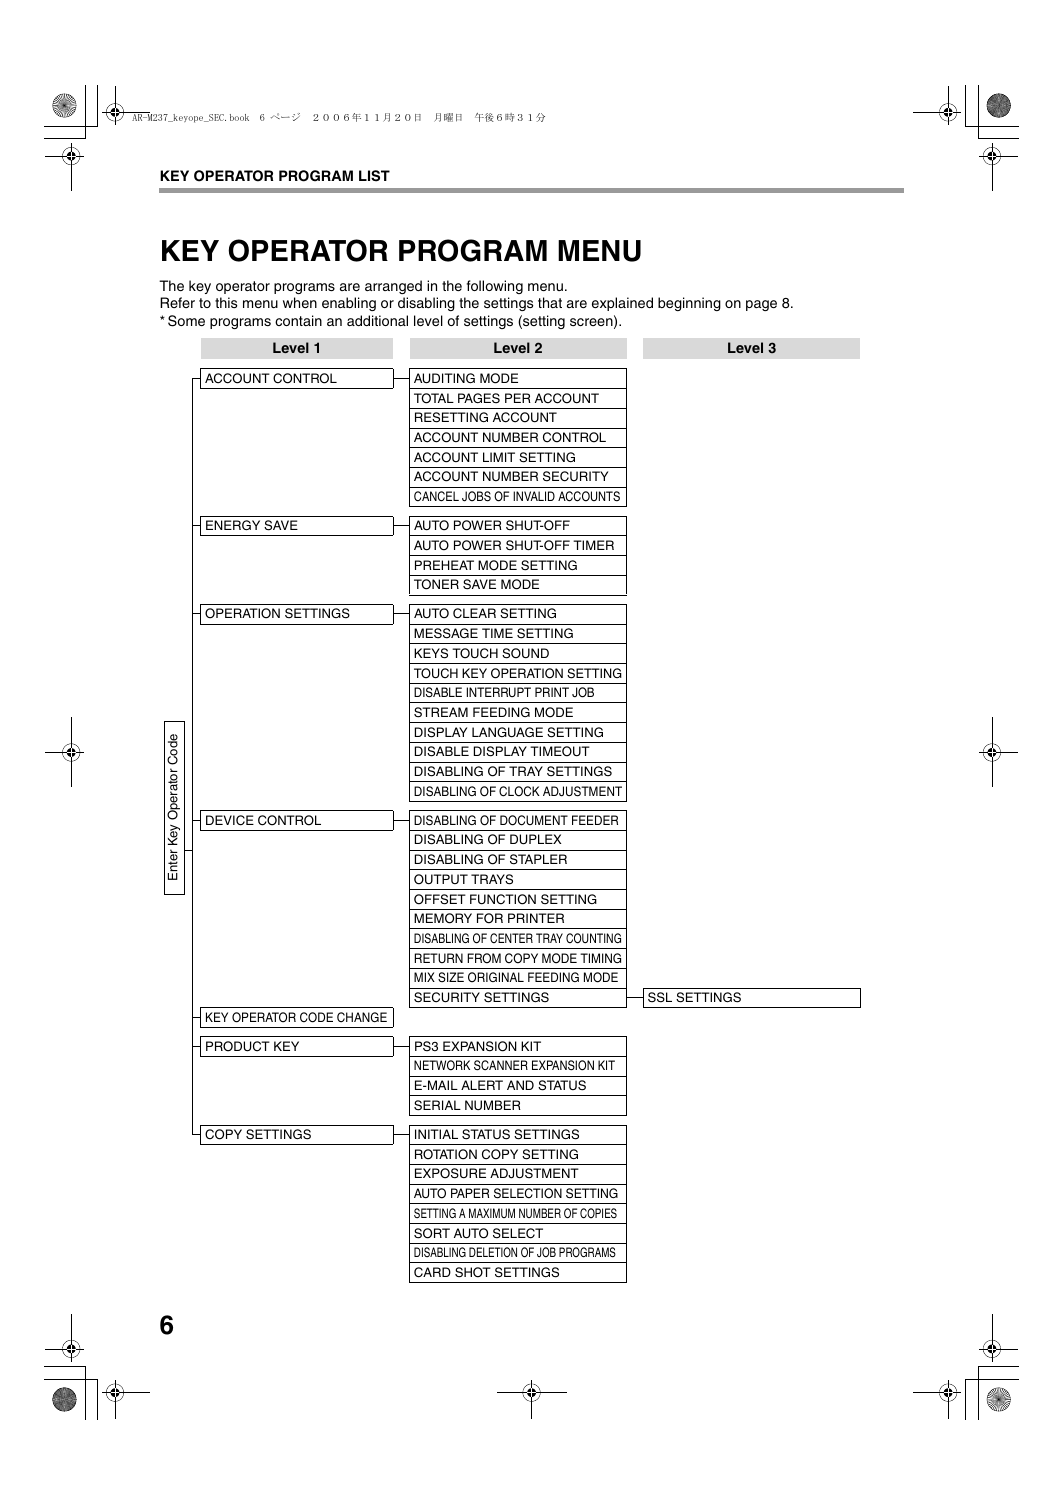
KEY OPERATOR PROGRAM MENU
The key operator programs are arranged in the following menu.
Refer to this menu when enabling or disabling the settings that are explained beginning on page 8.
* Some programs contain an additional level of settings (setting screen).
This chapter explains key operator programs that are common to all functions of the multifunction system (copy function, fax function, printer function, and network scanner function).
ACCOUNT CONTROL
AUDITING MODE
TOTAL PAGES PER ACCOUNT
RESETTING ACCOUNT
Resetting a single account
Resetting all accounts
ACCOUNT NUMBER CONTROL
Storing a new account number
Deleting an account number
Changing an account number
ACCOUNT LIMIT SETTING
Setting a limit for a single account
Setting a limit for all accounts
ACCOUNT NUMBER SECURITY
CANCEL JOBS OF INVALID ACCOUNTS
ENERGY SAVE
AUTO POWER SHUT-OFF
AUTO POWER SHUT-OFF TIMER
PREHEAT MODE SETTING
TONER SAVE MODE
OPERATION SETTINGS
AUTO CLEAR SETTING
MESSAGE TIME SETTING
KEYS TOUCH SOUND
TOUCH KEY OPERATION SETTING
DISABLE INTERRUPT PRINT JOB
STREAM FEEDING MODE
DISPLAY LANGUAGE SETTING
DISABLE DISPLAY TIMEOUT
DISABLING OF TRAY SETTINGS
DISABLING OF CLOCK ADJUSTMENT
DEVICE CONTROL
DISABLING OF DOCUMENT FEEDER
DISABLING OF DUPLEX
DISABLING OF STAPLER
OUTPUT TRAYS
OFFSET FUNCTION SETTING
MEMORY FOR PRINTER
Memory allocated to print hold
DISABLING OF CENTER TRAY COUNTING
RETURN FROM COPY MODE TIMING
MIX SIZE ORIGINAL FEEDING MODE
SECURITY SETTINGS
SSL SETTINGS
KEY OPERATOR CODE CHANGE
PRODUCT KEY
(When the PRINTER EXPANSION KIT is installed)
PS3 EXPANSION KIT
NETWORK SCANNER EXPANSION KIT
E-MAIL ALERT AND STATUS
SERIAL NUMBER
This chapter explains the key operator programs that are used for copy mode.
COPY SETTINGS
INITIAL STATUS SETTINGS
ROTATION COPY SETTING
EXPOSURE ADJUSTMENT
AUTO PAPER SELECTION SETTING
SETTING A MAXIMUM NUMBER OF COPIES
SORT AUTO SELECT
DISABLING DELETION OF JOB PROGRAMS
CARD SHOT SETTINGS
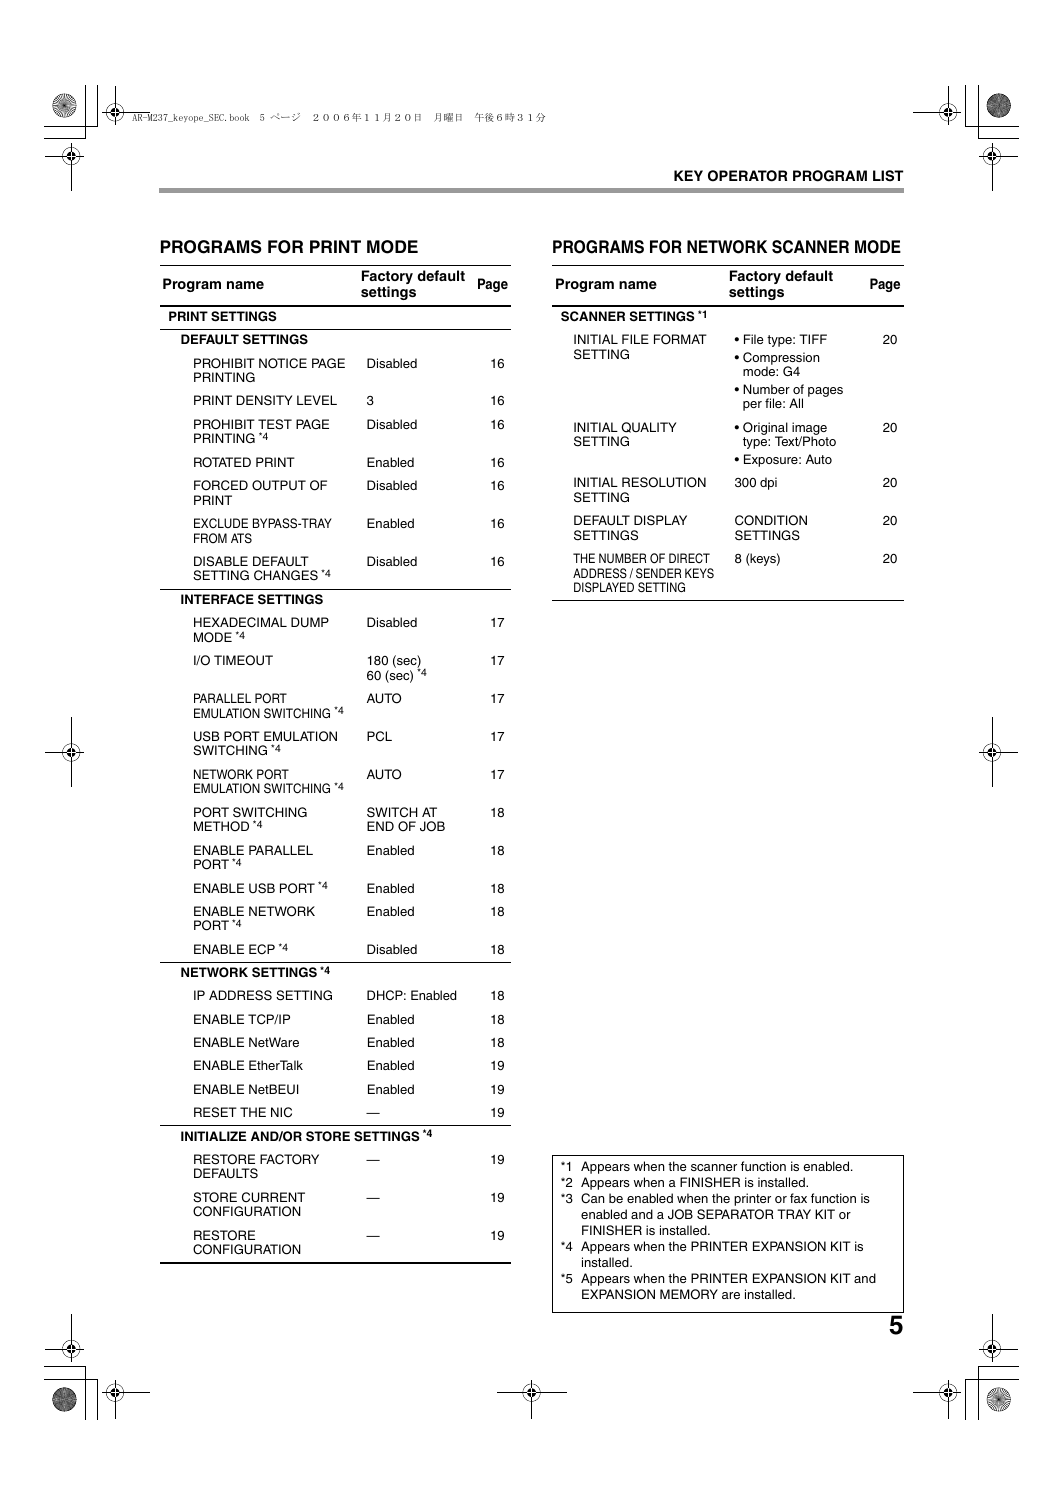
This chapter explains key operator programs that are used for the printer function. These programs can only be configured on models that have the printer function.
PRINT SETTINGS
DEFAULT SETTINGS
PROHIBIT NOTICE PAGE PRINTING
PRINT DENSITY LEVEL
PROHIBIT TEST PAGE PRINTING
ROTATED PRINT
FORCED OUTPUT OF PRINT
EXCLUDE BYPASS-TRAY FROM ATS
DISABLE DEFAULT SETTING CHANGES
INTERFACE SETTINGS
HEXADECIMAL DUMP MODE
I/O TIMEOUT
PARALLEL PORT EMULATION SWITCHING
USB PORT EMULATION SWITCHING
NETWORK PORT EMULATION SWITCHING
PORT SWITCHING METHOD
ENABLE PARALLEL PORT
ENABLE USB PORT
ENABLE NETWORK PORT
ENABLE ECP
NETWORK SETTINGS
IP ADDRESS SETTING
ENABLE TCP/IP
ENABLE NetWare
ENABLE EtherTalk
ENABLE NetBEUI
RESET THE NIC
*1
INITIALIZE AND/OR STORE SETTINGS
RESTORE FACTORY DEFAULTS
*1
STORE CURRENT CONFIGURATION
*1
RESTORE CONFIGURATION
*1
This chapter explains key operator programs that are used for the network scanner function. These programs can only be configured on models that have the network scanner function.
SCANNER SETTINGS
INITIAL FILE FORMAT SETTING
INITIAL QUALITY SETTING
INITIAL RESOLUTION SETTING
DEFAULT DISPLAY SETTINGS
THE NUMBER OF DIRECT ADDRESS / SENDER KEYS DISPLAYED SETTING
257-317 PCL6 Printing Guide.pdf
Introduction
How to use the online manual
How to Control the Online Manual
Following Links
Using Bookmarks
How to Print Out This Manual
Contents
Basic printing
When "Paper Selection" is set to "Auto Select"
When "FORCED OUTPUT OF PRINT" is disabled
When "FORCED OUTPUT OF PRINT" is enabled
When the "Paper Selection" setting is "Paper Source" or "Paper Type"
You selected a tray in "Paper Source", but the size of the paper in the selected tray does not match the printing size.
You selected a "Paper Type", and although the selected type of paper is loaded in the machine, its size does not match the printing size.
You selected a "Paper Type", but the selected type of paper is not loaded in the machine.
If the bypass tray can be used, a message prompting you to print from the bypass tray will appear. Press the [PRINT] key on the ...
Auditing mode
About the "No Offset" function setting
Opening the printer driver from the "start" button
Windows 2000/XP/Server 2003
Windows 98/Me/NT 4.0
Printer driver settings
Two-sided printing
Pamphlet style
Printing multiple pages on one page
Fitting the printed image to the paper
Rotating the print image 180 degrees
Printing a watermark
How to Print a Watermark
Stapling printed pages (when a finisher is installed)
When a finisher is installed
When a saddle stitch finisher is installed
Punch function
Print hold function
Printing using the print hold function
Selecting print hold settings in the printer driver at the time of printing
How to print a print hold job
Points to note about the Print Hold function
Carbon copy print
Printing using carbon copy print
Printing text and lines in black
Printing text in black
Printing lines in black
Printer utilities
Printer Status Monitor (for general users)
Printer Administration Utility (for administrators)
Before using the Printer Status Monitor
Printing via a server
Direct printing without a server
Using the printer utilities
Starting up the printer utilities
Printer Status Monitor
Printer Administration Utility
Using the printer utilities
Printer Status Monitor
Printer Administration Utility
Changing the Printer Status Monitor settings
Checking the printer status
Basic printing
SELECTING PAPER SETTINGS
Mac OS X
Mac OS 9
PRINTING
When "Paper Feed" is set to "Auto Select"
When "FORCED OUTPUT OF PRINT" is disabled
When "FORCED OUTPUT OF PRINT" is enabled
When "Paper Feed" is set to paper tray or paper type
You selected a tray, but the size of the paper in the selected tray does not match the printing size.
You selected a paper type, and although the selected type of paper is loaded in the machine, its size does not match the printing size.
You selected a paper type, but the selected type of paper is not loaded in the machine.
Two-sided printing
Mac OS X
Mac OS X
Pamphlet style
Mac OS X
Mac OS 9
Printing multiple pages on one page
Mac OS X
Mac OS 9
Fitting the printed image to the paper
Rotating the print image 180 degrees
Mac OS X
Mac OS 9
Printing a watermark
How to Print a Watermark
Mac OS X
Mac OS 9
Stapling printed pages (when a finisher is installed)
When a finisher is installed
When a saddle stitch finisher is installed
Punch function
Mac OS X
Mac OS 9
Job control function (Mac OS 9.0 to 9.2.2 and Mac OS X v10.2 to 10.4)
Printing when auditing mode is enabled
Using the print hold function
Giving priority to a print job / Canceling a print job
Giving priority to a print job
Canceling a print job
Configuring the printer condition settings
How to configure the settings
More information on the condition setting screen
Printer condition setting menu
Printer condition settings
DEFAULT SETTINGS
PCL SETTINGS
PostScript SETTINGS
Printing the printer setting and font lists
Troubleshooting
Printing does not take place
Check the connections
USB or parallel connection in Windows
Network connection
Check Your Computer
Points to check in Windows
Points to check on the Macintosh
Check the machine
Checking the printer driver
Points to check in Windows
Improper printing operation
Printing is slow
Two-sided printing is not possible
Stapling is not possible (when a finisher or a saddle stitch finisher is installed)
Punching is not possible (when a saddle stitch finisher is installed)
Print quality is not satisfactory
Check the paper being used
The printed image is coarse
The printed image is distorted
Part of the printed image is missing
If a notice page is printed
Notice Page regarding memory full on IMC board
When data loss error has occurred:
Notice Page regarding memory full on the printer board
Disabling notice page printing
Removing the software
Windows
Macintosh (Mac OS 9.0 to 9.2.2)
Mac OS X
About the Web page
Accessing the Web page
Directly printing a file in a computer
E-mail print function
Setting up the E-mail print function
Using the E-mail print function
E-mail status and e-mail alert settings
Information setup
SMTP setup
Status message setup
Alerts message setup
Protecting information programmed in the web page ("Passwords")
Printer specifications
Printer driver specifications
257-317 SPLC Printing Guide.pdf
Introduction
How to use the online manual
How to Control the Online Manual
Following Links
Using Bookmarks
How to Print Out This Manual
Contents
Basic printing
When "Paper Selection" is set to "Auto Select"
When "FORCED OUTPUT OF PRINT" is disabled
When "FORCED OUTPUT OF PRINT" is enabled
When the "Paper Selection" setting is "Paper Source" or "Paper Type"
You selected a tray in "Paper Source", but the size of the paper in the selected tray does not match the printing size.
You selected a "Paper Type", and although the selected type of paper is loaded in the machine, its size does not match the printing size.
You selected a "Paper Type", but the selected type of paper is not loaded in the machine.
Opening the printer driver from the "start" button
Windows 2000/XP
Windows 98/Me/NT 4.0
Printer driver settings
Two-sided printing
Printing multiple pages on one page
Fitting the printed image to the paper
Rotating the print image 180 degrees
Printing a watermark
How to Print a Watermark
Stapling printed pages (when a finisher is installed)
When a finisher is installed
When a saddle stitch finisher is installed
Punch function
Giving priority to a print job
Canceling a print job
Sharing the printer using windows networking
Shared printer settings
On the computer to which the machine is directly connected
Client settings
Settings in Windows NT 4.0
Troubleshooting
Printing does not take place
Check the connections
Check Your Computer
Check the machine
Checking the printer driver
Improper printing operation
Printing is slow
Two-sided printing is not possible
Stapling is not possible (when a finisher or a saddle stitch finisher is installed)
Punching is not possible (when a saddle stitch finisher is installed)
Print quality is not satisfactory
Check the paper being used
The printed image is coarse
The printed image is distorted
Part of the printed image is missing
If a Notice Page is printed
If a Notice Page is printed
When the Staple function is not selected:
When the Staple function is selected:
Disabling notice page printing
Uninstalling the printer driver
Printer specifications



 2023年江西萍乡中考道德与法治真题及答案.doc
 2012年重庆南川中考生物真题及答案.doc
 2013年江西师范大学地理学综合及文艺理论基础考研真题.doc
 2020年四川甘孜小升初语文真题及答案I卷.doc
 2020年注册岩土工程师专业基础考试真题及答案.doc
 2023-2024学年福建省厦门市九年级上学期数学月考试题及答案.doc
 2021-2022学年辽宁省沈阳市大东区九年级上学期语文期末试题及答案.doc
 2022-2023学年北京东城区初三第一学期物理期末试卷及答案.doc
 2018上半年江西教师资格初中地理学科知识与教学能力真题及答案.doc
 2012年河北国家公务员申论考试真题及答案-省级.doc
 2020-2021学年江苏省扬州市江都区邵樊片九年级上学期数学第一次质量检测试题及答案.doc
 2022下半年黑龙江教师资格证中学综合素质真题及答案.doc