Using this Guide
This guide introduces you to the NEC MobilePro™ Handheld Personal Computer (H/PC) hardware. Read the following
sections.
Chapter 1, Quick Start, provides all the information you need to getting your MobilePro 700 setup and working with
your desktop or notebook system.
Chapter 2, Getting Familiar, introduces you to MobilePro H/PC (also called the MobilePro) features, battery
installation, the display panel, and unit care.
Chapter 3, Using the MobilePro, shows you how to power on and off, make display panel adjustments,
connect external devices, and more.
Chapter 4, Troubleshooting, walks you through some common problems and possible solutions.
Chapter 5, Specifications, details the hardware specifications for your MobilePro.
Read this user’s guide to become familiar with your MobilePro. For software operation details, see the software guide that
comes with the unit.
Text Setup
To make this guide as easy to use as possible, text is set up as follows.
Warnings, cautions, and notes have the following format:
Warnings alert you to situations that could result in serious personal injury or loss of life.
WARNING
Cautions indicate situations that can damage the system hardware or software.
CAUTION
Notes give particularly important information about whatever is being described.
Names of keys are printed as they appear on the keyboard, for example, Ctrl, Alt, or Enter.
Text that you must type or keys that you must press are presented in bold type. For example, type dir and press Enter.
�
Quick Start
Congratulations and thank you for purchasing the NEC MobilePro Handheld PC (H/PC). This chapter shows you how you
can quickly setup and begin to use it either on its own or as a powerful desktop companion.
Quick Feature summary
Your new MobilePro 700 has the following key features:
A backlit display, which you can turn on under dim lighting conditions by pressing the backlight key on the keyboard
A large keyboard for true "touch typing"
A Compact Flash™ slot
A PC Card slot for Type I or Type II PC Cards
8 MB RAM (expandable to 32 MB)
an AC adapter for running your MobilePro H/PC using AC power
A low-power, hardware-based 33.6 Kbps fax/modem
A microphone and speaker for digital voice recording and playback
About Quick Start
The MobilePro 700 H/PC uses the Microsoft Windows CE 2.0 Operating System, which has a user interface very similar to
the Microsoft Windows 95 and Microsoft Windows NT operating systems. This chapter assumes that you are already
familiar with at least one of these operating systems.
Our purpose here is to get you very quickly up to speed and using your new MobilePro. The information in this chapter
has intentionally been kept concise. References are included to the other areas where you can find more detailed
information.
For important product information that was not available for inclusion in this guide, please refer to the Readme file
on the MobilePro H/PC Software Suite or to the Readme First sheet in the carton box.
Using Your MobilePro H/PC for the First Time
The MobilePro requires two type of batteries to operate as a portable computer:
2 AA Alkaline or rechargeable NiMH main batteries
1 CR2032 3-volt coin cell backup battery
When using the MobilePro for the first time, install the main batteries before removing the insulating sheet from the
backup battery compartment.
CAUTION
�
Installing the Batteries
Slide the battery cover lock switch to the MAIN position.
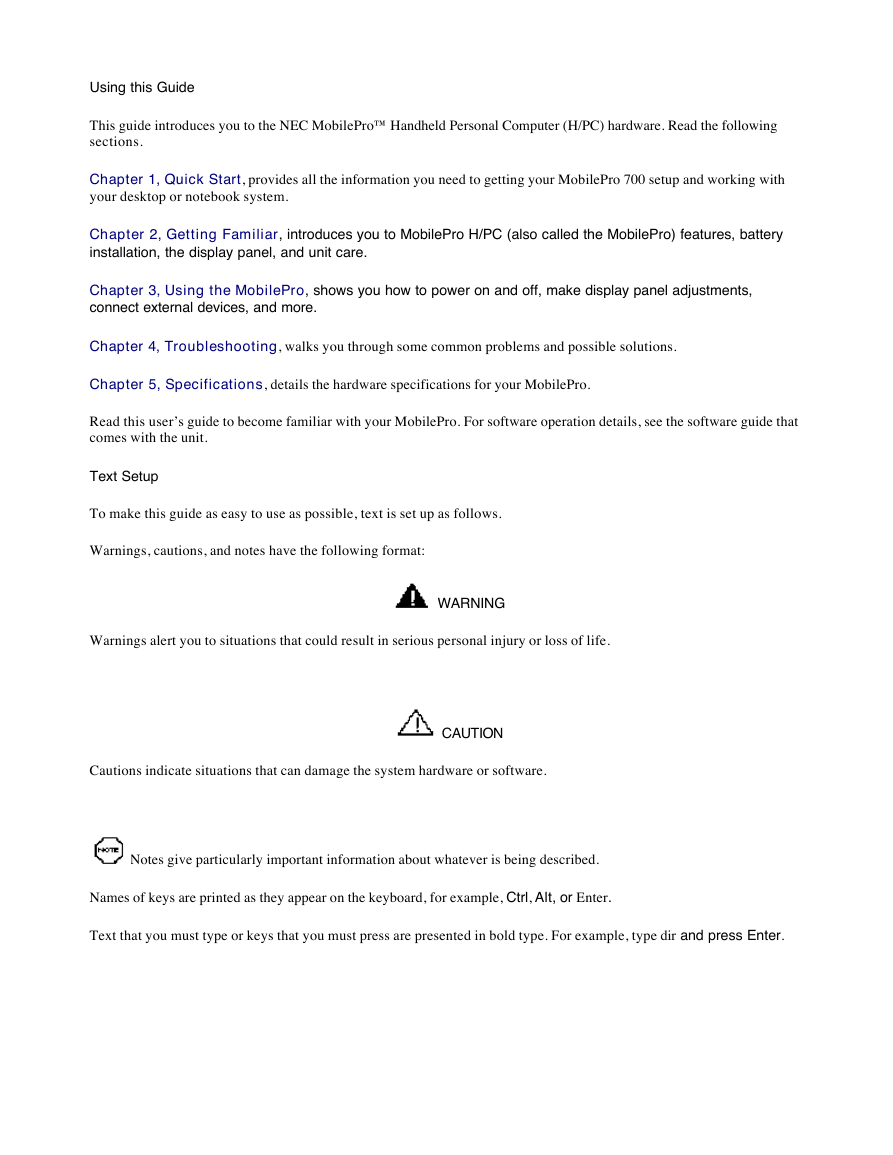
Open the main battery cover on the bottom-rear of your MobilePro.
Opening the battery bay cover
Slide the battery bay cover away from the unit and remove it.
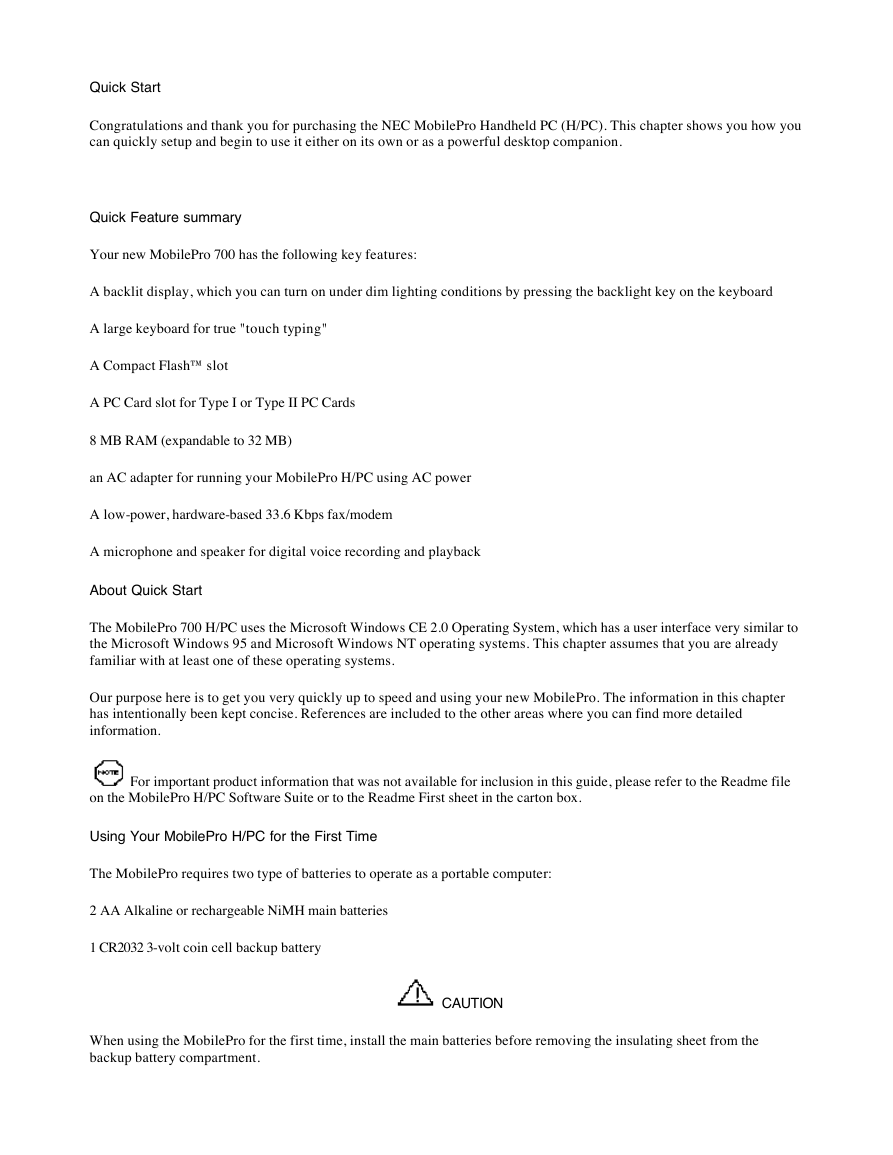
Inside the bay, locate the following:
The battery ribbon. Pull the ribbon gently so that it protrudes out of the bay.
The terminal notations (+ and –).
Locating the ribbon and terminal notations
�
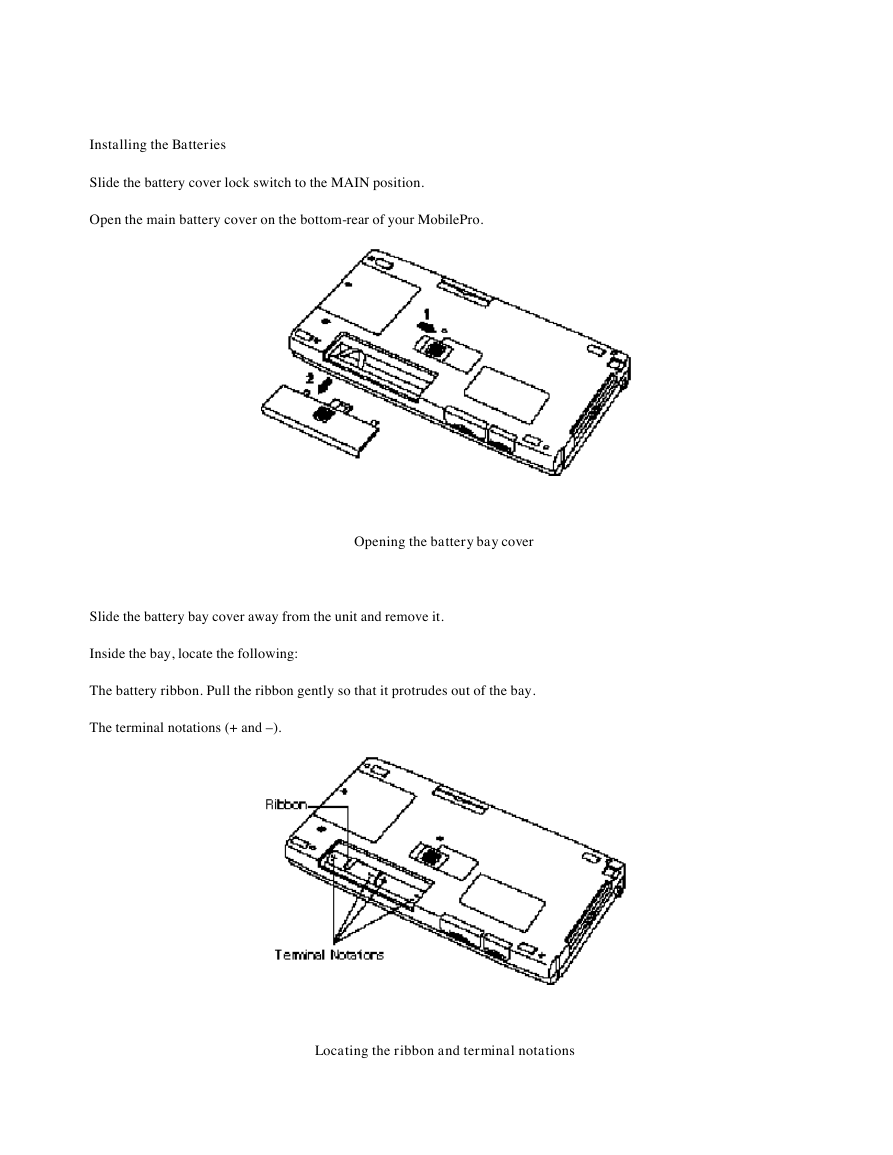
Put the AA batteries on the ribbon in the bay. Align the batteries so that the positive terminal (+) on the battery aligns
with the positive (+) notation in the bay.
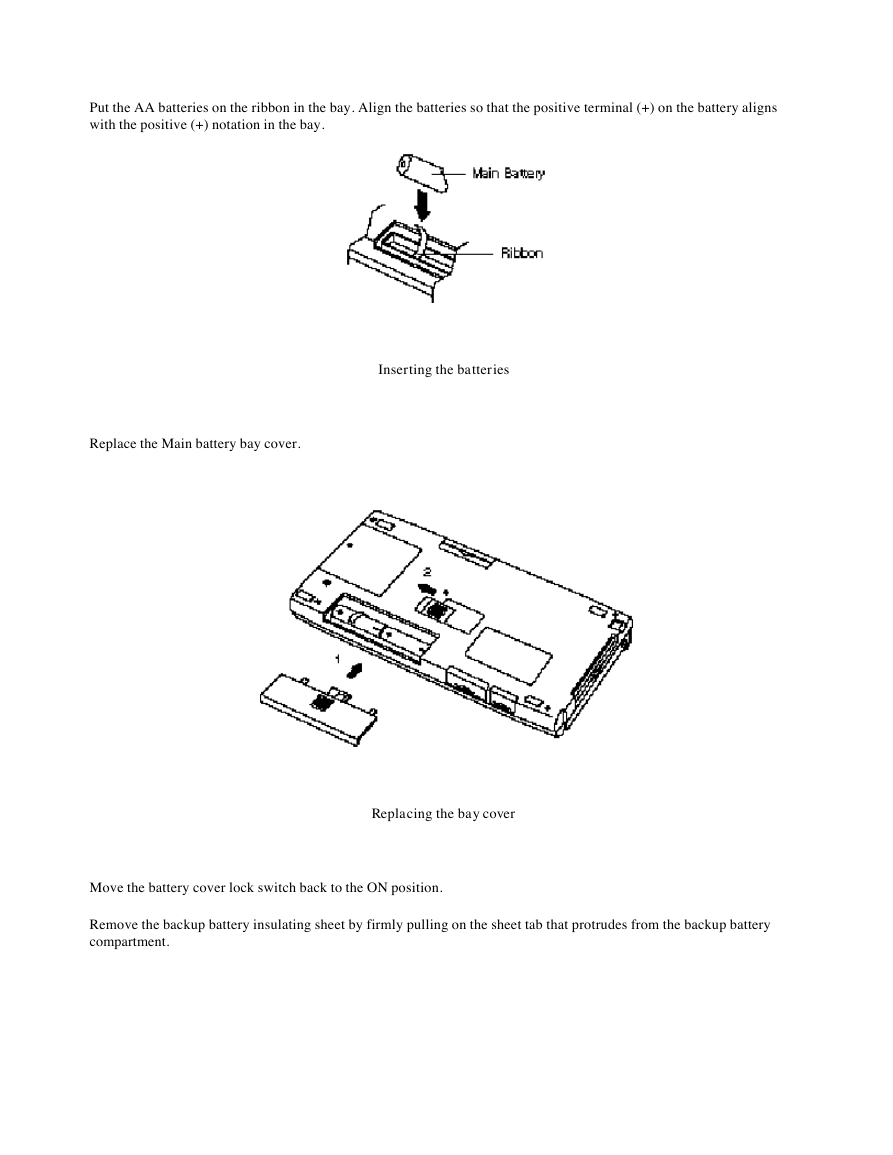
Replace the Main battery bay cover.
Inserting the batteries
Replacing the bay cover
Move the battery cover lock switch back to the ON position.
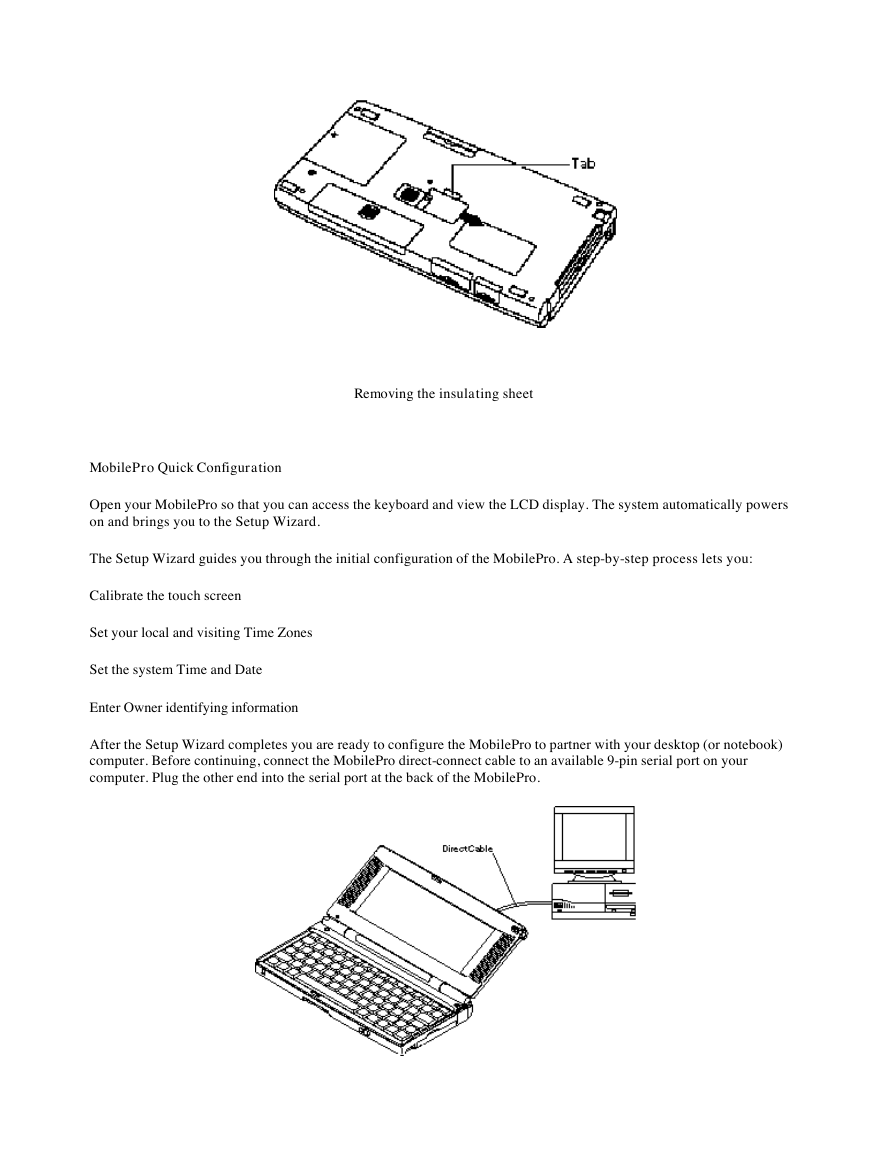
Remove the backup battery insulating sheet by firmly pulling on the sheet tab that protrudes from the backup battery
compartment.
�
Removing the insulating sheet
MobilePro Quick Configuration
Open your MobilePro so that you can access the keyboard and view the LCD display. The system automatically powers
on and brings you to the Setup Wizard.
The Setup Wizard guides you through the initial configuration of the MobilePro. A step-by-step process lets you:
Calibrate the touch screen
Set your local and visiting Time Zones
Set the system Time and Date
Enter Owner identifying information
After the Setup Wizard completes you are ready to configure the MobilePro to partner with your desktop (or notebook)
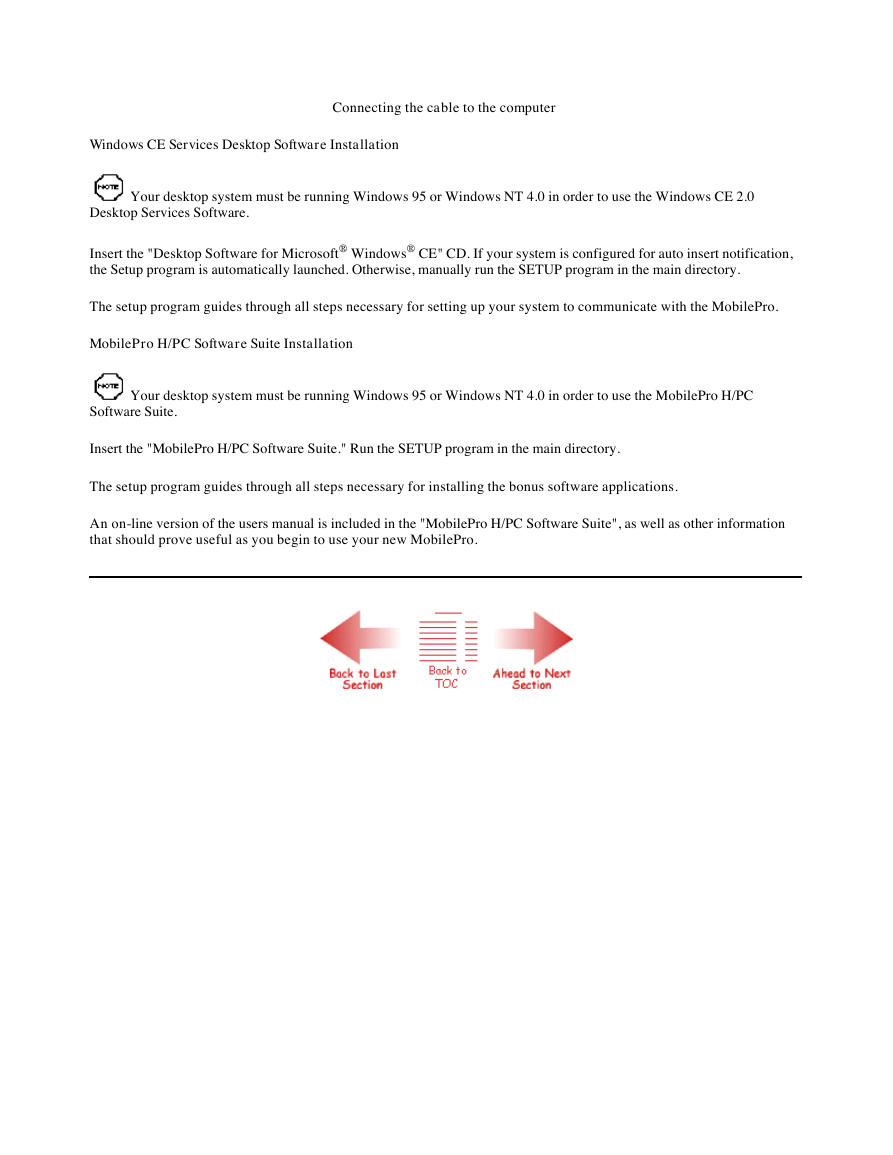
computer. Before continuing, connect the MobilePro direct-connect cable to an available 9-pin serial port on your
computer. Plug the other end into the serial port at the back of the MobilePro.
�
Windows CE Services Desktop Software Installation
Connecting the cable to the computer
Your desktop system must be running Windows 95 or Windows NT 4.0 in order to use the Windows CE 2.0
Desktop Services Software.
Insert the "Desktop Software for Microsoft® Windows® CE" CD. If your system is configured for auto insert notification,
the Setup program is automatically launched. Otherwise, manually run the SETUP program in the main directory.
The setup program guides through all steps necessary for setting up your system to communicate with the MobilePro.
MobilePro H/PC Software Suite Installation
Your desktop system must be running Windows 95 or Windows NT 4.0 in order to use the MobilePro H/PC
Software Suite.
Insert the "MobilePro H/PC Software Suite." Run the SETUP program in the main directory.
The setup program guides through all steps necessary for installing the bonus software applications.
An on-line version of the users manual is included in the "MobilePro H/PC Software Suite", as well as other information
that should prove useful as you begin to use your new MobilePro.
�
Getting Familiar with MobilePro
Welcome to the NEC MobilePro™ Handheld PC (H/PC). This H/PC lets you:
Edit, create, send, and receive documents including spreadsheets and e-mail
Manage your schedule and contacts
Access the Internet with the internal modem
Synchronize data with your notebook or desktop computer.
This chapter introduces you to the MobilePro features, display panel, stylus, and complete battery installation procedures.
Before using your MobilePro, read this chapter for details about installing the batteries. Do not attempt to use the
unit without the batteries installed. Be sure you have completed all the steps in Chapter 1, "Quick Start."
What’s in the Box
Your MobilePro ships with a number of accessories. When you unpack the MobilePro, check that you have all of the items
listed next and that they are in good condition. If anything is missing or damaged, immediately contact the vendor who
sold you the unit.
MobilePro 700 (a stylus ships in a holder integrated in the MobilePro)
MobilePro AC Adapter
MobilePro VGA Cable
MobilePro Direct Connection Cable
MobilePro Modem Cable
Two (2) AA alkaline batteries
One (1) CR2032 Back-Up Battery
MicrosoftÒ WindowsÒ CE Services 2.0 compact disc (CD) and MicrosoftÒ WindowsÒ CE PC Companion User’s Guide
MobilePro H/PC Software Suite CD (or diskette) containing NEC Bonus Software applications
MobilePro 700 H/PC User’s Guide (this document)
NEC MobilePro H/PC Resource Guide
Introducing MobilePro Features
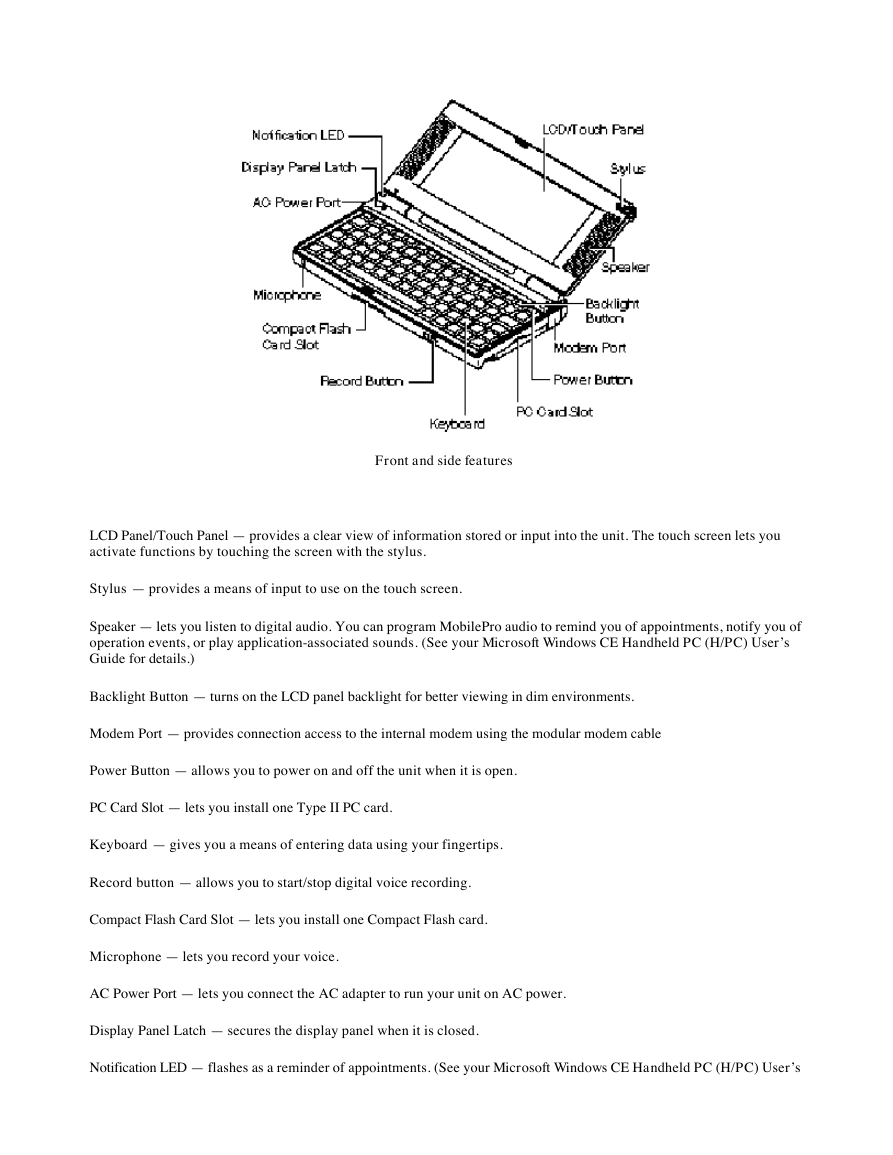
The MobilePro provides many features that you can see in the following figures. Feature descriptions follow each figure.
The front and side of the unit is shown first.
�
Front and side features
LCD Panel/Touch Panel — provides a clear view of information stored or input into the unit. The touch screen lets you
activate functions by touching the screen with the stylus.
Stylus — provides a means of input to use on the touch screen.
Speaker — lets you listen to digital audio. You can program MobilePro audio to remind you of appointments, notify you of
operation events, or play application-associated sounds. (See your Microsoft Windows CE Handheld PC (H/PC) User’s
Guide for details.)
Backlight Button — turns on the LCD panel backlight for better viewing in dim environments.
Modem Port — provides connection access to the internal modem using the modular modem cable
Power Button — allows you to power on and off the unit when it is open.
PC Card Slot — lets you install one Type II PC card.
Keyboard — gives you a means of entering data using your fingertips.
Record button — allows you to start/stop digital voice recording.
Compact Flash Card Slot — lets you install one Compact Flash card.
Microphone — lets you record your voice.
AC Power Port — lets you connect the AC adapter to run your unit on AC power.
Display Panel Latch — secures the display panel when it is closed.
Notification LED — flashes as a reminder of appointments. (See your Microsoft Windows CE Handheld PC (H/PC) User’s
�



 2023年江西萍乡中考道德与法治真题及答案.doc
 2012年重庆南川中考生物真题及答案.doc
 2013年江西师范大学地理学综合及文艺理论基础考研真题.doc
 2020年四川甘孜小升初语文真题及答案I卷.doc
 2020年注册岩土工程师专业基础考试真题及答案.doc
 2023-2024学年福建省厦门市九年级上学期数学月考试题及答案.doc
 2021-2022学年辽宁省沈阳市大东区九年级上学期语文期末试题及答案.doc
 2022-2023学年北京东城区初三第一学期物理期末试卷及答案.doc
 2018上半年江西教师资格初中地理学科知识与教学能力真题及答案.doc
 2012年河北国家公务员申论考试真题及答案-省级.doc
 2020-2021学年江苏省扬州市江都区邵樊片九年级上学期数学第一次质量检测试题及答案.doc
 2022下半年黑龙江教师资格证中学综合素质真题及答案.doc