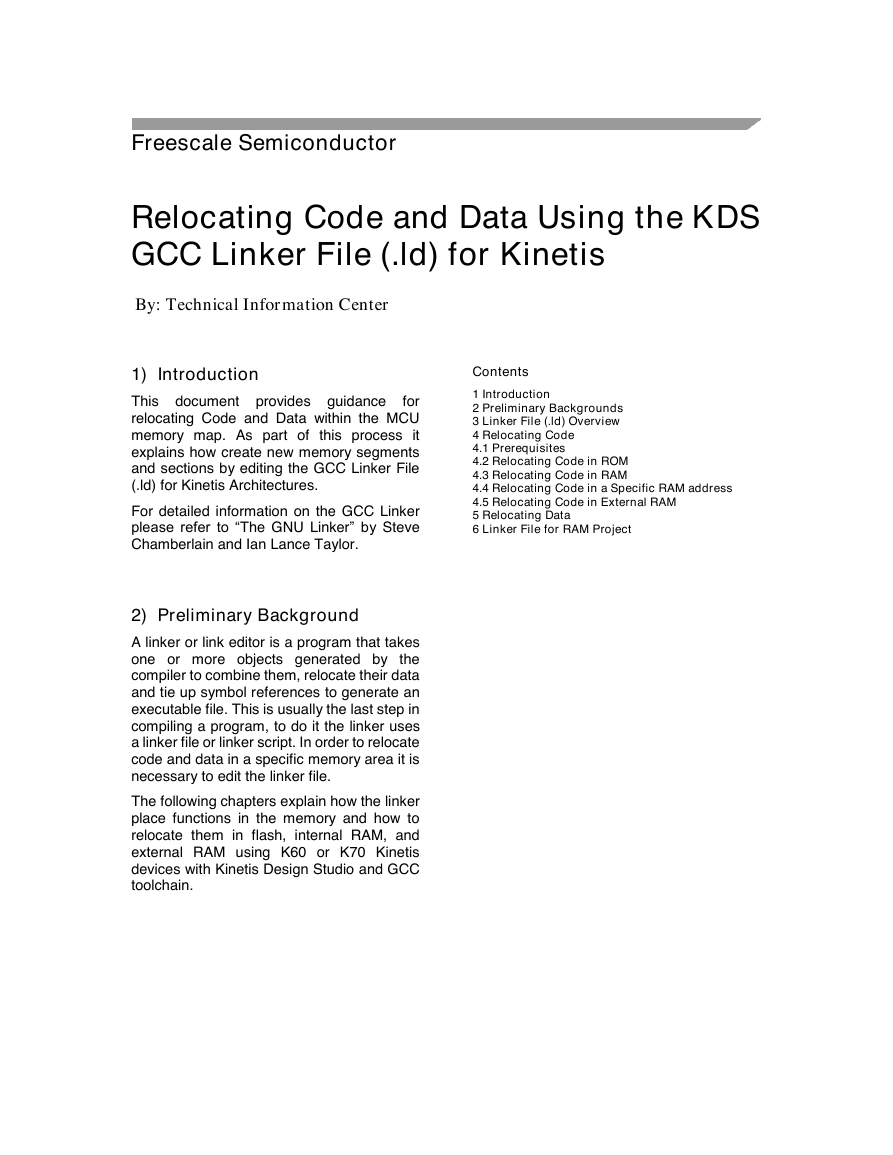
Freescale Semiconductor
Relocating Code and Data Using the KDS
GCC Linker File (.ld) for Kinetis
By: Technical Information Center
1) Introduction
Contents
for
This document provides guidance
relocating Code and Data within the MCU
memory map. As part of this process it
explains how create new memory segments
and sections by editing the GCC Linker File
(.ld) for Kinetis Architectures.
For detailed information on the GCC Linker
please refer to “The GNU Linker” by Steve
Chamberlain and Ian Lance Taylor.
2) Preliminary Background
A linker or link editor is a program that takes
one or more objects generated by the
compiler to combine them, relocate their data
and tie up symbol references to generate an
executable file. This is usually the last step in
compiling a program, to do it the linker uses
a linker file or linker script. In order to relocate
code and data in a specific memory area it is
necessary to edit the linker file.
The following chapters explain how the linker
place functions in the memory and how to
relocate them in flash, internal RAM, and
external RAM using K60 or K70 Kinetis
devices with Kinetis Design Studio and GCC
toolchain.
1 Introduction
2 Preliminary Backgrounds
3 Linker File (.ld) Overview
4 Relocating Code
4.1 Prerequisites
4.2 Relocating Code in ROM
4.3 Relocating Code in RAM
4.4 Relocating Code in a Specific RAM address
4.5 Relocating Code in External RAM
5 Relocating Data
6 Linker File for RAM Project
�
3) Linker File (.ld) Overview
Freescale linker files are divided in 2 main parts.
3.1) Memory Segment
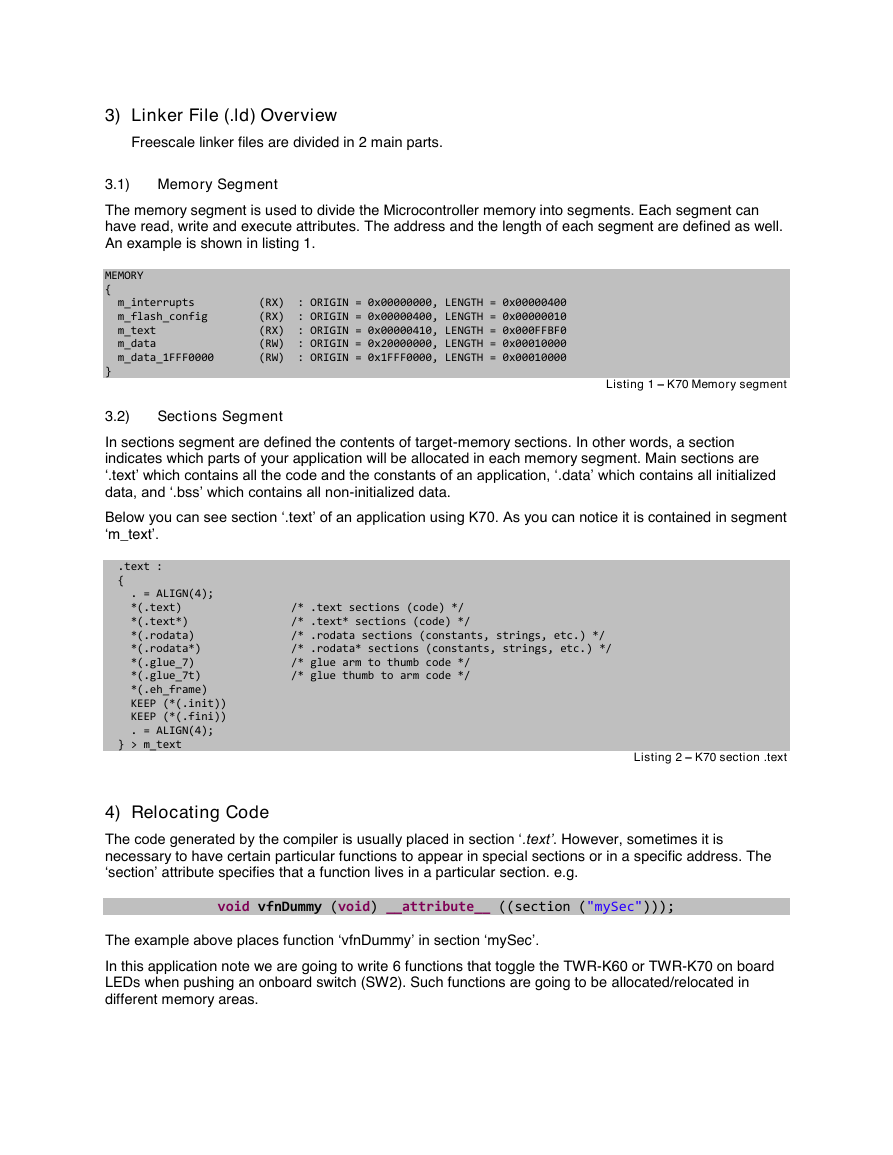
The memory segment is used to divide the Microcontroller memory into segments. Each segment can
have read, write and execute attributes. The address and the length of each segment are defined as well.
An example is shown in listing 1.
MEMORY
{
m_interrupts (RX) : ORIGIN = 0x00000000, LENGTH = 0x00000400
m_flash_config (RX) : ORIGIN = 0x00000400, LENGTH = 0x00000010
m_text (RX) : ORIGIN = 0x00000410, LENGTH = 0x000FFBF0
m_data (RW) : ORIGIN = 0x20000000, LENGTH = 0x00010000
m_data_1FFF0000 (RW) : ORIGIN = 0x1FFF0000, LENGTH = 0x00010000
}
Listing 1 – K70 Memory segment
3.2)
Sections Segment
In sections segment are defined the contents of target-memory sections. In other words, a section
indicates which parts of your application will be allocated in each memory segment. Main sections are
‘.text’ which contains all the code and the constants of an application, ‘.data’ which contains all initialized
data, and ‘.bss’ which contains all non-initialized data.
Below you can see section ‘.text’ of an application using K70. As you can notice it is contained in segment
‘m_text’.
.text :
{
. = ALIGN(4);
*(.text) /* .text sections (code) */
*(.text*) /* .text* sections (code) */
*(.rodata) /* .rodata sections (constants, strings, etc.) */
*(.rodata*) /* .rodata* sections (constants, strings, etc.) */
*(.glue_7) /* glue arm to thumb code */
*(.glue_7t) /* glue thumb to arm code */
*(.eh_frame)
KEEP (*(.init))
KEEP (*(.fini))
. = ALIGN(4);
} > m_text
Listing 2 – K70 section .text
4) Relocating Code
The code generated by the compiler is usually placed in section ‘.text’. However, sometimes it is
necessary to have certain particular functions to appear in special sections or in a specific address. The
‘section’ attribute specifies that a function lives in a particular section. e.g.
void vfnDummy (void) __attribute__ ((section ("mySec")));
The example above places function ‘vfnDummy’ in section ‘mySec’.
In this application note we are going to write 6 functions that toggle the TWR-K60 or TWR-K70 on board
LEDs when pushing an onboard switch (SW2). Such functions are going to be allocated/relocated in
different memory areas.
�
4.1) Prerequisites
Create a new Kinetis Design Studio project using K60 or K70.
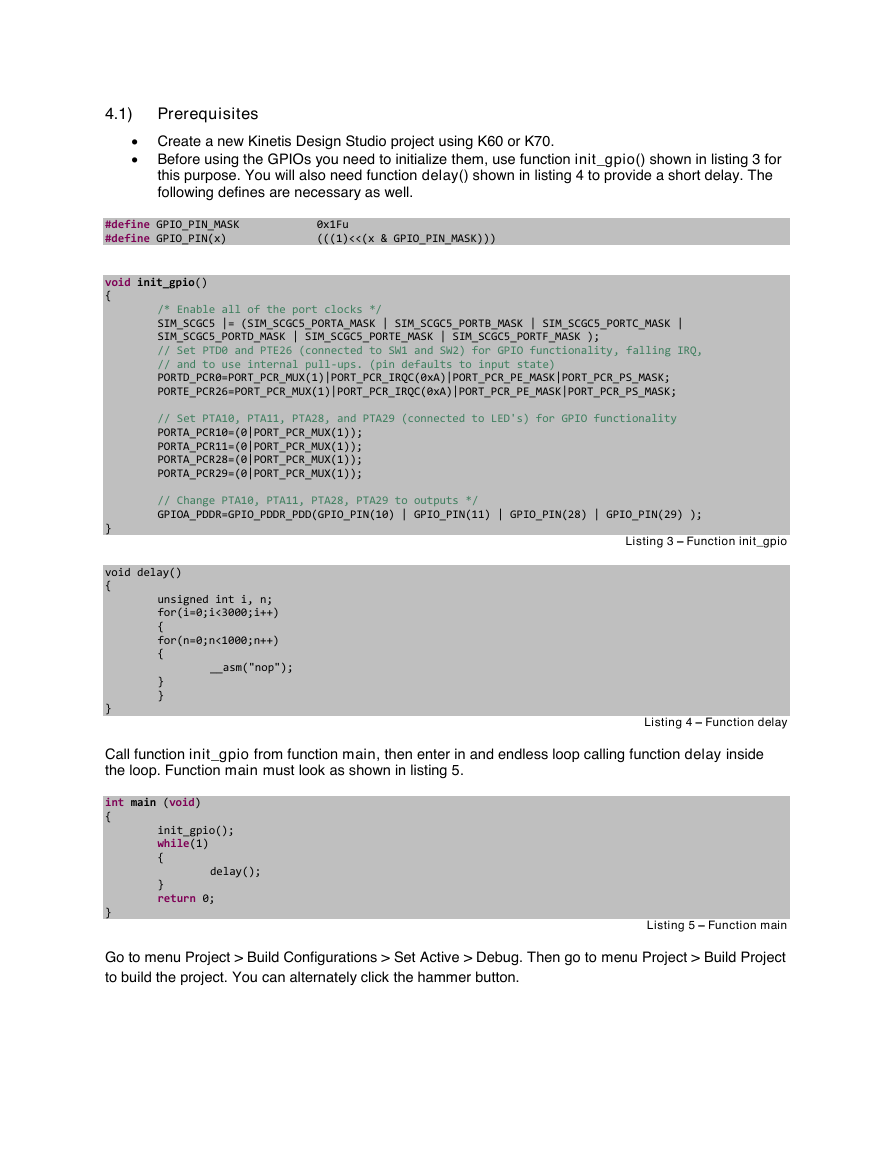
Before using the GPIOs you need to initialize them, use function init_gpio() shown in listing 3 for
this purpose. You will also need function delay() shown in listing 4 to provide a short delay. The
following defines are necessary as well.
#define GPIO_PIN_MASK 0x1Fu
#define GPIO_PIN(x) (((1)<<(x & GPIO_PIN_MASK)))
void init_gpio()
{
}
/* Enable all of the port clocks */
SIM_SCGC5 |= (SIM_SCGC5_PORTA_MASK | SIM_SCGC5_PORTB_MASK | SIM_SCGC5_PORTC_MASK |
SIM_SCGC5_PORTD_MASK | SIM_SCGC5_PORTE_MASK | SIM_SCGC5_PORTF_MASK );
// Set PTD0 and PTE26 (connected to SW1 and SW2) for GPIO functionality, falling IRQ,
// and to use internal pull-ups. (pin defaults to input state)
PORTD_PCR0=PORT_PCR_MUX(1)|PORT_PCR_IRQC(0xA)|PORT_PCR_PE_MASK|PORT_PCR_PS_MASK;
PORTE_PCR26=PORT_PCR_MUX(1)|PORT_PCR_IRQC(0xA)|PORT_PCR_PE_MASK|PORT_PCR_PS_MASK;
// Set PTA10, PTA11, PTA28, and PTA29 (connected to LED's) for GPIO functionality
PORTA_PCR10=(0|PORT_PCR_MUX(1));
PORTA_PCR11=(0|PORT_PCR_MUX(1));
PORTA_PCR28=(0|PORT_PCR_MUX(1));
PORTA_PCR29=(0|PORT_PCR_MUX(1));
// Change PTA10, PTA11, PTA28, PTA29 to outputs */
GPIOA_PDDR=GPIO_PDDR_PDD(GPIO_PIN(10) | GPIO_PIN(11) | GPIO_PIN(28) | GPIO_PIN(29) );
Listing 3 – Function init_gpio
void delay()
{
unsigned int i, n;
for(i=0;i<3000;i++)
{
for(n=0;n<1000;n++)
{
__asm("nop");
}
}
}
Listing 4 – Function delay
Call function init_gpio from function main, then enter in and endless loop calling function delay inside
the loop. Function main must look as shown in listing 5.
int main (void)
{
}
init_gpio();
while(1)
{
}
return 0;
delay();
Listing 5 – Function main
Go to menu Project > Build Configurations > Set Active > Debug. Then go to menu Project > Build Project
to build the project. You can alternately click the hammer button.
�
4.2) Relocating Code in ROM
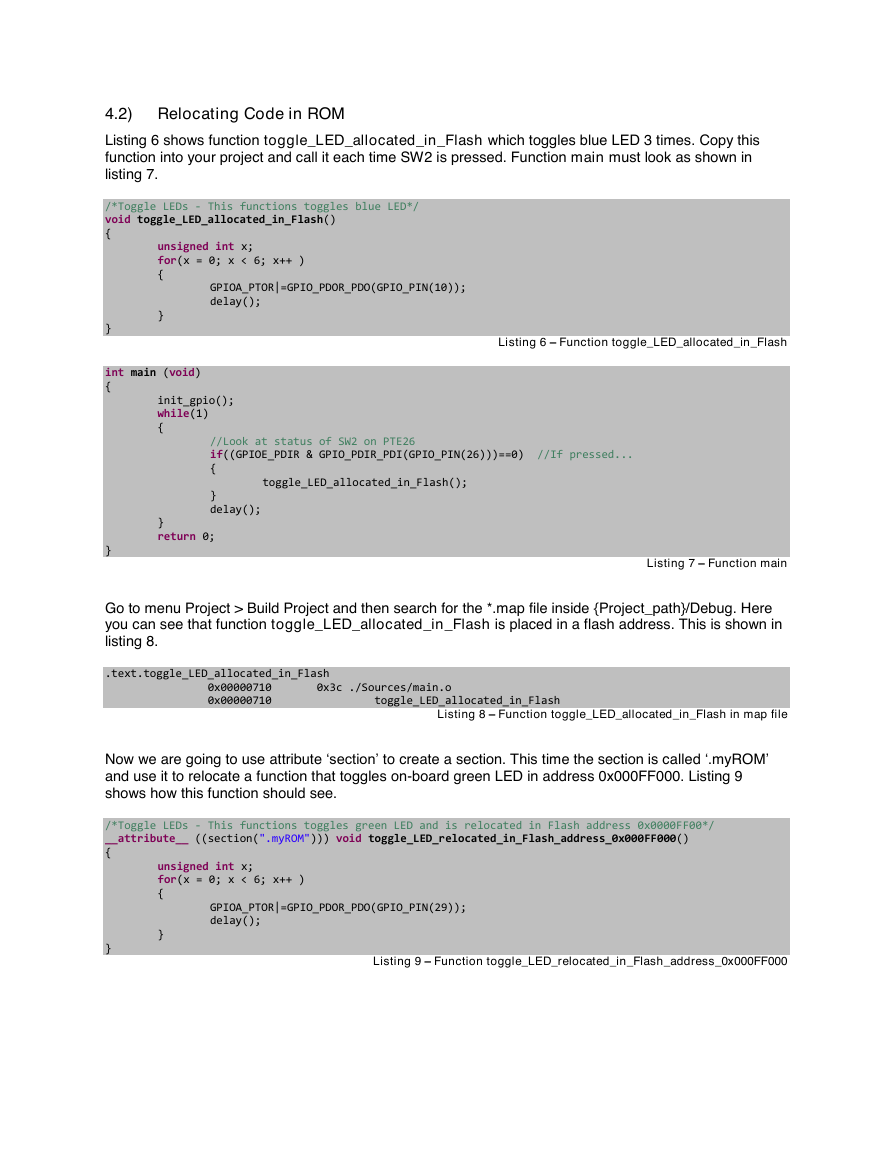
Listing 6 shows function toggle_LED_allocated_in_Flash which toggles blue LED 3 times. Copy this
function into your project and call it each time SW2 is pressed. Function main must look as shown in
listing 7.
/*Toggle LEDs - This functions toggles blue LED*/
void toggle_LED_allocated_in_Flash()
{
}
unsigned int x;
for(x = 0; x < 6; x++ )
{
}
GPIOA_PTOR|=GPIO_PDOR_PDO(GPIO_PIN(10));
delay();
Listing 6 – Function toggle_LED_allocated_in_Flash
int main (void)
{
}
init_gpio();
while(1)
{
}
return 0;
//Look at status of SW2 on PTE26
if((GPIOE_PDIR & GPIO_PDIR_PDI(GPIO_PIN(26)))==0) //If pressed...
{
}
delay();
toggle_LED_allocated_in_Flash();
Listing 7 – Function main
Go to menu Project > Build Project and then search for the *.map file inside {Project_path}/Debug. Here
you can see that function toggle_LED_allocated_in_Flash is placed in a flash address. This is shown in
listing 8.
.text.toggle_LED_allocated_in_Flash
0x00000710 0x3c ./Sources/main.o
0x00000710 toggle_LED_allocated_in_Flash
Listing 8 – Function toggle_LED_allocated_in_Flash in map file
Now we are going to use attribute ‘section’ to create a section. This time the section is called ‘.myROM’
and use it to relocate a function that toggles on-board green LED in address 0x000FF000. Listing 9
shows how this function should see.
/*Toggle LEDs - This functions toggles green LED and is relocated in Flash address 0x0000FF00*/
__attribute__ ((section(".myROM"))) void toggle_LED_relocated_in_Flash_address_0x000FF000()
{
}
unsigned int x;
for(x = 0; x < 6; x++ )
{
}
GPIOA_PTOR|=GPIO_PDOR_PDO(GPIO_PIN(29));
delay();
Listing 9 – Function toggle_LED_relocated_in_Flash_address_0x000FF000
�
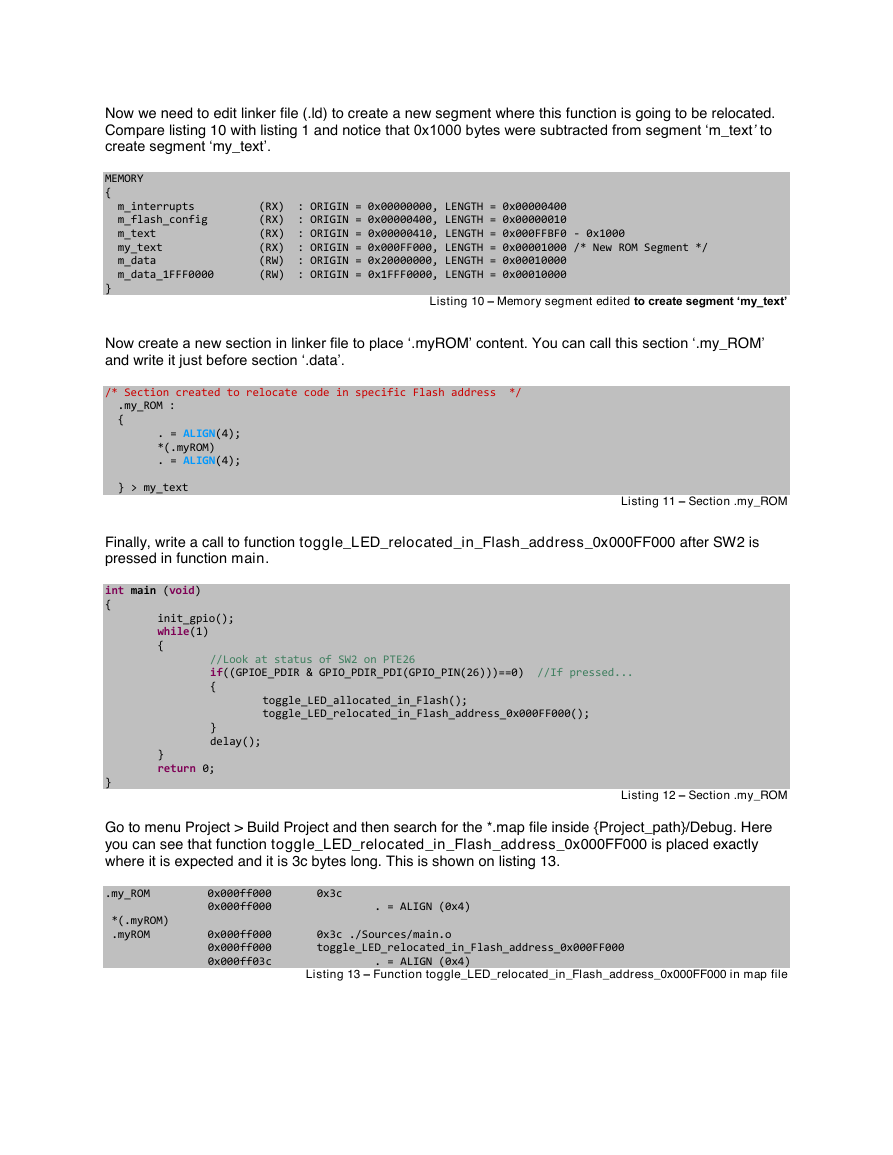
Now we need to edit linker file (.ld) to create a new segment where this function is going to be relocated.
Compare listing 10 with listing 1 and notice that 0x1000 bytes were subtracted from segment ‘m_text’ to
create segment ‘my_text’.
MEMORY
{
m_interrupts (RX) : ORIGIN = 0x00000000, LENGTH = 0x00000400
m_flash_config (RX) : ORIGIN = 0x00000400, LENGTH = 0x00000010
m_text (RX) : ORIGIN = 0x00000410, LENGTH = 0x000FFBF0 - 0x1000
my_text (RX) : ORIGIN = 0x000FF000, LENGTH = 0x00001000 /* New ROM Segment */
m_data (RW) : ORIGIN = 0x20000000, LENGTH = 0x00010000
m_data_1FFF0000 (RW) : ORIGIN = 0x1FFF0000, LENGTH = 0x00010000
}
Listing 10 – Memory segment edited to create segment ‘my_text’
Now create a new section in linker file to place ‘.myROM’ content. You can call this section ‘.my_ROM’
and write it just before section ‘.data’.
/* Section created to relocate code in specific Flash address */
.my_ROM :
{
} > my_text
. = ALIGN(4);
*(.myROM)
. = ALIGN(4);
Listing 11 – Section .my_ROM
Finally, write a call to function toggle_LED_relocated_in_Flash_address_0x000FF000 after SW2 is
pressed in function main.
int main (void)
{
}
//Look at status of SW2 on PTE26
if((GPIOE_PDIR & GPIO_PDIR_PDI(GPIO_PIN(26)))==0) //If pressed...
{
}
delay();
init_gpio();
while(1)
{
}
return 0;
toggle_LED_allocated_in_Flash();
toggle_LED_relocated_in_Flash_address_0x000FF000();
Listing 12 – Section .my_ROM
Go to menu Project > Build Project and then search for the *.map file inside {Project_path}/Debug. Here
you can see that function toggle_LED_relocated_in_Flash_address_0x000FF000 is placed exactly
where it is expected and it is 3c bytes long. This is shown on listing 13.
.my_ROM 0x000ff000 0x3c
0x000ff000 . = ALIGN (0x4)
*(.myROM)
.myROM 0x000ff000 0x3c ./Sources/main.o
0x000ff000 toggle_LED_relocated_in_Flash_address_0x000FF000
0x000ff03c . = ALIGN (0x4)
Listing 13 – Function toggle_LED_relocated_in_Flash_address_0x000FF000 in map file
�
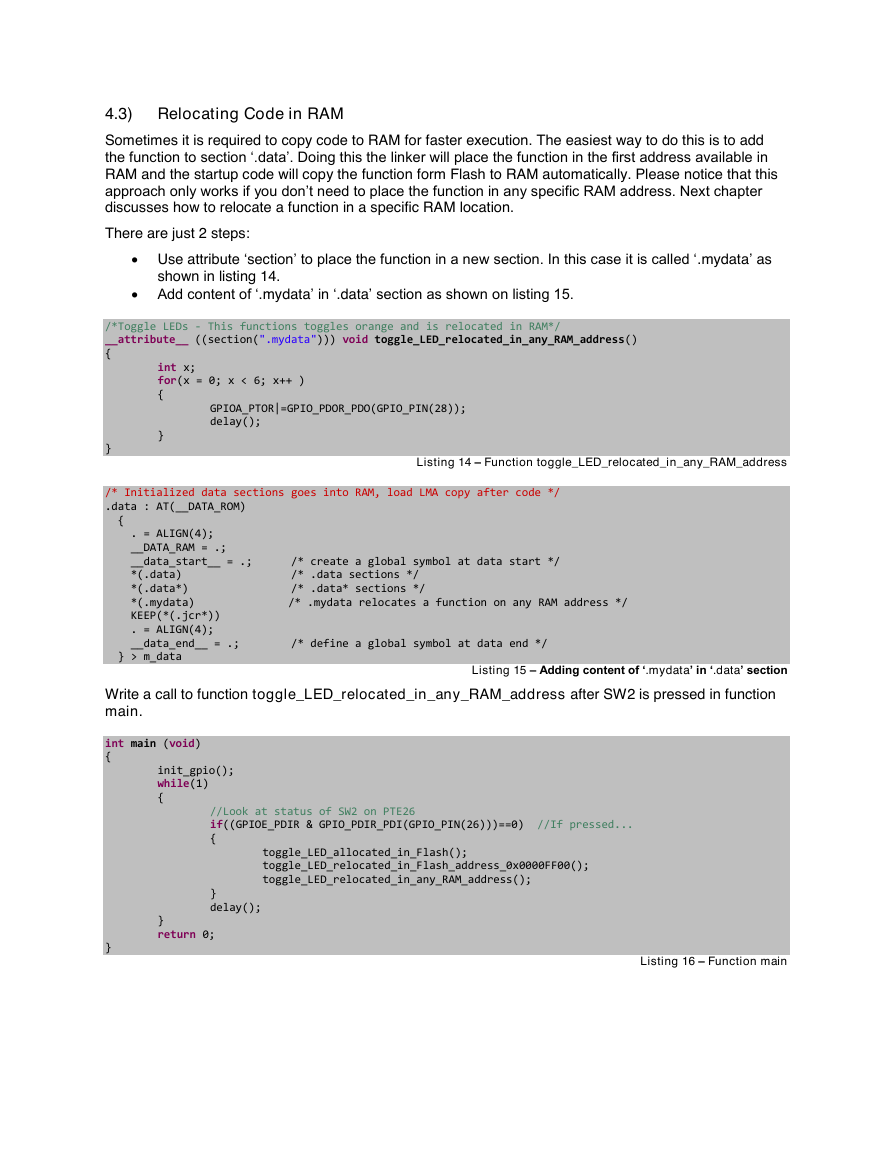
4.3) Relocating Code in RAM
Sometimes it is required to copy code to RAM for faster execution. The easiest way to do this is to add
the function to section ‘.data’. Doing this the linker will place the function in the first address available in
RAM and the startup code will copy the function form Flash to RAM automatically. Please notice that this
approach only works if you don’t need to place the function in any specific RAM address. Next chapter
discusses how to relocate a function in a specific RAM location.
There are just 2 steps:
Use attribute ‘section’ to place the function in a new section. In this case it is called ‘.mydata’ as
shown in listing 14.
Add content of ‘.mydata’ in ‘.data’ section as shown on listing 15.
/*Toggle LEDs - This functions toggles orange and is relocated in RAM*/
__attribute__ ((section(".mydata"))) void toggle_LED_relocated_in_any_RAM_address()
{
}
int x;
for(x = 0; x < 6; x++ )
{
}
GPIOA_PTOR|=GPIO_PDOR_PDO(GPIO_PIN(28));
delay();
Listing 14 – Function toggle_LED_relocated_in_any_RAM_address
/* Initialized data sections goes into RAM, load LMA copy after code */
.data : AT(__DATA_ROM)
{
. = ALIGN(4);
__DATA_RAM = .;
__data_start__ = .; /* create a global symbol at data start */
*(.data) /* .data sections */
*(.data*) /* .data* sections */
*(.mydata)
KEEP(*(.jcr*))
. = ALIGN(4);
__data_end__ = .; /* define a global symbol at data end */
} > m_data
/* .mydata relocates a function on any RAM address */
Listing 15 – Adding content of ‘.mydata’ in ‘.data’ section
Write a call to function toggle_LED_relocated_in_any_RAM_address after SW2 is pressed in function
main.
int main (void)
{
}
//Look at status of SW2 on PTE26
if((GPIOE_PDIR & GPIO_PDIR_PDI(GPIO_PIN(26)))==0) //If pressed...
{
}
delay();
init_gpio();
while(1)
{
}
return 0;
toggle_LED_allocated_in_Flash();
toggle_LED_relocated_in_Flash_address_0x0000FF00();
toggle_LED_relocated_in_any_RAM_address();
Listing 16 – Function main
�
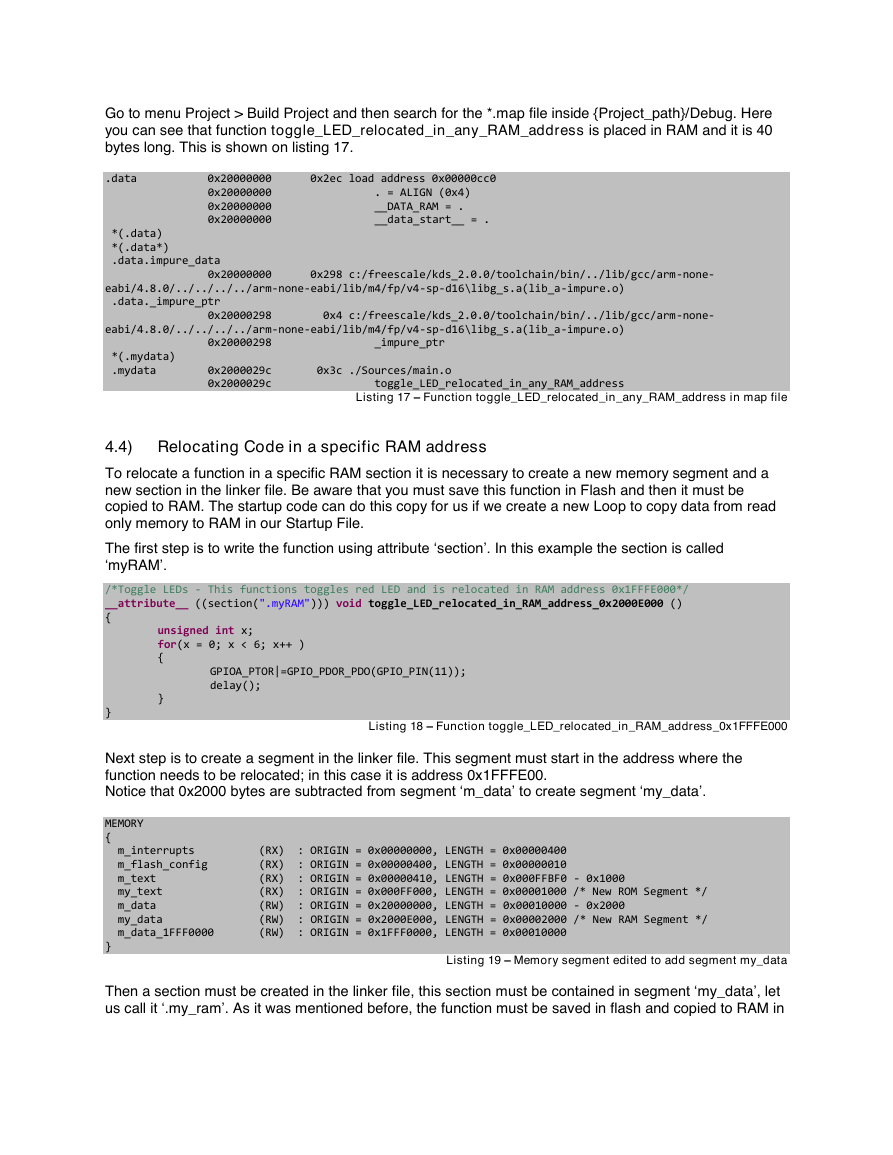
Go to menu Project > Build Project and then search for the *.map file inside {Project_path}/Debug. Here
you can see that function toggle_LED_relocated_in_any_RAM_address is placed in RAM and it is 40
bytes long. This is shown on listing 17.
.data 0x20000000 0x2ec load address 0x00000cc0
0x20000000 . = ALIGN (0x4)
0x20000000 __DATA_RAM = .
0x20000000 __data_start__ = .
*(.data)
*(.data*)
.data.impure_data
0x20000000 0x298 c:/freescale/kds_2.0.0/toolchain/bin/../lib/gcc/arm-none-
eabi/4.8.0/../../../../arm-none-eabi/lib/m4/fp/v4-sp-d16\libg_s.a(lib_a-impure.o)
.data._impure_ptr
0x20000298 0x4 c:/freescale/kds_2.0.0/toolchain/bin/../lib/gcc/arm-none-
eabi/4.8.0/../../../../arm-none-eabi/lib/m4/fp/v4-sp-d16\libg_s.a(lib_a-impure.o)
0x20000298 _impure_ptr
*(.mydata)
.mydata 0x2000029c 0x3c ./Sources/main.o
0x2000029c toggle_LED_relocated_in_any_RAM_address
Listing 17 – Function toggle_LED_relocated_in_any_RAM_address in map file
4.4) Relocating Code in a specific RAM address
To relocate a function in a specific RAM section it is necessary to create a new memory segment and a
new section in the linker file. Be aware that you must save this function in Flash and then it must be
copied to RAM. The startup code can do this copy for us if we create a new Loop to copy data from read
only memory to RAM in our Startup File.
The first step is to write the function using attribute ‘section’. In this example the section is called
‘myRAM’.
/*Toggle LEDs - This functions toggles red LED and is relocated in RAM address 0x1FFFE000*/
__attribute__ ((section(".myRAM"))) void toggle_LED_relocated_in_RAM_address_0x2000E000 ()
{
}
unsigned int x;
for(x = 0; x < 6; x++ )
{
}
GPIOA_PTOR|=GPIO_PDOR_PDO(GPIO_PIN(11));
delay();
Listing 18 – Function toggle_LED_relocated_in_RAM_address_0x1FFFE000
Next step is to create a segment in the linker file. This segment must start in the address where the
function needs to be relocated; in this case it is address 0x1FFFE00.
Notice that 0x2000 bytes are subtracted from segment ‘m_data’ to create segment ‘my_data’.
MEMORY
{
m_interrupts (RX) : ORIGIN = 0x00000000, LENGTH = 0x00000400
m_flash_config (RX) : ORIGIN = 0x00000400, LENGTH = 0x00000010
m_text (RX) : ORIGIN = 0x00000410, LENGTH = 0x000FFBF0 - 0x1000
my_text (RX) : ORIGIN = 0x000FF000, LENGTH = 0x00001000 /* New ROM Segment */
m_data (RW) : ORIGIN = 0x20000000, LENGTH = 0x00010000 - 0x2000
my_data (RW) : ORIGIN = 0x2000E000, LENGTH = 0x00002000 /* New RAM Segment */
m_data_1FFF0000 (RW) : ORIGIN = 0x1FFF0000, LENGTH = 0x00010000
}
Listing 19 – Memory segment edited to add segment my_data
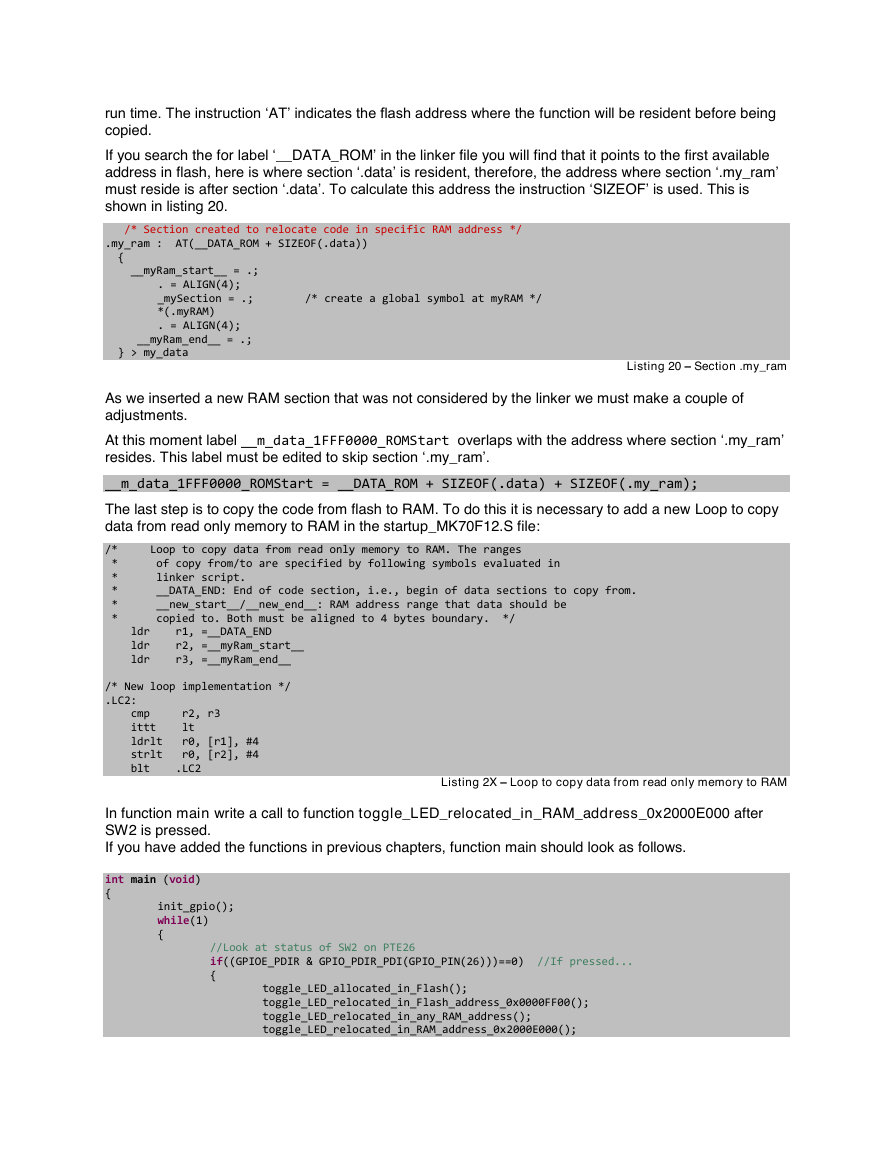
Then a section must be created in the linker file, this section must be contained in segment ‘my_data’, let
us call it ‘.my_ram’. As it was mentioned before, the function must be saved in flash and copied to RAM in
�
run time. The instruction ‘AT’ indicates the flash address where the function will be resident before being
copied.
If you search the for label ‘__DATA_ROM’ in the linker file you will find that it points to the first available
address in flash, here is where section ‘.data’ is resident, therefore, the address where section ‘.my_ram’
must reside is after section ‘.data’. To calculate this address the instruction ‘SIZEOF’ is used. This is
shown in listing 20.
/* Section created to relocate code in specific RAM address */
.my_ram : AT(__DATA_ROM + SIZEOF(.data))
{
__myRam_start__ = .;
__myRam_end__ = .;
} > my_data
. = ALIGN(4);
_mySection = .; /* create a global symbol at myRAM */
*(.myRAM)
. = ALIGN(4);
Listing 20 – Section .my_ram
As we inserted a new RAM section that was not considered by the linker we must make a couple of
adjustments.
At this moment label __m_data_1FFF0000_ROMStart overlaps with the address where section ‘.my_ram’
resides. This label must be edited to skip section ‘.my_ram’.
__m_data_1FFF0000_ROMStart = __DATA_ROM + SIZEOF(.data) + SIZEOF(.my_ram);
The last step is to copy the code from flash to RAM. To do this it is necessary to add a new Loop to copy
data from read only memory to RAM in the startup_MK70F12.S file:
/* Loop to copy data from read only memory to RAM. The ranges
* of copy from/to are specified by following symbols evaluated in
* linker script.
* __DATA_END: End of code section, i.e., begin of data sections to copy from.
* __new_start__/__new_end__: RAM address range that data should be
* copied to. Both must be aligned to 4 bytes boundary. */
ldr r1, =__DATA_END
ldr r2, =__myRam_start__
ldr r3, =__myRam_end__
/* New loop implementation */
.LC2:
cmp r2, r3
ittt lt
ldrlt r0, [r1], #4
strlt r0, [r2], #4
blt .LC2
Listing 2X – Loop to copy data from read only memory to RAM
In function main write a call to function toggle_LED_relocated_in_RAM_address_0x2000E000 after
SW2 is pressed.
If you have added the functions in previous chapters, function main should look as follows.
int main (void)
{
//Look at status of SW2 on PTE26
if((GPIOE_PDIR & GPIO_PDIR_PDI(GPIO_PIN(26)))==0) //If pressed...
{
init_gpio();
while(1)
{
toggle_LED_allocated_in_Flash();
toggle_LED_relocated_in_Flash_address_0x0000FF00();
toggle_LED_relocated_in_any_RAM_address();
toggle_LED_relocated_in_RAM_address_0x2000E000();
�


 2023年江西萍乡中考道德与法治真题及答案.doc
 2012年重庆南川中考生物真题及答案.doc
 2013年江西师范大学地理学综合及文艺理论基础考研真题.doc
 2020年四川甘孜小升初语文真题及答案I卷.doc
 2020年注册岩土工程师专业基础考试真题及答案.doc
 2023-2024学年福建省厦门市九年级上学期数学月考试题及答案.doc
 2021-2022学年辽宁省沈阳市大东区九年级上学期语文期末试题及答案.doc
 2022-2023学年北京东城区初三第一学期物理期末试卷及答案.doc
 2018上半年江西教师资格初中地理学科知识与教学能力真题及答案.doc
 2012年河北国家公务员申论考试真题及答案-省级.doc
 2020-2021学年江苏省扬州市江都区邵樊片九年级上学期数学第一次质量检测试题及答案.doc
 2022下半年黑龙江教师资格证中学综合素质真题及答案.doc