VL-AX1S/hyou3; 01/10/05/18:00
-
V
L
A
X
1
S
B
R
U
K
S
A
N
V
S
N
N
G
I
I
SHARP CORPORATION
M
A
N
U
A
L
D
E
O
P
E
R
A
Ç
Ã
O
I
O
P
E
R
A
T
O
N
M
A
N
U
A
L
VIDEOKAMERA MED FLYTANDE KRISTALLSKÄRM
CAMCORDER COM VISOR DE CRISTAL LÍQUIDO
LIQUID CRYSTAL DISPLAY CAMCORDER
VL-AX1S
S
V
E
N
S
K
A
P
O
R
T
U
G
U
Ê
S
E
N
G
L
S
H
I
Tryckt i Japan
Impresso no Japão
Printed in Japan
TINSL0307TAZZ
01P12-JKG
BRUKSANVISNING
MANUAL DE OPERAÇÃO
OPERATION MANUAL
�
VL-AX1S-CE1; 01/10/1/18:00
This equipment complies with the requirements of Directives 89/336/
EEC and 73/23/EEC as amended by 93/68/EEC.
Dieses Gerät entspricht den Anforderungen der EG-Richtlinien 89/336/
EWG und 73/23/EWG mit Änderung 93/68/EWG.
Ce matériel répond aux exigences contenues dans les directives 89/336/
CEE et 73/23/CEE modifiées par la directive 93/68/CEE.
Dit apparaat voldoet aan de eisen van de richtlijnen 89/336/EEG en 73/
23/EEG, gewijzigd door 93/68/EEG.
Dette udstyr overholder kravene i direktiv nr. 89/336/EEC og 73/23/EEC
med tillæg nr. 93/68/EEC.
Quest’ apparecchio è conforme ai requisiti delle direttive 89/336/EEC e
73/23/EEC, come emendata dalla direttiva 93/68/EEC.
« „ͷًÛÙ·ÛÁ ·ıÙfi ·ÌÙ·ÔÍÒflÌÂÙ·È ÛÙÈÚ ··ÈÙfiÛÂÈÚ Ù˘Ì Ô‰Á„È˛Ì ÙÁÚ
EıÒ˘·˙ÍfiÚ EÌ˘ÛÁÚ 89/336/EOK Í·È 73/23/EOK, ¸˘Ú ÔÈ Í·ÌÔÌÈÛÏÔfl
·ıÙÔfl ÛıÏÎÁÒ˛ËÁÍ·Ì ·¸ ÙÁÌ Ô‰Á„fl· 93/68/EOK.
Este equipamento obedece às exigências das directivas 89/336/CEE e
73/23/CEE, na sua versão corrigida pela directiva 93/68/CEE.
Este aparato satisface las exigencias de las Directivas 89/336/CEE y 73/
23/CEE, modificadas por medio de la 93/68/CEE.
Denna utrustning uppfyller kraven enligt riktlinjerna 89/336/EEC och 73/
23/EEC så som kompletteras av 93/68/EEC.
Dette produktet oppfyller betingelsene i direktivene 89/336/EEC og 73/
23/EEC i endringen 93/68/EEC.
Tämä laite täyttää direktiivien 89/336/EEC ja 73/23/EEC vaatimukset,
joita on muutettu direktiivillä 93/68/EEC.
POZOR! P¿ED SEJMUTÍM KRYTU NUTNO VYJMOUT SÍfiOVOU
VIDLICI ZE SÍfiOVÉ ZÁSUVKY.
UPOZORNÊNÍ: OPRAVU SMÍ PROVÁDÊT POUZE ODBORN„ SERVIS.
�
Before using the camcorder, please read this operation manual carefully,
especially page ix.
OPERATION MANUAL
ENGLISH
WARNING
TO PREVENT SHOCK
HAZARD, DO NOT EXPOSE
THIS APPLIANCE TO RAIN
OR MOISTURE.
This equipment should be used with
the recommended AC adapter/battery
charger or battery pack.
CAUTION
To prevent electric shocks and fire
hazards, do NOT use any other power
source.
Important:
Audio-visual material may consist of
copyrighted works which must not be
recorded without the authority of the
owner of the copyright. Please refer to
relevant laws in your country.
CAUTION
To prevent shock, do not open the
cabinet. No user serviceable parts
inside. Refer servicing to qualified
dealer or service centre.
E
N
G
L
S
H
I
Power supply:
This unit can be operated by
connecting it to either the AC adapter/
battery charger or battery pack. The
AC adapter/battery charger
incorporates the AUTO VOLTAGE (AC
110–240 V, 50/60 Hz) function.
NOTE
The LCD panel of this camcorder is a very high technology product with more than
120,000 thin-film transistors*, giving you fine picture detail. Occasionally, a pixel may
appear on the screen as a fixed point of blue, green, red, or black. Please note that
this does not affect the performance of your camcorder.
*Specifications are subject to change without notice.
Trademarks
• Microsoft and Windows are either registered trademarks or trademarks of Microsoft Corporation in the
United States and/or other countries.
• Adobe Acrobat Reader is a trademark of Adobe Systems Incorporated.
• DPOF is a trademark of CANON INC., Eastman Kodak Company, Fuji Photo Film Co., Ltd. and
Matsushita Electric Industrial Co., Ltd.
• All other brand or product names are registered trademarks or trademarks of their respective
holders.
VL-AX1S-GB-**tobira
1
01.10.9, 1:20 PM
�
Quick Operation Guide
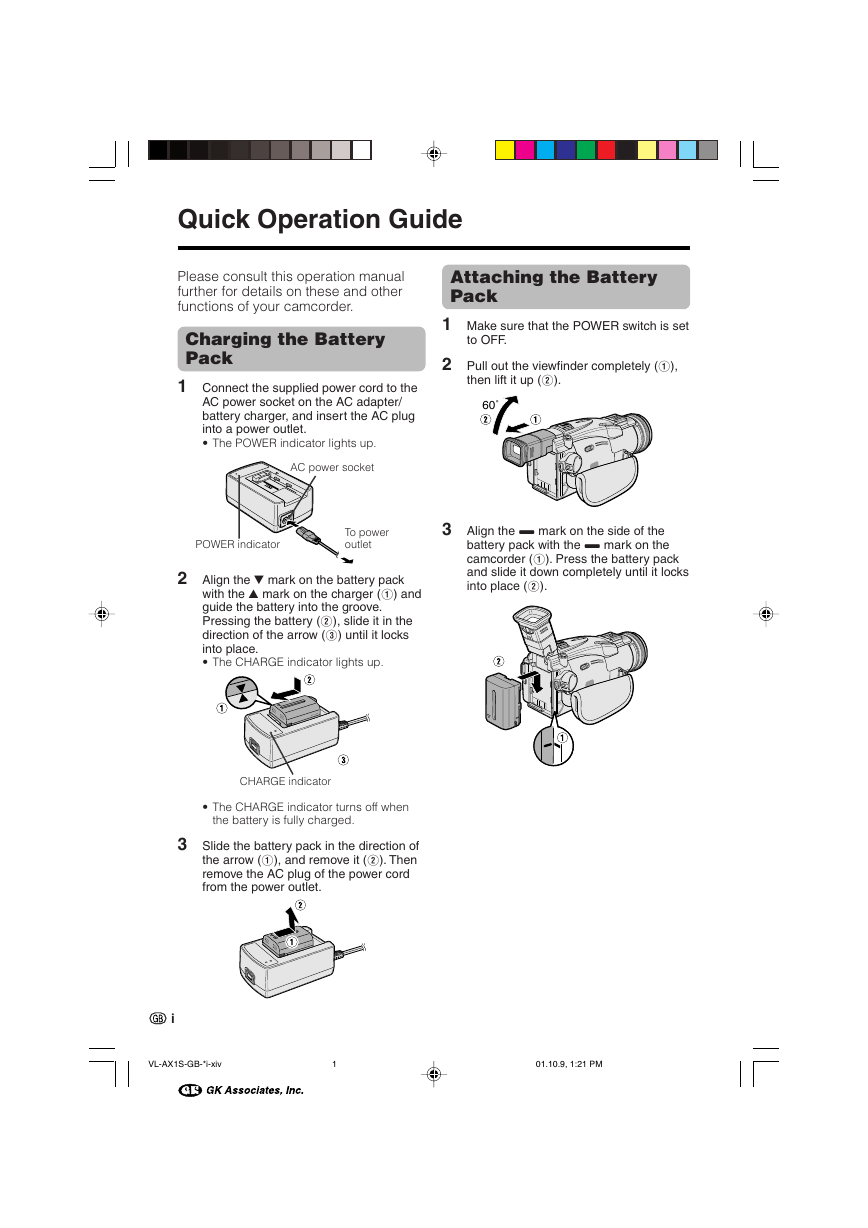
Attaching the Battery
Pack
1 Make sure that the POWER switch is set
to OFF.
2 Pull out the viewfinder completely (1),
then lift it up (2).
60˚
3 Align the = mark on the side of the
battery pack with the = mark on the
camcorder (1). Press the battery pack
and slide it down completely until it locks
into place (2).
Please consult this operation manual
further for details on these and other
functions of your camcorder.
Charging the Battery
Pack
1 Connect the supplied power cord to the
AC power socket on the AC adapter/
battery charger, and insert the AC plug
into a power outlet.
• The POWER indicator lights up.
AC power socket
POWER indicator
To power
outlet
2 Align the s mark on the battery pack
with the a mark on the charger (1) and
guide the battery into the groove.
Pressing the battery (2), slide it in the
direction of the arrow (3) until it locks
into place.
• The CHARGE indicator lights up.
CHARGE indicator
• The CHARGE indicator turns off when
the battery is fully charged.
3 Slide the battery pack in the direction of
the arrow (1), and remove it (2). Then
remove the AC plug of the power cord
from the power outlet.
i
VL-AX1S-GB-*i-xiv
1
01.10.9, 1:21 PM
�
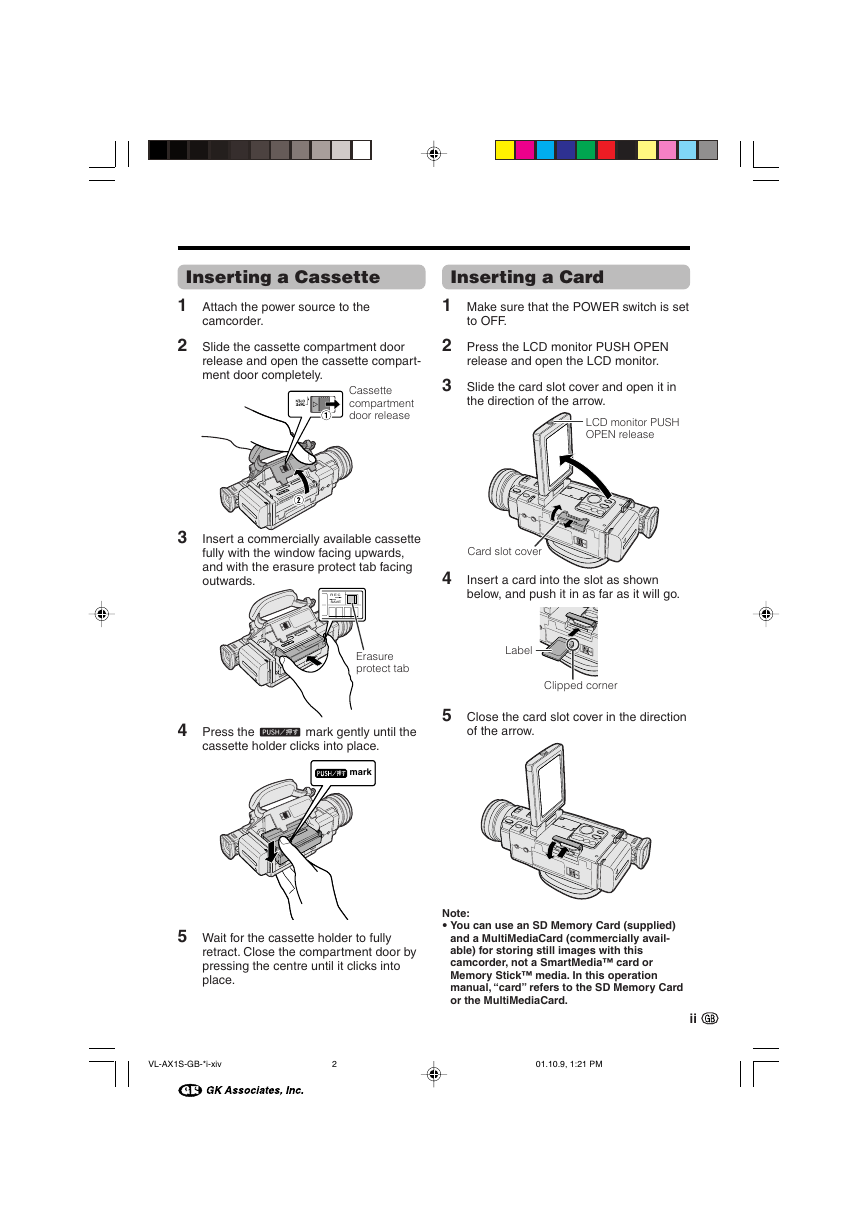
Inserting a Cassette
1 Attach the power source to the
camcorder.
2 Slide the cassette compartment door
release and open the cassette compart-
ment door completely.
Cassette
compartment
door release
Inserting a Card
1 Make sure that the POWER switch is set
to OFF.
2 Press the LCD monitor PUSH OPEN
release and open the LCD monitor.
3 Slide the card slot cover and open it in
the direction of the arrow.
LCD monitor PUSH
OPEN release
3 Insert a commercially available cassette
fully with the window facing upwards,
and with the erasure protect tab facing
outwards.
R E C
R E C
SAVE
SAVE
Card slot cover
4 Insert a card into the slot as shown
below, and push it in as far as it will go.
Erasure
protect tab
Label
4 Press the W mark gently until the
cassette holder clicks into place.
mark
Clipped corner
5 Close the card slot cover in the direction
of the arrow.
5 Wait for the cassette holder to fully
retract. Close the compartment door by
pressing the centre until it clicks into
place.
Note:
• You can use an SD Memory Card (supplied)
and a MultiMediaCard (commercially avail-
able) for storing still images with this
camcorder, not a SmartMediaE card or
Memory StickE media. In this operation
manual, “card” refers to the SD Memory Card
or the MultiMediaCard.
ii
VL-AX1S-GB-*i-xiv
2
01.10.9, 1:21 PM
�
Quick Operation Guide
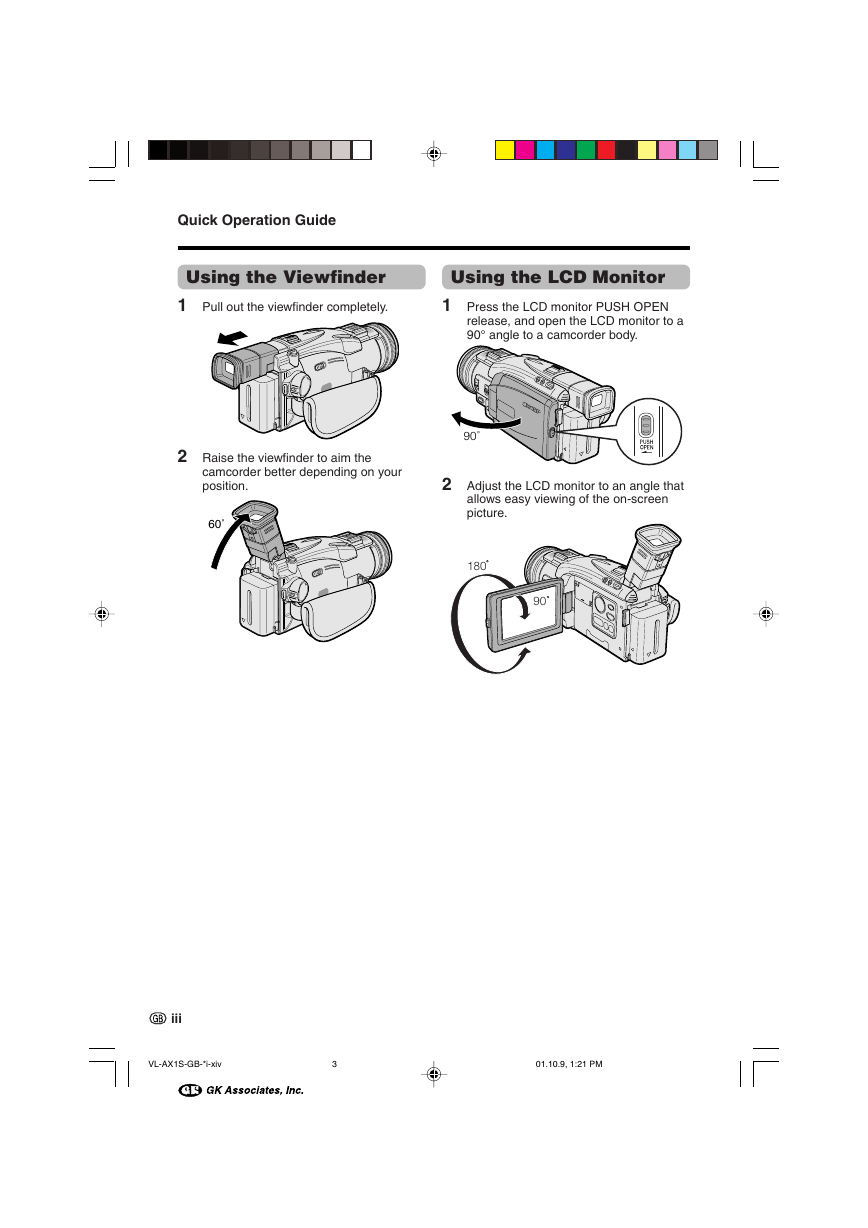
Using the Viewfinder
1 Pull out the viewfinder completely.
Using the LCD Monitor
1 Press the LCD monitor PUSH OPEN
release, and open the LCD monitor to a
90° angle to a camcorder body.
2 Raise the viewfinder to aim the
camcorder better depending on your
position.
60˚
90˚
2 Adjust the LCD monitor to an angle that
allows easy viewing of the on-screen
picture.
180
90
iii
VL-AX1S-GB-*i-xiv
3
01.10.9, 1:21 PM
�
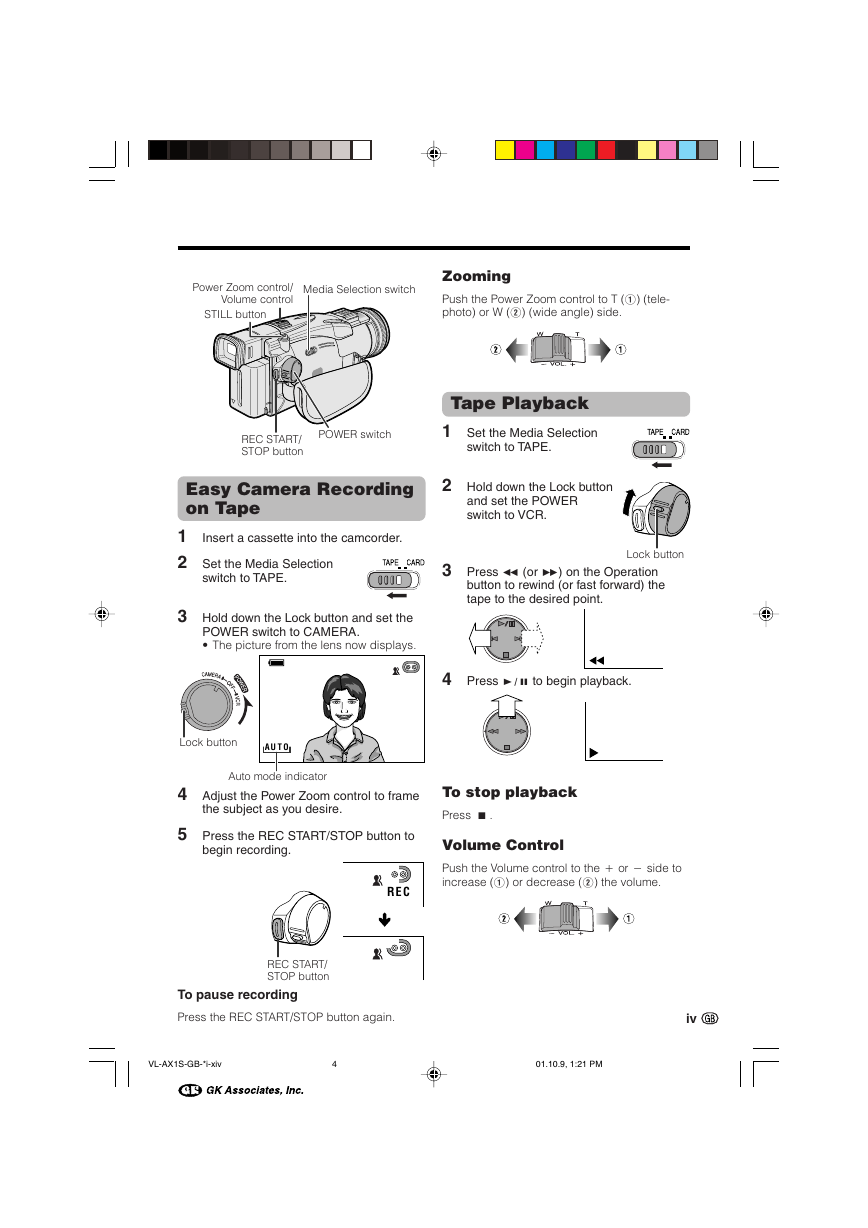
Power Zoom control/
Volume control
STILL button
Media Selection switch
Zooming
Push the Power Zoom control to T (1) (tele-
photo) or W (2) (wide angle) side.
REC START/
STOP button
POWER switch
Easy Camera Recording
on Tape
1 Insert a cassette into the camcorder.
2 Set the Media Selection
switch to TAPE.
3 Hold down the Lock button and set the
POWER switch to CAMERA.
• The picture from the lens now displays.
Lock button
AU T O
Auto mode indicator
4 Adjust the Power Zoom control to frame
the subject as you desire.
5 Press the REC START/STOP button to
begin recording.
REC
REC START/
STOP button
To pause recording
Press the REC START/STOP button again.
Tape Playback
1 Set the Media Selection
switch to TAPE.
2 Hold down the Lock button
and set the POWER
switch to VCR.
3 Press e (or r) on the Operation
button to rewind (or fast forward) the
tape to the desired point.
Lock button
4 Press y to begin playback.
To stop playback
Press d.
Volume Control
Push the Volume control to the L or + side to
increase (1) or decrease (2) the volume.
iv
VL-AX1S-GB-*i-xiv
4
01.10.9, 1:21 PM
�
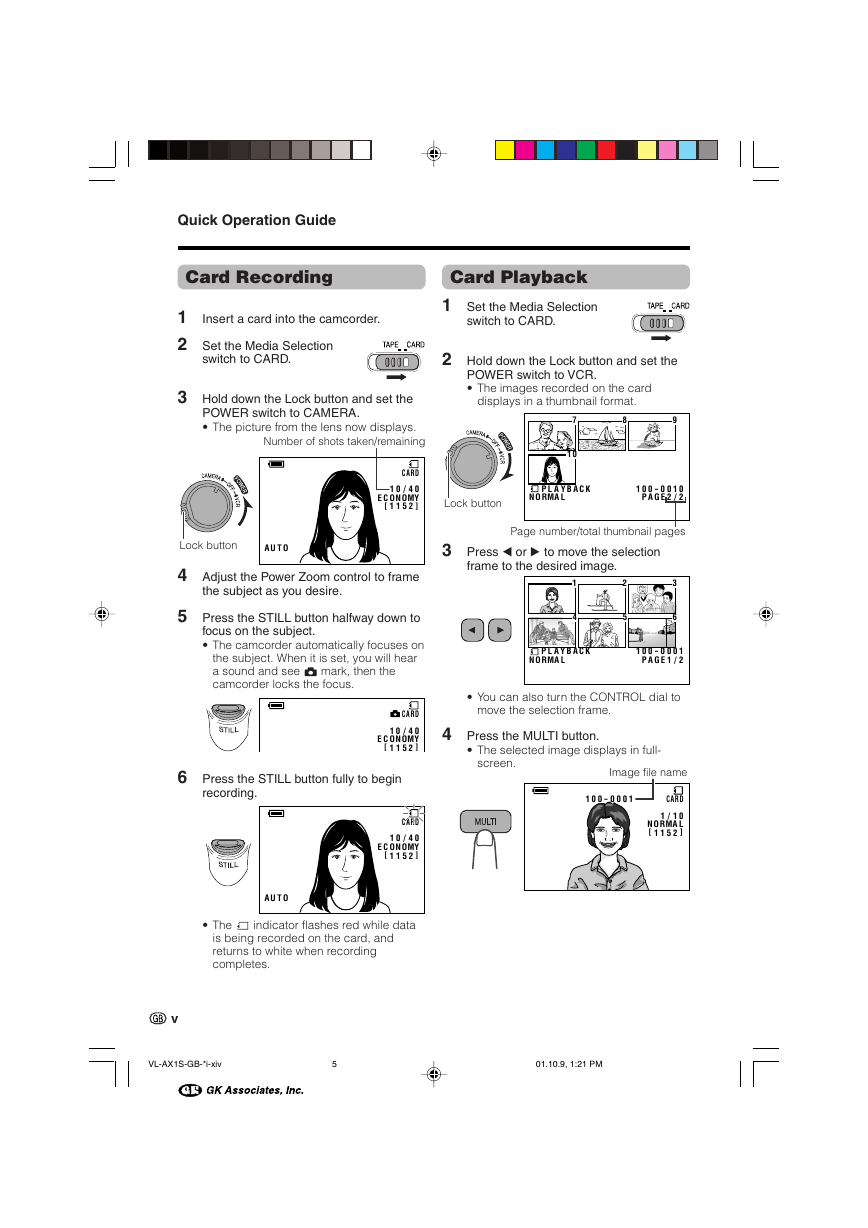
Quick Operation Guide
Card Recording
1 Insert a card into the camcorder.
2 Set the Media Selection
switch to CARD.
3 Hold down the Lock button and set the
POWER switch to CAMERA.
• The picture from the lens now displays.
Number of shots taken/remaining
CARD
/01
4 0
E C ONOMY
]
[ 1 1 5 2
Lock button
AU T O
4 Adjust the Power Zoom control to frame
the subject as you desire.
5 Press the STILL button halfway down to
focus on the subject.
• The camcorder automatically focuses on
the subject. When it is set, you will hear
a sound and see T mark, then the
camcorder locks the focus.
CARD
/01
4 0
E C ONOMY
]
[ 1 1 5 2
6 Press the STILL button fully to begin
recording.
CARD
/01
4 0
E C ONOMY
]
[ 1 1 5 2
Card Playback
1 Set the Media Selection
switch to CARD.
2 Hold down the Lock button and set the
POWER switch to VCR.
• The images recorded on the card
displays in a thumbnail format.
8
9
7
01
Lock button
P L A Y B A C K
NORMA L
1
0100-00
P A G E
2/2
Page number/total thumbnail pages
3 Press q or w to move the selection
frame to the desired image.
1
4
2
5
3
6
P L A Y B A C K
NORMA L
1
1000-00
P A G E
2/1
• You can also turn the CONTROL dial to
move the selection frame.
4 Press the MULTI button.
• The selected image displays in full-
screen.
Image file name
3000-001
1000-001
CARD
01/3
011 /
NORMA L
NORMA L
[ 1 1 5 2
]
AU T O
• The S indicator flashes red while data
is being recorded on the card, and
returns to white when recording
completes.
v
VL-AX1S-GB-*i-xiv
5
01.10.9, 1:21 PM
�




 2023年江西萍乡中考道德与法治真题及答案.doc
 2012年重庆南川中考生物真题及答案.doc
 2013年江西师范大学地理学综合及文艺理论基础考研真题.doc
 2020年四川甘孜小升初语文真题及答案I卷.doc
 2020年注册岩土工程师专业基础考试真题及答案.doc
 2023-2024学年福建省厦门市九年级上学期数学月考试题及答案.doc
 2021-2022学年辽宁省沈阳市大东区九年级上学期语文期末试题及答案.doc
 2022-2023学年北京东城区初三第一学期物理期末试卷及答案.doc
 2018上半年江西教师资格初中地理学科知识与教学能力真题及答案.doc
 2012年河北国家公务员申论考试真题及答案-省级.doc
 2020-2021学年江苏省扬州市江都区邵樊片九年级上学期数学第一次质量检测试题及答案.doc
 2022下半年黑龙江教师资格证中学综合素质真题及答案.doc