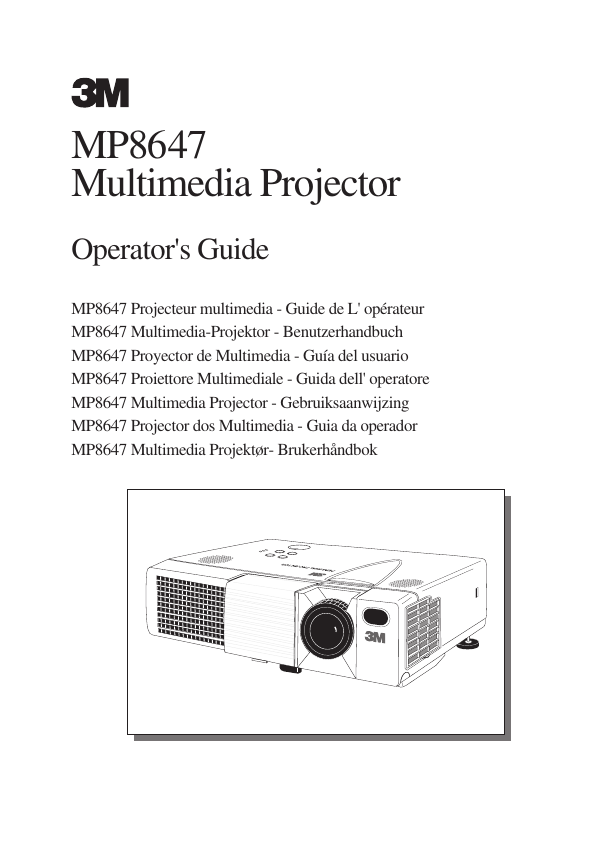
MP8647
Multimedia Projector
Operator's Guide
MP8647 Projecteur multimedia - Guide de L' opérateur
MP8647 Multimedia-Projektor - Benutzerhandbuch
MP8647 Proyector de Multimedia - Guía del usuario
MP8647 Proiettore Multimediale - Guida dell' operatore
MP8647 Multimedia Projector - Gebruiksaanwijzing
MP8647 Projector dos Multimedia - Guia da operador
MP8647 Multimedia Projektør- Brukerhåndbok
�
Intended Use Statement
Before operating this machine, please read the Operator’s Guide and
Product Safety Guide thoroughly. The 3M™ Multimedia Projectors are
designed, built, and tested for use indoors, using 3M lamps, 3M ceiling
mount hardware, and nominal local voltages. The use of other
replacement lamps, outdoor operation, or different voltages have not
been tested and could damage the projector peripheral equipment and/or
create a potentially unsafe operating condition. 3M Multimedia
projectors are designed to operate in a normal office environment.
16° to 29°C (60° to 85° F)
10-80 % RH (without condensation)
0-1828 m (0-6000 feet) above sea level
The ambient operating environment should be free of airborne smoke,
grease, oil and other contaminates that can affect the operation or
performance of the projector.
Use of this product in adverse conditions will
void the product warranty.
�
Multimedia Projector
Operator's Guide
Operator's Guide
Thank you for purchasing this liquid crystal projector.
WARNING • Please read the accompanying manual “Product Safety Guide”
and this “Operator's Guide” thoroughly to ensure correct usage through
understanding. After reading, store this instruction manual in a safe place for
future reference.
• The information in this manual is subject to change without notice.
NOTE
• The manufacturer assumes no responsibility for any errors that may appear in this manual
• The reproduction, transmission or use of this document or contents is not permitted without
express written authority.
TRADEMARK ACKNOWLEDGMENT : PS/2, VGA and XGA are registered trademarks of
International Business Machines Corporation. Apple, Mac and ADB are registered trademarks of
Apple Computer, Inc. VESA and SVGA are trademarks of the Video Electronics Standard
Association. Windows is a registered trademark of Microsoft Corporation. Carefully observe the
trademarks and registered trademarks of all companies, even when not mentioned.
I
H
S
L
G
N
E
CONTENTS
CONTENTS
Page
FEATURES .......................................2
BEFORE USE ...................................2
Contents of Package ..............................2
Part Names.............................................3
Loading the Battery ................................5
Fixing the Handle....................................5
INSTALLATION ................................6
Installation of the Projector and Screen........6
Angle Adjustment ...................................6
Cabling ...................................................7
Power Connection ..................................8
Example of System Setup ......................8
Plug & Play .............................................8
OPERATIONS...................................9
Power On ...................................................9
Power Off ................................................9
Basic Operation ....................................10
Setup Menu ..........................................12
Input Menu............................................13
Image Menu..........................................14
Options Menu .......................................15
No Signal Menu ....................................16
MAINTENANCE ..............................17
Lamp.....................................................17
Air Filter ................................................19
Other Maintenance...............................19
Page
TROUBLESHOOTING ....................20
Service Infomation................................20
OSD Message ......................................20
Indicators Message ..............................21
Symptom ..............................................22
SPECIFICATIONS...........................23
ACCESSORIES...............................24
TECHNICAL APPENDIX.................25
TABLES
Table 1. Installation Reference.................6
Table 2. Cabling .......................................7
Table 3. Basic Operations ......................10
Table 4. Setup Menu ..............................12
Table 5. Input Menu................................13
Table 6. Image Menu..............................14
Table 7. Options Menu ...........................15
Table 8. No Signal Menu........................16
Table 9. OSD Message ..........................20
Table 10. Indicator Message ..................21
Table 11. Symptom ................................22
Table 12. Specifications .........................23
.......................................................................................
For "TECHNICAL" and "REGULATORY
NOTICE", see the end of this manual.
ENGLISH-1
�
FEATURES
FEATURES
This liquid crystal projector is used to project various computer signals as well as NTSC / PAL /
SECAM video signals onto a screen. Little space is required for installation and large images can
easily be realized.
Outstanding Brightness
The UHB lamp and high-efficiency optical system assure a high level of brightness.
Partial Magnification Function
Interesting parts of images can be magnified for closer viewing.
Distortion Correction Function
Distortion-free images are quickly available.
BEFORE USE
BEFORE USE
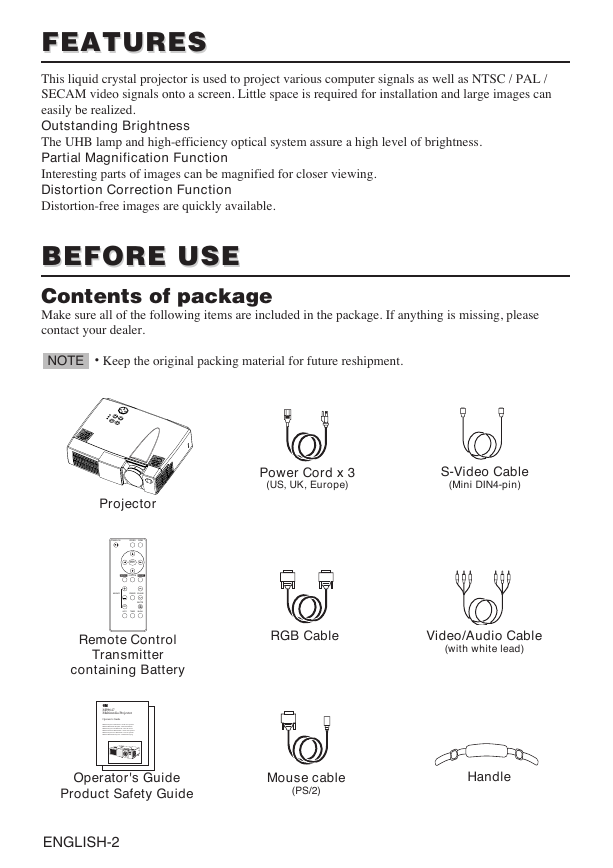
Contents of package
Make sure all of the following items are included in the package. If anything is missing, please
contact your dealer.
NOTE
• Keep the original packing material for future reshipment.
Projector
STANDBY/ON
VIDEO
RGB
MENU
SELECT
MENU
POSITION
RESET
MAGNIFY
FREEZE
VOLUME
MUTE
OFF
AUTO
TIMER
BLANK
Remote Control
Transmitter
containing Battery
Power Cord x 3
(US, UK, Europe)
S-Video Cable
(Mini DIN4-pin)
RGB Cable
Video/Audio Cable
(with white lead)
MP8647
Multimedia Projector
Operator's Guide
MP8647 Projecteur multimedia - Guide de I' opérateur
MP8647 Multimedia-Projektor - Benutzerhandbuch
MP8647 Proyector de Multimedia - Guía del usuario
MP8647 Proiettore Multimediale - Guida dell' operatore
MP8647 Projector dos Multimedia - Guia da operador
MP8647 Multimedia Projector - Gebruiksaanwijzing
Operator's Guide
Product Safety Guide
Mouse cable
(PS/2)
Handle
ENGLISH-2
�
BBBBEEEEFFFFOOOORRRREEEE UUUUSSSSEEEE ((((ccccoooonnnnttttiiiinnnnuuuueeeedddd))))
Part Names
Speaker
Handle Hook
Power Switch
AC Inlet
(to the Power Cord)
Ventilation Openings
(Intake)
I
H
S
L
G
N
E
Zoom Knob
Focus Ring
Remote Control Sensor
Lens
Slide Lens Door
Foot Adjuster
FRONT/LEFT VIEW OF
THE PROJECTOR
Control Panel (Refer to P.9 "OPERATIONS")
STANDBY/ON Button
MUTE Button
Foot Adjuster Button
Air Filter and Intake
(for the Cooling Fan)
Rear Foot Adjuster
S-VIDEO Terminal
VIDEO IN Terminal
AUDIO IN L Terminal
AUDIO IN R Terminal
AUDIO IN 1 Terminal
AUDIO IN 2 Terminal
AUDIO OUT Terminal
REAR/RIGHT VIEW OF
THE PROJECTOR
AUDIO IN VIDEO IN S-VIDEO IN
1
RGB IN
2
AUDIO
IN
1
2
AUDIO OUT
USB
RGB OUT
CONTROL
TERMINAL PANEL
INPUT Button
LAMP Indicator
TEMP Indicator
POWER Indicator
RESET Button
MENU Button
Ventilation Openings
(exhaust)
Terminal Panel
(Refer below)
Remote Control Sensor
RGB IN 1 Terminal
RGB IN 2 Terminal
CONTROL Terminal
RGB OUT Terminal
USB Terminal
ENGLISH-3
�
BBBBEEEEFFFFOOOORRRREEEE UUUUSSSSEEEE ((((ccccoooonnnnttttiiiinnnnuuuueeeedddd))))
Part Names (continued)
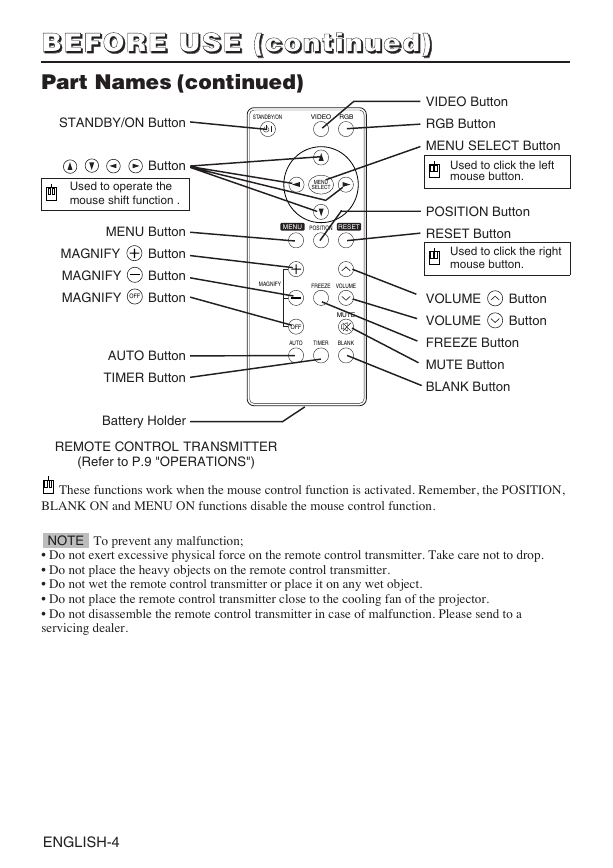
STANDBY/ON Button
STANDBY/ON
VIDEO
RGB
Button
Used to operate the
mouse shift function .
MENU Button
Button
Button
Button
MAGNIFY
MAGNIFY
MAGNIFY
OFF
MENU
SELECT
MENU
POSITION
RESET
MAGNIFY
FREEZE
VOLUME
MUTE
OFF
AUTO
TIMER
BLANK
AUTO Button
TIMER Button
Battery Holder
REMOTE CONTROL TRANSMITTER
(Refer to P.9 "OPERATIONS")
VIDEO Button
RGB Button
MENU SELECT Button
Used to click the left
mouse button.
POSITION Button
RESET Button
Used to click the right
mouse button.
Button
Button
VOLUME
VOLUME
FREEZE Button
MUTE Button
BLANK Button
These functions work when the mouse control function is activated. Remember, the POSITION,
BLANK ON and MENU ON functions disable the mouse control function.
To prevent any malfunction;
NOTE
• Do not exert excessive physical force on the remote control transmitter. Take care not to drop.
• Do not place the heavy objects on the remote control transmitter.
• Do not wet the remote control transmitter or place it on any wet object.
• Do not place the remote control transmitter close to the cooling fan of the projector.
• Do not disassemble the remote control transmitter in case of malfunction. Please send to a
servicing dealer.
ENGLISH-4
�
BBBBEEEEFFFFOOOORRRREEEE UUUUSSSSEEEE ((((ccccoooonnnnttttiiiinnnnuuuueeeedddd))))
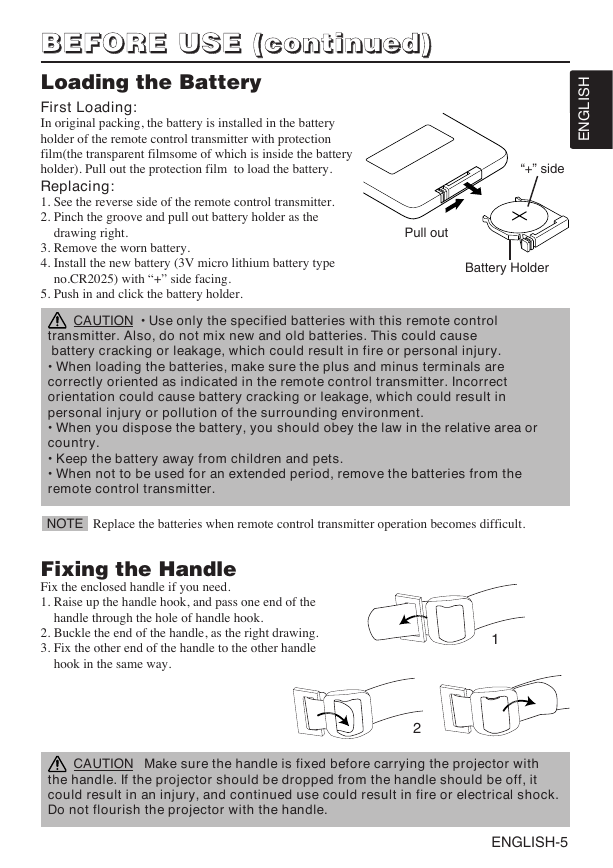
Loading the Battery
First Loading:
In original packing, the battery is installed in the battery
holder of the remote control transmitter with protection
film(the transparent filmsome of which is inside the battery
holder). Pull out the protection film to load the battery.
Replacing:
1. See the reverse side of the remote control transmitter.
2. Pinch the groove and pull out battery holder as the
I
H
S
L
G
N
E
“+” side
drawing right.
3. Remove the worn battery.
4. Install the new battery (3V micro lithium battery type
no.CR2025) with “+” side facing.
5. Push in and click the battery holder.
Pull out
Battery Holder
CAUTION • Use only the specified batteries with this remote control
transmitter. Also, do not mix new and old batteries. This could cause
battery cracking or leakage, which could result in fire or personal injury.
• When loading the batteries, make sure the plus and minus terminals are
correctly oriented as indicated in the remote control transmitter. Incorrect
orientation could cause battery cracking or leakage, which could result in
personal injury or pollution of the surrounding environment.
• When you dispose the battery, you should obey the law in the relative area or
country.
• Keep the battery away from children and pets.
• When not to be used for an extended period, remove the batteries from the
remote control transmitter.
NOTE
Replace the batteries when remote control transmitter operation becomes difficult.
Fixing the Handle
Fix the enclosed handle if you need.
1. Raise up the handle hook, and pass one end of the
handle through the hole of handle hook.
2. Buckle the end of the handle, as the right drawing.
3. Fix the other end of the handle to the other handle
hook in the same way.
1
2
CAUTION Make sure the handle is fixed before carrying the projector with
the handle. If the projector should be dropped from the handle should be off, it
could result in an injury, and continued use could result in fire or electrical shock.
Do not flourish the projector with the handle.
ENGLISH-5
�
INSTALLATION
INSTALLATION
Installation of the Projector and Screen
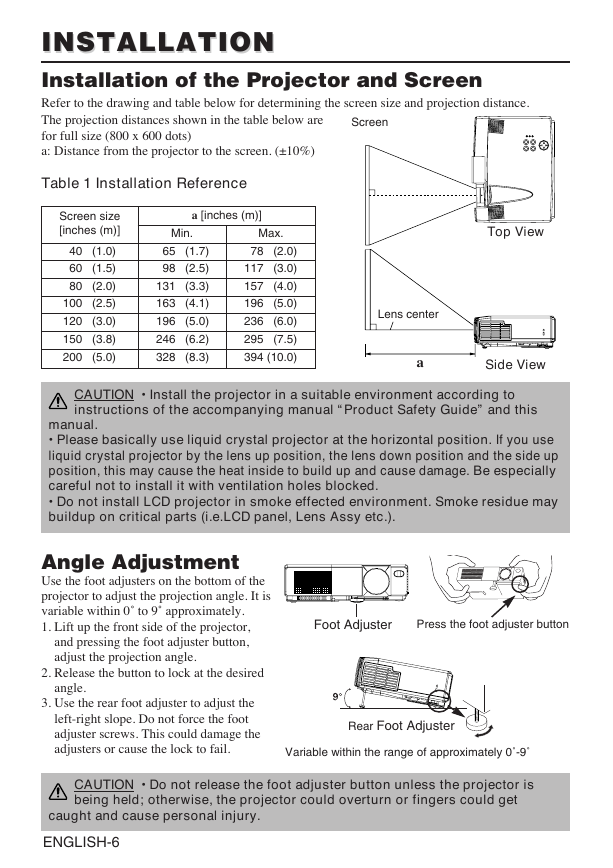
Refer to the drawing and table below for determining the screen size and projection distance.
The projection distances shown in the table below are
for full size (800 x 600 dots)
a: Distance from the projector to the screen. (±10%)
Screen
Table 1 Installation Reference
Screen size
[inches (m)]
40 (1.0)
60 (1.5)
80 (2.0)
100 (2.5)
120 (3.0)
150 (3.8)
200 (5.0)
a [inches (m)]
Min.
65 (1.7)
98 (2.5)
131 (3.3)
163 (4.1)
196 (5.0)
246 (6.2)
328 (8.3)
Max.
78 (2.0)
117 (3.0)
157 (4.0)
196 (5.0)
236 (6.0)
295 (7.5)
394 (10.0)
Top View
Lens center
a
Side View
CAUTION • Install the projector in a suitable environment according to
instructions of the accompanying manual “Product Safety Guide” and this
manual.
• Please basically use liquid crystal projector at the horizontal position. If you use
liquid crystal projector by the lens up position, the lens down position and the side up
position, this may cause the heat inside to build up and cause damage. Be especially
careful not to install it with ventilation holes blocked.
• Do not install LCD projector in smoke effected environment. Smoke residue may
buildup on critical parts (i.e.LCD panel, Lens Assy etc.).
Angle Adjustment
Use the foot adjusters on the bottom of the
projector to adjust the projection angle. It is
variable within 0˚ to 9˚ approximately.
1. Lift up the front side of the projector,
and pressing the foot adjuster button,
adjust the projection angle.
2. Release the button to lock at the desired
angle.
3. Use the rear foot adjuster to adjust the
left-right slope. Do not force the foot
adjuster screws. This could damage the
adjusters or cause the lock to fail.
Foot Adjuster
Press the foot adjuster button
Rear Foot Adjuster
Variable within the range of approximately 0˚-9˚
CAUTION • Do not release the foot adjuster button unless the projector is
being held; otherwise, the projector could overturn or fingers could get
caught and cause personal injury.
ENGLISH-6
�





 2023年江西萍乡中考道德与法治真题及答案.doc
 2012年重庆南川中考生物真题及答案.doc
 2013年江西师范大学地理学综合及文艺理论基础考研真题.doc
 2020年四川甘孜小升初语文真题及答案I卷.doc
 2020年注册岩土工程师专业基础考试真题及答案.doc
 2023-2024学年福建省厦门市九年级上学期数学月考试题及答案.doc
 2021-2022学年辽宁省沈阳市大东区九年级上学期语文期末试题及答案.doc
 2022-2023学年北京东城区初三第一学期物理期末试卷及答案.doc
 2018上半年江西教师资格初中地理学科知识与教学能力真题及答案.doc
 2012年河北国家公务员申论考试真题及答案-省级.doc
 2020-2021学年江苏省扬州市江都区邵樊片九年级上学期数学第一次质量检测试题及答案.doc
 2022下半年黑龙江教师资格证中学综合素质真题及答案.doc