在 x86 linux 上安装 minigui2.0.4
建议在安装 linux 操作系统的时候选择完全安装,以减少在安装 minigui 所依赖
的库没有安装的情况
一、激活 Frambuffer。
编辑 menu.lst
/boot/grub
#cd
#gedit menu.lst
在以“kernel”开头的最后一行添加 vga=0x0314
代码含义(fbcon 默认分辨率):
0x0317:1024x768-16bpp
0x0314:800x600-16bpp
成功后,在 linux 的开机画面会看到两个可爱的小企鹅 -_-~~
二、安装 minigui
(1)安装 minigui res
解压 minigui-res-2.0.4.tar.gz,进入到解压后的文件夹中。可以修改 config.linux
文件中的 prefix 项目值,改变安装路径,建议安装在默认路径下(/usr/local)。
#make install
(2)安装 libminigui
解压 libminigui-2.0.4-linux.tar.gz,进入解压后的文件夹中。
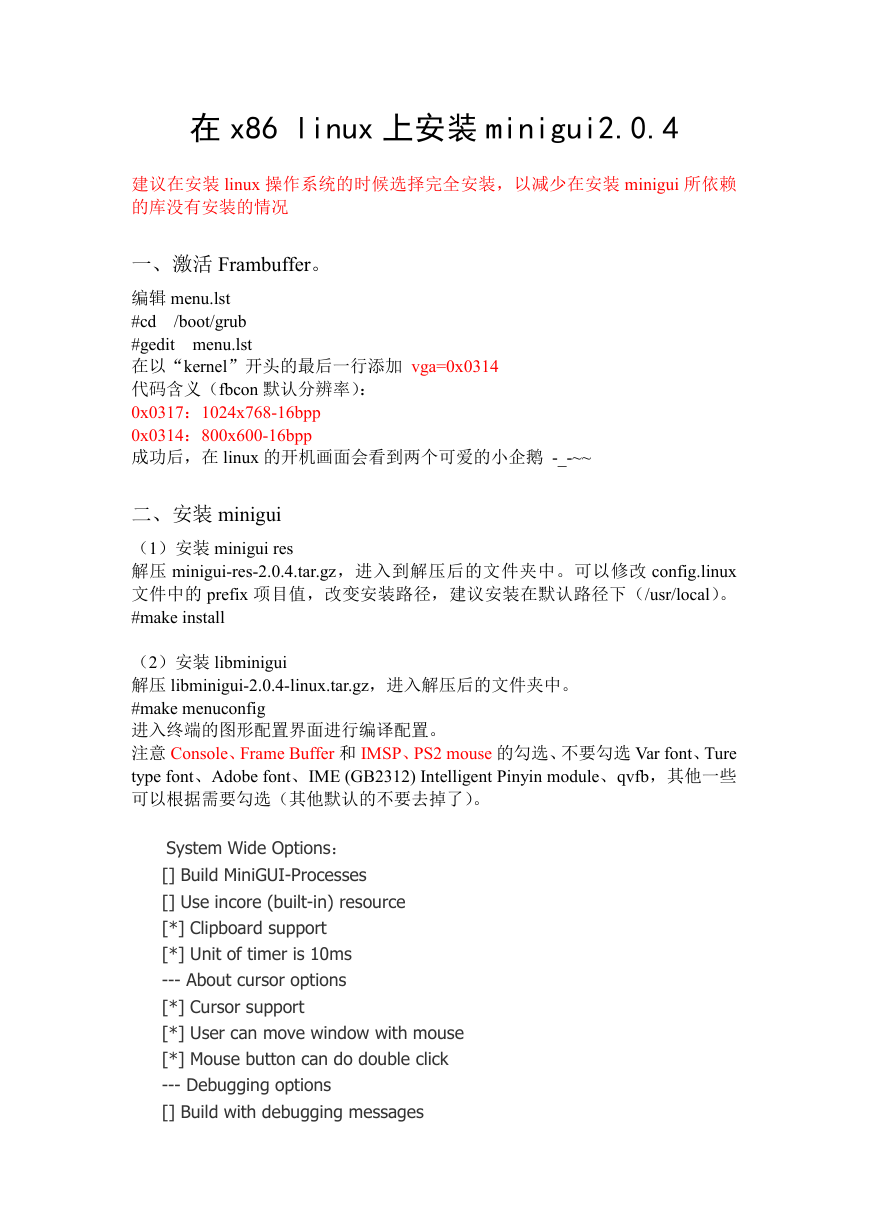
#make menuconfig
进入终端的图形配置界面进行编译配置。
注意 Console、Frame Buffer 和 IMSP、PS2 mouse 的勾选、不要勾选 Var font、Ture
type font、Adobe font、IME (GB2312) Intelligent Pinyin module、qvfb,其他一些
可以根据需要勾选(其他默认的不要去掉了)。
System Wide Options:
[] Build MiniGUI-Processes
[] Use incore (built-in) resource
[*] Clipboard support
[*] Unit of timer is 10ms
--- About cursor options
[*] Cursor support
[*] User can move window with mouse
[*] Mouse button can do double click
--- Debugging options
[] Build with debugging messages
�
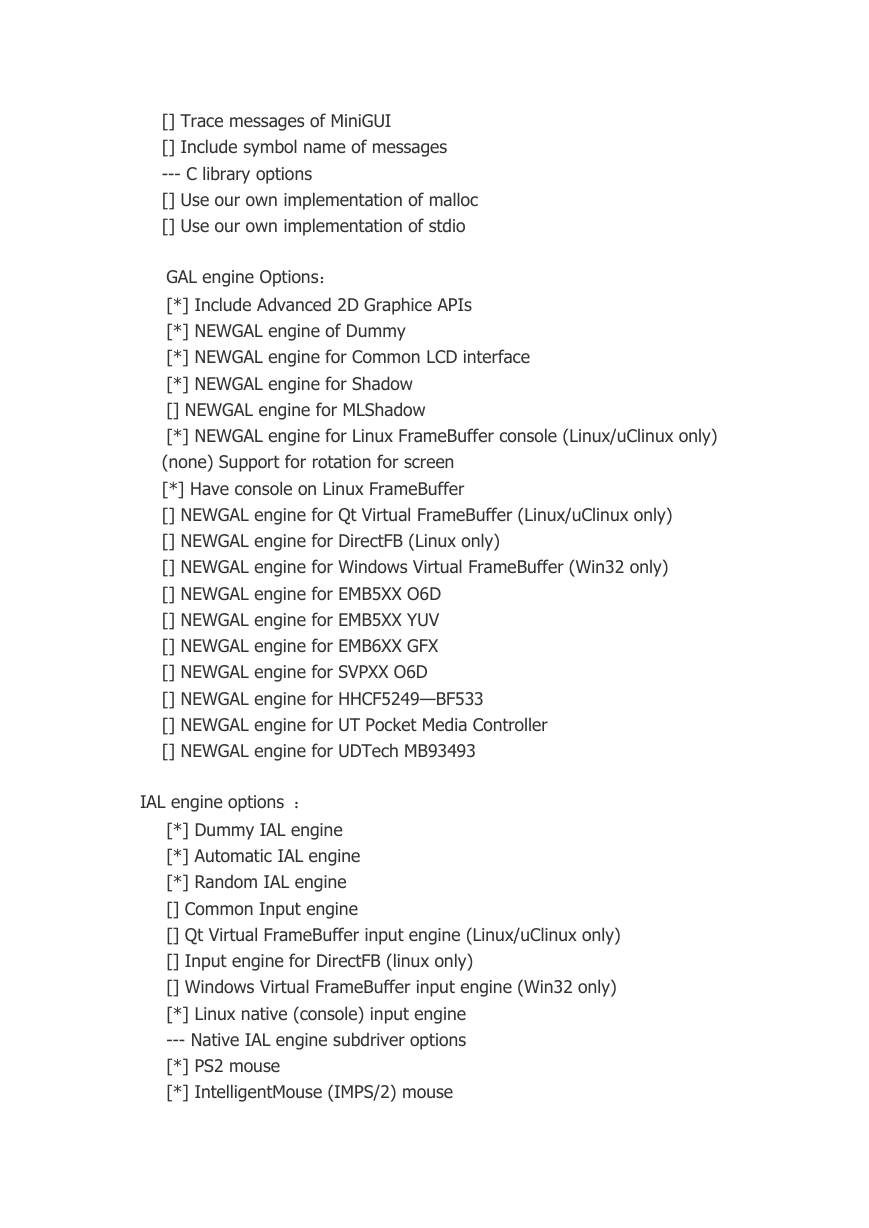
[] Trace messages of MiniGUI
[] Include symbol name of messages
--- C library options
[] Use our own implementation of malloc
[] Use our own implementation of stdio
GAL engine Options:
[*] Include Advanced 2D Graphice APIs
[*] NEWGAL engine of Dummy
[*] NEWGAL engine for Common LCD interface
[*] NEWGAL engine for Shadow
[] NEWGAL engine for MLShadow
[*] NEWGAL engine for Linux FrameBuffer console (Linux/uClinux only)
(none) Support for rotation for screen
[*] Have console on Linux FrameBuffer
[] NEWGAL engine for Qt Virtual FrameBuffer (Linux/uClinux only)
[] NEWGAL engine for DirectFB (Linux only)
[] NEWGAL engine for Windows Virtual FrameBuffer (Win32 only)
[] NEWGAL engine for EMB5XX O6D
[] NEWGAL engine for EMB5XX YUV
[] NEWGAL engine for EMB6XX GFX
[] NEWGAL engine for SVPXX O6D
[] NEWGAL engine for HHCF5249—BF533
[] NEWGAL engine for UT Pocket Media Controller
[] NEWGAL engine for UDTech MB93493
IAL engine options :
[*] Dummy IAL engine
[*] Automatic IAL engine
[*] Random IAL engine
[] Common Input engine
[] Qt Virtual FrameBuffer input engine (Linux/uClinux only)
[] Input engine for DirectFB (linux only)
[] Windows Virtual FrameBuffer input engine (Win32 only)
[*] Linux native (console) input engine
--- Native IAL engine subdriver options
[*] PS2 mouse
[*] IntelligentMouse (IMPS/2) mouse
�
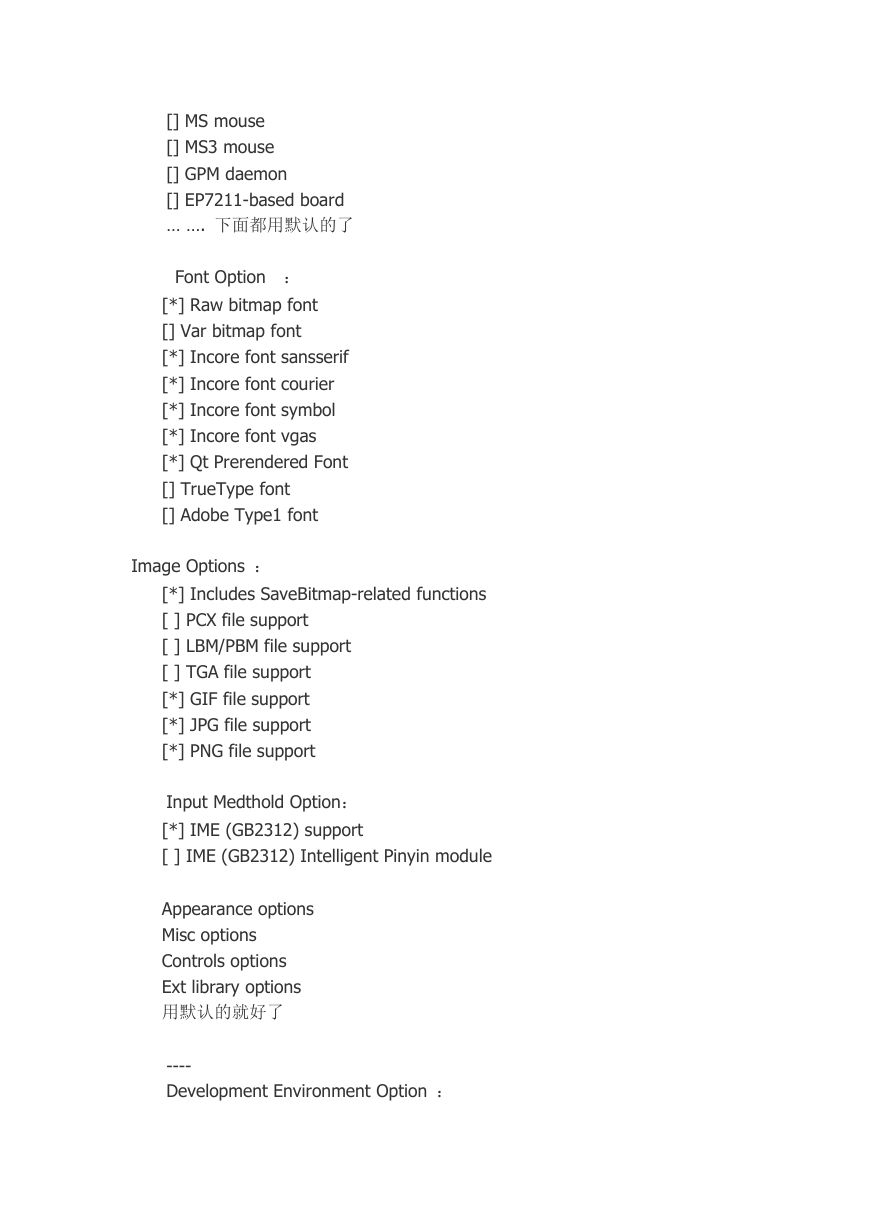
[] MS mouse
[] MS3 mouse
[] GPM daemon
[] EP7211-based board
… …. 下面都用默认的了
Font Option :
[*] Raw bitmap font
[] Var bitmap font
[*] Incore font sansserif
[*] Incore font courier
[*] Incore font symbol
[*] Incore font vgas
[*] Qt Prerendered Font
[] TrueType font
[] Adobe Type1 font
Image Options :
[*] Includes SaveBitmap-related functions
[ ] PCX file support
[ ] LBM/PBM file support
[ ] TGA file support
[*] GIF file support
[*] JPG file support
[*] PNG file support
Input Medthold Option:
[*] IME (GB2312) support
[ ] IME (GB2312) Intelligent Pinyin module
Appearance options
Misc options
Controls options
Ext library options
用默认的就好了
----
Development Environment Option :
�
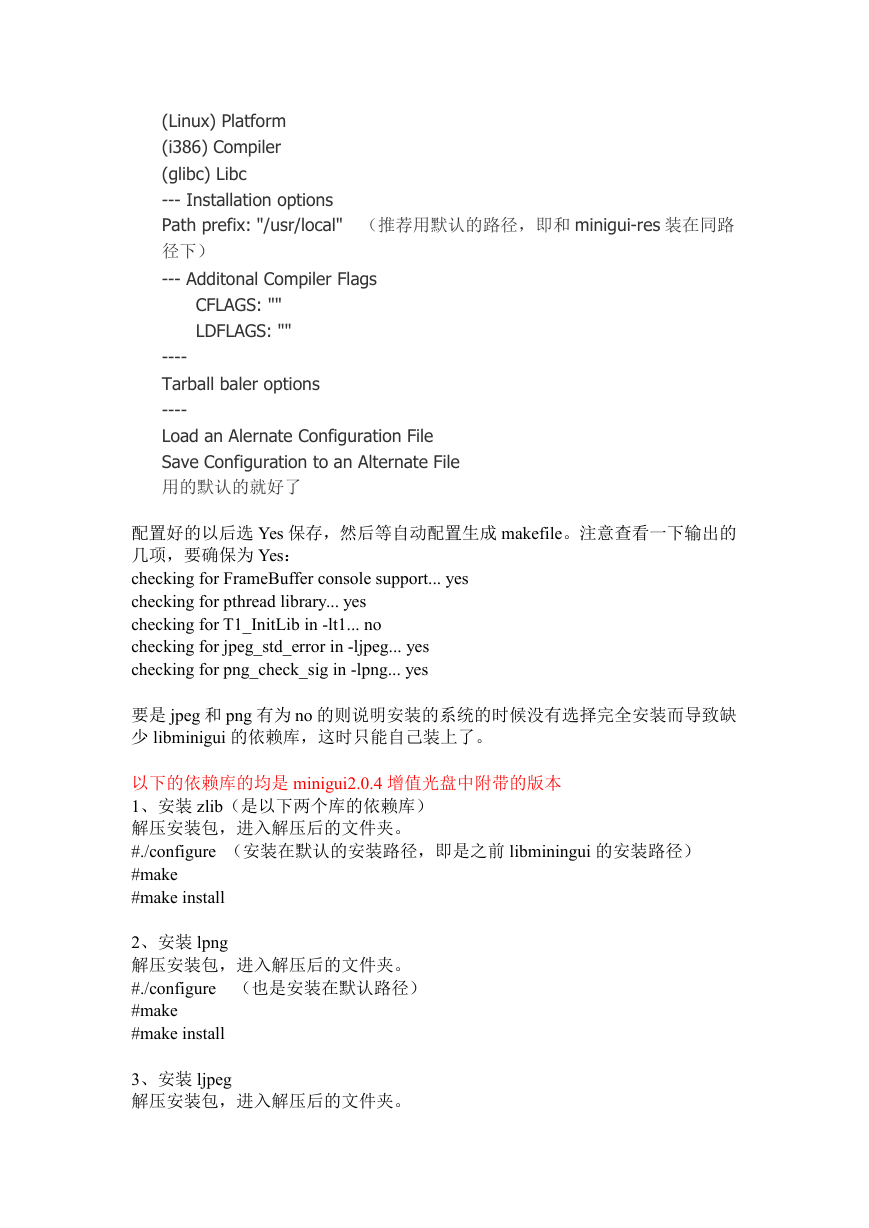
(Linux) Platform
(i386) Compiler
(glibc) Libc
--- Installation options
Path prefix: "/usr/local" (推荐用默认的路径,即和 minigui-res 装在同路
径下)
--- Additonal Compiler Flags
CFLAGS: ""
LDFLAGS: ""
----
Tarball baler options
----
Load an Alernate Configuration File
Save Configuration to an Alternate File
用的默认的就好了
配置好的以后选 Yes 保存,然后等自动配置生成 makefile。注意查看一下输出的
几项,要确保为 Yes:
checking for FrameBuffer console support... yes
checking for pthread library... yes
checking for T1_InitLib in -lt1... no
checking for jpeg_std_error in -ljpeg... yes
checking for png_check_sig in -lpng... yes
要是 jpeg 和 png 有为 no 的则说明安装的系统的时候没有选择完全安装而导致缺
少 libminigui 的依赖库,这时只能自己装上了。
以下的依赖库的均是 minigui2.0.4 增值光盘中附带的版本
1、安装 zlib(是以下两个库的依赖库)
解压安装包,进入解压后的文件夹。
#./configure (安装在默认的安装路径,即是之前 libminingui 的安装路径)
#make
#make install
2、安装 lpng
解压安装包,进入解压后的文件夹。
#./configure (也是安装在默认路径)
#make
#make install
3、安装 ljpeg
解压安装包,进入解压后的文件夹。
�
#./configure (还是安装在默认路径)
#make
#make install
若是出现中途有“无法创建 XX 文件夹”的编译错误,则自己去它报错的那个路
径下去手动创建文件夹后,再重现安装即可。
安装好 libminigui 所有的依赖库后,再次./configure 检查所有依赖库是否安装成
功。检测通过后:
#make
#make install
三、配置 minigui
1、设置连接路径
#gedit
在最后一行加入/usr/local/lib (即 libminigui 的安装路径下的 lib),退出保存。
#/sbin/ldconfig
/ect/ld.so.conf
2、配置 minigui 运行环境
#gedit
/usr/local/etc/minigui.cfg
修改如下几项:
[System]
#GAL
agl_engine = fbcon
defaultmode = 800x600 – 16bpp (改成之前激活 FrameBuffer 一致的分辨率)
#IAL
ial_engine = console
mdev = /dev/iput/mice (redhat9 下改成 mdev=/dev/mouse)
mtype = IMPS2
(IMPS2::USB 鼠标,PS2:PS2 鼠标)
[fbcon]
defaultmode=800x600 – 16bpp (改成之前激活 FrameBuffer 一致的分辨率)
四、编译和运行 minigui 实例程序
以上步骤都做好之后,就可以去编译 minigui2.0.x 增值光盘中自带的
mg-samples-2.0.4 例子程序。
#./configure
#make
编译没有报错之后就可以运行程序,看是否正常运行。
�
Fedor9(redhat9)下的一些命令:
Ctrl + Alt + F5
进入 console
Ctrl + Alt + Backspace 退出 console 的 FrameBuffer
Alt + F7
退出 console 回到图形界面
进入 console,运行示例程序,看是否能正常运行。如果能够正常运行,则说明
minigui 已经正常安装到你的 linux 系统上了 ^_^
�


 2023年江西萍乡中考道德与法治真题及答案.doc
 2012年重庆南川中考生物真题及答案.doc
 2013年江西师范大学地理学综合及文艺理论基础考研真题.doc
 2020年四川甘孜小升初语文真题及答案I卷.doc
 2020年注册岩土工程师专业基础考试真题及答案.doc
 2023-2024学年福建省厦门市九年级上学期数学月考试题及答案.doc
 2021-2022学年辽宁省沈阳市大东区九年级上学期语文期末试题及答案.doc
 2022-2023学年北京东城区初三第一学期物理期末试卷及答案.doc
 2018上半年江西教师资格初中地理学科知识与教学能力真题及答案.doc
 2012年河北国家公务员申论考试真题及答案-省级.doc
 2020-2021学年江苏省扬州市江都区邵樊片九年级上学期数学第一次质量检测试题及答案.doc
 2022下半年黑龙江教师资格证中学综合素质真题及答案.doc