�
�
Congratulations
MOTOROLA i1
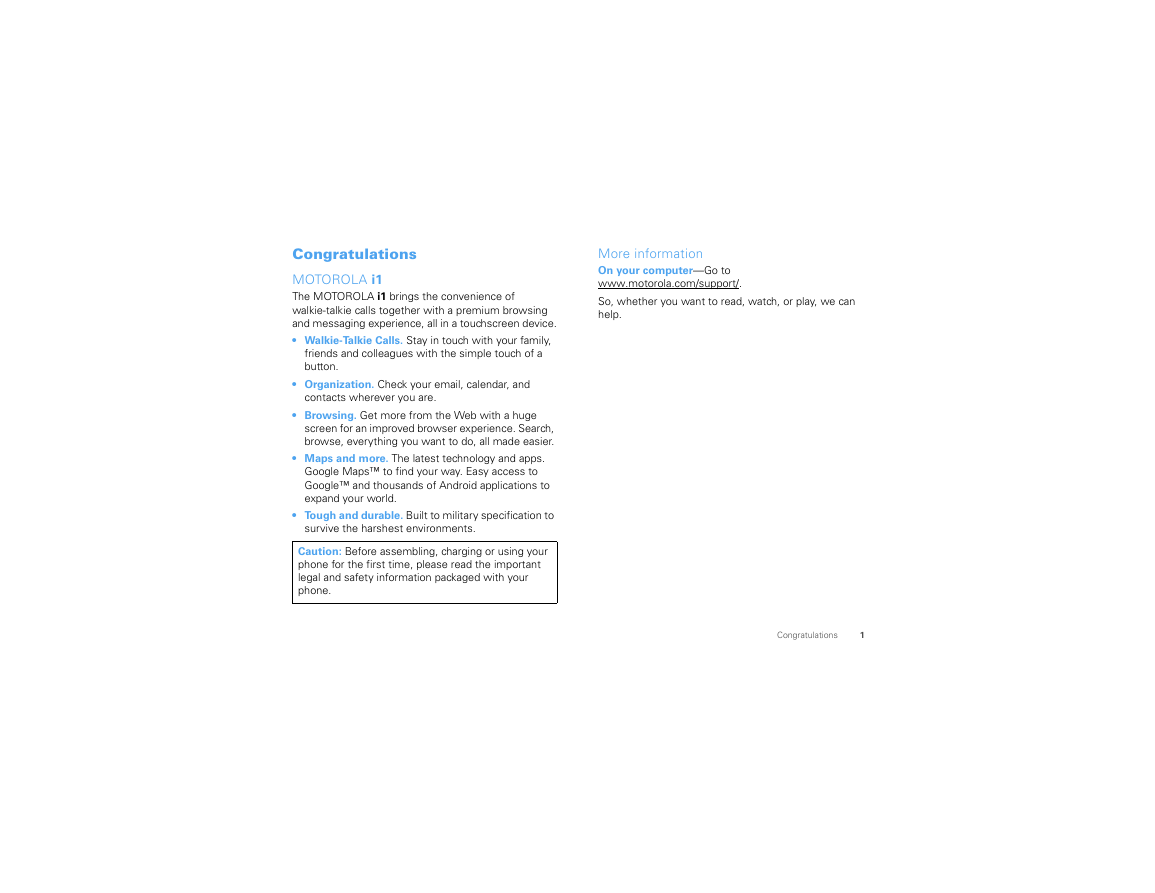
The MOTOROLA i1 brings the convenience of
walkie-talkie calls together with a premium browsing
and messaging experience, all in a touchscreen device.
• Walkie-Talkie Calls. Stay in touch with your family,
friends and colleagues with the simple touch of a
button.
Organization. Check your email, calendar, and
contacts wherever you are.
More information
On your computer—Go to
www.motorola.com/support/.
So, whether you want to read, watch, or play, we can
help.
Browsing. Get more from the Web with a huge
screen for an improved browser experience. Search,
browse, everything you want to do, all made easier.
Maps and more. The latest technology and apps.
Google Maps™ to find your way. Easy access to
Google™ and thousands of Android applications to
expand your world.
Tough and durable. Built to military specification to
survive the harshest environments.
Caution: Before assembling, charging or using your
phone for the first time, please read the important
legal and safety information packaged with your
phone.
Congratulations
1
�
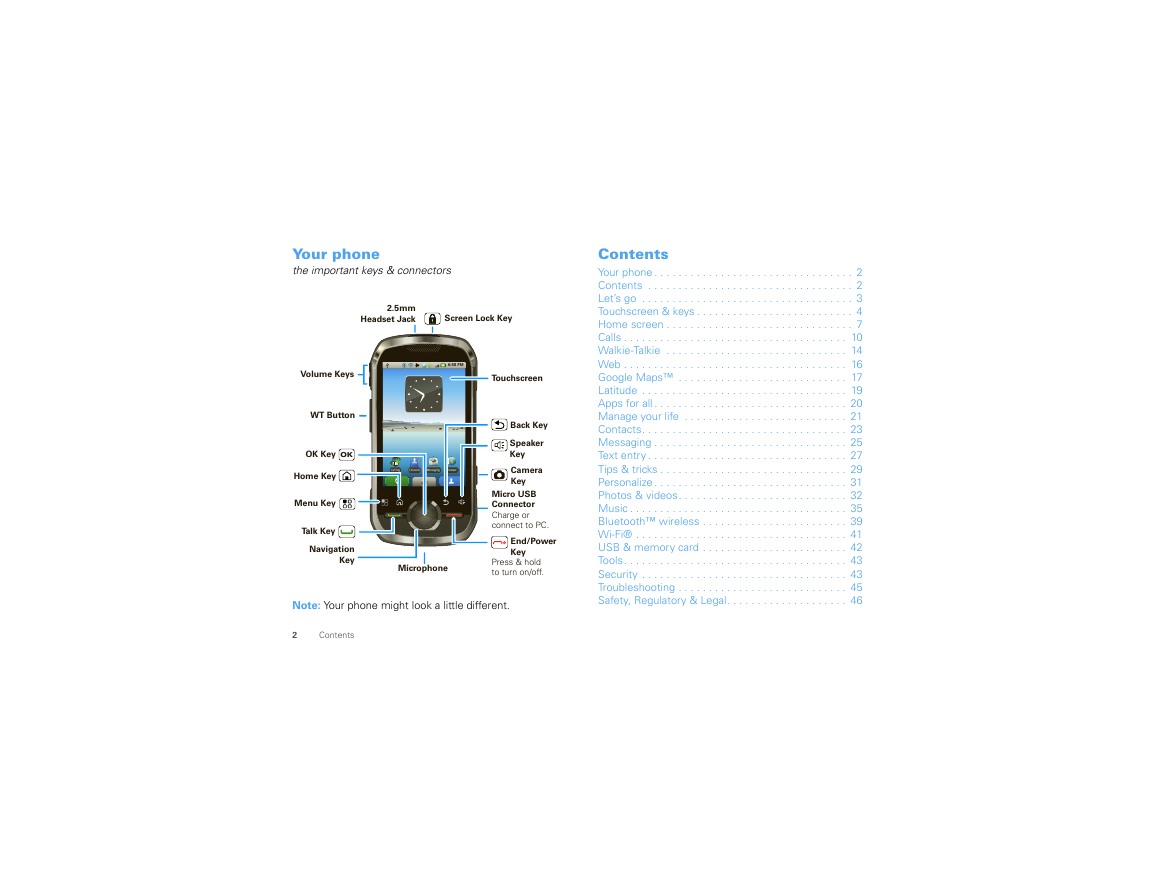
Your phone
the important keys & connectors
2.5mm
Headset Jack
Screen Lock Key
Volume Keys
WT Button
OK Key OK
Home Key
Menu Key
Talk Key
Navigation
Key
6:50 PM
Touchscreen
Back Key
Speaker
Key
Camera
Key
Micro USB
Connector
Charge or
connect to PC.
Key
End/Power
Press & hold
to turn on/off.
Call log
Contacts
Messaging
Browser
Microphone
Note: Your phone might look a little different.
2
Contents
Contents
Your phone . . . . . . . . . . . . . . . . . . . . . . . . . . . . . . . . . 2
Contents . . . . . . . . . . . . . . . . . . . . . . . . . . . . . . . . . . 2
Let’s go . . . . . . . . . . . . . . . . . . . . . . . . . . . . . . . . . . . 3
Touchscreen & keys . . . . . . . . . . . . . . . . . . . . . . . . . . 4
Home screen . . . . . . . . . . . . . . . . . . . . . . . . . . . . . . . 7
Calls . . . . . . . . . . . . . . . . . . . . . . . . . . . . . . . . . . . . . 10
Walkie-Talkie . . . . . . . . . . . . . . . . . . . . . . . . . . . . . . 14
Web . . . . . . . . . . . . . . . . . . . . . . . . . . . . . . . . . . . . . 16
Google Maps™ . . . . . . . . . . . . . . . . . . . . . . . . . . . . 17
Latitude . . . . . . . . . . . . . . . . . . . . . . . . . . . . . . . . . . 19
Apps for all . . . . . . . . . . . . . . . . . . . . . . . . . . . . . . . . 20
Manage your life . . . . . . . . . . . . . . . . . . . . . . . . . . . 21
Contacts. . . . . . . . . . . . . . . . . . . . . . . . . . . . . . . . . . 23
Messaging . . . . . . . . . . . . . . . . . . . . . . . . . . . . . . . . 25
Text entry . . . . . . . . . . . . . . . . . . . . . . . . . . . . . . . . . 27
Tips & tricks . . . . . . . . . . . . . . . . . . . . . . . . . . . . . . . 29
Personalize . . . . . . . . . . . . . . . . . . . . . . . . . . . . . . . . 31
Photos & videos. . . . . . . . . . . . . . . . . . . . . . . . . . . . 32
Music . . . . . . . . . . . . . . . . . . . . . . . . . . . . . . . . . . . . 35
Bluetooth™ wireless . . . . . . . . . . . . . . . . . . . . . . . . 39
Wi-Fi® . . . . . . . . . . . . . . . . . . . . . . . . . . . . . . . . . . . 41
USB & memory card . . . . . . . . . . . . . . . . . . . . . . . . 42
Tools. . . . . . . . . . . . . . . . . . . . . . . . . . . . . . . . . . . . . 43
Security . . . . . . . . . . . . . . . . . . . . . . . . . . . . . . . . . . 43
Troubleshooting . . . . . . . . . . . . . . . . . . . . . . . . . . . . 45
Safety, Regulatory & Legal. . . . . . . . . . . . . . . . . . . . 46
�
Let’s go
let’s get you up and running
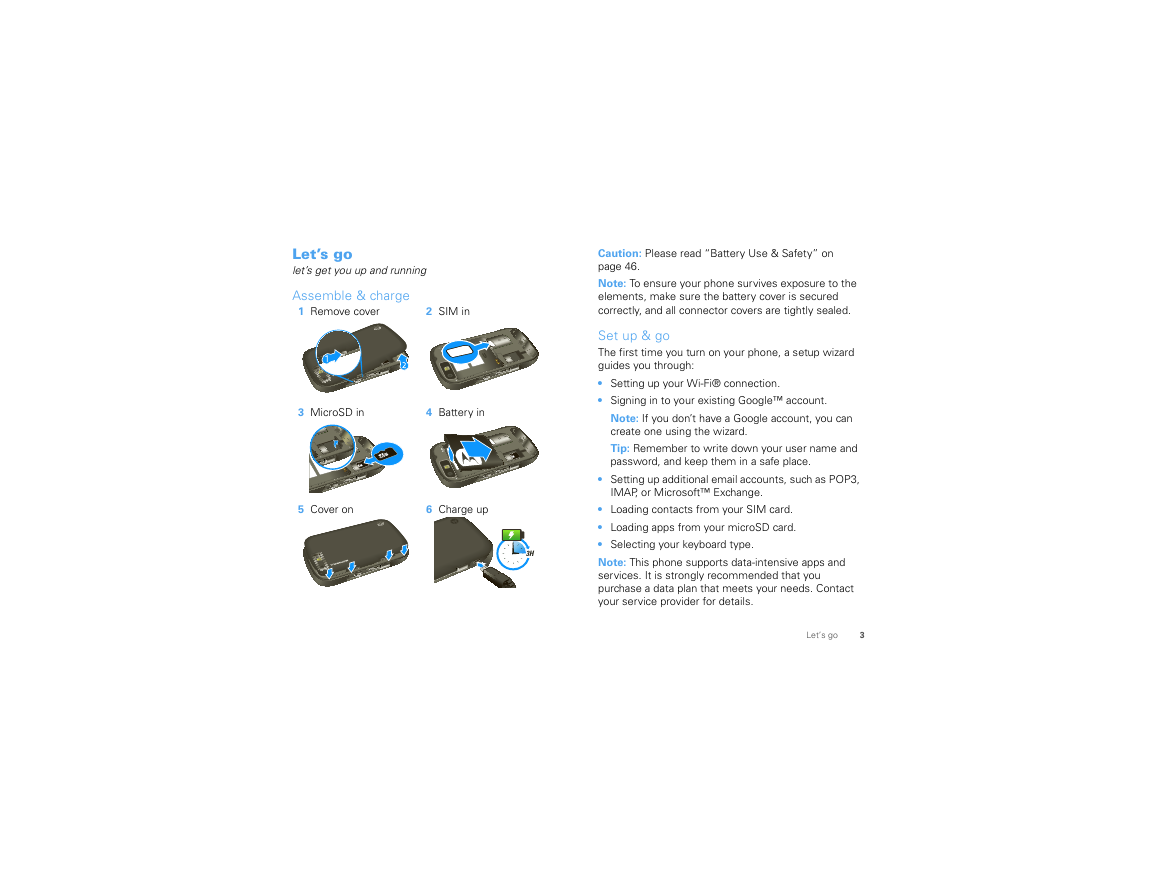
Assemble & charge
1 Remove cover
2 SIM in
3 MicroSD in
4 Battery in
5 Cover on
6 Charge up
3H
Caution: Please read “Battery Use & Safety” on
page 46.
Note: To ensure your phone survives exposure to the
elements, make sure the battery cover is secured
correctly, and all connector covers are tightly sealed.
Set up & go
The first time you turn on your phone, a setup wizard
guides you through:
• Setting up your Wi-Fi® connection.
• Signing in to your existing Google™ account.
Note: If you don’t have a Google account, you can
create one using the wizard.
Tip: Remember to write down your user name and
password, and keep them in a safe place.
• Setting up additional email accounts, such as POP3,
IMAP, or Microsoft™ Exchange.
• Loading contacts from your SIM card.
• Loading apps from your microSD card.
• Selecting your keyboard type.
Note: This phone supports data-intensive apps and
services. It is strongly recommended that you
purchase a data plan that meets your needs. Contact
your service provider for details.
Let’s go
3
�
Turn it on & off
To turn on your phone, press and
hold End/Power
To turn off your phone, press and
hold End/Power
, then touch
Power off.
.
Wi-Fi connect
If you want to use a Wi-Fi computer network for even
Settings >
faster Internet access, touch
>
Wireless controls > Wi-Fi settings.
End/Power
Key
Cool content & more
Browse and download thousands of the coolest apps
on the planet from Android Market™. See “Apps for
all” on page 20.
Note: It’s strongly recommended you use a Wi-Fi
connection when downloading apps from Android
Market.
Your phone comes with a microSD memory card
slot—you can load it up with photos, videos, and
music from your computer using “USB drag & drop”
on page 42.
4
Touchscreen & keys
Touchscreen & keys
a few essentials
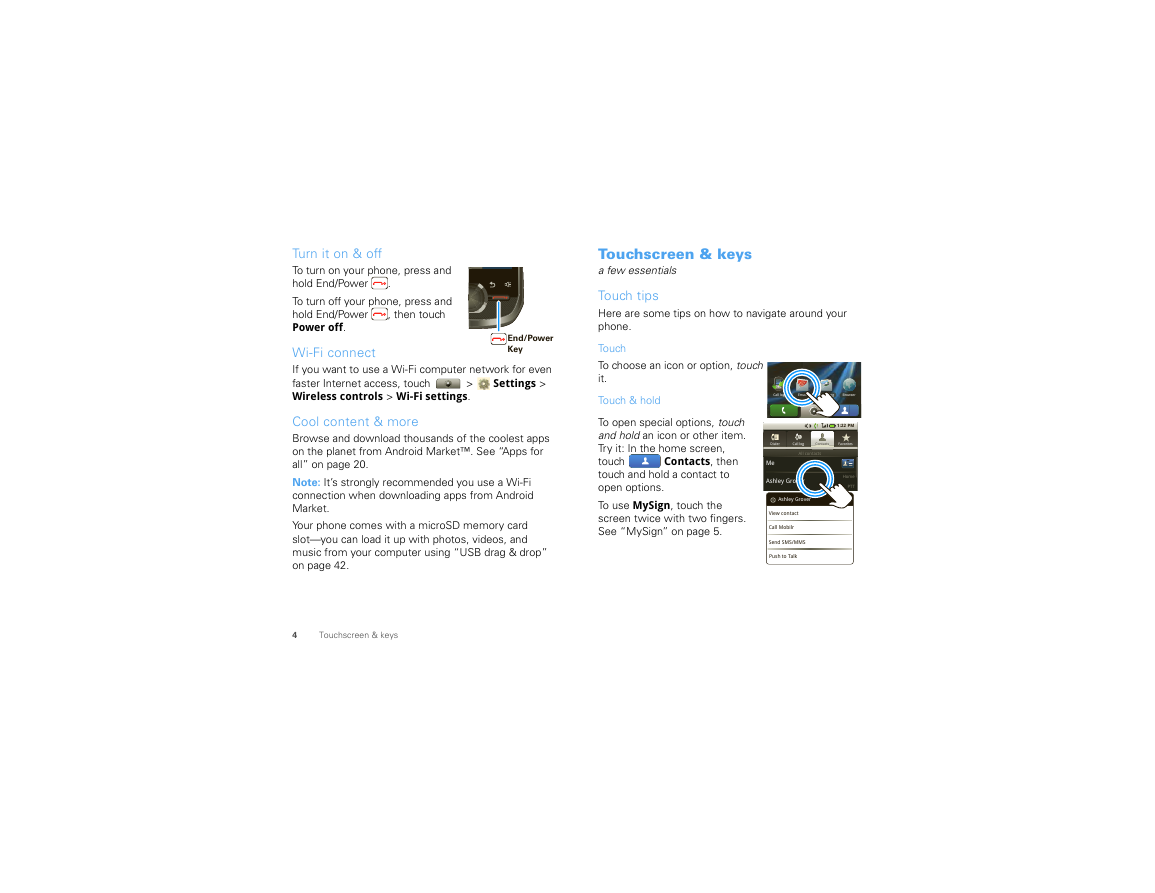
Touch tips
Here are some tips on how to navigate around your
phone.
Touch
To choose an icon or option, touch
it.
Touch & hold
Contacts, then
To open special options, touch
and hold an icon or other item.
Try it: In the home screen,
touch
touch and hold a contact to
open options.
To use MySign, touch the
screen twice with two fingers.
See “MySign” on page 5.
Call log
Email
Messaging
Browser
1:22 PM
Dialer
Dialer
Call log
Call logggg
Contacts
Contacts
Favorites
Favorites
All contacts
Home
PTT
Me
Ashley Grover
Ashley Grover
View contact
Call Mobilr
Send SMS/MMS
Push to Talk
�
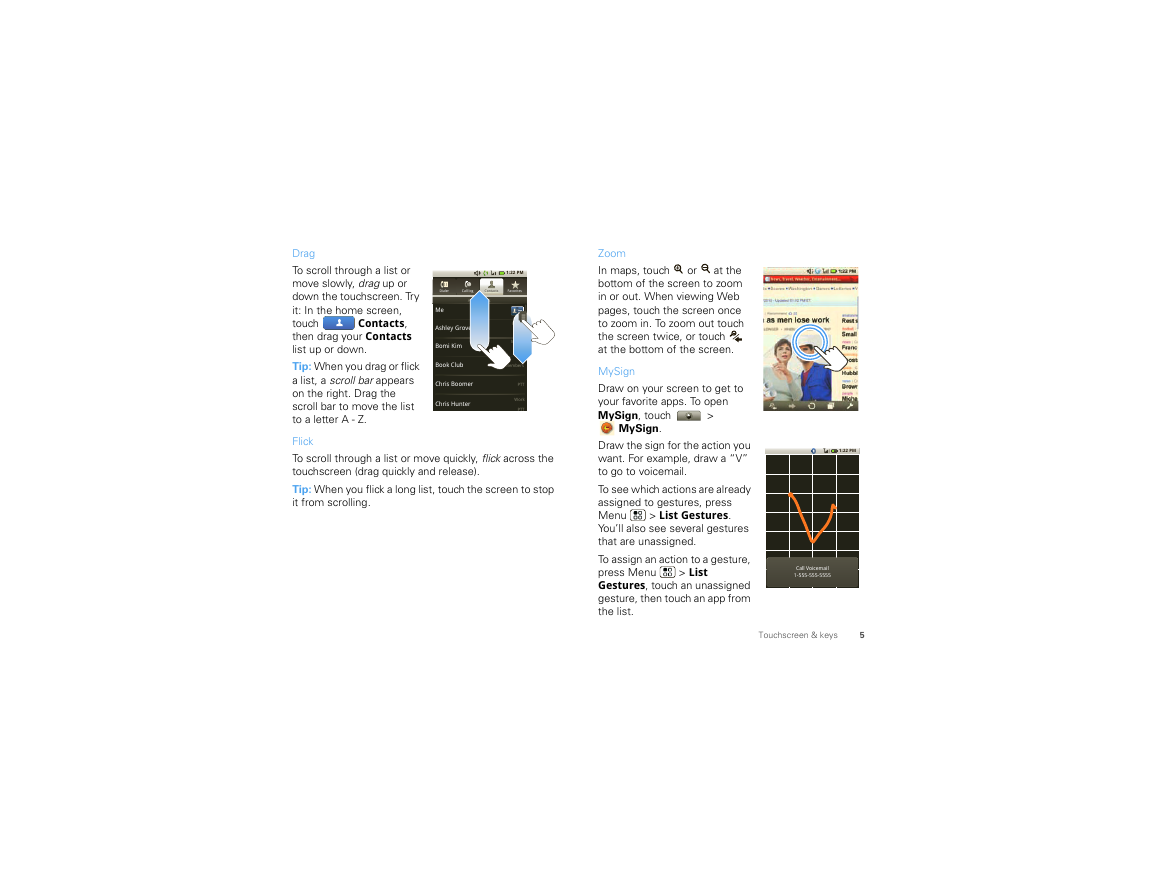
Drag
To scroll through a list or
move slowly, drag up or
down the touchscreen. Try
it: In the home screen,
Contacts,
touch
then drag your Contacts
list up or down.
Tip: When you drag or flick
a list, a scroll bar appears
on the right. Drag the
scroll bar to move the list
to a letter A - Z.
1:22 PM
Dialer
Dialer
Call log
Call logggg
Contacts
CoContntacactsts
Favorites
Favorites
All contacts
Me
Ashley Grover
Bomi Kim
Book Club
Chris Boomer
Chris Hunter
Home
PTT
Mobile
PTT
3 Members
PTT
Work
PTT
Flick
To scroll through a list or move quickly, flick across the
touchscreen (drag quickly and release).
Tip: When you flick a long list, touch the screen to stop
it from scrolling.
or
Zoom
In maps, touch
at the
bottom of the screen to zoom
in or out. When viewing Web
pages, touch the screen once
to zoom in. To zoom out touch
the screen twice, or touch
at the bottom of the screen.
MySign
Draw on your screen to get to
your favorite apps. To open
MySign, touch
>
MySign.
Draw the sign for the action you
want. For example, draw a “V”
to go to voicemail.
To see which actions are already
assigned to gestures, press
> List Gestures.
Menu
You’ll also see several gestures
that are unassigned.
To assign an action to a gesture,
press Menu
Gestures, touch an unassigned
gesture, then touch an app from
the list.
> List
1:22 PM
Call Voicemail
1-555-555-5555
Touchscreen & keys
5
�
To create a new gesture, press Menu
Gesture, select an action from the list, and draw a
gesture to assign to the action.
> New
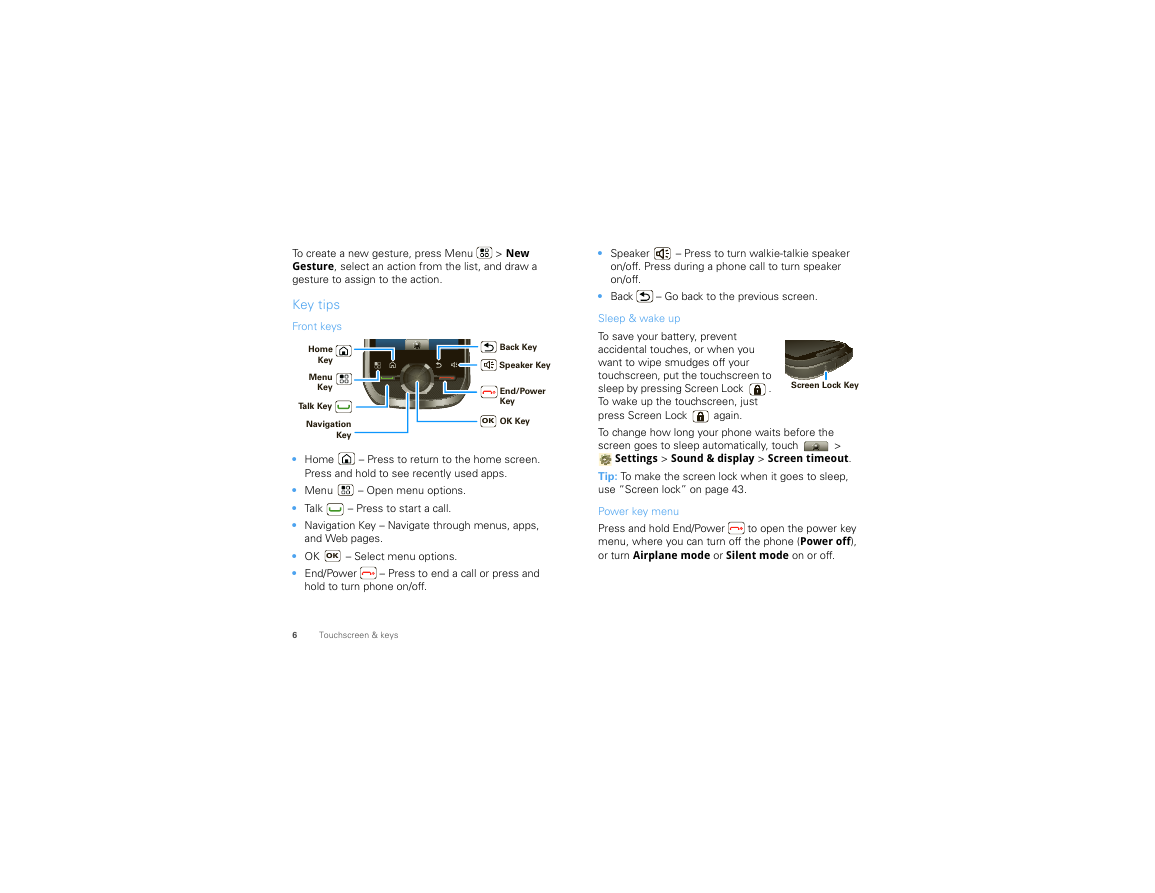
Key tips
Front keys
Home
Key
Menu
Key
Talk Key
Navigation
Key
Back Key
Speaker Key
End/Power
Key
OK
OK Key
• Home
– Press to return to the home screen.
Press and hold to see recently used apps.
– Open menu options.
• Menu
• Talk
• Navigation Key – Navigate through menus, apps,
– Press to start a call.
and Web pages.
– Select menu options.
OK
• OK
• End/Power
– Press to end a call or press and
hold to turn phone on/off.
6
Touchscreen & keys
• Speaker
– Press to turn walkie-talkie speaker
on/off. Press during a phone call to turn speaker
on/off.
• Back
– Go back to the previous screen.
Sleep & wake up
To save your battery, prevent
accidental touches, or when you
want to wipe smudges off your
touchscreen, put the touchscreen to
sleep by pressing Screen Lock
.
To wake up the touchscreen, just
press Screen Lock
To change how long your phone waits before the
screen goes to sleep automatically, touch
>
Settings > Sound & display > Screen timeout.
Tip: To make the screen lock when it goes to sleep,
use “Screen lock” on page 43.
again.
Screen Lock Key
Power key menu
Press and hold End/Power
to open the power key
menu, where you can turn off the phone (Power off),
or turn Airplane mode or Silent mode on or off.
�




 2023年江西萍乡中考道德与法治真题及答案.doc
 2012年重庆南川中考生物真题及答案.doc
 2013年江西师范大学地理学综合及文艺理论基础考研真题.doc
 2020年四川甘孜小升初语文真题及答案I卷.doc
 2020年注册岩土工程师专业基础考试真题及答案.doc
 2023-2024学年福建省厦门市九年级上学期数学月考试题及答案.doc
 2021-2022学年辽宁省沈阳市大东区九年级上学期语文期末试题及答案.doc
 2022-2023学年北京东城区初三第一学期物理期末试卷及答案.doc
 2018上半年江西教师资格初中地理学科知识与教学能力真题及答案.doc
 2012年河北国家公务员申论考试真题及答案-省级.doc
 2020-2021学年江苏省扬州市江都区邵樊片九年级上学期数学第一次质量检测试题及答案.doc
 2022下半年黑龙江教师资格证中学综合素质真题及答案.doc