Table of contents/Safety Instructions
Before Use
MULTIMEDIA PROJECTOR
Setting Up the Projector
User’s Manual
Projecting an Image from the Computer
Projecting an Image from AV Equipment
Useful Functions Available During a Presentation
Setting Up Functions from Menus
Maintenance
Troubleshooting
Appendix
Index
�
Quick Reference – How to start projection
Computer
1.
Install the projector.
Install the projector at the desired distance from the screen.
2. Connect the projector.
Connect the projector and the computer with a cable.
P30-31
P34-37
3. Turn on the projector.
Connect the power cord and turn on the projector.
Adjust the height of the projecting image (P41).
Select a display language when turning on the projector for the first time (P39).
P38-39
P44
P42-43
4. Press the
button.
Adjust the focus of the screen.
5. Set up the computer.
Turn on the computer and set the resolution.
6. Select the input signal by pressing the
Select an appropriate input signal in accord with the signal from the computer.
button.
P46-48
7. Press the
P44
Adjust the input signal, focusing, keystone distortion, etc. automatically with the
button again.
auto setup function.
8. Press the
P52
Optimize the input signal with the auto PC function (Skip this step if the projector
button.
is projecting an image properly.)
9. Select the image mode with the
button.
Select an appropriate image mode for projection.
Specify the aspect ratio or display area in the [Aspect] menu as required (P55,
P53-54
88).
10. Start the presentation.
P76-81
Set the useful functions available during the presentation from the remote control.
Finishing the projection...
Turn off the projector
Turn off the projector and unplug the power cord.
P58-59
2
�
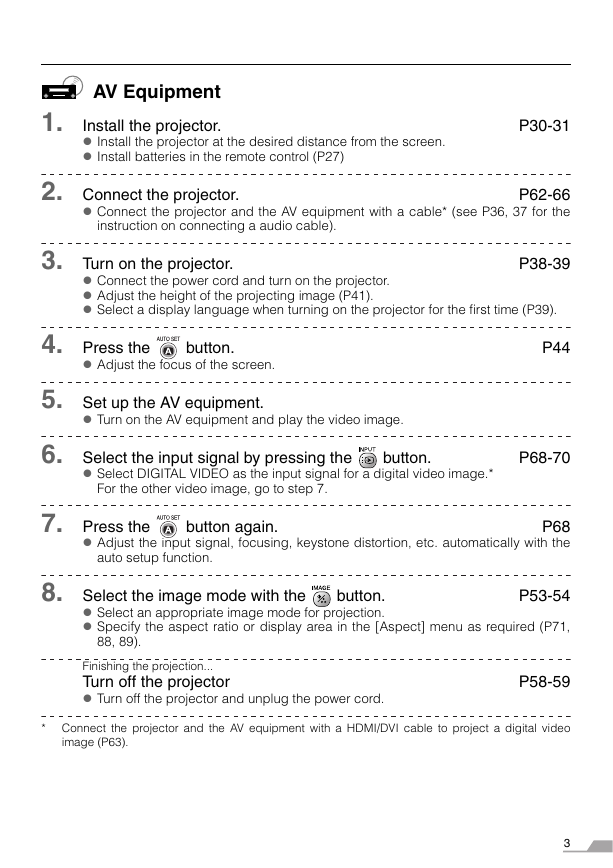
AV Equipment
1.
Install the projector.
Install the projector at the desired distance from the screen.
Install batteries in the remote control (P27)
P30-31
2. Connect the projector.
P62-66
Connect the projector and the AV equipment with a cable* (see P36, 37 for the
instruction on connecting a audio cable).
3. Turn on the projector.
Connect the power cord and turn on the projector.
Adjust the height of the projecting image (P41).
Select a display language when turning on the projector for the first time (P39).
P38-39
4. Press the
button.
Adjust the focus of the screen.
5. Set up the AV equipment.
Turn on the AV equipment and play the video image.
6. Select the input signal by pressing the
button.
Select DIGITAL VIDEO as the input signal for a digital video image.*
For the other video image, go to step 7.
P44
P68-70
7. Press the
P68
Adjust the input signal, focusing, keystone distortion, etc. automatically with the
button again.
auto setup function.
8. Select the image mode with the
button.
Select an appropriate image mode for projection.
Specify the aspect ratio or display area in the [Aspect] menu as required (P71,
P53-54
88, 89).
Finishing the projection...
Turn off the projector
Turn off the projector and unplug the power cord.
P58-59
* Connect the projector and the AV equipment with a HDMI/DVI cable to project a digital video
image (P63).
3
�
T
A
B
L
E
O
F
C
O
N
T
E
N
T
S
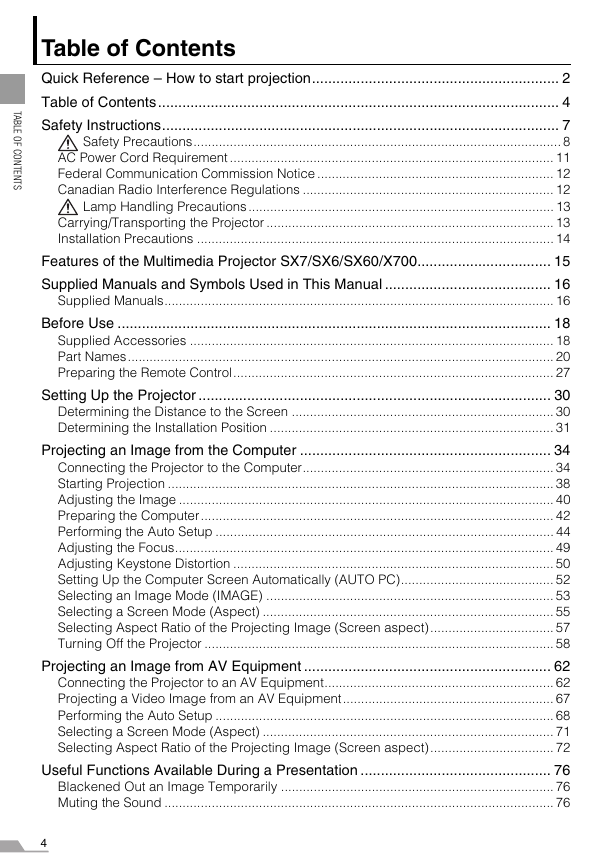
Table of Contents
Quick Reference – How to start projection............................................................. 2
Table of Contents................................................................................................... 4
Safety Instructions.................................................................................................. 7
Safety Precautions..................................................................................................... 8
AC Power Cord Requirement ......................................................................................... 11
Federal Communication Commission Notice ................................................................. 12
Canadian Radio Interference Regulations ..................................................................... 12
Lamp Handling Precautions .................................................................................... 13
Carrying/Transporting the Projector ............................................................................... 13
Installation Precautions .................................................................................................. 14
Features of the Multimedia Projector SX7/SX6/SX60/X700................................. 15
Supplied Manuals and Symbols Used in This Manual ......................................... 16
Supplied Manuals........................................................................................................... 16
Before Use ........................................................................................................... 18
Supplied Accessories .................................................................................................... 18
Part Names..................................................................................................................... 20
Preparing the Remote Control........................................................................................ 27
Setting Up the Projector ....................................................................................... 30
Determining the Distance to the Screen ........................................................................ 30
Determining the Installation Position .............................................................................. 31
Projecting an Image from the Computer .............................................................. 34
Connecting the Projector to the Computer..................................................................... 34
Starting Projection .......................................................................................................... 38
Adjusting the Image ....................................................................................................... 40
Preparing the Computer................................................................................................. 42
Performing the Auto Setup ............................................................................................. 44
Adjusting the Focus........................................................................................................ 49
Adjusting Keystone Distortion ........................................................................................ 50
Setting Up the Computer Screen Automatically (AUTO PC).......................................... 52
Selecting an Image Mode (IMAGE) ............................................................................... 53
Selecting a Screen Mode (Aspect) ................................................................................ 55
Selecting Aspect Ratio of the Projecting Image (Screen aspect).................................. 57
Turning Off the Projector ................................................................................................ 58
Projecting an Image from AV Equipment ............................................................. 62
Connecting the Projector to an AV Equipment............................................................... 62
Projecting a Video Image from an AV Equipment.......................................................... 67
Performing the Auto Setup ............................................................................................. 68
Selecting a Screen Mode (Aspect) ................................................................................ 71
Selecting Aspect Ratio of the Projecting Image (Screen aspect).................................. 72
Useful Functions Available During a Presentation ............................................... 76
Blackened Out an Image Temporarily ........................................................................... 76
Muting the Sound ........................................................................................................... 76
4
�
T
A
B
L
E
O
F
C
O
N
T
E
N
T
S
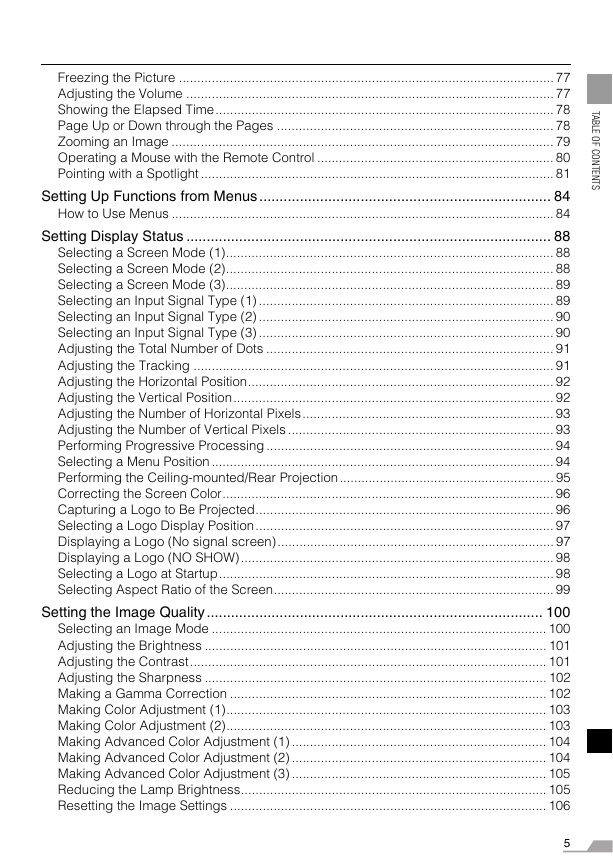
Freezing the Picture ....................................................................................................... 77
Adjusting the Volume ..................................................................................................... 77
Showing the Elapsed Time............................................................................................. 78
Page Up or Down through the Pages ............................................................................ 78
Zooming an Image ......................................................................................................... 79
Operating a Mouse with the Remote Control ................................................................. 80
Pointing with a Spotlight ................................................................................................. 81
Setting Up Functions from Menus ........................................................................ 84
How to Use Menus ......................................................................................................... 84
Setting Display Status .......................................................................................... 88
Selecting a Screen Mode (1).......................................................................................... 88
Selecting a Screen Mode (2).......................................................................................... 88
Selecting a Screen Mode (3).......................................................................................... 89
Selecting an Input Signal Type (1) ................................................................................. 89
Selecting an Input Signal Type (2) ................................................................................. 90
Selecting an Input Signal Type (3) ................................................................................. 90
Adjusting the Total Number of Dots ............................................................................... 91
Adjusting the Tracking ................................................................................................... 91
Adjusting the Horizontal Position.................................................................................... 92
Adjusting the Vertical Position........................................................................................ 92
Adjusting the Number of Horizontal Pixels..................................................................... 93
Adjusting the Number of Vertical Pixels ......................................................................... 93
Performing Progressive Processing ............................................................................... 94
Selecting a Menu Position .............................................................................................. 94
Performing the Ceiling-mounted/Rear Projection........................................................... 95
Correcting the Screen Color........................................................................................... 96
Capturing a Logo to Be Projected.................................................................................. 96
Selecting a Logo Display Position.................................................................................. 97
Displaying a Logo (No signal screen)............................................................................ 97
Displaying a Logo (NO SHOW)...................................................................................... 98
Selecting a Logo at Startup............................................................................................ 98
Selecting Aspect Ratio of the Screen............................................................................. 99
Setting the Image Quality ................................................................................... 100
Selecting an Image Mode ............................................................................................ 100
Adjusting the Brightness .............................................................................................. 101
Adjusting the Contrast.................................................................................................. 101
Adjusting the Sharpness .............................................................................................. 102
Making a Gamma Correction ....................................................................................... 102
Making Color Adjustment (1)........................................................................................ 103
Making Color Adjustment (2)........................................................................................ 103
Making Advanced Color Adjustment (1) ...................................................................... 104
Making Advanced Color Adjustment (2) ...................................................................... 104
Making Advanced Color Adjustment (3) ...................................................................... 105
Reducing the Lamp Brightness.................................................................................... 105
Resetting the Image Settings ....................................................................................... 106
5
�
T
A
B
L
E
O
F
C
O
N
T
E
N
T
S
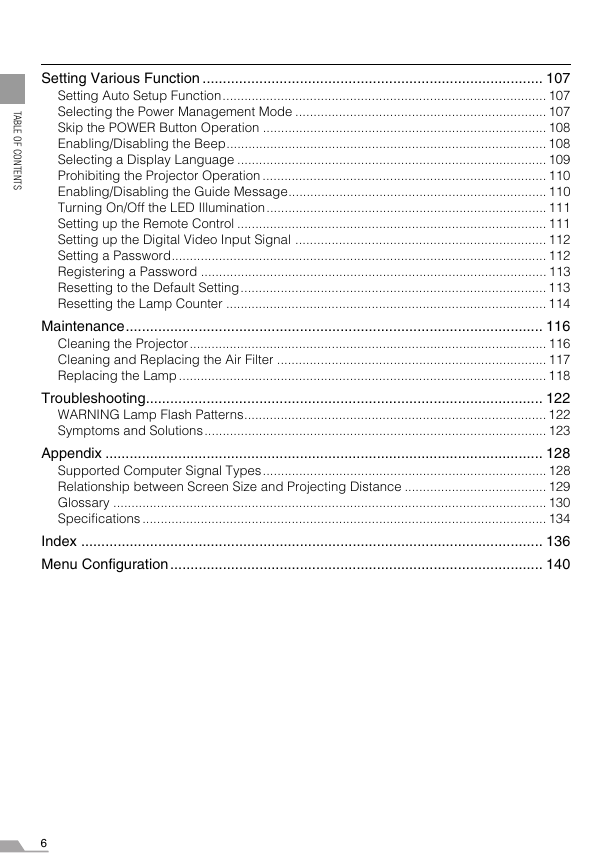
Setting Various Function .................................................................................... 107
Setting Auto Setup Function......................................................................................... 107
Selecting the Power Management Mode ..................................................................... 107
Skip the POWER Button Operation .............................................................................. 108
Enabling/Disabling the Beep........................................................................................ 108
Selecting a Display Language ..................................................................................... 109
Prohibiting the Projector Operation .............................................................................. 110
Enabling/Disabling the Guide Message....................................................................... 110
Turning On/Off the LED Illumination............................................................................. 111
Setting up the Remote Control ..................................................................................... 111
Setting up the Digital Video Input Signal ..................................................................... 112
Setting a Password....................................................................................................... 112
Registering a Password ............................................................................................... 113
Resetting to the Default Setting.................................................................................... 113
Resetting the Lamp Counter ........................................................................................ 114
Maintenance....................................................................................................... 116
Cleaning the Projector.................................................................................................. 116
Cleaning and Replacing the Air Filter .......................................................................... 117
Replacing the Lamp ..................................................................................................... 118
Troubleshooting.................................................................................................. 122
WARNING Lamp Flash Patterns................................................................................... 122
Symptoms and Solutions.............................................................................................. 123
Appendix ............................................................................................................ 128
Supported Computer Signal Types.............................................................................. 128
Relationship between Screen Size and Projecting Distance ....................................... 129
Glossary ....................................................................................................................... 130
Specifications ............................................................................................................... 134
Index .................................................................................................................. 136
Menu Configuration ............................................................................................ 140
6
�
Safety Instructions
Before operating this projector, read this manual thoroughly in order to operate the
projector properly.
This projector offers many convenient features and functions. Operating the projector
properly enables you to manage those features and maintain it in good condition for a long
period.
Improper operation may result in not only reducing the product-life, but also malfunctions,
fire hazards, or other accidents.
If your projector is not operating correctly, read this manual again, check operations and
cable connections, and try the solutions shown in the "Troubleshooting" section at the end
of this booklet. If the problem still persists, contact the service center or the dealer where
you purchased the projector.
S
A
F
E
T
Y
I
N
S
T
R
U
C
T
O
N
S
I
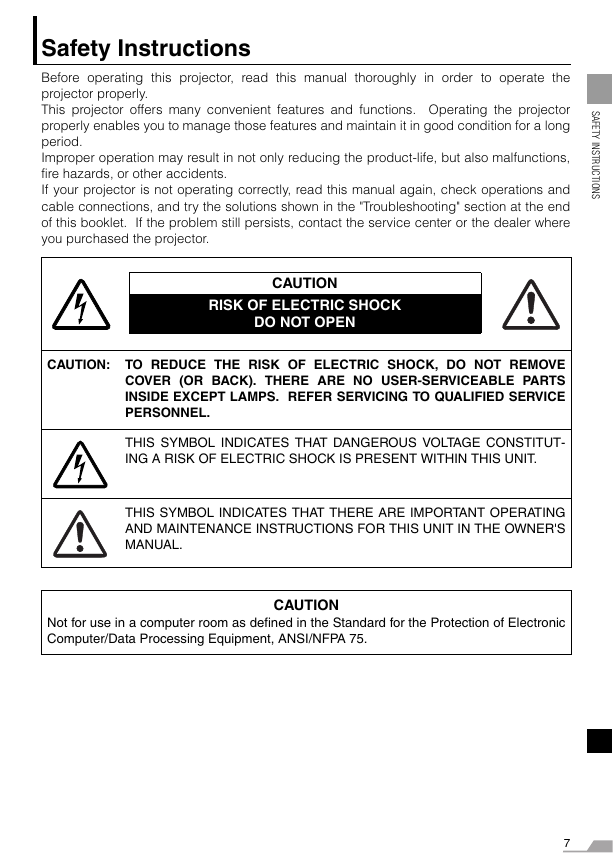
CAUTION
RISK OF ELECTRIC SHOCK
DO NOT OPEN
CAUTION: TO REDUCE THE RISK OF ELECTRIC SHOCK, DO NOT REMOVE
COVER (OR BACK). THERE ARE NO USER-SERVICEABLE PARTS
INSIDE EXCEPT LAMPS. REFER SERVICING TO QUALIFIED SERVICE
PERSONNEL.
THIS SYMBOL INDICATES THAT DANGEROUS VOLTAGE CONSTITUT-
ING A RISK OF ELECTRIC SHOCK IS PRESENT WITHIN THIS UNIT.
THIS SYMBOL INDICATES THAT THERE ARE IMPORTANT OPERATING
AND MAINTENANCE INSTRUCTIONS FOR THIS UNIT IN THE OWNER'S
MANUAL.
Not for use in a computer room as defined in the Standard for the Protection of Electronic
Computer/Data Processing Equipment, ANSI/NFPA 75.
CAUTION
7
�
Safety Precautions
S
A
F
E
T
Y
I
N
S
T
R
U
C
T
O
N
S
I
WARNING: TO REDUCE THE RISK OF FIRE OR ELECTRIC SHOCK, DO NOT EXPOSE
THIS APPLIANCE TO RAIN OR MOISTURE.
This projector projects intense light from the projection lens. Do not stare directly into
the lens if possible, as doing so may result in eye damage. Be especially careful that
children do not stare directly into the beam.
Install the projector in an appropriate position.
Installing the projector in an inappropriate position may result in a fire hazard.
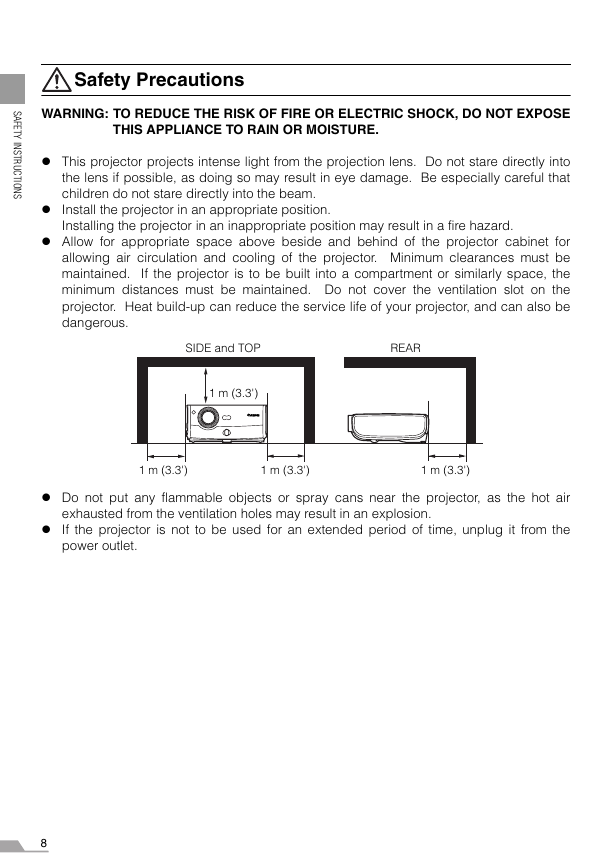
Allow for appropriate space above beside and behind of the projector cabinet for
allowing air circulation and cooling of the projector. Minimum clearances must be
maintained. If the projector is to be built into a compartment or similarly space, the
minimum distances must be maintained. Do not cover the ventilation slot on the
projector. Heat build-up can reduce the service life of your projector, and can also be
dangerous.
SIDE and TOP
REAR
1 m (3.3')
1 m (3.3')
1 m (3.3')
1 m (3.3')
Do not put any flammable objects or spray cans near the projector, as the hot air
exhausted from the ventilation holes may result in an explosion.
If the projector is not to be used for an extended period of time, unplug it from the
power outlet.
8
�




 2023年江西萍乡中考道德与法治真题及答案.doc
 2012年重庆南川中考生物真题及答案.doc
 2013年江西师范大学地理学综合及文艺理论基础考研真题.doc
 2020年四川甘孜小升初语文真题及答案I卷.doc
 2020年注册岩土工程师专业基础考试真题及答案.doc
 2023-2024学年福建省厦门市九年级上学期数学月考试题及答案.doc
 2021-2022学年辽宁省沈阳市大东区九年级上学期语文期末试题及答案.doc
 2022-2023学年北京东城区初三第一学期物理期末试卷及答案.doc
 2018上半年江西教师资格初中地理学科知识与教学能力真题及答案.doc
 2012年河北国家公务员申论考试真题及答案-省级.doc
 2020-2021学年江苏省扬州市江都区邵樊片九年级上学期数学第一次质量检测试题及答案.doc
 2022下半年黑龙江教师资格证中学综合素质真题及答案.doc