English
Safety Notice
FCC Compliance Statement
Getting Started
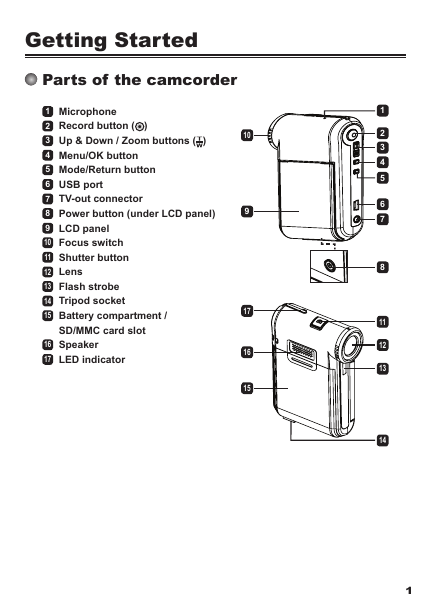
Parts of the camcorder
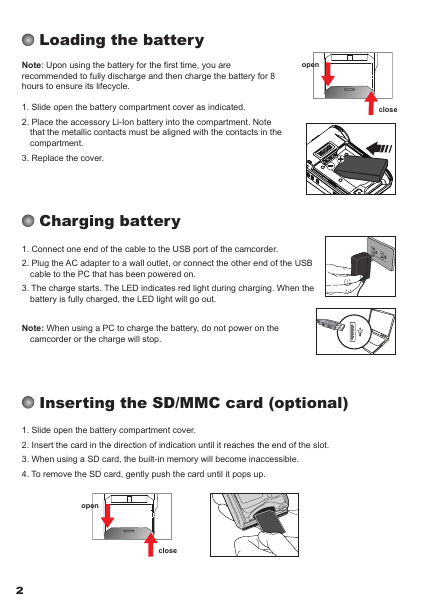
Loading the battery
Charging battery
Inserting the SD/MMC card (optional)
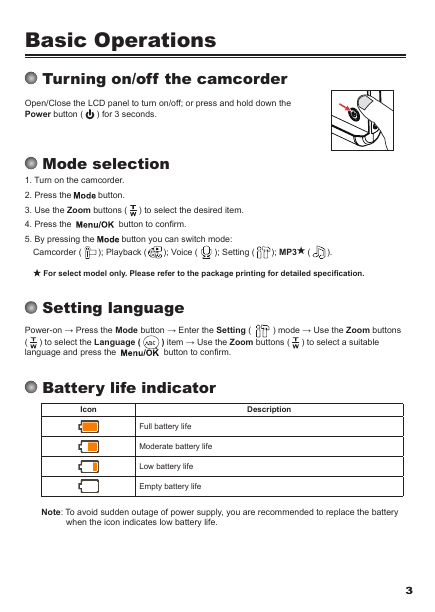
Basic Operations
Turning on/off the camcorder
Setting language
Mode selection
Battery life indicator
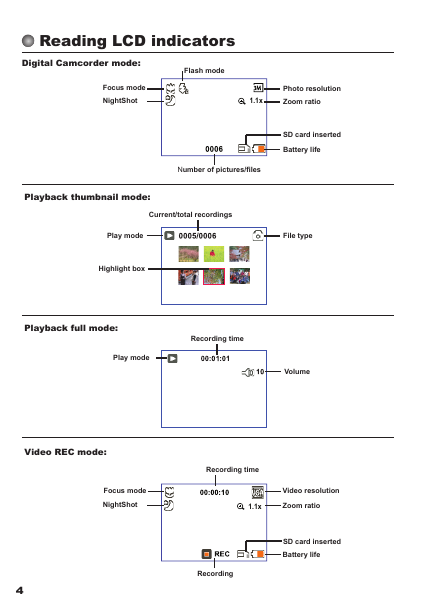
Reading LCD indicators
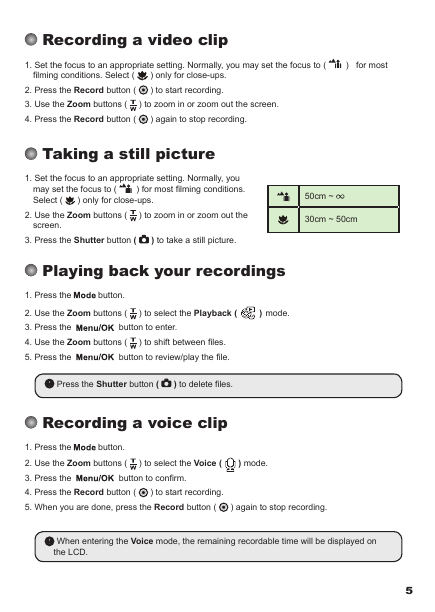
Recording a video clip
Taking a still picture
Playing back your recordings
Recording a voice clip
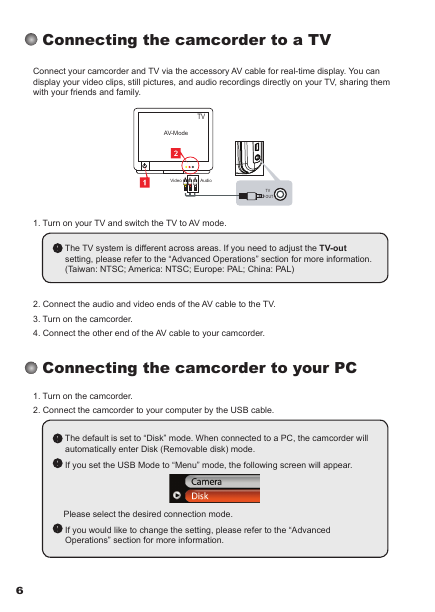
Connecting the camcorder to a TV
Connecting the camcorder to your PC
Playing MP3 music ( * )
Advanced Operations
Using menu
Menu items in Camcorder mode (1)
Menu items in Camcorder mode (2)
Menu items in Playback mode
Menu items in Setting mode (1)
Menu items in Setting mode (2)
Advanced Instructions
Connecting to PC
Using PC Camera
Appendix
Deutsch
Sicherheitshinweise
Erste Schritte
Die Komponenten des Camcorders
Einlegen des Akkus
Aufladen des Akkus
Einstecken der SD-/MMC-Karte (optional)
Grundfunktionen
Ein-/Ausschalten des Camcorders
Moduswahl
Einstellen der Sprache
Akkuladestandanzeige
Ablesen der LCD-Anzeigen
Aufzeichnen eines Videoclips
Aufnehmen eines Fotos
Wiedergeben der Aufzeichnungen
Aufzeichnen eines Audioclips
Anschließen des Camcorders an einen Fernseher
Anschließen des Camcorders an einen PC
Wiedergabe von MP3-Musik
Erweiterte Funktionen
Verwenden des Menüs
Menüelemente im Camcordermodus (1)
Menüelemente im Camcordermodus (2)
Menüelemente im Wiedergabemodus
Menüelemente im Einstellungsmodus (1)
Menüelemente im Einstellungsmodus (2)
Weitere Anweisungen
Anschließen an einen PC
Verwenden als PC-Kamera
Anhang
Français
Instructions de sécurité
Démarrage
Les pièces du caméscope
Installer la batterie
Charger la batterie
Insertion d’une carte SD/MMC (en option)
Utilisation de base
Allumer / éteindre le caméscope
Choix du mode
Régler la langue
Indicateur de niveau des piles
Lire les indicateurs LCD
Enregistrer un clip vidéo
Prendre une photo
Lire vos enregistrements
Enregistrement d’un clip audio
Relier le caméscope à un téléviseur
Connexion du caméscope à votre PC
Playing MP3 music
Utilisation avancée
Utilisation du Menu
Les éléments de menu du mode Caméscope (1)
Les éléments de menu du mode Caméscope (2)
Les éléments de menu du mode Lecture
Les éléments de menu du mode Réglages (1)
Les éléments de menu du mode Réglages (2)
Instructions avancées
Relier à un PC
Utilisation de la PC Caméra
Appendice
Italiano
Avviso per la sicurezza
Preparazione
Parti della videocamera
Inserimento della batteria
Caricamento della batteria
Inserimento della scheda SD/MMC (opzionale)
Operazioni di base
Accendere e spegnere la videocamera
Selezione modalità
Impostazione della lingua
Indicatore di carica della batteria
Lettura degli indicatori del display LCD
Registrazione di una sequenza video
Fotografare
Riproduzione delle registrazioni
Registrazione di una sequenza audio
Collegamento della videocamera al televisore
Collegamento della videocamera al PC
Riproduzione di musica MP3
Operazioni avanzate
Uso del menu
Voci del menu in modalità Videocamera (1)
Voci del menu in modalità Videocamera (2)
Voci del menu in modalità Riproduzione
Voci del menu in modalità Impostazione (1)
Voci del menu in modalità Impostazione (2)
Istruzioni avanzate
Collegamento al PC
Uso della funzione PC Webcam
Appendice
Español
Aviso de seguridad
Procedimientos iniciales
Partes de la videocámara
Insertar la batería
Cargar la batería
Insertar una tarjeta de memoria SD/MMC (opcional)
Funcionamiento básico
Encender y apagar la videocámara
Seleccionar el modo
Establecer el idioma
Indicador de carga de las pilas
Leer los indicadores LCD
Grabar un clip de vídeo
Capturar una imagen estática
Reproducir las grabaciones
Grabar un clip de voz
Conectar la videocámara a un televisor
Conectar la videocámara a su PC
Reproducir música MP3
Funcionamiento avanzado
Usar el menú
Elementos de menú en el modo Videocámara (1)
Elementos de menú en el modo Videocámara (2)
Elementos de menú en el modo Reproducción
Elementos de menú en el modo Configuración (1)
Elementos de menú en el modo Configuración (2)
Instrucciones avanzadas
Establecer conexión con su PC
Utilizar la cámara de PC
Apéndice
Nederlands
Veiligheidsrichtlijnen
Aan de slag
Onderdelen van de camcorder
De batterij plaatsen
De batterij opladen
De SD/MMC-kaart plaatsen (optioneel)
Basisbediening
De camcorder in-/uitschakelen
Modus selectie
De taal instellen
Indicator levensduur batterij
LCD-indicators aflezen
Een videoclip opnemen
Een foto maken
Uw opnamen afspelen
Een spraakopname maken
De camcorder aansluiten op een tv
De camcorder aansluiten op uw pc
MP3-muziek afspelen
Geavanceerde bewerkingen
Het menu gebruiken
Menu-items in de camcordermodus (1)
Menu-items in de camcordermodus (2)
Menu-items in de weergavemodus
Menu-items in de Instellingsmodus (1)
Menu-items in de Instellingsmodus (2)
Geavanceerde instructies
Aansluiten op de pc
De PC-camera gebruiken
Bijlage
Português
Normas de segurança
Introdução
Partes da câmara
Introduzir a bateria
Carregar a bateria
Introdução do cartão de memória SD/MMC (opcional)
Operações básicas
Ligar/desligar a câmara
Modo selecção
Definição do idioma
Indicador de carga da bateria
Significado dos ícones apresentados no ecrã LCD
Gravação de um clip de vídeo
Tirar fotografias
Reprodução das suas gravações
Gravação de um ficheiro de voz
Ligação da câmara a um televisor
Ligação da câmara ao PC
Reprodução de música MP3
Operações avançadas
Utilização do menu
Itens do menu no modo Câmara de vídeo (1)
Itens do menu no modo Câmara de vídeo (2)
Itens do menu no modo Reprodução
Itens do menu no modo Definição (1)
Itens do menu no modo Definição (2)
Instruções Avançadas
Ligação ao PC
Utilização da função PC Camera
Apêndice
Polski
Uwaga dotycząca bezpieczeństwa
Wprowadzenie
Części kamery
Wkładanie baterii
Ładowanie baterii
Wkładanie karty SD/MMC (opcjonalna)
Podstawowe czynności
Włączanie/wyłączanie kamery
Wybór trybu
Ustawianie języka
Wskaźnik naładowania baterii
Odczytywanie wskaźników panelu LCD
Nagrywanie klipu wideo
Wykonywanie zdjęcia
Odtwarzanie nagrań
Nagrywanie klipu głosowego
Podłączanie kamery do telewizora
Podłączanie kamery do komputera
Odtwarzanie plików muzycznych MP3
Czynności zaawansowane
Używanie menu
Elementy menu w trybie kamery (1)
Elementy menu w trybie kamery (2)
Elementy menu w trybie odtwarzania
Elementy menu w trybie ustawień (1)
Elementy menu w trybie ustawień (2)
Instrukcje zaawansowane
Podłączanie do komputera
Używanie kamery komputerowej
Dodatek
Русский
Памятка по технике безопасности
Подготовка к эксплуатации
Внешний вид камеры и элементы управления
Установка батареи
Зарядка батареи
Установка карты памяти SD или MMC (не входит в комплект поставки)
Основные операции
Включение и выключение видеокамеры
Выбор режима
Выбор языка
Индикатор заряда батареи
Сообщения, отображаемые на ЖК-индикаторе
Запись видеороликов
Фотосъемка
Воспроизведение записей и просмотр снимков
Запись голоса
Подключение видеокамеры к телевизору
Подключение видеокамеры к ПК
Воспроизведение музыки в формате MP3
Дополнительные операции
Использование меню
Пункты меню в режиме видеокамеры (1)
Пункты меню в режиме видеокамеры (2)
Пункты меню в режиме воспроизведения
Пункты меню в режиме настройки (1)
Пункты меню в режиме настройки (2)
Дополнительные инструкции
Подключение к ПК
Использование функции веб-камеры
Приложение
繁體中文
注意事項
準備事項
攝影機各部名稱
安裝電池
電池充電
插入SD/MMC記憶卡(選購)
基本操作
開啟/關閉攝影機電源
模式選擇
設定系統語言
電池圖示對照表
操作畫面圖示
攝錄動態影像
拍照
瀏覽功能
錄音
攝影機與電視連線輸出
將攝影機連結至電腦
播放MP3音樂
進階設定
使用選單
攝影機模式的選單項目(1)
攝影機模式的選單項目(2)
播放模式的選單項目
系統設定模式的選單項目(1)
系統設定模式的選單項目(2)
進階指示說明
連接 PC
使用PC Camera
附錄
簡体中文
安全注意事项
准备使用
摄像机部件
安装电池
电池充电
插入SD/MMC卡(选配件)
基本操作
打开/关闭摄像机电源
模式选择
设置语言
电池电量图示
操作画面图示
录制视频剪辑
拍摄静态照片
播放录制内容
录制语音剪辑
将摄像机连接到电视
将摄像机连接到计算机
播放MP3音乐
高级操作
使用菜单
摄像机模式下的菜单项目(1)
摄像机模式下的菜单项目 (2)
播放模式下的菜单项目
设置模式下的菜单项目 (1)
设置模式下的菜单项目 (2)
高级使用说明
连接到计算机
使用计算机相机
附录
日本語
安全にお使いいただくために
始めましょう
ビデオカメラの各部の名称
電池の取り付け
電池の充電
SD/MMC カード(オプション)を挿入する
基本操作
ビデオカメラをOn/Offにする
モード選択
言語を設定する
電池残量インジケータ
LCD インジケータの意味
ビデオクリップを録画する
写真を撮影する
録画を再生する
音声クリップを録音する
ビデオカメラをテレビに接続する
MP3 ミュージックの再生
アドバンスド操作
メニューを使う
ビデオカメラモードのメニュー項目(1)
ビデオカメラモードのメニュー項目(2)
再生モードのメニュー項目
設定モードのメニュー項目(1)
設定モードのメニュー項目(2)
アドバンスド操作について
PC に接続する
PC カメラを使用する
付録
한국어
안전 주의사항
시작하기
캠코더 각부 명칭
전지 장착하기
전지 충전하기
SD/MMC 카드(선택 사항) 삽입하기
기본 조작
캠코더 켜기/끄기
모드 선택
언어 설정하기
전지 수명 표시기
LCD 표시기 읽기
비디오 클립 기록하기
정지 사진 촬영하기
기록물 재생하기
음성 클립 기록하기
TV에 캠코더 연결하기
PC에 캠코더 연결하기
MP3 음악 재생하기
고급 조작
메뉴 사용하기
촬영 모드의 메뉴 항목(1)
촬영 모드의 메뉴 항목(2)
재생 모드의 메뉴 항목
설정 모드의 메뉴 항목(1)
설정 모드의 메뉴 항목(2)
고급 설명서
PC에 연결하기
PC 카메라 사용하기
부록
ไทย
ประกาศเพื่อความปลอดภัย
เริ่มต้นการใช้งาน
ส่วนต่างๆ ของกล้องถ่ายวิดีโอ
การใส่แบตเตอรี่
การชาร์จแบตเตอรี่
การใส่ SD/MMC การ์ด (ใส่หรือไม่ก็ได้)
การทำงานพื้นฐาน
การเปิด/ปิดกล้องถ่ายวิดีโอ
การเลือกโหมด
การตั้งภาษา
ตัวแสดงสถานะอายุแบตเตอรี่
การอ่านตัวแสดงสถานะบน LCD
การบันทึกวิดีโอคลิป
การถ่ายภาพนิ่ง
การเล่นสิ่งที่คุณบันทึก
การบันทึกคลิปเสียง
การเชื่อมต่อกล้องถ่ายวิดีโอไปยัง TV
การเชื่อมต่อกล้องถ่ายวิดีโอไปยังพีซีของคุณ
การเล่นเพลง MP3
การทำงานชั้นสูง
การใช้เมนู
รายการเมนในูโหมดกล้องถ่ายวิดีโอ (1)
รายการเมนูในโหมดกล้องถ่ายวิดีโอ (2)
รายการเมนูในโหมดดูข้อมูล
รายการเมนูในโหมดตั้งค่าใช้งาน (1)
รายการเมนูในโหมดตั้งค่าใช้งาน (2)
ขั้นตอนขั้นสูง
การเชื่อมต่อไปยังพีซี
การใช้กล้องพีซี
ภาคผนวก
العربية
بدء التشغيل
أجزاء الكاميرا الرقمية التلفزيونية المسجلة
تركيب البطارية
شحن البطارية
(اختياري) SD/MMC تركيب بط
العمليات الأساسية
تشغيل/إيقاف الكاميرا
اختيار الوضع
ضبط اللغة
مؤشر عمر البطارية
(LCD) قراءة مؤشرات
تسجيل مقطع فيديو
التقاط صورة ساكنة
تشغيل التسجيلات
تسجيل مقطع صوتي
توصيل الكاميرا التلفزيونية المسجلة بجهاز تلفزيون
توصيل الكاميرا التلفزيونية المسجلة بجهاز كمبيوتر
MPتشغيل ملفات الموسيقى3
عمليات التشغيل المتقدمة
استخدام القائمة
عناصر القائمة في وضع الكاميرا
عناصر القائمة في وضع الكاميرا
عناصر القائمة في وضع التشغيل
عناصر القائمة في وضع الإعداد
عناصر القائمة في وضع الإعداد
تعليمات متقدمة
التوصيل بالكمبيوتر
استخدام كاميرا الكمبيوتر
الملحق
Português do Brasil
Observações de segurança
Primeiros passos
Componentes da filmadora
Instalação da bateria
Carga da bateria
Instalação do cartão SD/MMC (opcional)
Operações básicas
Ligar e desligar a filmadora
Seleção de modo
Configuração do idioma
Indicador de carga da bateria
Leitura dos indicadores do LCD
Gravação de um videoclipe
Tirar uma foto estática
Reprodução das gravações
Gravação de um videoclipes
Conexão da filmadora a uma TV
Conexão da filmadora ao PC
Reprodução de música MP3
Operações avançadas
Uso o menu
Itens do menu no modo Filmadora (1)
Itens do menu no modo Filmadora (2)
Itens do menu para o modo Reprodução
Itens do menu no modo Configuração (1)
Itens do menu no modo Configuração (2)
Instruções avançadas
Conexão ao PC
Uso da câmera PC
Apêndice
TÜRKÇE
Güvenlik Yönergeleri
Başlarken
Video kameranın parçaları
Pili takılması
Pili doldurma
SD/MMC kartının takılması (isteğe bağlı)
Temel Işlemler
Video kameranın açılması/kapatılması
Mod seçimi
Dil ayarı
Pil ömrü göstergesi
LCD göstergelerin okunması
Video klip kaydetme
Harketsiz resim çekme
Kayıtlarınızı oynatma
Ses klibi kaydetme
Video kamerayı TV’ye bağlama
Video kamerayı PC’nize bağlama
MP3 müziği çalma
Ileri Düzey Işlemler
Menüyü kullanma
Video kamera modunda bulunan menü öğeleri (1)
Video kamera modunda bulunan menü öğeleri (2)
Oynatma modunda bulunan menü öğeleri
Ayar modunda bulunan menü öğeleri (1)
Ayar modunda bulunan menü öğeleri (2)
Gelişmiş Yönergeler
PC’ye Bağlama
PC Kamerayı Kullanma
Ek


 2023年江西萍乡中考道德与法治真题及答案.doc
 2012年重庆南川中考生物真题及答案.doc
 2013年江西师范大学地理学综合及文艺理论基础考研真题.doc
 2020年四川甘孜小升初语文真题及答案I卷.doc
 2020年注册岩土工程师专业基础考试真题及答案.doc
 2023-2024学年福建省厦门市九年级上学期数学月考试题及答案.doc
 2021-2022学年辽宁省沈阳市大东区九年级上学期语文期末试题及答案.doc
 2022-2023学年北京东城区初三第一学期物理期末试卷及答案.doc
 2018上半年江西教师资格初中地理学科知识与教学能力真题及答案.doc
 2012年河北国家公务员申论考试真题及答案-省级.doc
 2020-2021学年江苏省扬州市江都区邵樊片九年级上学期数学第一次质量检测试题及答案.doc
 2022下半年黑龙江教师资格证中学综合素质真题及答案.doc