English
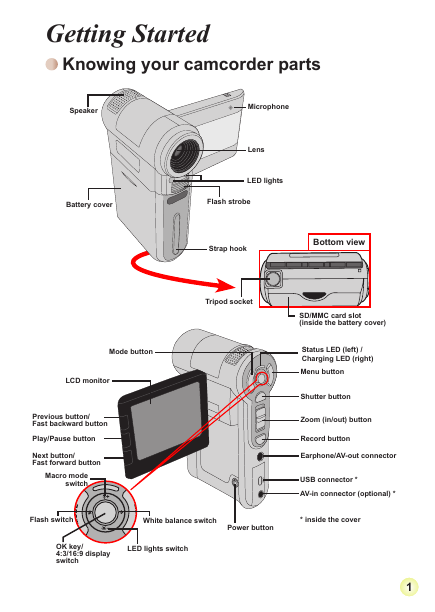
Getting Started
Knowing your camcorder parts
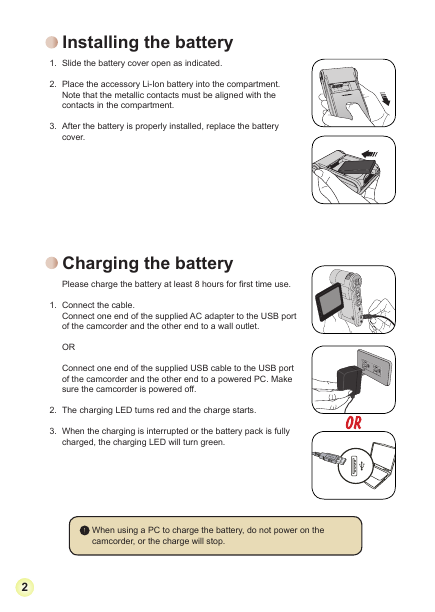
Installing the battery
Charging the battery
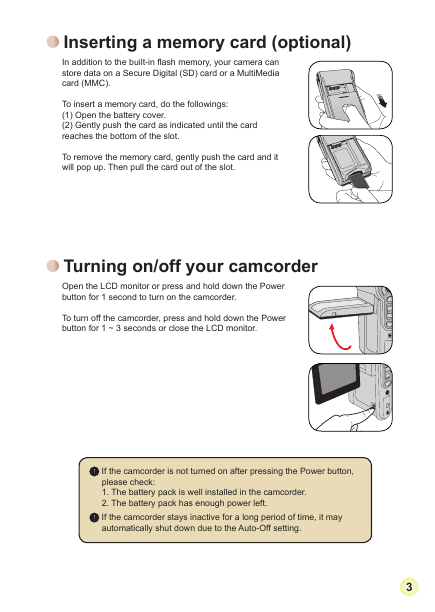
Inserting a memory card (optional)
Turning on/off your camcorder
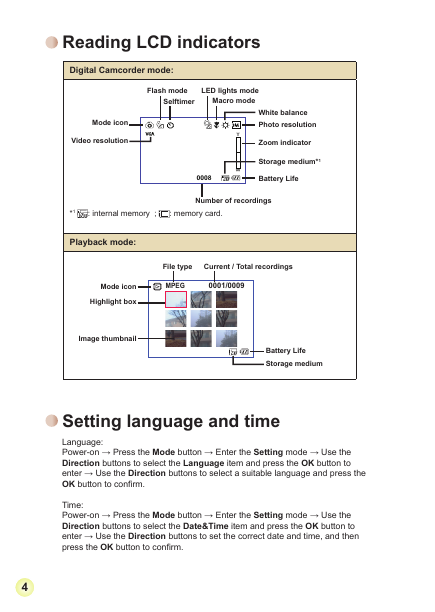
Reading LCD indicators
Setting language and time
Basic Operations
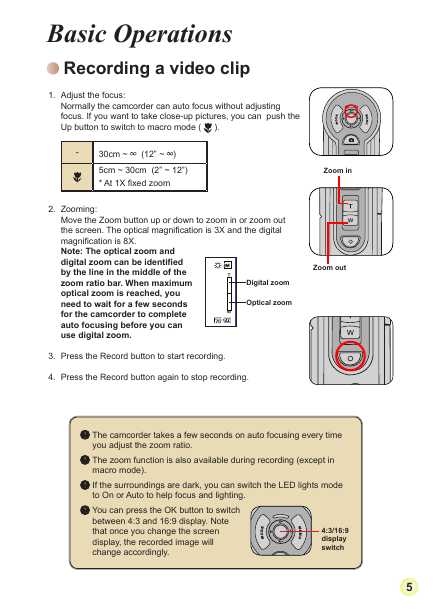
Recording a video clip
Taking a still picture
Recording a voice clip
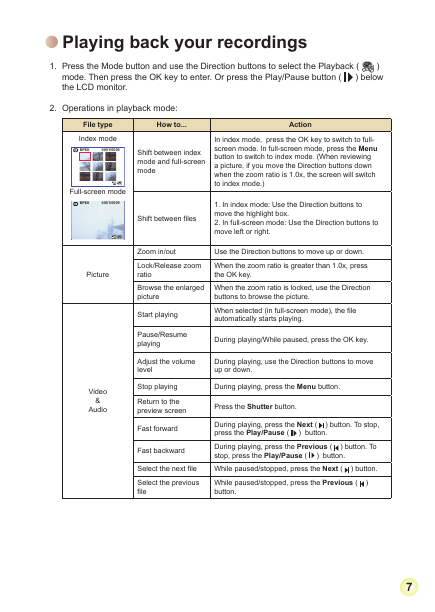
Playing back your recordings
Connecting the camcorder to a TV
Advanced Operations
Menu operation
Menu items in Camera mode
Menu items in Camera mode (continued)
Menu items in Playback mode
Menu items in Voice mode
Menu items in Setting mode
Menu items in Setting mode (continued)
Battery Life Indicator
Battery Life
Storage Capacity
Advanced Instructions
Copying files to Your PC
Installing the driver to your PC
Connecting the camcorder to your PC
File location
Appendix: A
Troubleshooting
System Message
Appendix: B
Instruction for ArcSoft MediaConverter™
Appendix: C
System Requirements
Deutsch
Erste Schritte
Kennenlernen der Camcorderteile
Einlegen der Batterie
Laden der Batterie
Einlegen einer Speicherkarte (optional)
Ein-/Ausschalten des Camcorders
Lesen der LCD-Anzeigen
Einstellen der Sprache und der Zeit
Grundfunktionen
Aufzeichnen von Videos
Aufnehmen von Fotos
Aufzeichnen von Sprachdateien
Wiedergeben Ihrer Aufzeichnungen
Anschließen des Camcorders an einen Fernseher
Erweiterte Funktionen
Menübedienung
Menüpunkte im Kameramodus
Menüpunkte im Kameramodus (Fortsetzung)
Menüpunkte im Wiedergabemodus
Menüpunkte im Sprachaufzeichnungs-modus
Menüpunkte im Einstellungsmodus
Menüpunkte im Einstellungsmodus (Fortsetzung)
Batterieladestandanzeige
Batterieladestand
Speicherkapazität
Erweiterte Anweisungen
Kopieren von Dateien auf Ihren PC
Installieren des Treibers auf dem PC
Anschließen des Camcorders an einen PC
Dateipfad
Anhang: A
Problembehebung
Systemmeldungen
Anhang: B
Anweisung für ArcSoft MediaConverter™
Anhang: C
Systemvoraussetzungen
Français
Prise en main
Connaître les parties de votre caméscope
Installer la batterie
Charger la batterie
Insérer une carte mémoire (facultatif)
Allumer/éteindre le caméscope
Lire les indicateurs LCD
Réglage de langue et de l’heure
Utilisation de base
Enregistrer un clip vidéo
Prendre une photo
Enregistrer une séquence vocale
Lire vos enregistrements
Relier le caméscope à un téléviseur
Utilisation avancée
Utilisation du menu
Les éléments de menu du mode caméra
Les éléments de menu du mode caméra (suite)
Les éléments de menu du mode Lecture
Les éléments de menu du mode d’enregistrement vocal
Les éléments de menu du mode réglage
Les éléments de menu du mode réglage (suite)
Indicateur d’autonomie batterie
Autonomie batterie
Capacité de stockage
Instructions avancées
Copier des fichiers vers votre PC
Installer le pilote sur votre PC
Branchement du caméscope sur votre PC
Emplacement des fichiers
Annexe: A
Dépannage
Messages système
Annexe: B
Instructions pour ArcSoft MediaConverter™
Annexe: C
Configuration système requise
Italiano
Preparazione
Conoscere la parti della videocamera
Inserimento della batteria
Caricamento della batteria
Inserimento di una scheda memoria (optional)
Accendere e spegnere la videocamera
Lettura degli indicatori del display LCD
Impostazione della lingua e dell’ora
Operazioni di base
Registrazione di una sequenza video
Fotografare
Registrazione di una sequenza vocale
Riproduzione delle registrazioni
Collegamento della videocamera al televisore
Operazioni avanzate
Funzionamento dei menu
Voci del menu in modalità Fotocamera
Voci del menu in modalità Fotocamera (segue)
Voci del menu in modalità Riproduzione
Voci del menu in modalità Voce
Voci del menu in modalità Impostazioni
Voci del menu in modalità Impostazioni (segue)
Indicatore di carica della batteria
Durata della batteria
Capacità d’archiviazione
Istruzioni avanzate
Copiare i file sul PC
Installazione del driver sul PC
Collegamento della videocamera al PC
Posizione dei file
Appendice: A
Risoluzione dei problemi
Messaggi del sistema
Appendice: B
Istruzioni per ArcSoft MediaConverter™
Appendice: C
Requisiti del sistema
Español
Procedimientos iniciales
Introducción a las partes de la videocámara
Instalar la batería
Cargar la batería
Insertar una tarjeta de memoria (opcional)
Encender y apagar la videocámara
Leer los indicadores LCD
Establecer el idioma y la hora
Funcionamiento básico
Grabar un clip de vídeo
Capturar una imagen estática
Grabar un clip de voz
Reproducir las grabaciones
Conectar la videocámara a un televisor
Funcionamiento avanzado
Uso de los menús
Elementos de menú en el modo Cámara
Elementos de menú en el modo Cámara (continuación)
Elementos de menú en el modo Reproducción
Elementos de menú en el modo Voz
Elementos de menú en el modo Configuración
Elementos de menú en el modo Configuración (continuación)
Indicador de carga de la batería
Vida de la batería
Capacidad de almacenamiento
Instrucciones avanzadas
Copiar archivos al PC
Instalar el controlador en el PC
Conectar la videocámara a su PC
Ubicación de los archivos
Apéndice: A
Solución de problemas
Mensajes del sistema
Apéndice: B
Instrucciones para la aplicación ArcSoft MediaConverter™
Apéndice: C
Requisitos del sistema
Nederlands
Aan de slag
Kennismaken met de onderdelen van uw camcorder
De batterij plaatsen
De batterij opladen
Een geheugenkaart plaatsen (optioneel)
Uw camera in-/uitschakelen
LCD-indicators aflezen
Taal en tijd instellen
Basisgebruik
Een videoclip opnemen
Een foto maken
Een spraakopname maken
Uw opnamen afspelen
De camcorder aansluiten op een tv
Geavanceerd gebruik
Menugebruik
Menu-items in de camerastand
Menu-items in de camerastand (vervolg)
Menu-items in de weergavemodus
Menu-items in de Spraakopnamemodus
Menu-items in de instellingsstand
Menu-items in de instellingsstand (vervolg)
Indicator levensduur batterij
Levensduur batterij
Opslagcapaciteit
Geavanceerde richtlijnen
Bestanden kopiëren naar uw pc
Het stuurprogramma voor uw pc installeren
De camcorder aansluiten op uw pc
Bestandslocatie
Bijlage: A
Problemen oplossen
Systeembericht
Bijlage: B
Richtlijnen voor ArcSoft MediaConverter™
Bijlage: C
Systeemvereisten
Português
Introdução
Conheça as peças que compõem a sua camcorder
Colocação da bateria
Carregamento da bateria
Introdução de um cartão de memória (opcional)
Ligar/desligar a camcorder
Significado dos ícones apresentados no ecrã LCD
Definição do idioma e da hora
Operações básicas
Gravação de um clip de vídeo
Tirar fotografias
Gravação de um clip de voz
Reprodução das suas gravações
Ligação da camcorder a um televisor
Operações avançadas
Operações do menu
Itens do menu no modo Câmara
Itens do menu no modo Câmara (Continuação)
Itens do menu no modo Reproduzir
Itens do menu no modo Grav. Voz
Itens do menu no modo Definição
Itens do menu no modo Definição (continuação)
Indicador de carga da bateria
Duração da bateria
Capacidade de armazenamento
Instruções avançadas
Copiar ficheiros para o PC
Instalação do controlador no PC
Ligação da camcorder ao PC
Localização dos ficheiros
Apêndice: A
Resolução de problemas
Mensagens do sistema
Apêndice: B
Instruções para o ArcSoft MediaConverter™
Apêndice: C
Requisitos do sistema
Svenska
Komma igång
Lär känna kamerans delar
Sätta i batteri
Ladda batteriet
Sätta i ett minneskort (tillval)
Sätta på/stänga av kameran
Avläsa LCD-indikatorer
Ställa in språk och tid
Grundläggande användning
Spela in ett videoklipp
Ta stillbilder
Spela in ett röstklipp
Spela upp dina inspelningar
Ansluta kameran till en TV
Avancerad användning
Menyfunktioner
Menyposter i kameraläge
Menyposter i kameraläge (forts.)
Menyposter i uppspelningsläge
Menyposter i röstläge
Menyposter i inställningsläge
Menyposter i inställningsläge (forts.)
Indikator för batterilivslängd
Batteriets livslängd
Lagringskapacitet
Avancerade anvisningar
Kopiera filer till PC
Installera drivrutinen i din PC
Ansluta kameran till datorn
Filplacering
Bilagor: A
Felsökning
Systemmeddelande
Bilagor: B
Instruktion för ArcSoft MediaConverter™
Bilagor: C
Systemkrav
Русский
Подготовка к эксплуатации
Детали видеокамеры
Установка батареи
Зарядка батареи
Установка карты памяти (не входит в комплект поставки)
Включение и выключение видеокамеры
Значения индикаторов ЖК-дисплея
Установка времени и языка
Основные операции
Видеосъемка
Фотосъемка
Аудиозапись
Воспроизведение записей и просмотр снимков
Подключение видеокамеры к телевизору
Дополнительные операции
Операции с меню
Пункты меню в режиме «Фотокамера»
Пункты меню в режиме «Фотокамера»(продолжение)
Пункты меню в режиме «Просмотр»
Пункты меню в режиме «Диктофон»
Пункты меню в режиме «Настройка»
Пункты меню в режиме «Настройка»(продолжение)
Индикатор зарядки батареи
Время работы батареи
Емкость носителей
Дополнительные инструкции
Копирование файлов на ПК
Установка драйвера на ПК
Подключение камеры к компьютеру
Расположение файлов
Приложение A
Устранение неполадок
Системные сообщения
Приложение B
Инструкции по использованию ArcSoft MediaConverter™
Приложение C
Системные требования
한국어
시작하기
캠코더 각 부분의 명칭
전지 장착하기
전지 충전하기
메모리 카드(옵션) 끼워넣기
캠코더 켜기/끄기
LCD 표시기 읽기
시간 및 언어 설정하기
기본 조작
비디오 클립 촬영하기
스틸 사진 촬영하기
음성 클립 녹음하기
파일 재생하기
TV에 캠코더 연결하기
고급 조작
메뉴 조작
카메라 모드 메뉴 항목
카메라 모드 메뉴 항목(계속)
재생 모드 메뉴 항목
음성 모드 메뉴 항목
설정 모드 메뉴 항목
설정 모드 메뉴 항목(계속)
전지 용량 표시기
전지 용량
저장 용량
고급 설명서
PC에 파일 복사하기
PC에 드라이버 설치하기
PC에 캠코더 연결하기
파일 위치
부록: A
문제 해결
시스템 메시지
부록: B
ArcSoft MediaConverter™ 사용법
부록: C
시스템 요구 사항
繁體中文
準備事項
攝影機各部名稱
安裝電池
電池充電
插入存儲卡(另購)
打開/關閉攝影機電源
操作介面顯示
設定語言和時間
基本操作
攝影
拍照
錄音
播放您錄製的檔案
將攝影機連接到電視
進階設定
選單操作
攝影模式中的選單項目
攝影模式中的選單項目(續)
播放模式中的選單項目
語音模式中的選單項目
設定模式中的選單項目
設定模式中的選單項目(續)
電池電量圖示
電池使用時間
儲存容量表
進階說明
複製檔案至電腦中 (1)
安裝驅動程式
將攝影機連結至電腦
檔案位置
附錄:A
疑難排解
系統訊息表
附錄:B
ArcSoft MediaConverter�的指示說明
附錄:C
系統要求
簡體中文
准备事项
摄像机各部名称
安装电池
电池充电
插入存储卡(选配件)
打开/关闭摄像机电源
操作画面图示
设置语言和时间
基本操作
录制视频剪辑
拍摄静态照片
录制语音剪辑
播放摄录内容
将摄像机连接到电视
高级操作
菜单操作
摄像拍照模式下的菜单项目
摄像拍照模式下的菜单项目(续)
播放模式下的菜单项目
录音模式下的菜单项目
系统设置模式下的菜单项目
系统设置模式下的菜单项目(续)
电池电量图示
电池使用时间
存储容量
进阶說明
复制档案至计算机中(1)
安装驱动程序
将摄像机连结至计算机
档案位置
附录:A
疑难排解
系统讯息表
附录:B
ArcSoft MediaConverter�的指示说明
附录:C
系统要求



 2023年江西萍乡中考道德与法治真题及答案.doc
 2012年重庆南川中考生物真题及答案.doc
 2013年江西师范大学地理学综合及文艺理论基础考研真题.doc
 2020年四川甘孜小升初语文真题及答案I卷.doc
 2020年注册岩土工程师专业基础考试真题及答案.doc
 2023-2024学年福建省厦门市九年级上学期数学月考试题及答案.doc
 2021-2022学年辽宁省沈阳市大东区九年级上学期语文期末试题及答案.doc
 2022-2023学年北京东城区初三第一学期物理期末试卷及答案.doc
 2018上半年江西教师资格初中地理学科知识与教学能力真题及答案.doc
 2012年河北国家公务员申论考试真题及答案-省级.doc
 2020-2021学年江苏省扬州市江都区邵樊片九年级上学期数学第一次质量检测试题及答案.doc
 2022下半年黑龙江教师资格证中学综合素质真题及答案.doc