Interfacing Gocator 4.x firmware to LabVIEW
1.1
Title:
Revision:
Table of Contents
1 Overview ................................................................................................................................................................. 2
2 Installing the LabVIEW VIs ..................................................................................................................................... 3
2.1 GoSdk.dll and kApi.dll ...................................................................................................................................... 3
3 Setting up the Gocator to Communicate with LabVIEW ......................................................................................... 3
4 Go2Labview Example ............................................................................................................................................. 4
4.1 Structure of the Go2Labview Example ............................................................................................................. 7
4.2 Gocator Result Cluster ..................................................................................................................................... 9
5 Gocator Public VIs ................................................................................................................................................ 10
6 64-Bit LabVIEW .................................................................................................................................................... 11
7 Dual-Sensor System ............................................................................................................................................. 11
8 Wrapping Go SDK Functions ................................................................................................................................ 11
9 Application Builder ................................................................................................................................................ 14
10 Conclusion .......................................................................................................................................................... 16
Page | 1
�
1 Overview
LabVIEW is a comprehensive software package for controlling measurement and control systems. LMI
provides a set of Virtual Instruments (VIs) that can be used to interface LabVIEW with Gocator 2x00
sensors. These VIs can be used to control and stream measurement results, intensity and 3D data (as
individual profiles or whole part scans) into LabVIEW in real-time for processing and control.
This document assumes that LabVIEW is already installed. Users are assumed to be already familiar with
LabVIEW and the Gocator must already be setup to generate profile or whole part data.
Gocator Firmware Release 4.0.0 or later and LabVIEW Version 2010 (32-bit) or later are required.
Page | 2
�
2 Installing the LabVIEW VIs
The LabView VIs are included in the Gocator Integration Tool package (e.g. 14405-
4.x.x.x_SOFTWARE_Go2_Integration_Tools.zip), under the directory Labview. The VIs are structured
into four directories
Directory
\Labview
\Labview\Examples
\Labview\Private
\Labview\Public
Contents
Labview library project files
Example code that illustrate how to use the public VIs to control the Gocators.
Private files, wrapper VIs of Gocator SDK functions.
Gocator Public VIs. Users use these VIs to control and acquire data from the
Gocator
To open the project, click Go2Labview.lvlb. LabVIEW may prompt you for missing GoSdk.dll the first time
you open the project. When prompted, choose the GoSdk.dll in the \Labview\Private folder and continue.
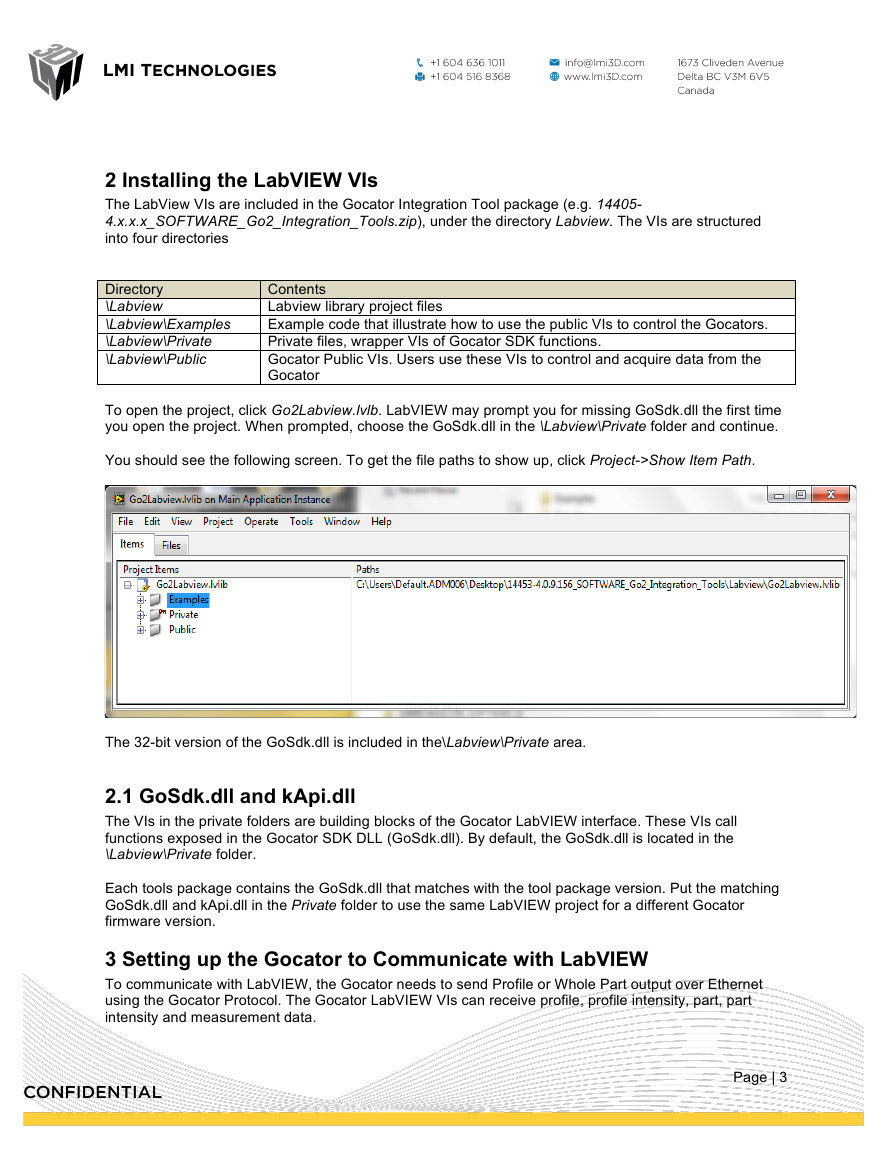
You should see the following screen. To get the file paths to show up, click Project->Show Item Path.
The 32-bit version of the GoSdk.dll is included in the\Labview\Private area.
2.1 GoSdk.dll and kApi.dll
The VIs in the private folders are building blocks of the Gocator LabVIEW interface. These VIs call
functions exposed in the Gocator SDK DLL (GoSdk.dll). By default, the GoSdk.dll is located in the
\Labview\Private folder.
Each tools package contains the GoSdk.dll that matches with the tool package version. Put the matching
GoSdk.dll and kApi.dll in the Private folder to use the same LabVIEW project for a different Gocator
firmware version.
3 Setting up the Gocator to Communicate with LabVIEW
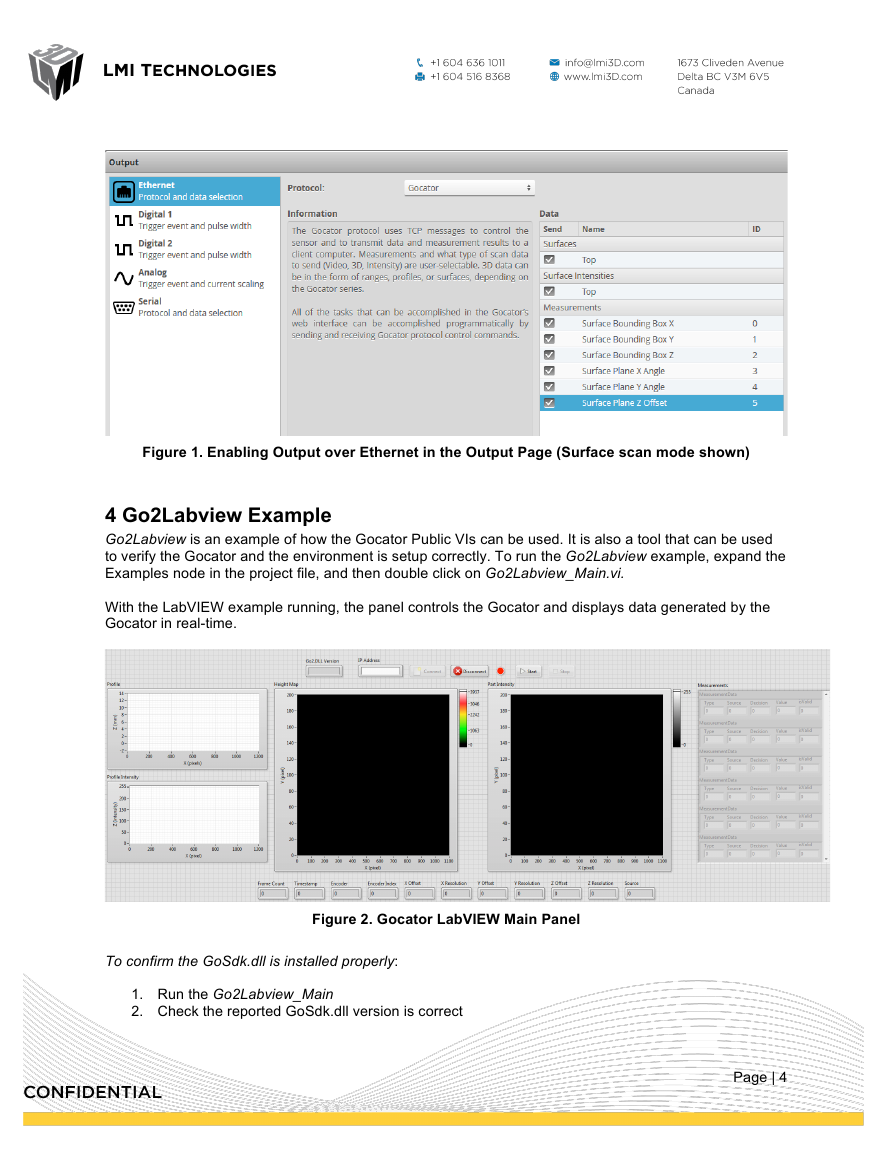
To communicate with LabVIEW, the Gocator needs to send Profile or Whole Part output over Ethernet
using the Gocator Protocol. The Gocator LabVIEW VIs can receive profile, profile intensity, part, part
intensity and measurement data.
Page | 3
�
Figure 1. Enabling Output over Ethernet in the Output Page (Surface scan mode shown)
4 Go2Labview Example
Go2Labview is an example of how the Gocator Public VIs can be used. It is also a tool that can be used
to verify the Gocator and the environment is setup correctly. To run the Go2Labview example, expand the
Examples node in the project file, and then double click on Go2Labview_Main.vi.
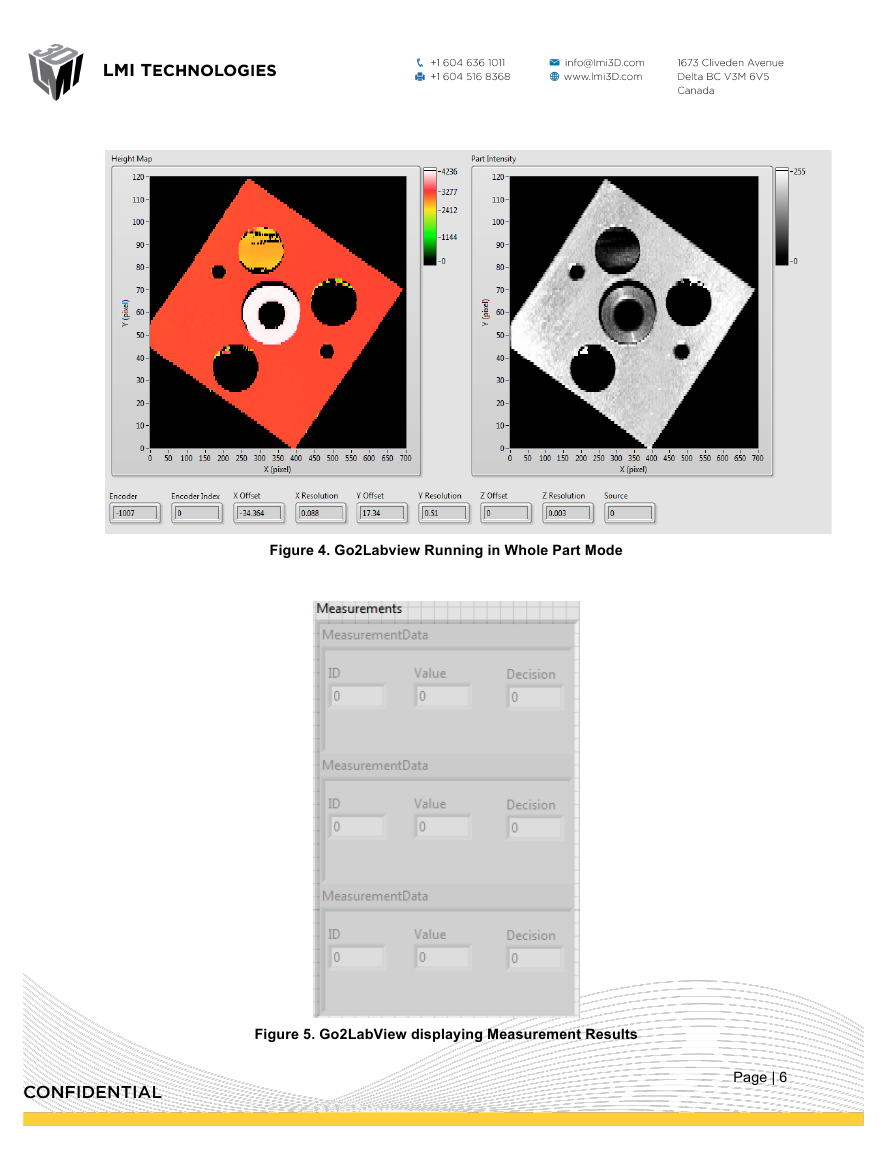
With the LabVIEW example running, the panel controls the Gocator and displays data generated by the
Gocator in real-time.
Figure 2. Gocator LabVIEW Main Panel
To confirm the GoSdk.dll is installed properly:
1. Run the Go2Labview_Main
2. Check the reported GoSdk.dll version is correct
Page | 4
�
To connect to the Gocator and acquire data:
1. Press Connect.
Note: IP address is no longer needed as the GoSystem_Connect call will connect to all available sensors on the network.
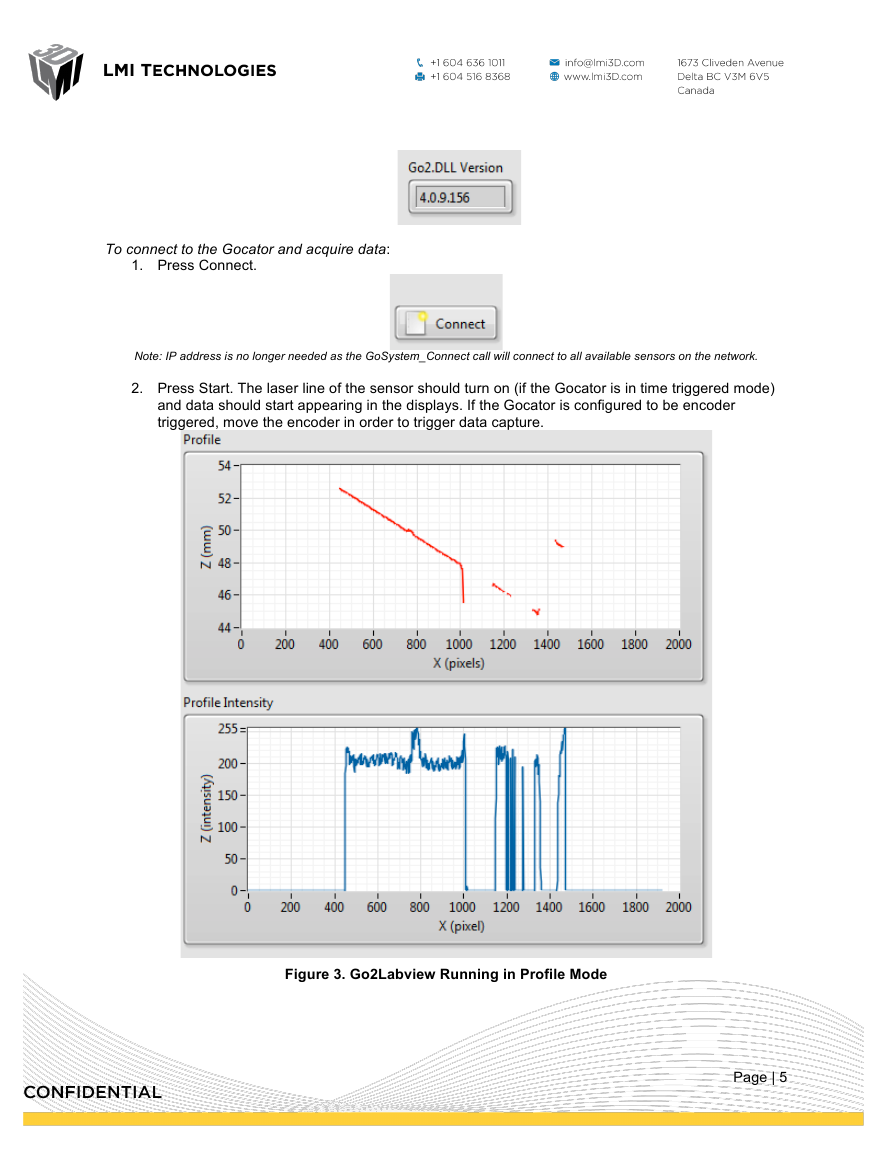
2. Press Start. The laser line of the sensor should turn on (if the Gocator is in time triggered mode)
and data should start appearing in the displays. If the Gocator is configured to be encoder
triggered, move the encoder in order to trigger data capture.
Figure 3. Go2Labview Running in Profile Mode
Page | 5
�
Figure 4. Go2Labview Running in Whole Part Mode
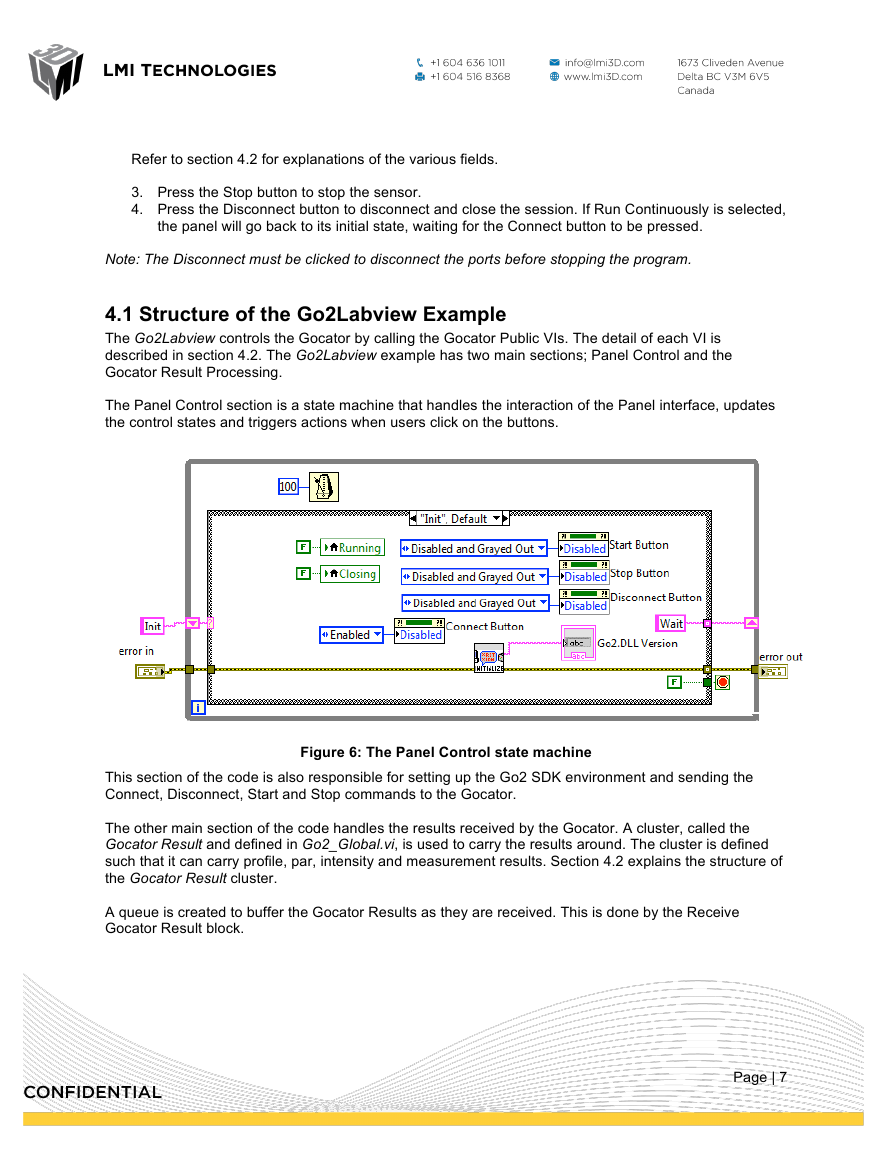
Figure 5. Go2LabView displaying Measurement Results
Page | 6
�
Refer to section 4.2 for explanations of the various fields.
3. Press the Stop button to stop the sensor.
4. Press the Disconnect button to disconnect and close the session. If Run Continuously is selected,
the panel will go back to its initial state, waiting for the Connect button to be pressed.
Note: The Disconnect must be clicked to disconnect the ports before stopping the program.
4.1 Structure of the Go2Labview Example
The Go2Labview controls the Gocator by calling the Gocator Public VIs. The detail of each VI is
described in section 4.2. The Go2Labview example has two main sections; Panel Control and the
Gocator Result Processing.
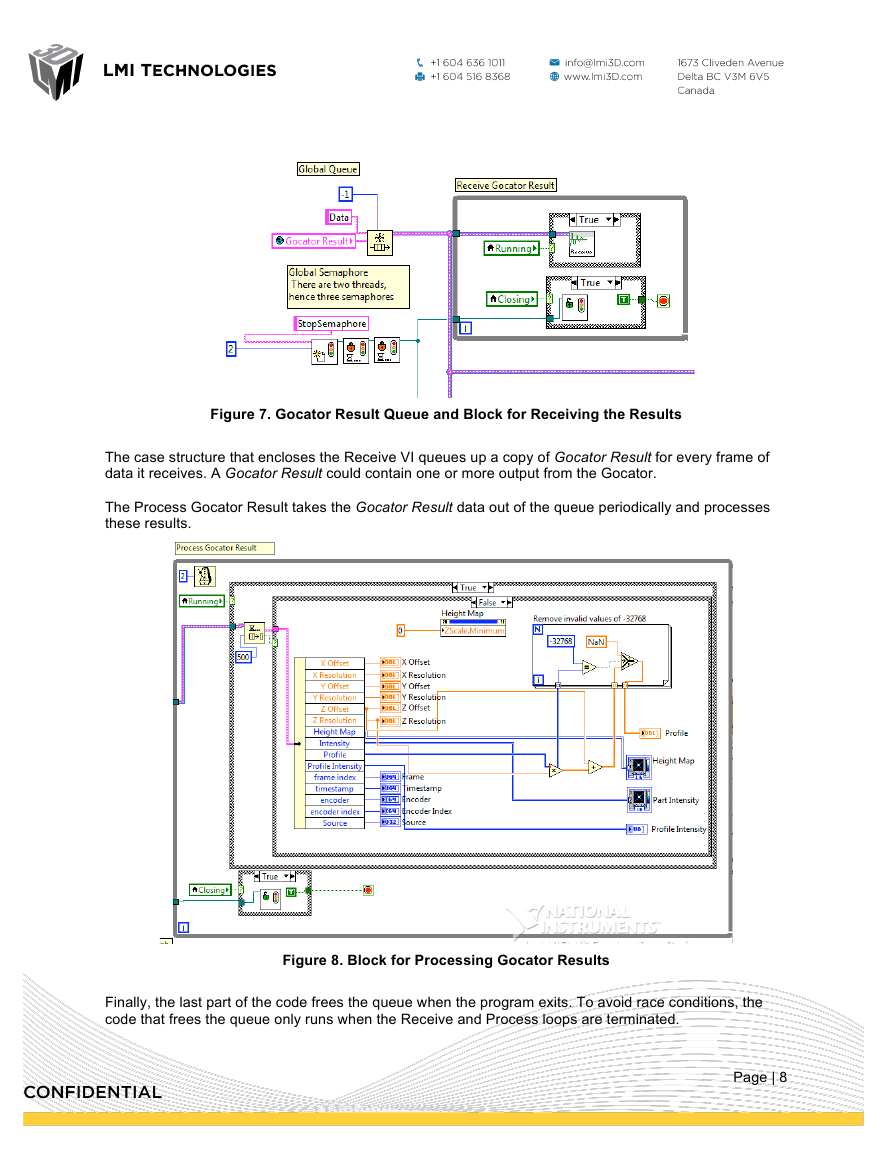
The Panel Control section is a state machine that handles the interaction of the Panel interface, updates
the control states and triggers actions when users click on the buttons.
Figure 6: The Panel Control state machine
This section of the code is also responsible for setting up the Go2 SDK environment and sending the
Connect, Disconnect, Start and Stop commands to the Gocator.
The other main section of the code handles the results received by the Gocator. A cluster, called the
Gocator Result and defined in Go2_Global.vi, is used to carry the results around. The cluster is defined
such that it can carry profile, par, intensity and measurement results. Section 4.2 explains the structure of
the Gocator Result cluster.
A queue is created to buffer the Gocator Results as they are received. This is done by the Receive
Gocator Result block.
Page | 7
�
Figure 7. Gocator Result Queue and Block for Receiving the Results
The case structure that encloses the Receive VI queues up a copy of Gocator Result for every frame of
data it receives. A Gocator Result could contain one or more output from the Gocator.
The Process Gocator Result takes the Gocator Result data out of the queue periodically and processes
these results.
Figure 8. Block for Processing Gocator Results
Finally, the last part of the code frees the queue when the program exits. To avoid race conditions, the
code that frees the queue only runs when the Receive and Process loops are terminated.
Page | 8
�


 2023年江西萍乡中考道德与法治真题及答案.doc
 2012年重庆南川中考生物真题及答案.doc
 2013年江西师范大学地理学综合及文艺理论基础考研真题.doc
 2020年四川甘孜小升初语文真题及答案I卷.doc
 2020年注册岩土工程师专业基础考试真题及答案.doc
 2023-2024学年福建省厦门市九年级上学期数学月考试题及答案.doc
 2021-2022学年辽宁省沈阳市大东区九年级上学期语文期末试题及答案.doc
 2022-2023学年北京东城区初三第一学期物理期末试卷及答案.doc
 2018上半年江西教师资格初中地理学科知识与教学能力真题及答案.doc
 2012年河北国家公务员申论考试真题及答案-省级.doc
 2020-2021学年江苏省扬州市江都区邵樊片九年级上学期数学第一次质量检测试题及答案.doc
 2022下半年黑龙江教师资格证中学综合素质真题及答案.doc