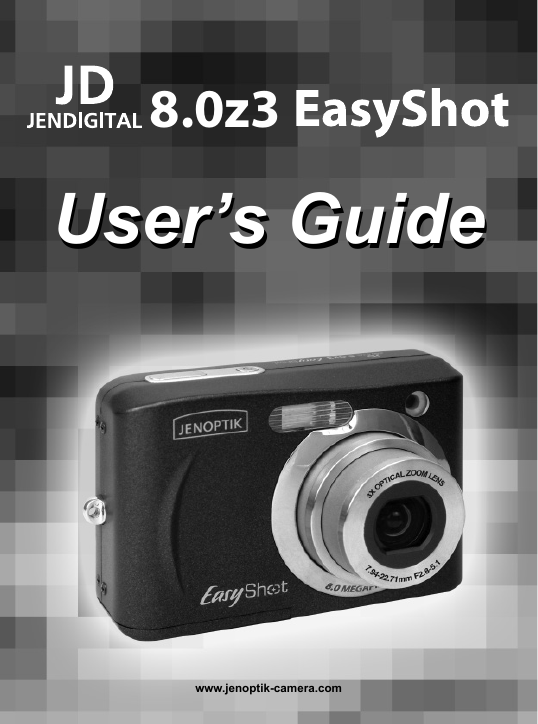
8.0z3
User’s Guide
User’s Guide
www.jenoptik-camera.com
�
ENGLISH
Table of Contents
GETTING STARTED ............................................................................................................3
STANDARD ACCESSORIES ............................................................................................................ 3
Attaching the Wrist Strap ........................................................................................................... 3
Using the Soft Case ................................................................................................................... 4
NAMES OF PARTS ........................................................................................................................... 4
INSERTING THE BATTERIES .......................................................................................................... 5
Low Battery Indicator ................................................................................................................. 5
INSERTING A MEMORY CARD ....................................................................................................... 5
About Camera Memory .............................................................................................................. 6
DCF Protocol ............................................................................................................................. 6
SETTING THE DATE AND TIME ...................................................................................................... 6
BASIC OPERATIONS ..........................................................................................................7
TURNING THE POWER ON AND OFF ............................................................................................ 7
Power Saving Function .............................................................................................................. 7
SWITCHING BETWEEN RECORD AND PLAYBACK ...................................................................... 7
In Record mode ......................................................................................................................... 7
In Playback mode ...................................................................................................................... 7
USING THE MENUS ........................................................................................................................ 8
Recording Menu / Playback Menu ............................................................................................. 8
ADJ. Menu ................................................................................................................................. 9
Setup Menu ............................................................................................................................... 9
USING THE LCD MONITOR .......................................................................................................... 10
LCD Screen Indicator .............................................................................................................. 10
Switching the Screen Display .................................................................................................. 10
RECORDING ......................................................................................................................11
RECORDING STILL IMAGES ......................................................................................................... 11
Using the Zoom Function ........................................................................................................ 11
Using the Flash ........................................................................................................................ 12
Using the Self-timer & Burst .................................................................................................... 12
Using the Macro mode ............................................................................................................ 13
RECORDING MOVIE CLIPS .......................................................................................................... 14
VOICES RECORDING .................................................................................................................... 14
SETTING THE RECORDING FUNCTIONS ................................................................................... 14
Using the Scene Mode ............................................................................................................ 14
Setting the Resolution and Quality .......................................................................................... 15
Setting the Movie Size ............................................................................................................. 16
Setting the White Balance ....................................................................................................... 16
Setting the ISO ........................................................................................................................ 16
Setting the Exposure ............................................................................................................... 17
Setting the Metering ................................................................................................................. 17
Setting the Sharpness ............................................................................................................. 17
Setting the Photo Effect ........................................................................................................... 17
Setting Date Stamp .................................................................................................................. 18
PLAYBACK ........................................................................................................................18
PLAYING BACK IMAGES ............................................................................................................... 18
Using the Thumbnail ................................................................................................................ 18
1
�
Magnifying Still Images ............................................................................................................ 18
Playing Back Movie Clips ........................................................................................................ 18
PLAYING BACK SOUNDS ............................................................................................................. 19
Recording a Voice Memo ........................................................................................................ 19
Playing Back a Voice Memo .................................................................................................... 19
DELETING FILES ........................................................................................................................... 19
Deleting a Single File ............................................................................................................... 19
Deleting All Files ...................................................................................................................... 20
Protecting Files ........................................................................................................................ 20
EDITING IMAGES ........................................................................................................................... 21
Rotating Still Images ................................................................................................................ 21
Changing the Image Size ........................................................................................................ 21
Adding Stickers to a Still Image ............................................................................................... 21
Setting Photo Effect ................................................................................................................. 22
SETTING THE DPOF ..................................................................................................................... 22
PLAYING A SLIDE SHOW .............................................................................................................. 23
COPYING THE FILES .................................................................................................................... 23
ADVANCE SETTINGS .......................................................................................................23
ADJUSTING SOUNDS ................................................................................................................... 23
SETTING AUTO REVIEW .............................................................................................................. 24
SETTING THE POWER SAVE ....................................................................................................... 24
SETTING THE LANGUAGE ........................................................................................................... 24
RESETTING THE FILE NUMBERS ................................................................................................ 24
About the Folder & File Name ................................................................................................. 24
File Naming .............................................................................................................................. 25
SETTING THE TV OUT .................................................................................................................. 25
SETTING USB PORT ..................................................................................................................... 25
CHOOSING A STARTUP IMAGE ................................................................................................... 25
FORMATTING THE MEMORY ....................................................................................................... 26
RESETTING TO DEFAULT SETTINGS .......................................................................................... 26
MAKING CONNECTIONS .................................................................................................26
CONNECTING THE CAMERA TO A TV ......................................................................................... 26
CONNECTING THE CAMERA TO A PC ........................................................................................ 27
Using the Card Reader ............................................................................................................ 27
Connecting the Camera to a Computer with a USB Cable ..................................................... 27
PRINGTING PICTURES DIRECTLY ..................................................................................28
SOFTWARE INSTALLATION ............................................................................................29
SYSTEM REQUIREMENTS ........................................................................................................... 29
USING THE INSTALLER SPLASH SCREEN ................................................................................. 29
INSTALLING YOUR CAMERA DRIVER ......................................................................................... 30
INSTALLING XVID CODEC ............................................................................................................ 31
INSTALLING WINDOWS MEDIA PLAYER 9 .................................................................................. 34
INSTALLING ARCSOFT PHOTOIMPRESSION ............................................................................ 36
INSTALLING ADOBE ACROBAT READER .................................................................................... 38
USING ARCSOFT PHOTOIMPRESSION ...................................................................................... 41
INSTALLING SOFTWARE-FOR MAC USERS .................................................................42
APPENDIX .........................................................................................................................43
TROUBLESHOOTING .................................................................................................................... 43
SPECIFICATIONS .......................................................................................................................... 44
GETTING HELP .............................................................................................................................. 45
SAFETY TIPS AND MANITENANCE ............................................................................................. 46
REGULATORY INFORMATION ...................................................................................................... 48
2
�
GETTING STARTED
GETTING STARTED
STANDARD ACCESSORIES
Camera
USB Cable
Video out Cable
Soft Case
Strap
2 x AA Batteries
Software Installation CD-ROM Quick Start Guide
Attaching the Wrist Strap
Attach the wrist strap to your camera as shown.
Note: Do not swing the camera when carrying by the wrist strap.
3
�
Using the Soft Case
When not using the digital camera, keep it in the soft case for protection.
GETTING STARTED
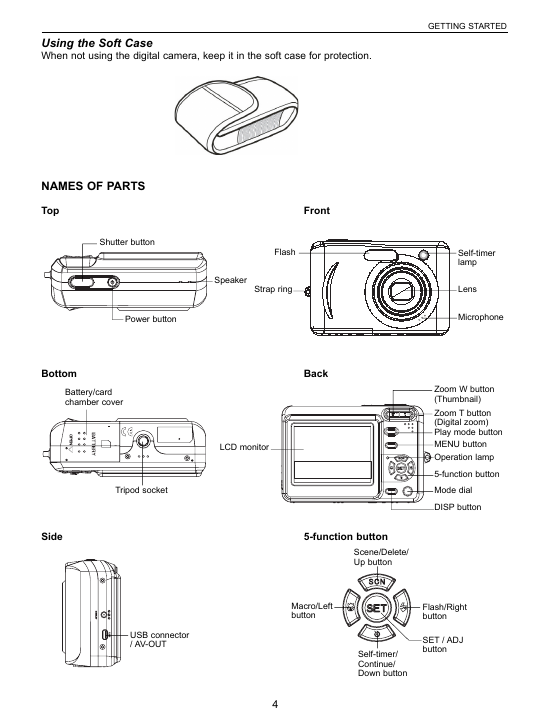
NAMES OF PARTS
Top
Shutter button
Power button
Bottom
Battery/card
chamber cover
Tripod socket
Side
USB connector
/ AV-OUT
Front
Flash
Speaker
Strap ring
Back
LCD monitor
Self-timer
lamp
Lens
Microphone
Zoom W button
(Thumbnail)
Zoom T button
(Digital zoom)
Play mode button
MENU button
Operation lamp
5-function button
Mode dial
DISP button
5-function button
Scene/Delete/
Up button
Macro/Left
button
Flash/Right
button
SET / ADJ
button
Self-timer/
Continue/
Down button
4
�
GETTING STARTED
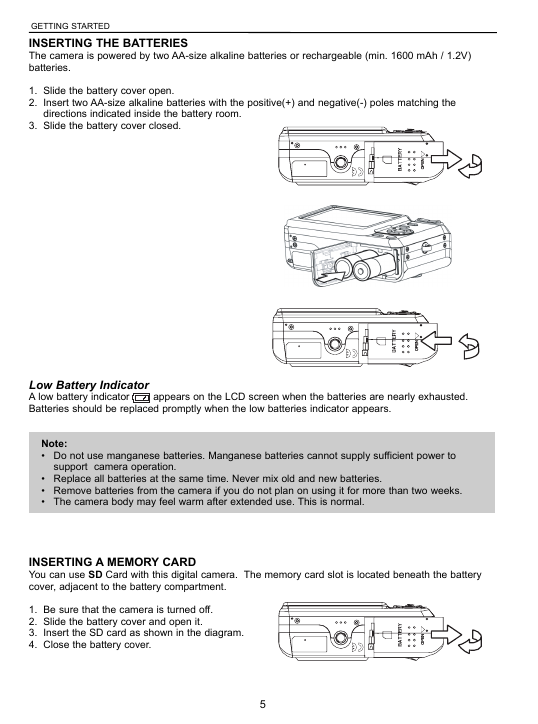
INSERTING THE BATTERIES
The camera is powered by two AA-size alkaline batteries or rechargeable (min. 1600 mAh / 1.2V)
batteries.
1. Slide the battery cover open.
2. Insert two AA-size alkaline batteries with the positive(+) and negative(-) poles matching the
directions indicated inside the battery room.
3. Slide the battery cover closed.
Low Battery Indicator
A low battery indicator
Batteries should be replaced promptly when the low batteries indicator appears.
appears on the LCD screen when the batteries are nearly exhausted.
Note:
• Do not use manganese batteries. Manganese batteries cannot supply sufficient power to
support camera operation.
• Replace all batteries at the same time. Never mix old and new batteries.
• Remove batteries from the camera if you do not plan on using it for more than two weeks.
• The camera body may feel warm after extended use. This is normal.
640
320
160
INSERTING A MEMORY CARD
You can use SD Card with this digital camera. The memory card slot is located beneath the battery
cover, adjacent to the battery compartment.
1. Be sure that the camera is turned off.
2. Slide the battery cover and open it.
3. Insert the SD card as shown in the diagram.
4. Close the battery cover.
5
�
To remove the memory card, gently press on the edge of the card and release it. Pull the card out
and close the battery cover.
GETTING STARTED
About Camera Memory
The digital camera is equipped with internal memory. If the memory card is not inserted in the camera,
all images and movie clips recorded by the camera will be stored in the internal memory. If the
memory card is inserted, images and movie clips are stored on the memory card.
DCF Protocol
The DCF protocol defines the format for image file data as well as the directory structure for the
memory card. Images that are taken by a DCF camera can be viewed on DCF-compatible cameras
from other manufacturers.
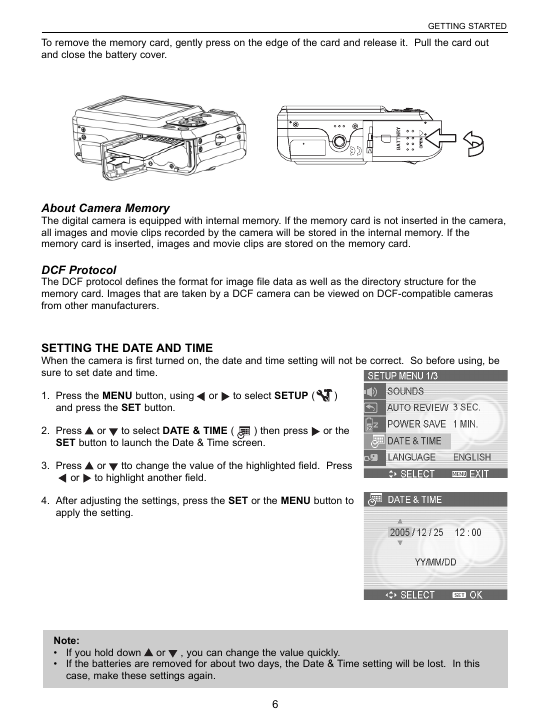
SETTING THE DATE AND TIME
When the camera is first turned on, the date and time setting will not be correct. So before using, be
sure to set date and time.
1. Press the MENU button, using
or
to select SETUP (
)
and press the SET button.
2. Press
or
to select DATE & TIME (
) then press
or the
SET button to launch the Date & Time screen.
3. Press
or
or
to highlight another field.
tto change the value of the highlighted field. Press
4. After adjusting the settings, press the SET or the MENU button to
apply the setting.
640
320
160
640
320
160
640
320
160
640
320
160
640
320
160
640
320
160
640
320
160
640
320
160
640
320
160
640
320
160
640
320
160
Note:
•
•
If you hold down
If the batteries are removed for about two days, the Date & Time setting will be lost. In this
case, make these settings again.
, you can change the value quickly.
or
640
320
640
6
�
BASIC OPERATIONS
BASIC OPERATIONS
TURNING THE POWER ON AND OFF
Power button
1. Press the POWER button to turn on the camera in the Record
button to turn on the camera in the
mode. Or you can press the
Playback mode.
2. Press the POWER button again to turn the power off.
640
320
160
Hint:
• You can turn on the camera without the start-up and operating
sound by pressing and holding the POWER or the
1.5 seconds.
640
button over
320
160
Power Saving Function
If the camera is turned off by Power Save feature, press the POWER or the
again.
The Power Save feature does not work in the following situation:
• Connecting the camera to a computer or printer with the USB cable.
• Connecting the camera with the AC adapter (sold separate).
Play mode button
button to turn it on
640
320
160
SWITCHING BETWEEN RECORD AND PLAYBACK
You can switch between the Record mode and the Playback mode in following ways:
In Record mode
• Press the MODE button to cycle through the still image shooting,
voice recording, and movie recording.
button to switch to the Playback mode.
• Press the
Note:
•
640
320
160
If you switch to Playback mode, the lens will retract after
approximately 10 seconds.
Mode dial
In Playback mode
• Press the MODE or the
Record mode.
button switch to the previous used
640
320
160
7
Play mode button
�


 2023年江西萍乡中考道德与法治真题及答案.doc
 2012年重庆南川中考生物真题及答案.doc
 2013年江西师范大学地理学综合及文艺理论基础考研真题.doc
 2020年四川甘孜小升初语文真题及答案I卷.doc
 2020年注册岩土工程师专业基础考试真题及答案.doc
 2023-2024学年福建省厦门市九年级上学期数学月考试题及答案.doc
 2021-2022学年辽宁省沈阳市大东区九年级上学期语文期末试题及答案.doc
 2022-2023学年北京东城区初三第一学期物理期末试卷及答案.doc
 2018上半年江西教师资格初中地理学科知识与教学能力真题及答案.doc
 2012年河北国家公务员申论考试真题及答案-省级.doc
 2020-2021学年江苏省扬州市江都区邵樊片九年级上学期数学第一次质量检测试题及答案.doc
 2022下半年黑龙江教师资格证中学综合素质真题及答案.doc