VNX 装系统
�
一、 准备工具
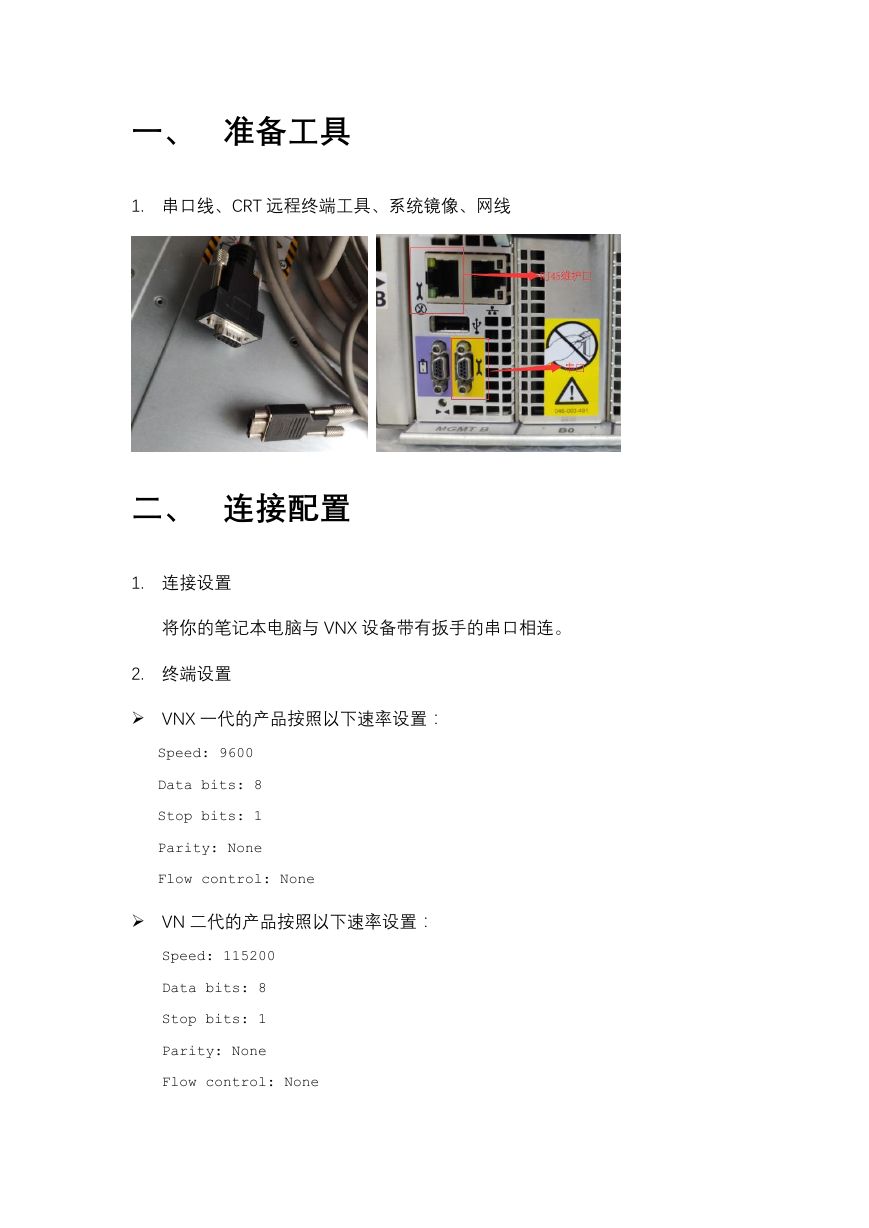
1. 串口线、CRT 远程终端工具、系统镜像、网线
二、 连接配置
1. 连接设置
将你的笔记本电脑与 VNX 设备带有扳手的串口相连。
2. 终端设置
VNX 一代的产品按照以下速率设置:
Speed: 9600
Data bits: 8
Stop bits: 1
Parity: None
Flow control: None
VN 二代的产品按照以下速率设置:
Speed: 115200
Data bits: 8
Stop bits: 1
Parity: None
Flow control: None
�
三、 开始装机
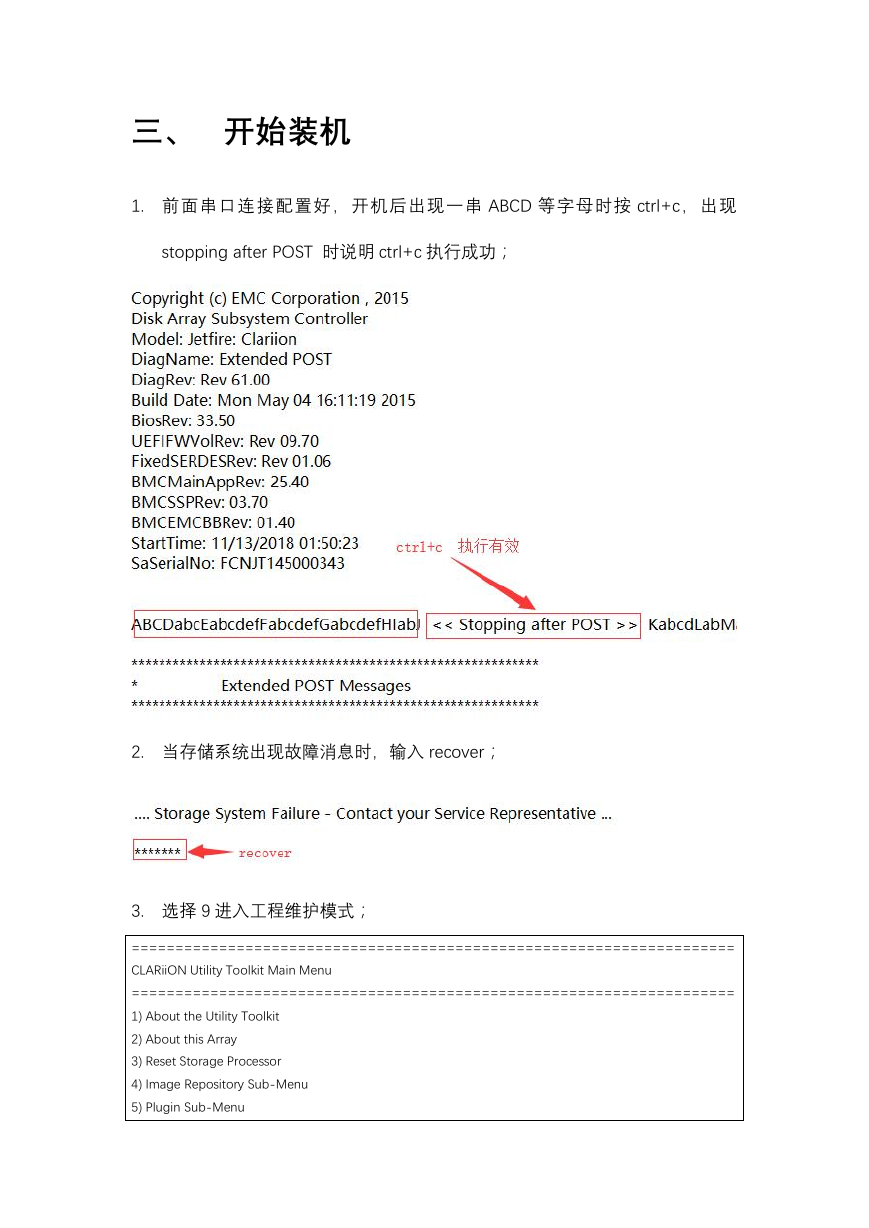
1. 前面串口连接配置好,开机后出现一串 ABCD 等字母时按 ctrl+c,出现
stopping after POST 时说明 ctrl+c 执行成功;
2. 当存储系统出现故障消息时,输入 recover;
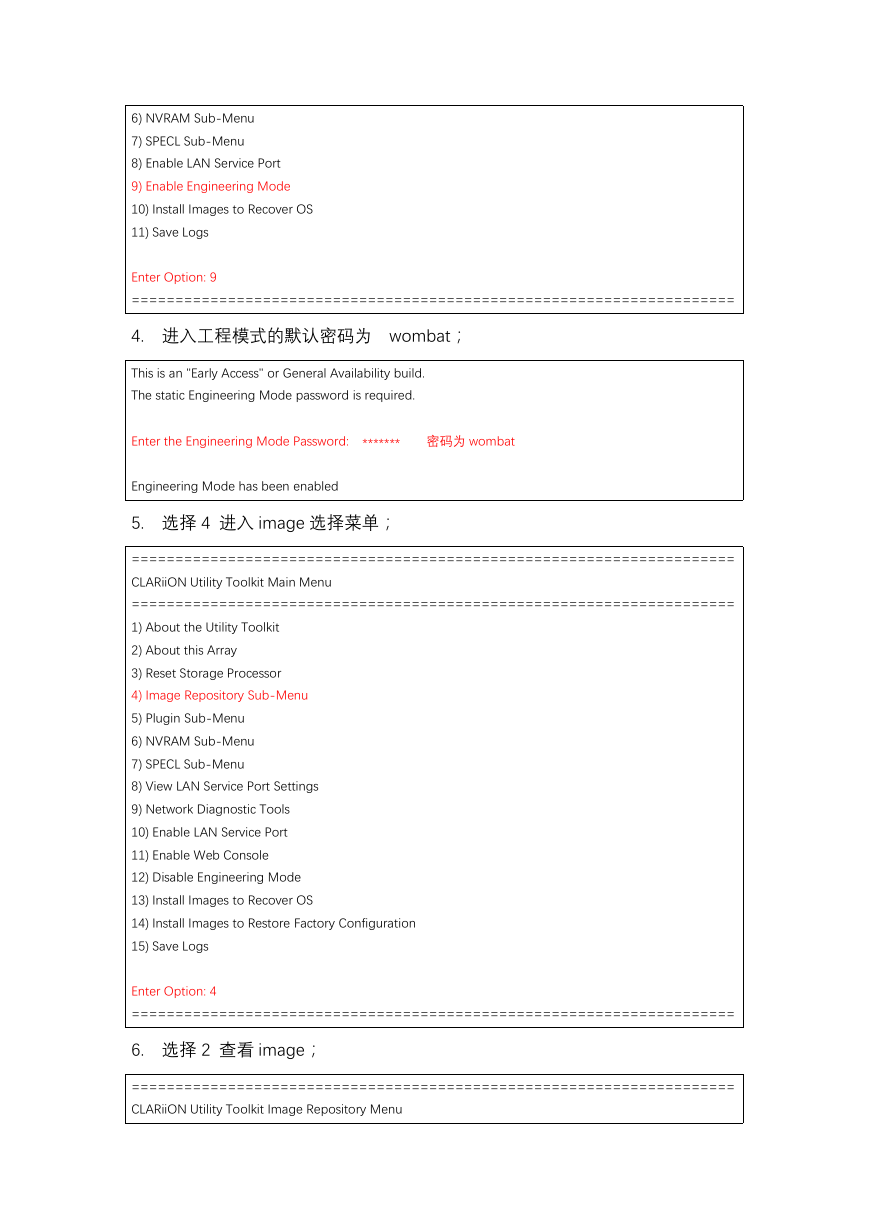
3. 选择 9 进入工程维护模式;
=====================================================================
CLARiiON Utility Toolkit Main Menu
=====================================================================
1) About the Utility Toolkit
2) About this Array
3) Reset Storage Processor
4) Image Repository Sub-Menu
5) Plugin Sub-Menu
�
6) NVRAM Sub-Menu
7) SPECL Sub-Menu
8) Enable LAN Service Port
9) Enable Engineering Mode
10) Install Images to Recover OS
11) Save Logs
Enter Option: 9
=====================================================================
4. 进入工程模式的默认密码为 wombat;
This is an "Early Access" or General Availability build.
The static Engineering Mode password is required.
Enter the Engineering Mode Password:
*******
密码为 wombat
Engineering Mode has been enabled
5. 选择 4 进入 image 选择菜单;
=====================================================================
CLARiiON Utility Toolkit Main Menu
=====================================================================
1) About the Utility Toolkit
2) About this Array
3) Reset Storage Processor
4) Image Repository Sub-Menu
5) Plugin Sub-Menu
6) NVRAM Sub-Menu
7) SPECL Sub-Menu
8) View LAN Service Port Settings
9) Network Diagnostic Tools
10) Enable LAN Service Port
11) Enable Web Console
12) Disable Engineering Mode
13) Install Images to Recover OS
14) Install Images to Restore Factory Configuration
15) Save Logs
Enter Option: 4
=====================================================================
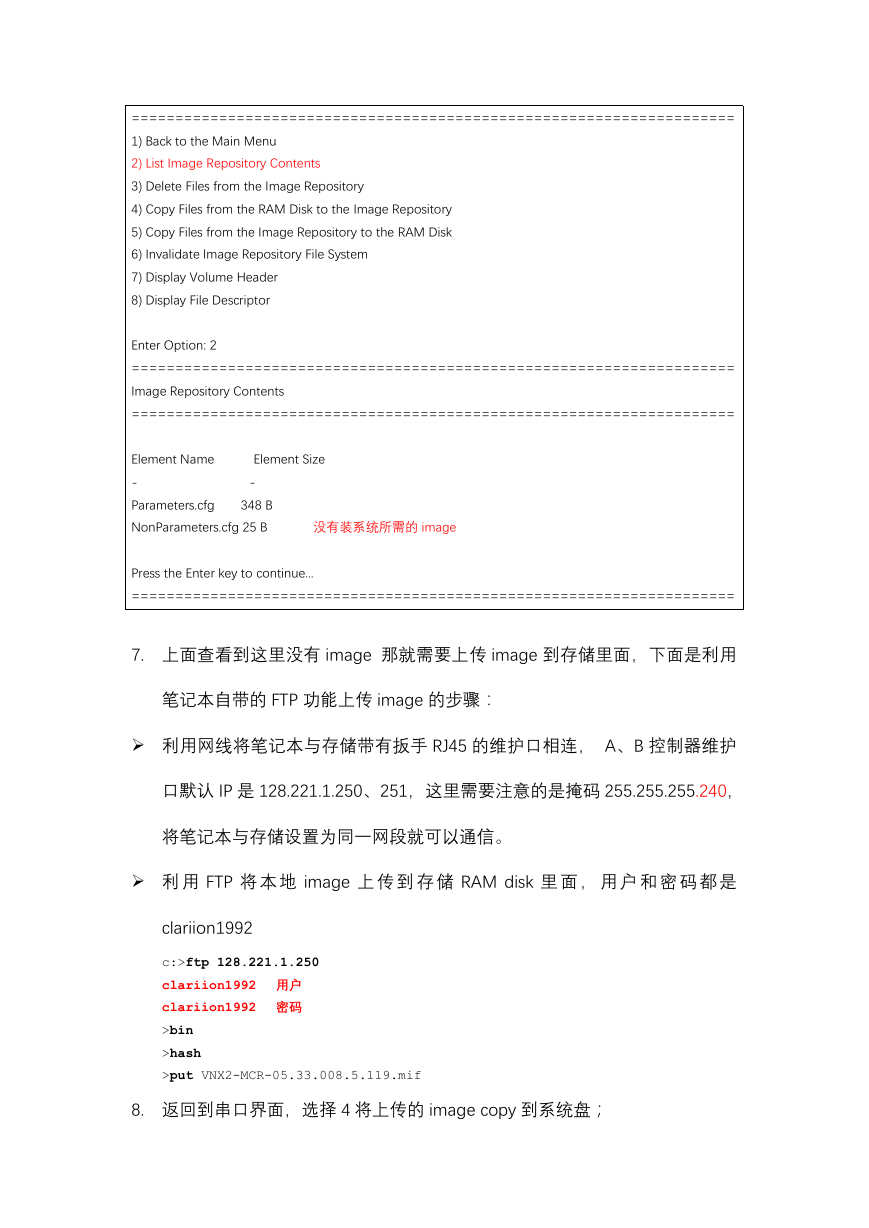
6. 选择 2 查看 image;
=====================================================================
CLARiiON Utility Toolkit Image Repository Menu
�
=====================================================================
1) Back to the Main Menu
2) List Image Repository Contents
3) Delete Files from the Image Repository
4) Copy Files from the RAM Disk to the Image Repository
5) Copy Files from the Image Repository to the RAM Disk
6) Invalidate Image Repository File System
7) Display Volume Header
8) Display File Descriptor
Enter Option: 2
=====================================================================
Image Repository Contents
=====================================================================
Element Size
-
Element Name
-
Parameters.cfg
348 B
NonParameters.cfg 25 B
没有装系统所需的 image
Press the Enter key to continue...
=====================================================================
7. 上面查看到这里没有 image 那就需要上传 image 到存储里面,下面是利用
笔记本自带的 FTP 功能上传 image 的步骤:
利用网线将笔记本与存储带有扳手 RJ45 的维护口相连, A、B 控制器维护
口默认 IP 是 128.221.1.250、251,这里需要注意的是掩码 255.255.255.240,
将笔记本与存储设置为同一网段就可以通信。
利 用 FTP 将 本 地 image 上 传 到 存 储 RAM disk 里 面 , 用 户 和 密 码 都 是
clariion1992
c:>ftp 128.221.1.250
clariion1992 用户
clariion1992 密码
>bin
>hash
>put VNX2-MCR-05.33.008.5.119.mif
8. 返回到串口界面,选择 4 将上传的 image copy 到系统盘;
�
===================================================
CLARiiON Utility Toolkit Image Repository Menu
===================================================
1) Back to the Main Menu
2) List Image Repository Contents
3) Delete Files from the Image Repository
4) Copy Files from the RAM Disk to the Image Repository
5) Copy Files from the Image Repository to the RAM Disk
6) Invalidate Image Repository File System
7) Display Volume Header
8) Display File Descriptor
Enter Option: 4
===================================================
Select files to copy to the Image Repository
===================================================
1) Parameters.cfg
2) NonParameters.cfg
3) UtilityFE_running
4) VNX2-MCR-05.33.008.5.119.mif
Enter comma separated list of options: 4
Copying VNX2-MCR-05.33.008.5.119.mif to the Image Repository... Success
Press the Enter key to continue...
===================================================
9. 接下来选择 1 返回主菜单,然后选择 11 安装镜像以恢复出厂设置;
==============================================================
CLARiiON Utility Toolkit Image Repository Menu
==============================================================
1) Back to the Main Menu
2) List Image Repository Contents
3) Delete Files from the Image Repository
4) Copy Files from the RAM Disk to the Image Repository
5) Copy Files from the Image Repository to the RAM Disk
6) Invalidate Image Repository File System
7) Display Volume Header
8) Display File Descriptor
Enter Option: 1
==============================================================
CLARiiON Utility Toolkit Main Menu
==============================================================
1) About the Utility Toolkit
2) About this Array
�
3) Reset Storage Processor
4) Image Repository Sub-Menu
5) Plugin Sub-Menu
6) NVRAM Sub-Menu
7) SPECL Sub-Menu
8) Enable LAN Service Port
9) Disable Engineering Mode
10) Install Images to Recover OS
11) Install Images to Restore Factory Configuration
12) Save Logs
Enter Option: 11
==============================================================
Install Images with AutoConfig
==============================================================
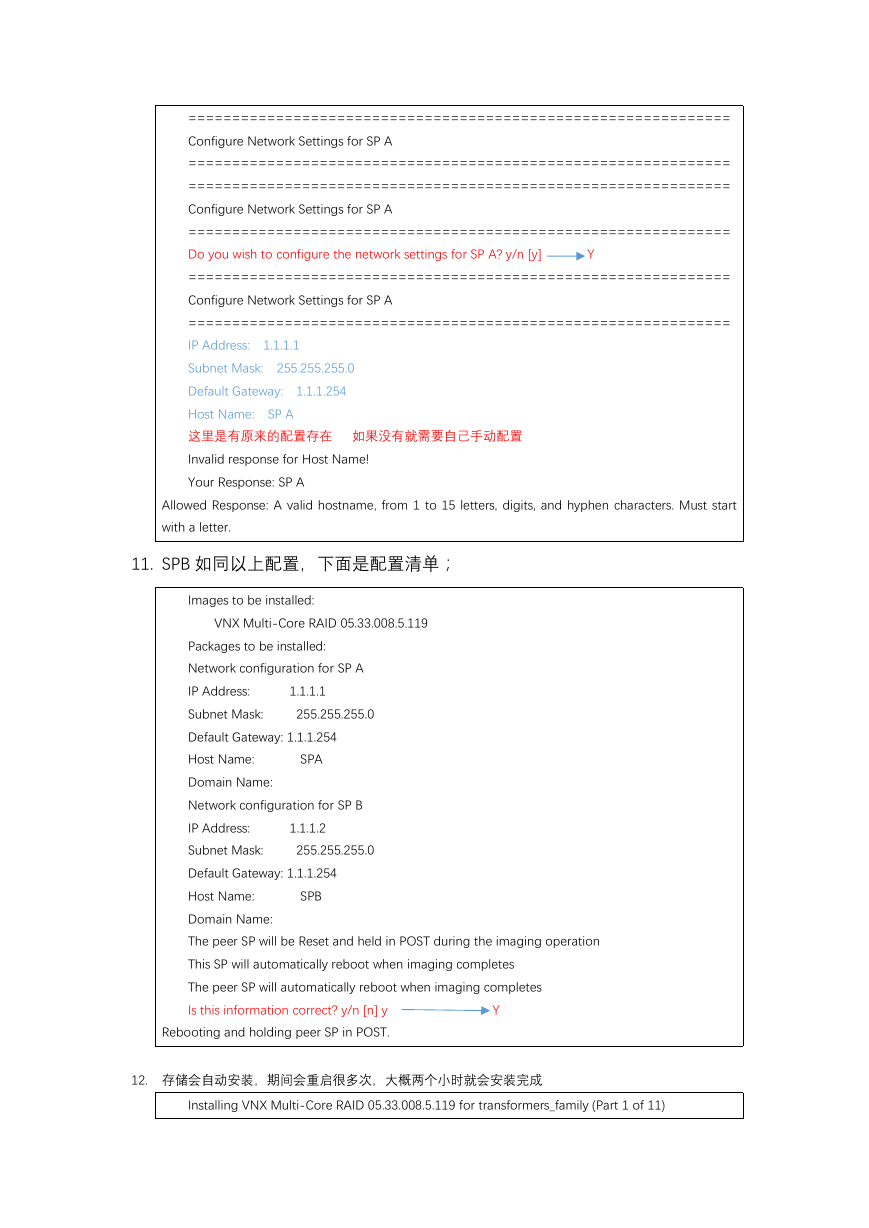
10. 下面步骤就是配置 A 控制器的 ip、名称等;
==============================================================
! ! ! W A R N I N G ! ! !
When installing images using AutoConfig functionality, all existing array
configuration and user data will be PERMANENTLY DESTROYED!
Y
Do you wish to continue? y/n [n] y
==============================================================
Select Images to Install
==============================================================
1) VNX Multi-Core RAID 05.33.008.5.119
2) Back to the Main Menu
Enter comma separated list of options: 1
==============================================================
Select NDU Packages to Install
==============================================================
1
There are no NDU Packages available for installation
You may transfer ndu packages to the ramdisk by opening an FTP Session
ftp://clariion1992:clariion1992@/
Do you wish to continue? y/n [y]
Y
�
==============================================================
Configure Network Settings for SP A
==============================================================
==============================================================
Configure Network Settings for SP A
==============================================================
Do you wish to configure the network settings for SP A? y/n [y]
==============================================================
Configure Network Settings for SP A
==============================================================
IP Address: 1.1.1.1
Subnet Mask: 255.255.255.0
Default Gateway: 1.1.1.254
Host Name: SP A
这里是有原来的配置存在 如果没有就需要自己手动配置
Invalid response for Host Name!
Your Response: SP A
Y
Allowed Response: A valid hostname, from 1 to 15 letters, digits, and hyphen characters. Must start
with a letter.
11. SPB 如同以上配置,下面是配置清单;
Images to be installed:
VNX Multi-Core RAID 05.33.008.5.119
1.1.1.1
255.255.255.0
Packages to be installed:
Network configuration for SP A
IP Address:
Subnet Mask:
Default Gateway: 1.1.1.254
Host Name:
Domain Name:
Network configuration for SP B
IP Address:
Subnet Mask:
Default Gateway: 1.1.1.254
Host Name:
Domain Name:
The peer SP will be Reset and held in POST during the imaging operation
This SP will automatically reboot when imaging completes
The peer SP will automatically reboot when imaging completes
Is this information correct? y/n [n] y
Rebooting and holding peer SP in POST.
1.1.1.2
255.255.255.0
SPA
SPB
Y
12. 存储会自动安装,期间会重启很多次,大概两个小时就会安装完成
Installing VNX Multi-Core RAID 05.33.008.5.119 for transformers_family (Part 1 of 11)
�





 2023年江西萍乡中考道德与法治真题及答案.doc
 2012年重庆南川中考生物真题及答案.doc
 2013年江西师范大学地理学综合及文艺理论基础考研真题.doc
 2020年四川甘孜小升初语文真题及答案I卷.doc
 2020年注册岩土工程师专业基础考试真题及答案.doc
 2023-2024学年福建省厦门市九年级上学期数学月考试题及答案.doc
 2021-2022学年辽宁省沈阳市大东区九年级上学期语文期末试题及答案.doc
 2022-2023学年北京东城区初三第一学期物理期末试卷及答案.doc
 2018上半年江西教师资格初中地理学科知识与教学能力真题及答案.doc
 2012年河北国家公务员申论考试真题及答案-省级.doc
 2020-2021学年江苏省扬州市江都区邵樊片九年级上学期数学第一次质量检测试题及答案.doc
 2022下半年黑龙江教师资格证中学综合素质真题及答案.doc