MS 2010
MS 2110 Traffic
Quick Start Guide
Erste Schritte und wichtige Hinweise
First Steps and Important Notes
Premiers pas et instructions importantes
Primeros pasos y advertencia importante
Primi passi e avviso importante
Primeiros passos e avisos importantes
Aan de slag en belangrijke aanwijzingen
Komma igång och viktiga anvisningar
Kom i gang og viktige anvisningar
h
c
s
t
u
e
D
h
s
i
l
g
n
E
s
i
a
ç
n
a
r
F
l
o
ñ
a
p
s
E
o
n
a
i
l
a
t
I
s
ê
u
g
u
t
r
o
P
s
d
n
a
l
r
e
d
e
N
a
k
s
n
e
v
S
k
s
n
a
D
Portable Navigation Device
© 05/2006 Siemens VDO Trading GmbH
�
QSG-EHV-2.book Seite 21 Donnerstag, 27. April 2006 12:02 00
Contents General Instructions
21
Contents
General Instructions . . . . . . . . . . . . . . . . . . . . . . . . . . . . . . . . . . . . . . . . . . . . . . . . . . . . . . . 21
Safety Advice and Important Information. . . . . . . . . . . . . . . . . . . . . . . . . . . . . . . . . . . . . . . . 21
Maintenance and Cleaning. . . . . . . . . . . . . . . . . . . . . . . . . . . . . . . . . . . . . . . . . . . . . . . . . . . . 22
Overview of Device . . . . . . . . . . . . . . . . . . . . . . . . . . . . . . . . . . . . . . . . . . . . . . . . . . . . . . . . 23
What's Included? . . . . . . . . . . . . . . . . . . . . . . . . . . . . . . . . . . . . . . . . . . . . . . . . . . . . . . . . . . . . 23
Controls and Connection Ports . . . . . . . . . . . . . . . . . . . . . . . . . . . . . . . . . . . . . . . . . . . . . . . . . 24
Setup and Mounting . . . . . . . . . . . . . . . . . . . . . . . . . . . . . . . . . . . . . . . . . . . . . . . . . . . . . . 26
Initial Setup . . . . . . . . . . . . . . . . . . . . . . . . . . . . . . . . . . . . . . . . . . . . . . . . . . . . . . . . . . . . . . . . 26
Assembly and Mounting . . . . . . . . . . . . . . . . . . . . . . . . . . . . . . . . . . . . . . . . . . . . . . . . . . . . . . 26
Configuration . . . . . . . . . . . . . . . . . . . . . . . . . . . . . . . . . . . . . . . . . . . . . . . . . . . . . . . . . . . . . 27
Settings. . . . . . . . . . . . . . . . . . . . . . . . . . . . . . . . . . . . . . . . . . . . . . . . . . . . . . . . . . . . . . . . . . . . 28
GPS and TMC . . . . . . . . . . . . . . . . . . . . . . . . . . . . . . . . . . . . . . . . . . . . . . . . . . . . . . . . . . . . . . . 30
Navigation . . . . . . . . . . . . . . . . . . . . . . . . . . . . . . . . . . . . . . . . . . . . . . . . . . . . . . . . . . . . . . . . . 32
The Multimedia Menu . . . . . . . . . . . . . . . . . . . . . . . . . . . . . . . . . . . . . . . . . . . . . . . . . . . . . . 36
Troubleshooting . . . . . . . . . . . . . . . . . . . . . . . . . . . . . . . . . . . . . . . . . . . . . . . . . . . . . . . . . . . 39
Technical Data . . . . . . . . . . . . . . . . . . . . . . . . . . . . . . . . . . . . . . . . . . . . . . . . . . . . . . . . . . . . . . 40
Safety Advice and Important Information
Before you start to mount and use this navigation system, please familiarise yourself with its
various components and functions. Furthermore, please read through the safety instructions
carefully to avoid causing injury to yourself and/or other road users.
The use of the navigation system does not under any circumstances release the driver
from his/her personal responsibility. The applicable road traffic regulations and cur-
rent traffic conditions always have priority.
For safety reasons, you should install the device and enter the required information in
the navigation system before you start your journey or when your vehicle is stationary.
If you decide to install the device in your vehicle using a mount, please be aware of
the following: On no account should the screen be adjusted by moving the device it-
self. Position the screen so that you are able to glance at the display quickly and easily.
The device should also be positioned in a way that avoids reflections and glare from
the screen. The screen should not be installed/positioned in a place that obstructs your
view of things that are necessary for driving the vehicle (e.g. the view of the road or
the vehicle's instruments). The screen should also not be positioned within the area di-
rectly in front of the airbag as this may prevent the airbag from inflating. Make sure
the device is sufficiently secure so that it will not become dislodged even in the event
of emergency braking or a collision.
Only look at the screen when it is safe to do so. If you need to look at the screen for a
longer period of time, stop the vehicle at an appropriate and safe place.
The values in the status bar are calculated for the current speed, remaining travel time
and remaining travel distance. However the accuracy of these values cannot be guar-
anteed in every case. The actual speed can always be determined by reading the vehi-
cle's speedometer.
�
QSG-EHV-2.book Seite 22 Donnerstag, 27. April 2006 12:02 00
22
General Instructions
The navigation system does not take the relative safety of the suggested routes into
consideration. Road closures, roadworks, height and weight restrictions, traffic and
weather conditions, or other factors that can influence the safety and the journey time
of the route are not taken into consideration for the suggested routes. Use your own
judgement to check the suitability of the suggested routes. If required, use the
“Change Route” function to calculate alternatives to the original route. Alternatively
take the road you prefer and the software will automatically perform a re-routing (i.e.
calculate a new route based on your new position).
In certain areas, one-way streets, turning restrictions and no entry signs (e.g. pedestri-
an zones) cannot be accounted for. In such situations, pay particular attention to the
road signs and rules of the road that apply.
If you need the help of the emergency services (police, fire, ambulance, etc.), do not
rely exclusively on the navigation system. Act in a way that you consider to be suitable
and sensible in order to receive help in such a situation.
Do not subject the navigation system to high temperatures or extreme exposure to
sunlight. Temperatures over 50 °C can severely damage the navigation system, espe-
cially the lithium ion battery. The battery should only be charged if someone is moni-
toring the device. Do not open the battery with force as this may release corrosive
acids. Damaged batteries or batteries that are past their expiry date should no longer
be used and should be disposed of in a safe and suitable way.
Never expose the navigation system to humidity as this can result in damage. It is es-
pecially important to protect the navigation system from getting wet if you are on a
motorcycle, bicycle or in a convertible car. This is because the device is not splash-
proof.
Avoid touching the screen with sharp or rough-edged objects as these can damage the
sensitive touchscreen display.
GPS (Global Positioning System) is a satellite-based system that supports geographical
and time-related information all around the world. The system is operated and con-
trolled by the United States of America. The USA is also responsible for the availability
and accuracy of this system. All changes to the GPS availability and accuracy as well as
other factors from the surrounding environment can influence the operation of the
navigation system. SVDO Trading GmbH does not accept any liability whatsoever for
the availability and accuracy of GPS data.
Please ensure that every person intending to use the navigation system reads this safe-
ty information and the recommendations for operating the system beforehand.
Before attaching the mount to the front windscreen, you should clean, with the cloth
provided or benzene, the area of the windscreen that you wish to stick the suction cup
to. This is to remove grease and dust from the area.
Differences between daytime and nighttime temperatures and/or humidity and mois-
ture can break the vacuum seal under the suction cup of the mount. Therefore you
should attach the navigation system so that it will not cause any damage if it fell off
the windscreen. As a precautionary measure, you should detach the navigation system
at night.
Furthermore, if you plan to leave the vehicle unattended for a long period of time,you
should remove the navigation system from the vehicle in order to avoid theft.
Maintenance and Cleaning
Please do not use any cleaning agents or detergents to clean the screen and case of
the device. The best method is to use a soft, damp cloth.
�
QSG-EHV-2.book Seite 23 Donnerstag, 27. April 2006 12:02 00
Overview of Device
23
What's Included?
Your navigation system package includes the following parts:
1 Navigation system (including lithium ion battery)
2 Mount with suction cup to attach the device to the windscreen.
3 Cloth for cleaning the windscreen before attaching the suction cup.
4 TMC antenna (only for traffic product version) for receiving traffic information
5 DC cable 12V/24V to power the navigation system from within the vehicle (adapter for
cigarette lighter)
You should not use any cables other than the AC (optional) and DC cables provided to
power the device and to charge the battery!
6 USB data cable to connect the navigation system to a PC
(Microsoft® Windows® Personal Computer)
7 Quick Start Guide
1
4
2
3
5
6
7
�
QSG-EHV-2.book Seite 24 Donnerstag, 27. April 2006 12:02 00
24
Overview of Device
Controls and Connection Ports
Front
1 Display / touchscreen
2 Infrared sensor
Usable with remote
control on steering
wheel RCS 5100
(accessories)
2
3
1
3 On-off switch / multi-function switch / status LED
Quick tap: switches the navigation system to stand-by mode.
Another quick tap will turn the system on again. The stand-by screen appears.
Hold down the button for about 3 seconds to switch off the navigation system.
To switch the device back on, hold down the button for 3 seconds again.
The navigation system will be completely restarted.
The status LED can display the following colours:
Green Battery fully charged. The navigation device is being powered by the battery or
the power cable.
Yellow Battery is being charged
Red
Battery level is critical, almost dead.
5
6
7
Back
4 Compartment for lith-
ium ion battery (cover)
5 GPS antenna
(adjustable)
6 Connection for exter-
nal GPS antenna
7 Loud speaker
8 Holder for mounting
device
4
8
�
QSG-EHV-2.book Seite 25 Donnerstag, 27. April 2006 12:02 00
Overview of Device
25
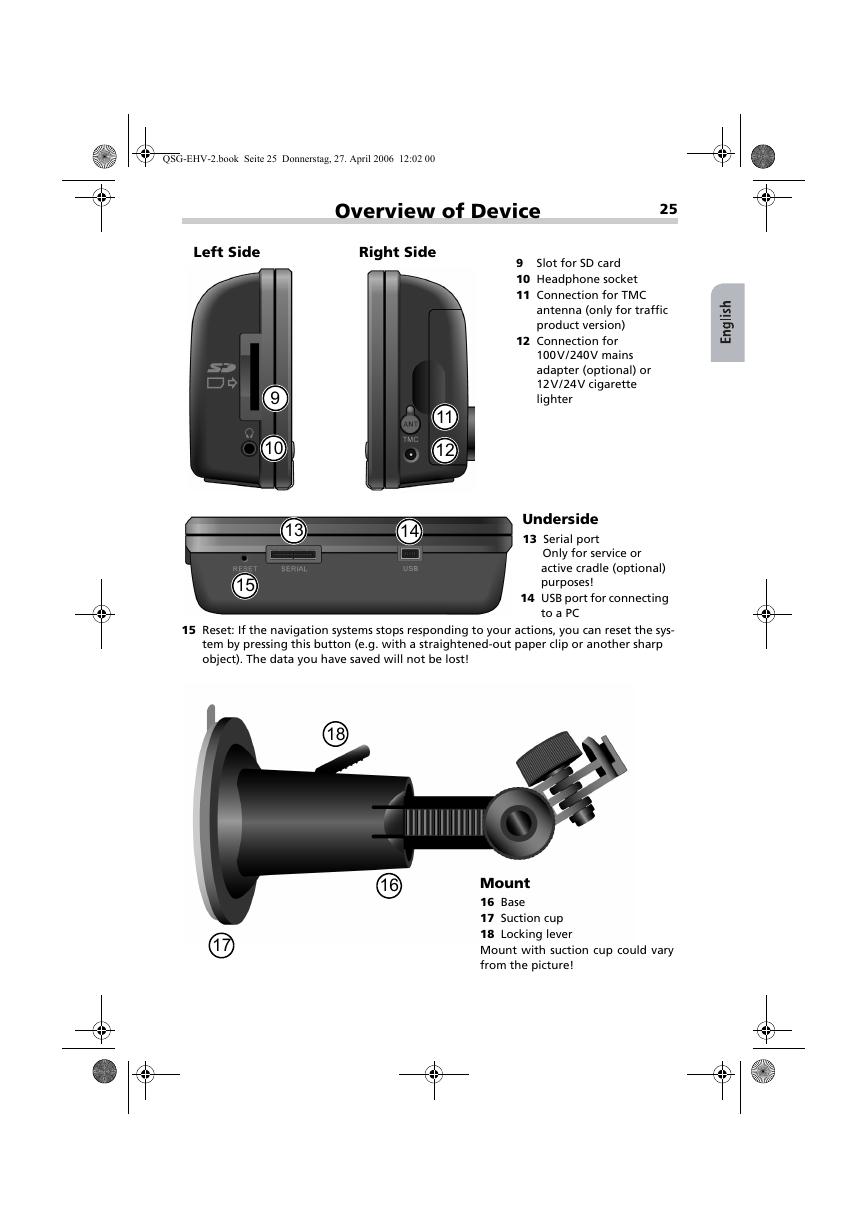
Left Side
Right Side
11
12
13
14
9
10
15
9 Slot for SD card
10 Headphone socket
11 Connection for TMC
antenna (only for traffic
product version)
12 Connection for
100V/240V mains
adapter (optional) or
12V/24V cigarette
lighter
Underside
13 Serial port
Only for service or
active cradle (optional)
purposes!
14 USB port for connecting
to a PC
15 Reset: If the navigation systems stops responding to your actions, you can reset the sys-
tem by pressing this button (e.g. with a straightened-out paper clip or another sharp
object). The data you have saved will not be lost!
18
17
16
Mount
16 Base
17 Suction cup
18 Locking lever
Mount with suction cup could vary
from the picture!
�
QSG-EHV-2.book Seite 26 Donnerstag, 27. April 2006 12:02 00
26
Setup and Mounting
Initial Setup
When you switch on the navigation system for the first time,
you must firstly deactivate the transport safety switch. This can
be done by performing the following steps:
Open the battery compartment and lift up the battery. Here
it is important that the connecting cable is not unplugged.
Next to the cable socket, you will see a small switch. Move
the switch downwards in order to activate the power sup-
ply.
Connect the navigation system to the 12V/24V power supply
in your vehicle. The battery will then start to charge.
Information about the lithium ion battery: The lithium ion battery can only be
charged within a temperature range of 0-45 °C. It takes approximately 5 hours to fully
charge the battery. Please note the safety instructions when operating the battery!
The battery life without an external power source is approx. 4 hours when the device
is being used for navigation and approx. 5 hours when the device is being used as an
MP3 player .
In many countries it is forbidden to dispose of empty batteries with normal household
waste. Please find out the regulations that apply in your area regarding the disposal
of used batteries.
Assembly and Mounting
To mount the device in the vehicle, proceed as follows:
Find a suitable place in the vehicle for mounting the mount.
The screen be must be clearly visible from the driver's seat
but the device should not obscure the driver's view.
Please note the safety instructions when choosing the loca-
tion page 21.
Attach the navigation system near to the dashboard so that
it will not cause any damage if it falls down.
Clean the area of the windscreen that you wish to stick the
suction cup to. This is to remove grease and dust from the
area.
Press the suction cup against the glass in a free sky viewing
position and move the pressure lever towards the glass until it locks into place.
Attach the navigation system to the mount and make sure it is firmly locked in place.
On no account should the screen be adjusted by moving the device itself.
Dismounting: To detach the device, switch the pressure lever in the opposite direc-
tion and carefully pull the transparent rubber end of the suction cup to remove it from
the window.
�
QSG-EHV-2.book Seite 27 Donnerstag, 27. April 2006 12:02 00
Configuration
27
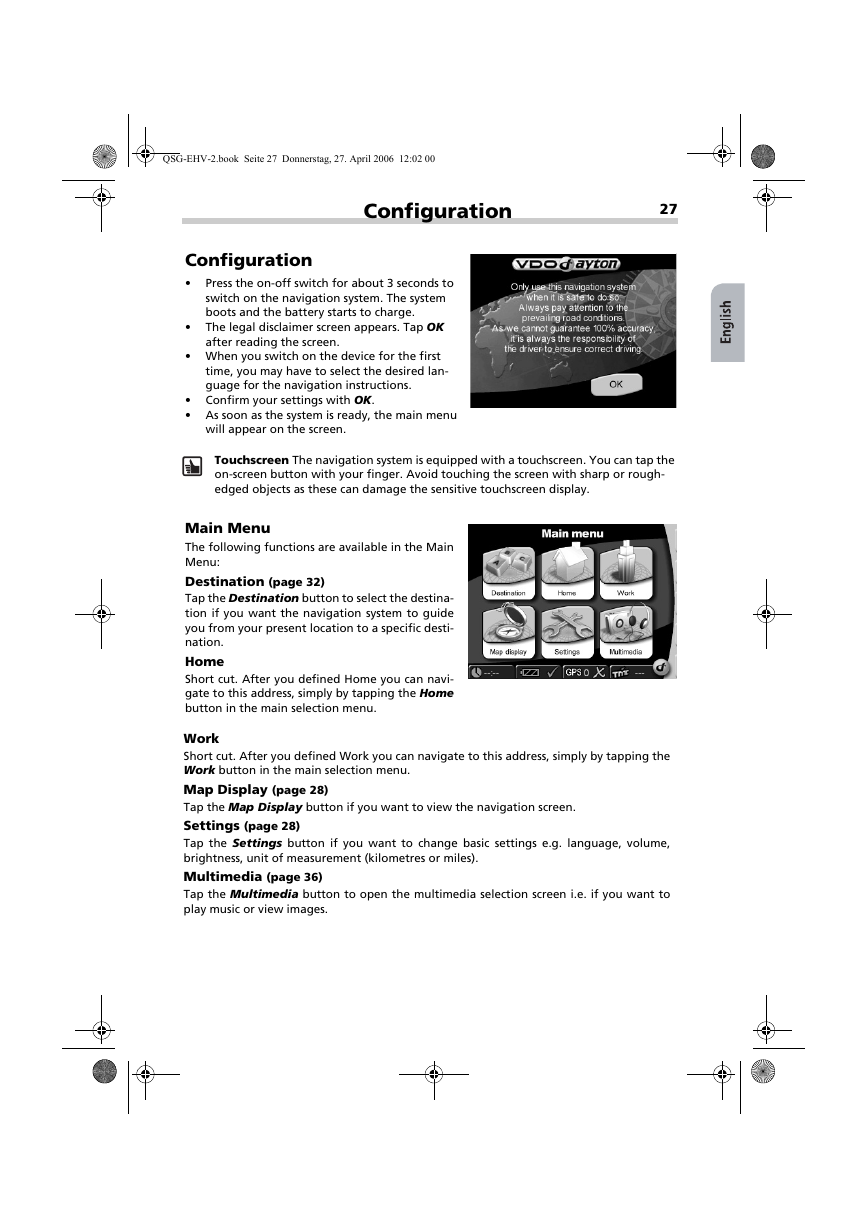
Configuration
Press the on-off switch for about 3 seconds to
switch on the navigation system. The system
boots and the battery starts to charge.
The legal disclaimer screen appears. Tap OK
after reading the screen.
When you switch on the device for the first
time, you may have to select the desired lan-
guage for the navigation instructions.
Confirm your settings with OK.
As soon as the system is ready, the main menu
will appear on the screen.
Touchscreen The navigation system is equipped with a touchscreen. You can tap the
on-screen button with your finger. Avoid touching the screen with sharp or rough-
edged objects as these can damage the sensitive touchscreen display.
Main Menu
The following functions are available in the Main
Menu:
Destination (page 32)
Tap the Destination button to select the destina-
tion if you want the navigation system to guide
you from your present location to a specific desti-
nation.
Home
Short cut. After you defined Home you can navi-
gate to this address, simply by tapping the Home
button in the main selection menu.
Work
Short cut. After you defined Work you can navigate to this address, simply by tapping the
Work button in the main selection menu.
Map Display (page 28)
Tap the Map Display button if you want to view the navigation screen.
Settings (page 28)
Tap the Settings button if you want to change basic settings e.g. language, volume,
brightness, unit of measurement (kilometres or miles).
Multimedia (page 36)
Tap the Multimedia button to open the multimedia selection screen i.e. if you want to
play music or view images.
�






 2023年江西萍乡中考道德与法治真题及答案.doc
 2012年重庆南川中考生物真题及答案.doc
 2013年江西师范大学地理学综合及文艺理论基础考研真题.doc
 2020年四川甘孜小升初语文真题及答案I卷.doc
 2020年注册岩土工程师专业基础考试真题及答案.doc
 2023-2024学年福建省厦门市九年级上学期数学月考试题及答案.doc
 2021-2022学年辽宁省沈阳市大东区九年级上学期语文期末试题及答案.doc
 2022-2023学年北京东城区初三第一学期物理期末试卷及答案.doc
 2018上半年江西教师资格初中地理学科知识与教学能力真题及答案.doc
 2012年河北国家公务员申论考试真题及答案-省级.doc
 2020-2021学年江苏省扬州市江都区邵樊片九年级上学期数学第一次质量检测试题及答案.doc
 2022下半年黑龙江教师资格证中学综合素质真题及答案.doc