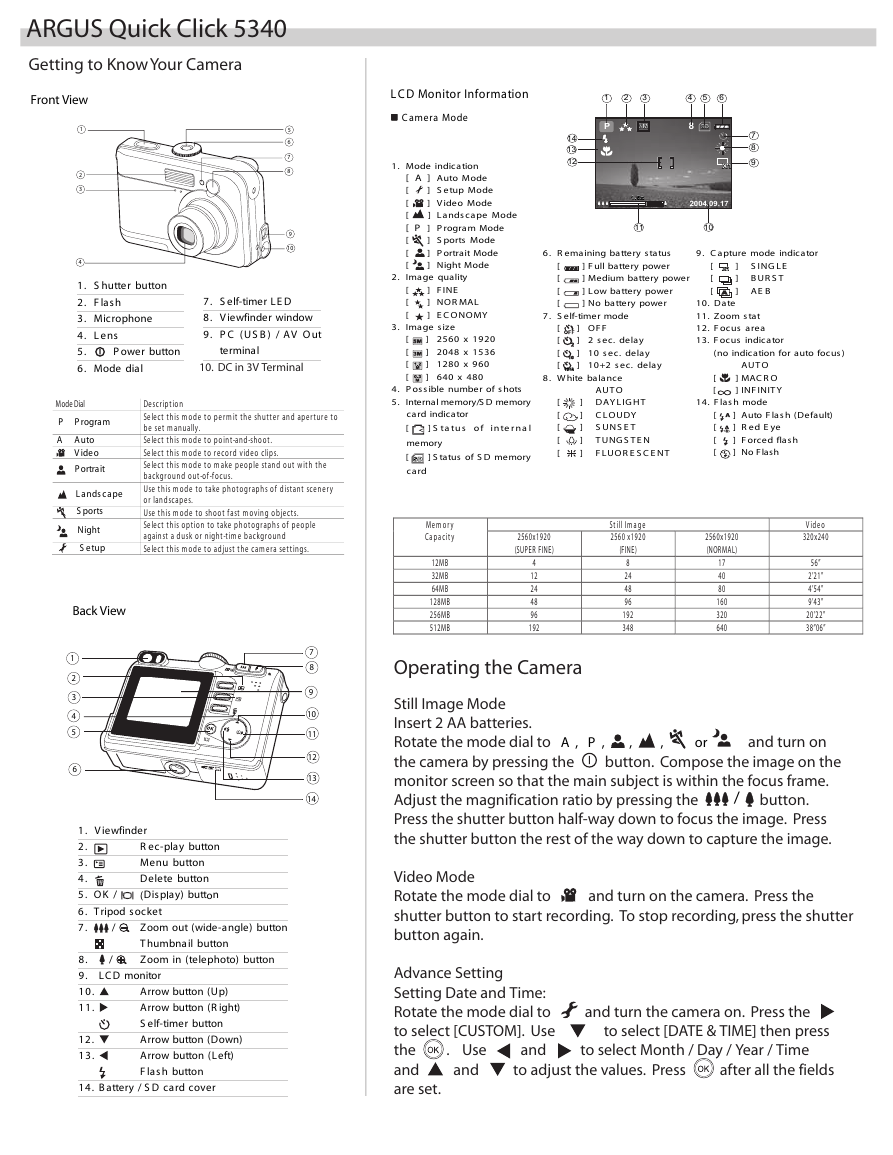
noitamrofnI rotinoM DCL
edoM aremaC
noitacidni edoM.1
1
P
41
31
21
2
3
4
5
6
33MM
8 SSDD
7
8
9
XX11
edoM otuA
]
edoM puteS]
edoM oediV]
edoM epacsdnaL]
edoM margorP]
edoM stropS]
edoM tiartroP]
edoM thgiN]
[ A
[
[
[
[ P
[
[
[
ytilauq egamI
[
[
[
ezis egamI
[
[
[
[
0291 x 0652]
6351 x 8402]
069 x 0821]
084 x 046]
ENIF]
LAMRON]
YMONOCE]
stohs fo rebmun elbissoP.4
.5
yromem DS/yromem lanretnI
rotacidni drac
[
lanretni fo sutatS]
yromem
[ SSDD
drac
yromem DS fo sutatS]
11..55xx
11
71.90.4002
01
sutats yrettab gniniameR.6
rewop yrettab lluF]
rewop yrettab muideM]
rewop yrettab woL]
rewop yrettab oN]
[
[
[
[
edom remit-fleS.7
[
[
[
[ 1100++22
FFO]
yaled .ces 2]
yaled .ces 01]
yaled .ces 2+01]
ecnalab etihW.8
OTUA
[
[
[
[
[
THGILYAD]
]
]
]
]
YDUOLC
TESNUS
NETSGNUT
TNECSEROULF
rotacidni edom erutpaC.9
XX11
[
[
[
ELGNIS
TSRUB
BEA
]
]
]
etaD .01
tats mooZ .11
aera sucoF .21
rotacidni sucoF .31
)sucof otua rof noitacidni on(
OTUA
ORCAM]
YTINIFNI]
[
[
edom hsalF .41
[
[
[
[
)tluafeD( hsalF otuA]
eyE deR]
hsalf decroF]
hsalF oN]
ARGUS Quick Click 5340
Getting to Know Your Camera
Front View
1
2
3
4
5
6
7
8
9
10
nottub rettuhS.1
hsalF.2
enohporciM.3
sneL.4
.5
laid edoM.6
nottub rewoP
DEL remit-fleS.7
wodniw rednifweiV.8
tuO VA / )BSU( CP.9
lanimret
10. DC in 3V Terminal
.2
.3
Mode Dial
P
margorP
otuA
oediV
tiartroP
epacsdnaL
stropS
thgiN
puteS
A
Back View
1
2
3
4
5
6
Description
Select this m ode to perm it the shutter and aperture to
be set m anually.
Select this m ode to point-and-shoot.
Select this m ode to record video clips.
Select this m ode to m ake people stand out w ith the
background out-of-focus.
Use this m ode to take photographs of distant scenery
or landscapes.
Use this m ode to shoot fast m oving objects.
Select this option to take photographs of people
against a dusk or night-tim e background
Select this m ode to adjust the cam era settings.
7
8
9
10
11
12
13
14
rednifweiV.1
.2
.3
.4
/ KO.5
tekcos dopirT.6
.7
/
nottub yalp-ceR
nottub uneM
nottub eteleD
nottub )yalpsiD(
nottub )elgna-ediw( tuo mooZ
nottub lianbmuhT
nottub )otohpelet( ni mooZ
/
.8
.9
.01
.11
.21
.31
rotinom DCL
)pU( nottub worrA
)thgiR( nottub worrA
nottub remit-fleS
)nwoD( nottub worrA
)tfeL( nottub worrA
nottub hsalF
revoc drac DS / yrettaB.41
Mem or y
Ca pa cit y
2560x1920
(SUPER FINE)
12MB
32MB
64MB
128MB
256MB
512MB
4
12
24
48
96
192
Operating the Camera
St ill Im a ge
2560 x1920
(FINE)
8
24
48
96
192
348
2560x1920
(NORMAL)
17
40
80
160
320
640
Video
320x240
56”
2’21”
4’54”
9’43”
20’22”
38”06”
A , P ,
Still Image Mode
Insert 2 AA batteries.
Rotate the mode dial to and turn on
the camera by pressing the button. Compose the image on the
monitor screen so that the main subject is within the focus frame.
Adjust the magnification ratio by pressing the button.
Press the shutter button half-way down to focus the image. Press
the shutter button the rest of the way down to capture the image.
ro
/
,
,
Video Mode
Rotate the mode dial to and turn on the camera. Press the
shutter button to start recording. To stop recording, press the shutter
button again.
Advance Setting
Setting Date and Time:
Rotate the mode dial to and turn the camera on. Press the
to select [DATE & TIME] then press
to select [CUSTOM]. Use
the
. Use and to select Month / Day / Year / Time
and and to adjust the values. Press after all the fields
are set.
�
ARGUS Quick Click 5340
A , P ,
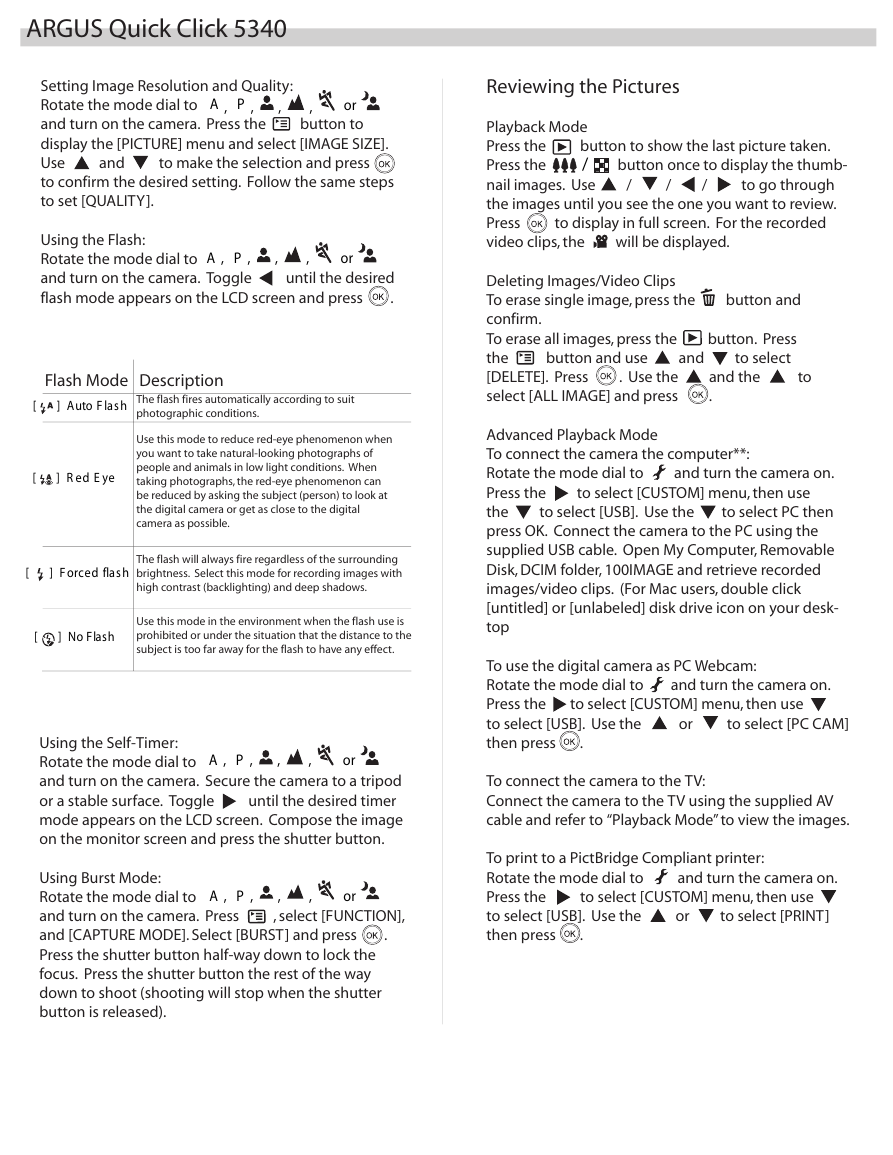
Setting Image Resolution and Quality:
Rotate the mode dial to
ro
,
and turn on the camera. Press the button to
display the [PICTURE] menu and select [IMAGE SIZE].
Use and to make the selection and press
to confirm the desired setting. Follow the same steps
to set [QUALITY].
,
Using the Flash:
Rotate the mode dial to
and turn on the camera. Toggle until the desired
flash mode appears on the LCD screen and press .
A , P ,
ro
,
,
Flash Mode Description
hsalF otuA]
[
[
[
[
The flash fires automatically according to suit
photographic conditions.
Use this mode to reduce red-eye phenomenon when
you want to take natural-looking photographs of
people and animals in low light conditions. When
taking photographs, the red-eye phenomenon can
be reduced by asking the subject (person) to look at
the digital camera or get as close to the digital
camera as possible.
eyE deR]
hsalf decroF]
The flash will always fire regardless of the surrounding
brightness. Select this mode for recording images with
high contrast (backlighting) and deep shadows.
hsalF oN]
Use this mode in the environment when the flash use is
prohibited or under the situation that the distance to the
subject is too far away for the flash to have any effect.
A , P ,
Using the Self-Timer:
Rotate the mode dial to
and turn on the camera. Secure the camera to a tripod
or a stable surface. Toggle until the desired timer
mode appears on the LCD screen. Compose the image
on the monitor screen and press the shutter button.
ro
,
,
,
,
A , P ,
Using Burst Mode:
Rotate the mode dial to
and turn on the camera. Press , select [FUNCTION],
and [CAPTURE MODE]. Select [BURST] and press .
Press the shutter button half-way down to lock the
focus. Press the shutter button the rest of the way
down to shoot (shooting will stop when the shutter
button is released).
ro
Reviewing the Pictures
/
Playback Mode
Press the button to show the last picture taken.
Press the button once to display the thumb-
nail images. Use / / / to go through
the images until you see the one you want to review.
Press to display in full screen. For the recorded
video clips, the will be displayed.
Deleting Images/Video Clips
To erase single image, press the button and
confirm.
To erase all images, press the button. Press
the button and use and to select
[DELETE]. Press . Use the and the to
select [ALL IMAGE] and press .
Advanced Playback Mode
To connect the camera the computer**:
Rotate the mode dial to and turn the camera on.
Press the to select [CUSTOM] menu, then use
the to select [USB]. Use the to select PC then
press OK. Connect the camera to the PC using the
supplied USB cable. Open My Computer, Removable
Disk, DCIM folder, 100IMAGE and retrieve recorded
images/video clips. (For Mac users, double click
[untitled] or [unlabeled] disk drive icon on your desk-
top
To use the digital camera as PC Webcam:
Rotate the mode dial to and turn the camera on.
Press the to select [CUSTOM] menu, then use
to select [USB]. Use the or to select [PC CAM]
then press .
To connect the camera to the TV:
Connect the camera to the TV using the supplied AV
cable and refer to “Playback Mode” to view the images.
To print to a PictBridge Compliant printer:
Rotate the mode dial to and turn the camera on.
Press the to select [CUSTOM] menu, then use
to select [USB]. Use the or to select [PRINT]
then press .
�
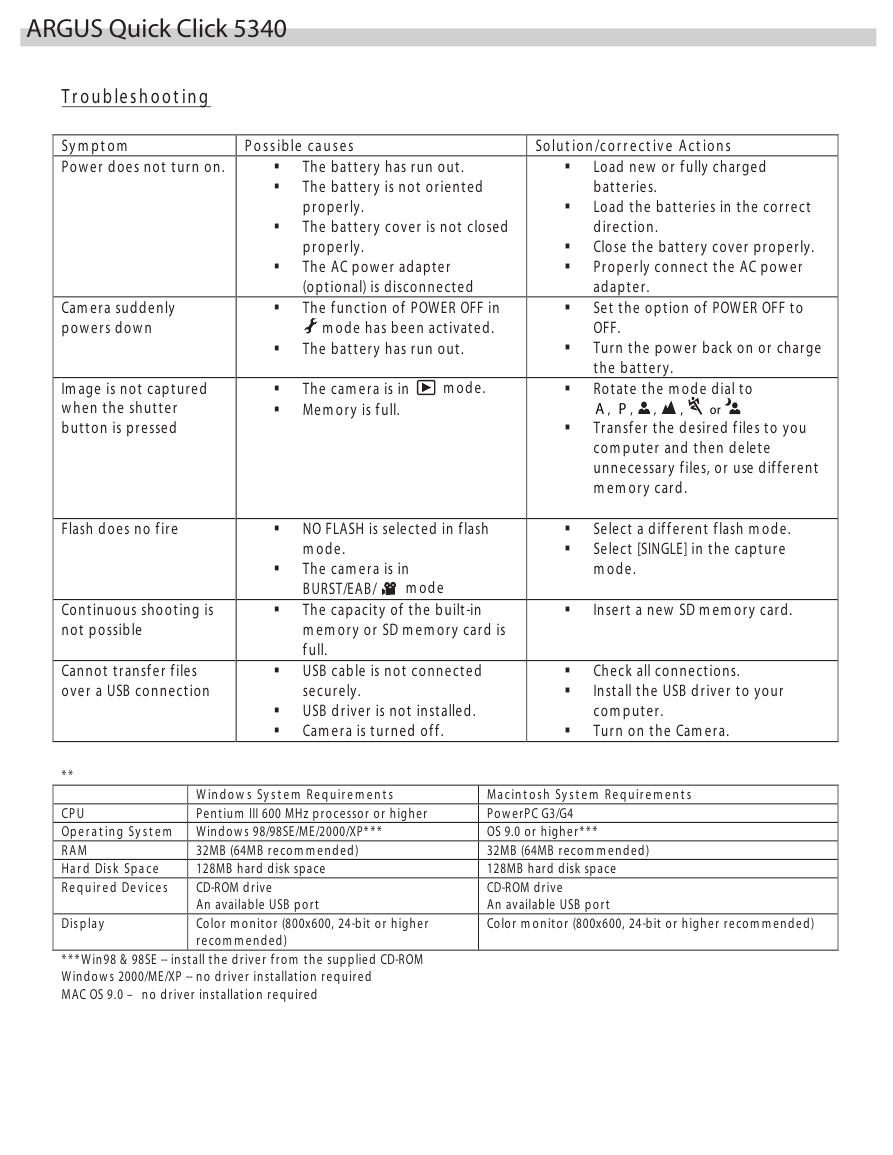
P o s s ib le ca u s e s
So lu t io n /co r r e ct iv e Act io n s
ARGUS Quick Click 5340
T r o u b le s h o o t in g
Sy m p t o m
Pow er does not turn on.
Cam era suddenly
pow ers dow n
Im age is not captured
w hen the shutter
button is pressed
Flash does no f ire
Continuous shooting is
not possible
Cannot transf er f iles
over a USB connection
The battery has run out.
The battery is not oriented
properly.
The battery cover is not closed
properly.
The AC pow er adapter
(optional) is disconnected
The f unction of POWER OFF in
m ode has been activated.
The battery has run out.
The cam era is in
Mem ory is f ull.
m ode.
NO FLASH is selected in f lash
m ode.
The cam era is in
BURST/EAB/ m ode
The capacity of the built -in
m em ory or SD m em ory card is
f ull.
USB cable is not connected
securely.
USB driver is not installed.
Cam era is turned of f .
Load new or f ully charged
batteries.
Load the batteries in the correct
direction.
Close the battery cover properly.
Properly connect the AC pow er
adapter.
Set the option of POWER OFF to
OFF.
Turn the pow er back on or charge
the battery.
Rotate the m ode dial to
A , P ,
Transf er the desired f iles to you
com puter and then delete
unnecessary f iles, or use dif f erent
m em ory card.
ro
,
,
Select a dif f erent f lash m ode.
Select [SINGLE] in the capture
m ode.
Insert a new SD m em ory card.
Check all connections.
Install the USB driver to your
com puter.
Turn on the Cam era.
* *
CP U
Op e r a t in g Sy s t e m
R A M
Ha r d Dis k Sp a ce
R e q u ir e d De v ice s
Dis p la y
W in d o w s Sy s t e m R e q u ir e m e n t s
Pentium III 600 MHz pro cesso r o r higher
Wind o w s 98/98SE/ME/2000/XP* * *
32MB (64MB reco m m end ed )
128MB hard d isk space
CD-ROM d rive
An available USB po rt
Co lo r m o nito r (800x600, 24-bit o r higher
reco m m end ed )
Ma cin t o s h Sy s t e m R e q u ir e m e n t s
Po w erPC G3/G4
OS 9.0 o r higher * * *
32MB (64MB reco m m end ed )
128MB hard d isk space
CD-ROM d rive
An available USB po rt
Co lo r m o nito r (800x600, 24-bit o r higher reco m m end ed )
* * * Win 98 & 98SE -- install the d river f ro m the supplied CD-ROM
Wind o w s 2000/ME/XP -- no d river installatio n req uired
MAC OS 9.0 – no d river installatio n req uired
�


 2023年江西萍乡中考道德与法治真题及答案.doc
 2012年重庆南川中考生物真题及答案.doc
 2013年江西师范大学地理学综合及文艺理论基础考研真题.doc
 2020年四川甘孜小升初语文真题及答案I卷.doc
 2020年注册岩土工程师专业基础考试真题及答案.doc
 2023-2024学年福建省厦门市九年级上学期数学月考试题及答案.doc
 2021-2022学年辽宁省沈阳市大东区九年级上学期语文期末试题及答案.doc
 2022-2023学年北京东城区初三第一学期物理期末试卷及答案.doc
 2018上半年江西教师资格初中地理学科知识与教学能力真题及答案.doc
 2012年河北国家公务员申论考试真题及答案-省级.doc
 2020-2021学年江苏省扬州市江都区邵樊片九年级上学期数学第一次质量检测试题及答案.doc
 2022下半年黑龙江教师资格证中学综合素质真题及答案.doc