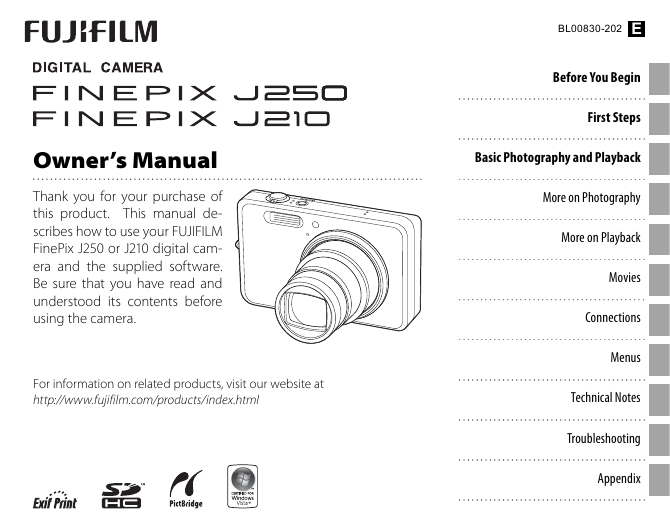
Owner’s Manual
Thank you for your purchase of
this product. This manual de-
scribes how to use your FUJIFILM
FinePix J250 or J210 digital cam-
era and the supplied software.
Be sure that you have read and
understood its contents before
using the camera.
For information on related products, visit our website at
http://www.fujifilm.com/products/index.html
BL00830-202 E
Before You Begin
First Steps
Basic Photography and Playback
More on Photography
More on Playback
Movies
Connections
Menus
Technical Notes
Troubleshooting
Appendix
�
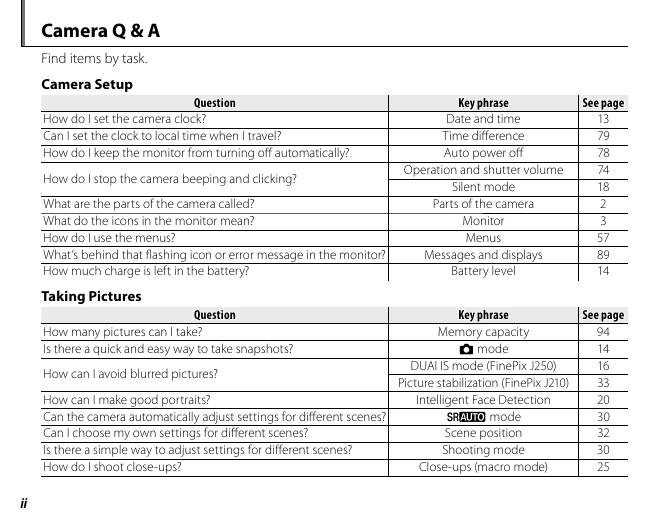
Camera Q & A
Find items by task.
Camera Setup
Camera Setup
Question
Question
How do I set the camera clock?
Can I set the clock to local time when I travel?
How do I keep the monitor from turning off automatically?
How do I stop the camera beeping and clicking?
What are the parts of the camera called?
What do the icons in the monitor mean?
How do I use the menus?
What’s behind that fl ashing icon or error message in the monitor?
How much charge is left in the battery?
Taking Pictures
Taking Pictures
Question
Question
How many pictures can I take?
Is there a quick and easy way to take snapshots?
How can I avoid blurred pictures?
Key phrase
Key phrase
Date and time
Time diff erence
Auto power off
Operation and shutter volume
Silent mode
Parts of the camera
Monitor
Menus
Messages and displays
Battery level
Key phrase
Key phrase
Memory capacity
B mode
DUAI IS mode (FinePix J250)
Picture stabilization (FinePix J210)
How can I make good portraits?
Can the camera automatically adjust settings for diff erent scenes? M mode
Can I choose my own settings for diff erent scenes?
Scene position
Is there a simple way to adjust settings for diff erent scenes?
Shooting mode
How do I shoot close-ups?
Close-ups (macro mode)
Intelligent Face Detection
See page
See page
13
79
78
74
18
2
3
57
89
14
See page
See page
94
14
16
33
20
30
32
30
25
ii
�
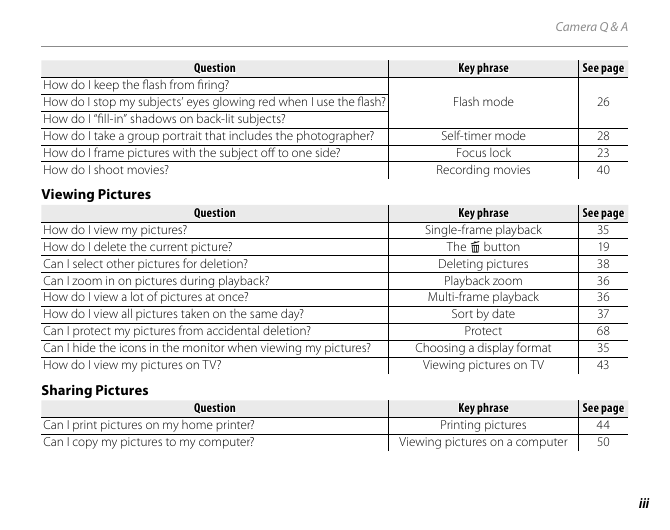
Question
Question
How do I keep the fl ash from fi ring?
How do I stop my subjects’ eyes glowing red when I use the fl ash?
How do I “fi ll-in” shadows on back-lit subjects?
How do I take a group portrait that includes the photographer?
How do I frame pictures with the subject off to one side?
How do I shoot movies?
Viewing Pictures
Viewing Pictures
Camera Q & A
Key phrase
Key phrase
See page
See page
Flash mode
Self-timer mode
Focus lock
Recording movies
26
28
23
40
Question
Question
Key phrase
Key phrase
See page
See page
How do I view my pictures?
How do I delete the current picture?
Can I select other pictures for deletion?
Can I zoom in on pictures during playback?
How do I view a lot of pictures at once?
How do I view all pictures taken on the same day?
Can I protect my pictures from accidental deletion?
Can I hide the icons in the monitor when viewing my pictures?
How do I view my pictures on TV?
Sharing Pictures
Sharing Pictures
Question
Question
Can I print pictures on my home printer?
Can I copy my pictures to my computer?
Single-frame playback
The b button
Deleting pictures
Playback zoom
Multi-frame playback
Sort by date
Protect
Choosing a display format
Viewing pictures on TV
35
19
38
36
36
37
68
35
43
Key phrase
Key phrase
Printing pictures
Viewing pictures on a computer
See page
See page
44
50
iii
�
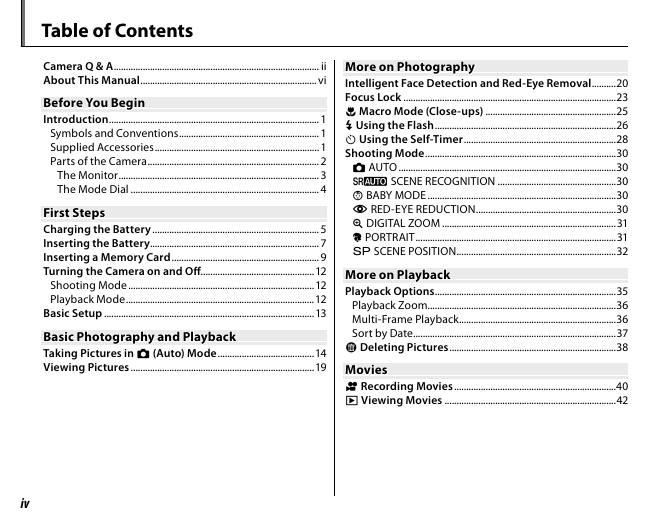
Table of Contents
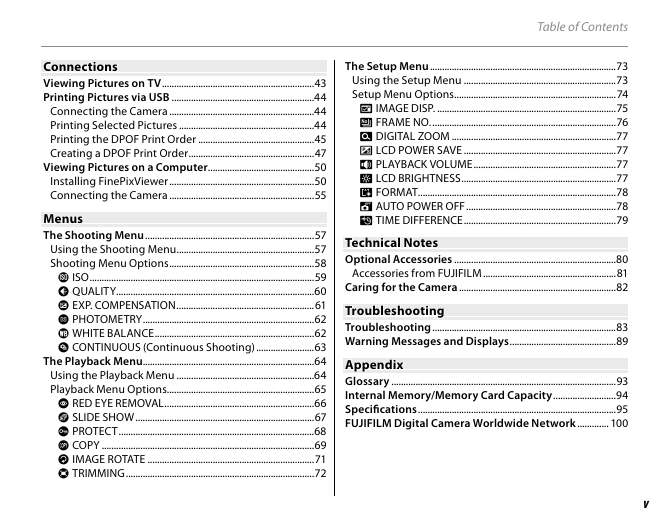
Camera Q & A ..................................................................................... ii
About This Manual ......................................................................... vi
Before You Begin
Before You Begin
Introduction ....................................................................................... 1
Symbols and Conventions .......................................................... 1
Supplied Accessories .................................................................... 1
Parts of the Camera ....................................................................... 2
The Monitor ................................................................................... 3
The Mode Dial .............................................................................. 4
First Steps
First Steps
Charging the Battery ..................................................................... 5
Inserting the Battery...................................................................... 7
Inserting a Memory Card ............................................................. 9
Turning the Camera on and Off ...............................................12
Shooting Mode .............................................................................12
Playback Mode ..............................................................................12
Basic Setup .......................................................................................13
Basic Photography and Playback
Basic Photography and Playback
Taking Pictures in B (Auto) Mode ........................................14
Viewing Pictures ............................................................................19
More on Photography
More on Photography
Intelligent Face Detection and Red-Eye Removal ..........20
Focus Lock ........................................................................................23
F Macro Mode (Close-ups) ......................................................25
N Using the Flash ...........................................................................26
h Using the Self-Timer ...............................................................28
Shooting Mode ...............................................................................30
B AUTO ..........................................................................................30
M SCENE RECOGNITION .................................................30
Y BABY MODE ..............................................................................30
J RED-EYE REDUCTION ..........................................................30
k DIGITAL ZOOM ........................................................................31
C PORTRAIT ...................................................................................31
H SCENE POSITION ..................................................................32
More on Playback
More on Playback
Playback Options ...........................................................................35
Playback Zoom ..............................................................................36
Multi-Frame Playback .................................................................36
Sort by Date ....................................................................................37
A Deleting Pictures .....................................................................38
Movies
Movies
F Recording Movies ...................................................................40
a Viewing Movies .......................................................................42
iv
�
Connections
Connections
Viewing Pictures on TV ...............................................................43
Printing Pictures via USB ...........................................................44
Connecting the Camera ............................................................44
Printing Selected Pictures ........................................................44
Printing the DPOF Print Order ................................................45
Creating a DPOF Print Order ....................................................47
Viewing Pictures on a Computer ............................................50
Installing FinePixViewer ............................................................50
Connecting the Camera ............................................................55
Menus
Menus
The Shooting Menu ......................................................................57
Using the Shooting Menu .........................................................57
Shooting Menu Options ............................................................58
N ISO .............................................................................................59
O QUALITY ..................................................................................60
V EXP. COMPENSATION .........................................................61
C PHOTOMETRY .......................................................................62
D WHITE BALANCE ..................................................................62
R CONTINUOUS (Continuous Shooting) ........................63
The Playback Menu.......................................................................64
Using the Playback Menu .........................................................64
Playback Menu Options .............................................................65
B RED EYE REMOVAL ..............................................................66
I SLIDE SHOW ..........................................................................67
D PROTECT .................................................................................68
E COPY ........................................................................................69
C IMAGE ROTATE .....................................................................71
G TRIMMING ..............................................................................72
Table of Contents
The Setup Menu .............................................................................73
Using the Setup Menu ...............................................................73
Setup Menu Options ...................................................................74
A IMAGE DISP. ..........................................................................75
B FRAME NO. ............................................................................76
D DIGITAL ZOOM ....................................................................77
U LCD POWER SAVE ...............................................................77
I PLAYBACK VOLUME ...........................................................77
J LCD BRIGHTNESS ................................................................77
K FORMAT..................................................................................78
M AUTO POWER OFF ..............................................................78
N TIME DIFFERENCE ...............................................................79
Technical Notes
Technical Notes
Optional Accessories ...................................................................80
Accessories from FUJIFILM .......................................................81
Caring for the Camera .................................................................82
Troubleshooting
Troubleshooting
Troubleshooting ............................................................................83
Warning Messages and Displays ............................................89
Appendix
Appendix
Glossary .............................................................................................93
Internal Memory/Memory Card Capacity ..........................94
Specifi cations ..................................................................................95
FUJIFILM Digital Camera Worldwide Network ............. 100
v
�
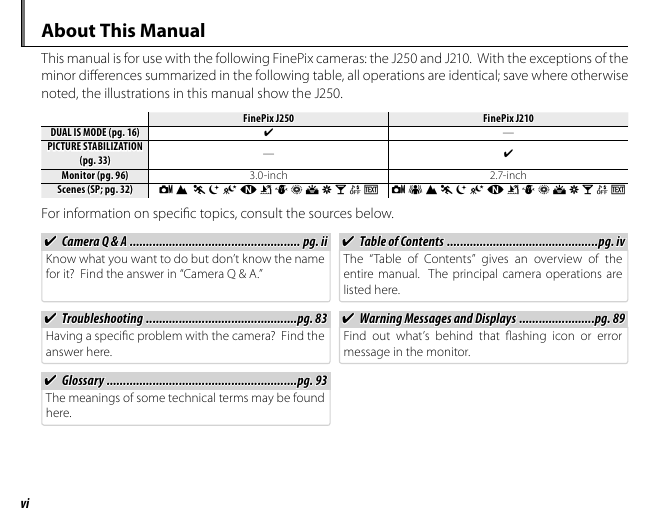
About This Manual
This manual is for use with the following FinePix cameras: the J250 and J210. With the exceptions of the
minor diff erences summarized in the following table, all operations are identical; save where otherwise
noted, the illustrations in this manual show the J250.
DUAL IS MODE (pg. 16)
DUAL IS MODE (pg. 16)
PICTURE STABILIZATION
PICTURE STABILIZATION
(pg. 33)
(pg. 33)
FinePix J250
FinePix J250
—
FinePix J210
FinePix J210
—
Monitor (pg. 96)
Monitor (pg. 96)
Scenes (SP; pg. 32)
Scenes (SP; pg. 32) I M N O H D S R P Q V U T W I E M N O H D S R P Q V U T W
3.0-inch
2.7-inch
For information on specifi c topics, consult the sources below.
Camera Q & A
Camera Q & A ....................................................
.................................................... pg. ii
pg. ii
Know what you want to do but don’t know the name
for it? Find the answer in “Camera Q & A.”
Table of Contents
Table of Contents ..............................................
..............................................pg. iv
pg. iv
The “Table of Contents” gives an overview of the
entire manual. The principal camera operations are
listed here.
Troubleshooting
Troubleshooting ..............................................
..............................................pg. 83
pg. 83
Having a specifi c problem with the camera? Find the
answer here.
Warning Messages and Displays
Warning Messages and Displays .......................
.......................pg. 89
pg. 89
Find out what’s behind that fl ashing icon or error
message in the monitor.
Glossary
Glossary ..........................................................
..........................................................pg. 93
pg. 93
The meanings of some technical terms may be found
here.
vi
✔
✔
✔
✔
✔
✔
✔
✔
✔
✔
✔
✔
�
Introduction
Symbols and Conventions
Symbols and Conventions
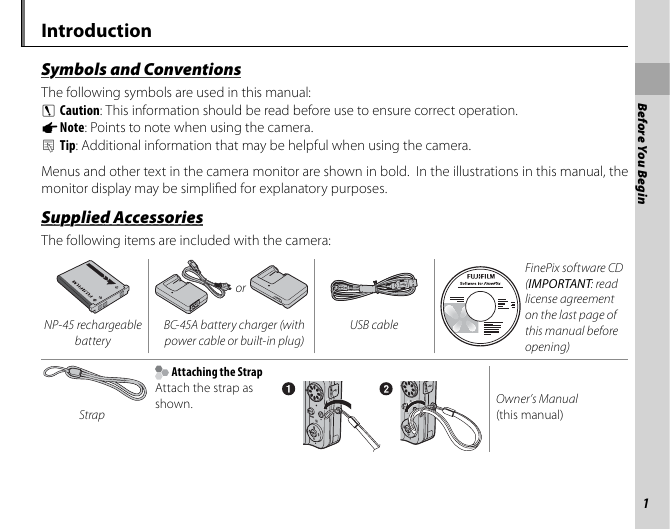
The following symbols are used in this manual:
3 Caution: This information should be read before use to ensure correct operation.
1 Note: Points to note when using the camera.
2 Tip: Additional information that may be helpful when using the camera.
Menus and other text in the camera monitor are shown in bold. In the illustrations in this manual, the
monitor display may be simplifi ed for explanatory purposes.
Supplied Accessories
Supplied Accessories
The following items are included with the camera:
or
NP-45 rechargeable
battery
BC-45A battery charger (with
power cable or built-in plug)
USB cable
Attaching the Strap
Attach the strap as
shown.
Strap
FinePix software CD
(IMPORTANT: read
license agreement
on the last page of
this manual before
opening)
Owner’s Manual
(this manual)
B
e
f
o
r
e
Y
o
u
B
e
g
i
n
1
�
Parts of the Camera
Parts of the Camera
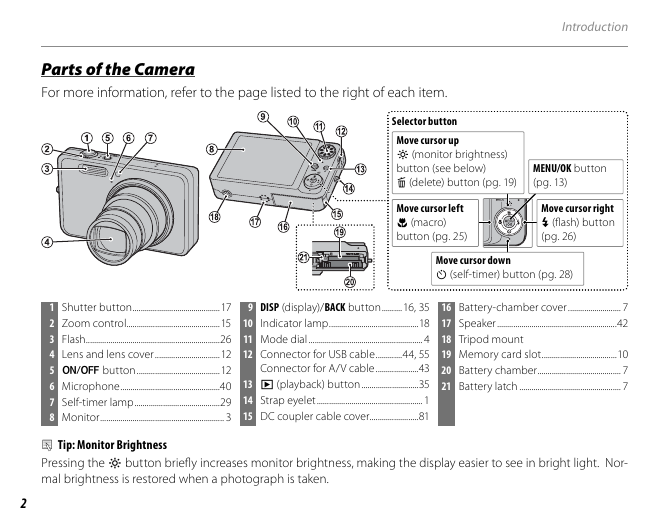
For more information, refer to the page listed to the right of each item.
Introduction
Selector button
Move cursor up
m (monitor brightness)
button (see below)
b (delete) button (pg. 19)
Move cursor left
F (macro)
button (pg. 25)
MENU/OK button
(pg. 13)
Move cursor right
N (fl ash) button
(pg. 26)
1 Shutter button ...........................................17
2 Zoom control ..............................................15
3 Flash ..................................................................26
4 Lens and lens cover ................................12
5 G button .........................................12
6 Microphone .................................................40
7 Self-timer lamp ..........................................29
8 Monitor ............................................................. 3
9 DISP (display)/BACK button ..........16, 35
10 Indicator lamp ............................................18
11 Mode dial ........................................................ 4
12 Connector for USB cable .............44, 55
Connector for A/V cable .....................43
13 a (playback) button ............................35
14 Strap eyelet .................................................... 1
15 DC coupler cable cover ........................81
Move cursor down
h (self-timer) button (pg. 28)
16 Battery-chamber cover .......................... 7
17 Speaker ...........................................................42
18 Tripod mount
19 Memory card slot .....................................10
20 Battery chamber ......................................... 7
21 Battery latch .................................................. 7
2 Tip: Monitor Brightness
Pressing the m button briefl y increases monitor brightness, making the display easier to see in bright light. Nor-
mal brightness is restored when a photograph is taken.
2
�


 2023年江西萍乡中考道德与法治真题及答案.doc
 2012年重庆南川中考生物真题及答案.doc
 2013年江西师范大学地理学综合及文艺理论基础考研真题.doc
 2020年四川甘孜小升初语文真题及答案I卷.doc
 2020年注册岩土工程师专业基础考试真题及答案.doc
 2023-2024学年福建省厦门市九年级上学期数学月考试题及答案.doc
 2021-2022学年辽宁省沈阳市大东区九年级上学期语文期末试题及答案.doc
 2022-2023学年北京东城区初三第一学期物理期末试卷及答案.doc
 2018上半年江西教师资格初中地理学科知识与教学能力真题及答案.doc
 2012年河北国家公务员申论考试真题及答案-省级.doc
 2020-2021学年江苏省扬州市江都区邵樊片九年级上学期数学第一次质量检测试题及答案.doc
 2022下半年黑龙江教师资格证中学综合素质真题及答案.doc