�
1 Product Overview…………………………………………………………………………………… 3
2 Getting Started…………………………………………………………………………………...…. 3
2.1 Loading the Batteries……………………………………………………………………..….. 3
2.2 Attach the hand Strap ………………………………………………………...………..……. 3
2.3
Inserting and Removing an SD/MMC Memory Card (Optional).………………….…..…. 4
2.4 Turning the Camera Power ON/OFF………………………………………………………. 4
2.5 Capturing Images……………………………………………………………………….……. 4
3 Camera Controls and Displays …………………………………………………………….…… 5
3.1 Camera Mode………………………………………………………………………………… 5
3.2 Playback Mode……………………………………………………………………………….. 8
4 Connecting Your Camera to Your Computer……………………………………...…………… 11
4.1
Installing the USB Driver……………………………………………………………………… 11
4.2 Transferring Images to your Computer…………………………………...……..…………. 11
4.3 Printing your Images……………………………………………………………………………11
4.4 PC/Web Camera Mode…………………………………………………………………………11
5 Using the V3632 Camera with VideoImpression 1.6…………………………………………. 13
Installing VideoImpression 1.6 …………………………………………………………….. 13
5.1
5.2 Using Your Camera with VideoImpression 1.6……………….…………………………….. 13
6 Vivicam 3632 Specifications…………………………………..…………………………….….. 16
Page 2 of 16
Revised 01 July 03
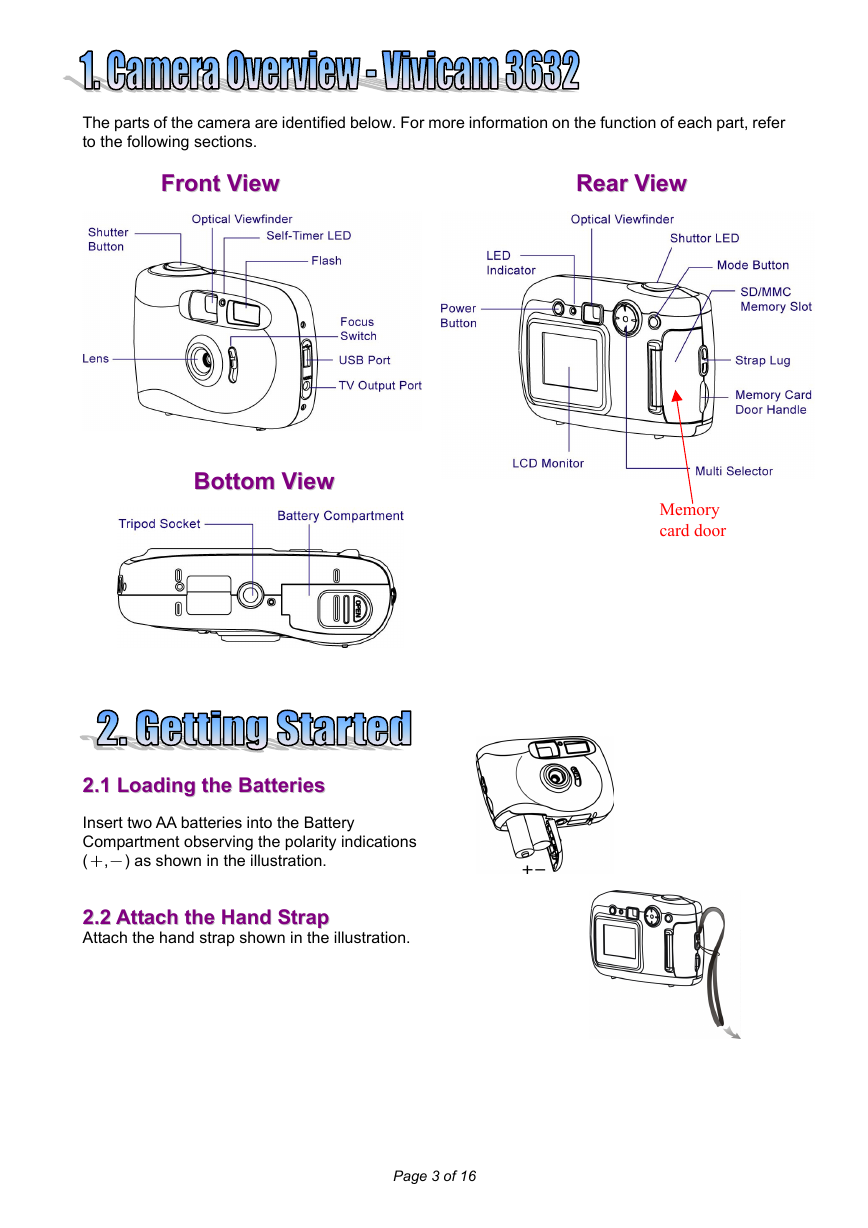
The parts of the camera are identified below. For more information on the function of each part, refer
to the following sections.
RReeaarr VViieeww
FFrroonntt VViieeww
BBoottttoomm VViieeww
22..11 LLooaaddiinngg tthhee BBaatttteerriieess
Insert two AA batteries into the Battery
Compartment observing the polarity indications
(+,-) as shown in the illustration.
22..22 AAttttaacchh tthhee HHaanndd SSttrraapp
Attach the hand strap shown in the illustration.
Memory
card door
Page 3 of 16
�
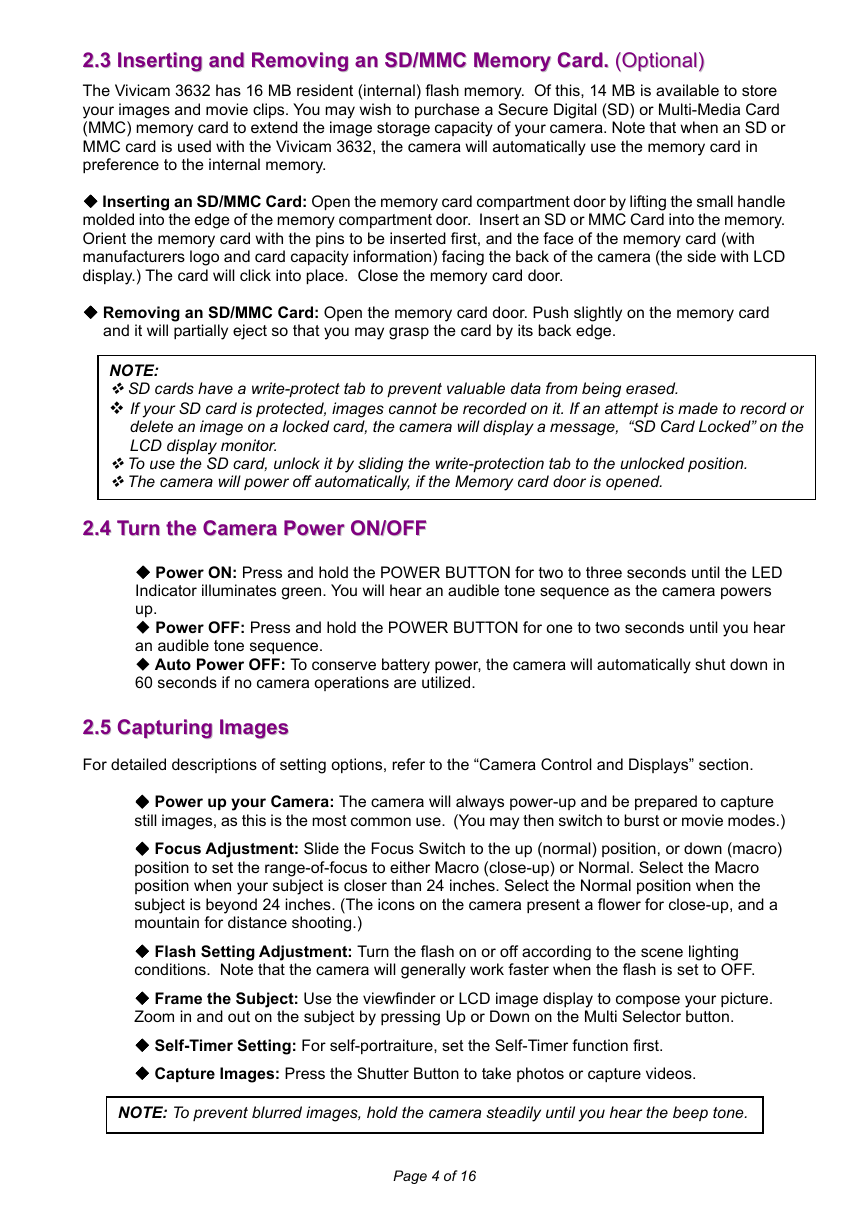
22..33 IInnsseerrttiinngg aanndd RReemmoovviinngg aann SSDD//MMMMCC MMeemmoorryy CCaarrdd.. ((OOppttiioonnaall))
The Vivicam 3632 has 16 MB resident (internal) flash memory. Of this, 14 MB is available to store
your images and movie clips. You may wish to purchase a Secure Digital (SD) or Multi-Media Card
(MMC) memory card to extend the image storage capacity of your camera. Note that when an SD or
MMC card is used with the Vivicam 3632, the camera will automatically use the memory card in
preference to the internal memory.
Inserting an SD/MMC Card: Open the memory card compartment door by lifting the small handle
molded into the edge of the memory compartment door. Insert an SD or MMC Card into the memory.
Orient the memory card with the pins to be inserted first, and the face of the memory card (with
manufacturers logo and card capacity information) facing the back of the camera (the side with LCD
display.) The card will click into place. Close the memory card door.
Removing an SD/MMC Card: Open the memory card door. Push slightly on the memory card
and it will partially eject so that you may grasp the card by its back edge.
NOTE:
SD cards have a write-protect tab to prevent valuable data from being erased.
If your SD card is protected, images cannot be recorded on it. If an attempt is made to record or
delete an image on a locked card, the camera will display a message, “SD Card Locked” on the
LCD display monitor.
To use the SD card, unlock it by sliding the write-protection tab to the unlocked position.
The camera will power off automatically, if the Memory card door is opened.
22..44 TTuurrnn tthhee CCaammeerraa PPoowweerr OONN//OOFFFF
Power ON: Press and hold the POWER BUTTON for two to three seconds until the LED
Indicator illuminates green. You will hear an audible tone sequence as the camera powers
up.
Power OFF: Press and hold the POWER BUTTON for one to two seconds until you hear
an audible tone sequence.
Auto Power OFF: To conserve battery power, the camera will automatically shut down in
60 seconds if no camera operations are utilized.
22..55 CCaappttuurriinngg IImmaaggeess
For detailed descriptions of setting options, refer to the “Camera Control and Displays” section.
Power up your Camera: The camera will always power-up and be prepared to capture
still images, as this is the most common use. (You may then switch to burst or movie modes.)
Focus Adjustment: Slide the Focus Switch to the up (normal) position, or down (macro)
position to set the range-of-focus to either Macro (close-up) or Normal. Select the Macro
position when your subject is closer than 24 inches. Select the Normal position when the
subject is beyond 24 inches. (The icons on the camera present a flower for close-up, and a
mountain for distance shooting.)
Flash Setting Adjustment: Turn the flash on or off according to the scene lighting
conditions. Note that the camera will generally work faster when the flash is set to OFF.
Frame the Subject: Use the viewfinder or LCD image display to compose your picture.
Zoom in and out on the subject by pressing Up or Down on the Multi Selector button.
Self-Timer Setting: For self-portraiture, set the Self-Timer function first.
Capture Images: Press the Shutter Button to take photos or capture videos.
NOTE: To prevent blurred images, hold the camera steadily until you hear the beep tone.
Page 4 of 16
�
33..11 CCaammeerraa MMooddee
The camera will always power-up in Camera Mode, and it will be prepared to capture
still images. Press the Mode Button to change between Camera-Mode and
Playback-Mode.
Within Camera Mode there are two additional camera functions: movie clip capture,
and burst capture.
To changing camera settings, use the Multi Selector button to navigate through the
setting options.
Note: Camera Mode is the default setting when the camera is powered on.
3.1.1 On-Screen Display (OSD) Information – Camera Mode:
3.1.1.1 The Multi Selector Button:
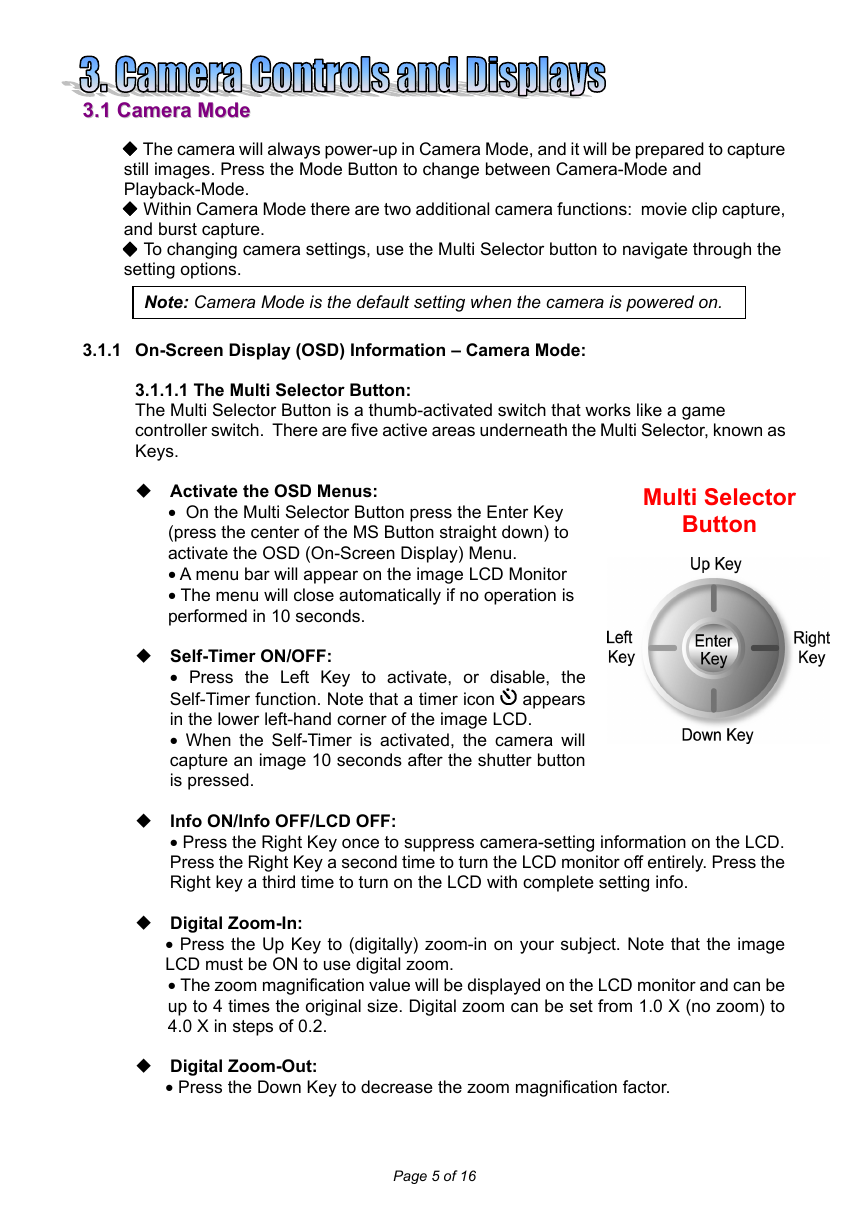
The Multi Selector Button is a thumb-activated switch that works like a game
controller switch. There are five active areas underneath the Multi Selector, known as
Keys.
Activate the OSD Menus:
Multi Selector
Button
• On the Multi Selector Button press the Enter Key
(press the center of the MS Button straight down) to
activate the OSD (On-Screen Display) Menu.
• A menu bar will appear on the image LCD Monitor
• The menu will close automatically if no operation is
performed in 10 seconds.
Self-Timer ON/OFF:
• Press the Left Key to activate, or disable, the
Self-Timer function. Note that a timer icon
appears
in the lower left-hand corner of the image LCD.
• When the Self-Timer is activated, the camera will
capture an image 10 seconds after the shutter button
is pressed.
Info ON/Info OFF/LCD OFF:
• Press the Right Key once to suppress camera-setting information on the LCD.
Press the Right Key a second time to turn the LCD monitor off entirely. Press the
Right key a third time to turn on the LCD with complete setting info.
Digital Zoom-In:
• Press the Up Key to (digitally) zoom-in on your subject. Note that the image
LCD must be ON to use digital zoom.
• The zoom magnification value will be displayed on the LCD monitor and can be
up to 4 times the original size. Digital zoom can be set from 1.0 X (no zoom) to
4.0 X in steps of 0.2.
Digital Zoom-Out:
• Press the Down Key to decrease the zoom magnification factor.
Page 5 of 16
�
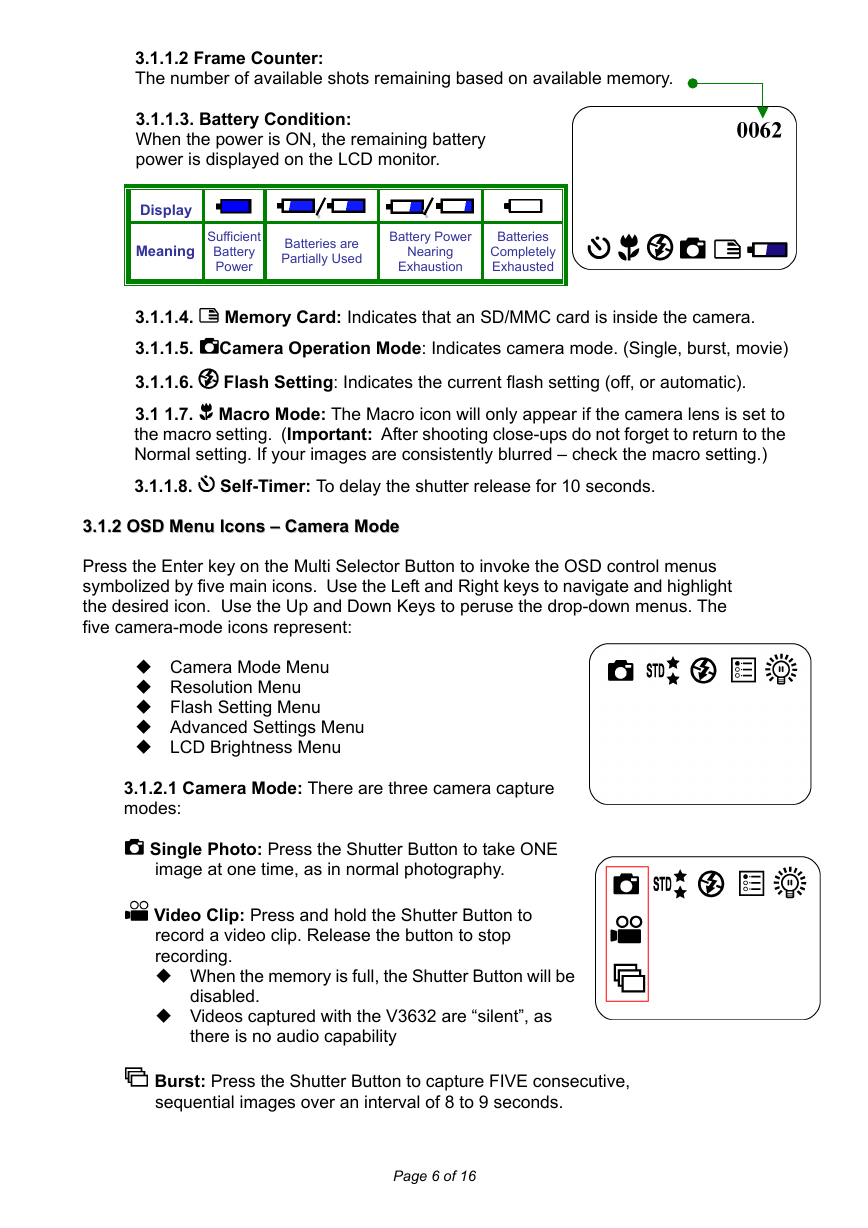
3.1.1.2 Frame Counter:
The number of available shots remaining based on available memory.
3.1.1.3. Battery Condition:
When the power is ON, the remaining battery
power is displayed on the LCD monitor.
Display
Meaning
Sufficient
Battery
Power
Batteries are
Partially Used
Battery Power
Nearing
Exhaustion
Batteries
Completely
Exhausted
Memory Card: Indicates that an SD/MMC card is inside the camera.
3.1.1.4.
3.1.1.5. Camera Operation Mode: Indicates camera mode. (Single, burst, movie)
3.1.1.6.
Flash Setting: Indicates the current flash setting (off, or automatic).
3.1 1.7.
Macro Mode: The Macro icon will only appear if the camera lens is set to
the macro setting. (Important: After shooting close-ups do not forget to return to the
Normal setting. If your images are consistently blurred – check the macro setting.)
3.1.1.8.
Self-Timer: To delay the shutter release for 10 seconds.
33..11..22 OOSSDD MMeennuu IIccoonnss –– CCaammeerraa MMooddee
Press the Enter key on the Multi Selector Button to invoke the OSD control menus
symbolized by five main icons. Use the Left and Right keys to navigate and highlight
the desired icon. Use the Up and Down Keys to peruse the drop-down menus. The
five camera-mode icons represent:
Camera Mode Menu
Resolution Menu
Flash Setting Menu
Advanced Settings Menu
LCD Brightness Menu
3.1.2.1 Camera Mode: There are three camera capture
modes:
Single Photo: Press the Shutter Button to take ONE
image at one time, as in normal photography.
Video Clip: Press and hold the Shutter Button to
record a video clip. Release the button to stop
recording.
When the memory is full, the Shutter Button will be
disabled.
Videos captured with the V3632 are “silent”, as
there is no audio capability
Burst: Press the Shutter Button to capture FIVE consecutive,
sequential images over an interval of 8 to 9 seconds.
Page 6 of 16
�
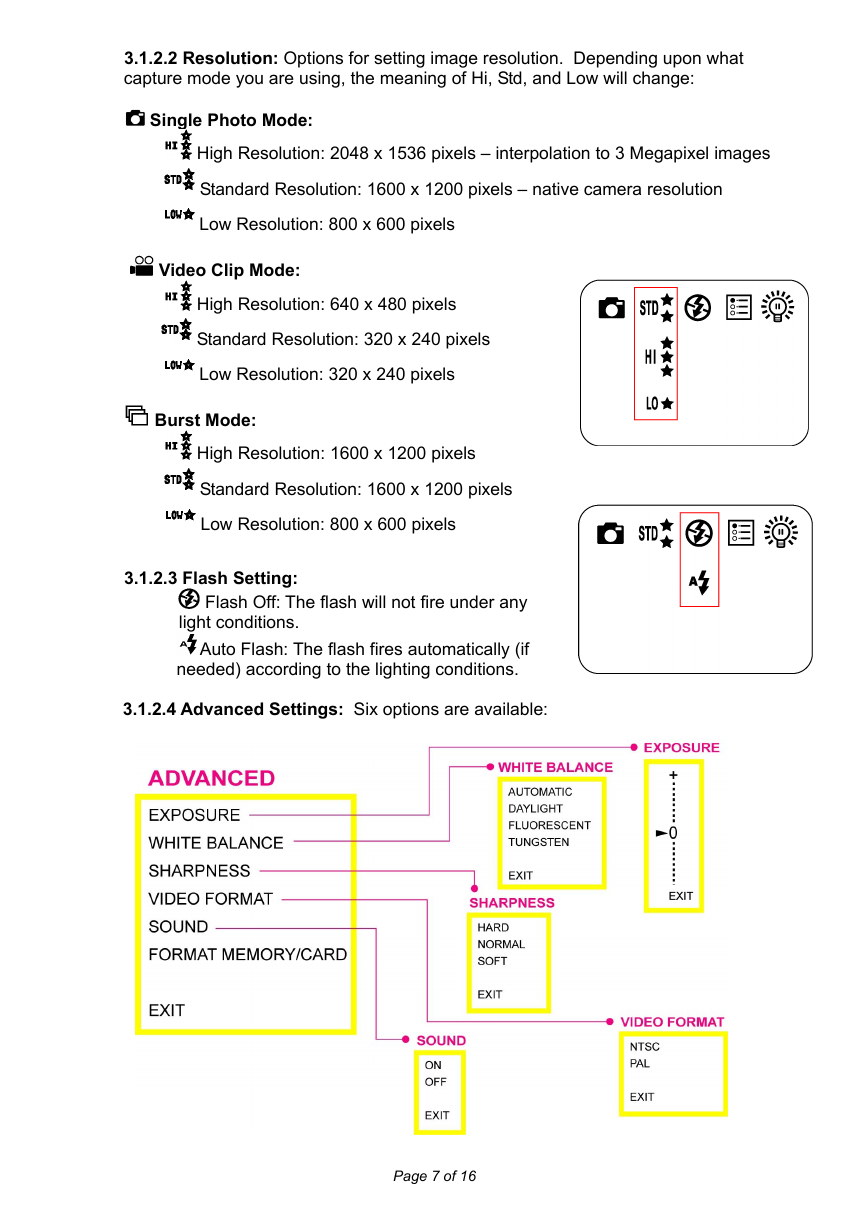
3.1.2.2 Resolution: Options for setting image resolution. Depending upon what
capture mode you are using, the meaning of Hi, Std, and Low will change:
Single Photo Mode:
High Resolution: 2048 x 1536 pixels – interpolation to 3 Megapixel images
Standard Resolution: 1600 x 1200 pixels – native camera resolution
Low Resolution: 800 x 600 pixels
Video Clip Mode:
High Resolution: 640 x 480 pixels
Standard Resolution: 320 x 240 pixels
Low Resolution: 320 x 240 pixels
Burst Mode:
High Resolution: 1600 x 1200 pixels
Standard Resolution: 1600 x 1200 pixels
Low Resolution: 800 x 600 pixels
3.1.2.3 Flash Setting:
Flash Off: The flash will not fire under any
light conditions.
Auto Flash: The flash fires automatically (if
needed) according to the lighting conditions.
3.1.2.4 Advanced Settings: Six options are available:
Page 7 of 16
�
Exposure Value: Your camera will automatically set the exposure for each
image. However, if you wish to adjust the exposure manually, use the Up and
Down keys to position the arrow () to increase or decrease the exposure
compensation value. This will over ride the automatic exposure setting.
White Balance: Your camera will automatically set the white balance for each
image. However, if you wish to specify the white balance settings because of
particular lighting conditions you may specify:
Automatic: Automatic adjustment (camera will determine).
Daylight: For photography outdoors on a sunny day.
Fluorescent: For photography under standard fluorescent lighting.
Tungsten: For photography under tungsten lighting.
You may specify the level of sharpness for images taken by your camera -
Hard: The image is processed to increase sharpness, making edges more
distinct. (This may make the image appear slightly more focused but it may
affect print quality. Experiment for best results.)
Normal: Standard level of sharpening on all images, suited to most
Soft: Amount of sharpening reduced below normal level resulting in softer
Sharpness:
applications.
images.
Video Format:
You may connect your camera to a television to show your images. Select the
video output format compatible with your television or VCR.
NTSC: Video output setting compatible with NTSC TV systems used in USA,
Canada, Mexico, South Korea, Japan, and Taiwan, etc.
PAL: Video output setting compatible with PAL TV systems used in United
Kingdom, France, Germany, Italy, Spain, Portugal, Ireland, Denmark,
Belgium, Australia, China, Singapore and India, etc.
NOTE: The camera LCD monitor will be disabled when the camera connects to an
external monitor, such as a television.
Sound (camera audio tones and beeps):
ON: Camera generates sounds/beep tones.
OFF: Camera will function silently.
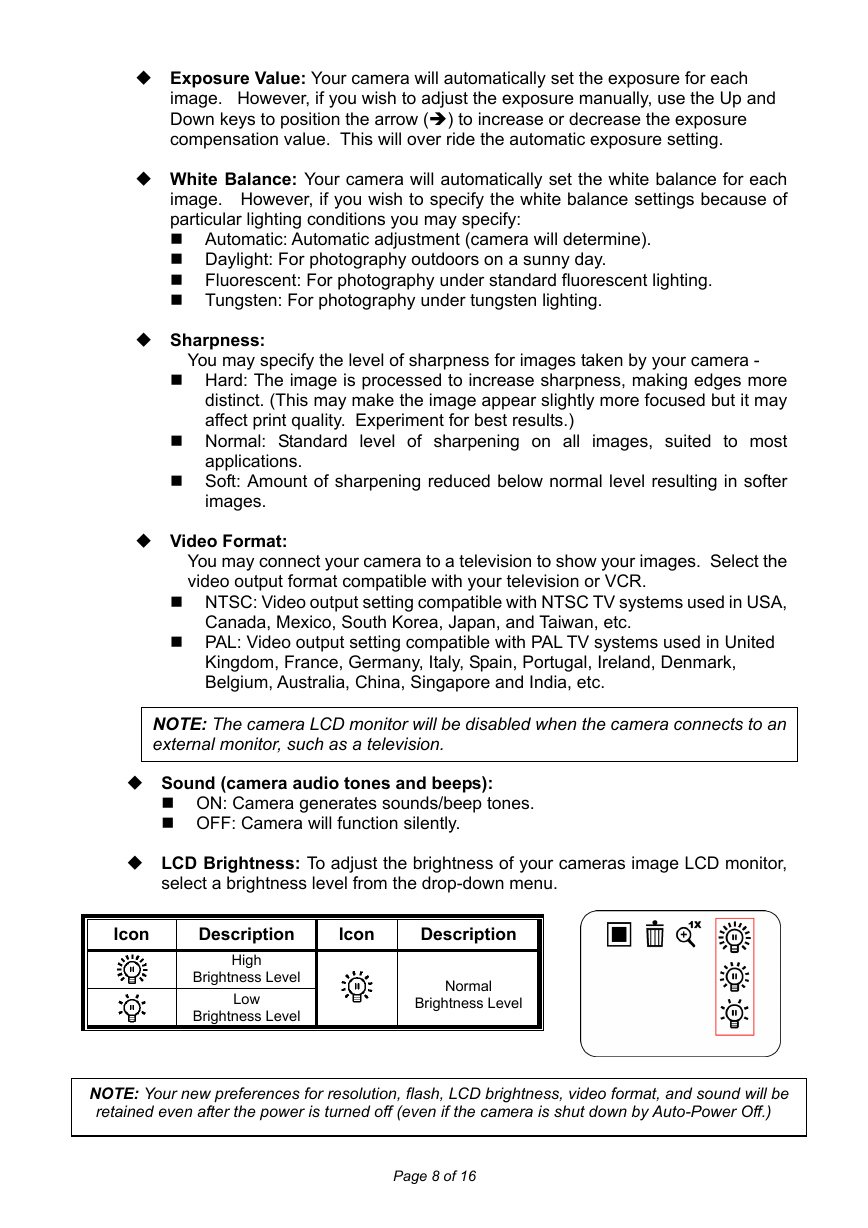
LCD Brightness: To adjust the brightness of your cameras image LCD monitor,
select a brightness level from the drop-down menu.
Icon
Description
Icon
Description
High
Brightness Level
Low
Brightness Level
Normal
Brightness Level
NOTE: Your new preferences for resolution, flash, LCD brightness, video format, and sound will be
retained even after the power is turned off (even if the camera is shut down by Auto-Power Off.)
Page 8 of 16
�



 2023年江西萍乡中考道德与法治真题及答案.doc
 2012年重庆南川中考生物真题及答案.doc
 2013年江西师范大学地理学综合及文艺理论基础考研真题.doc
 2020年四川甘孜小升初语文真题及答案I卷.doc
 2020年注册岩土工程师专业基础考试真题及答案.doc
 2023-2024学年福建省厦门市九年级上学期数学月考试题及答案.doc
 2021-2022学年辽宁省沈阳市大东区九年级上学期语文期末试题及答案.doc
 2022-2023学年北京东城区初三第一学期物理期末试卷及答案.doc
 2018上半年江西教师资格初中地理学科知识与教学能力真题及答案.doc
 2012年河北国家公务员申论考试真题及答案-省级.doc
 2020-2021学年江苏省扬州市江都区邵樊片九年级上学期数学第一次质量检测试题及答案.doc
 2022下半年黑龙江教师资格证中学综合素质真题及答案.doc