Application Report
SLVA527–June 2012
Importing a SPICE NetList into TINA9-TI
John Miller ..................................................................................................................... Analog eLab
ABSTRACT
This application note describes the procedure for importing an unencrypted SPICE netlist into TINA9-TI
(available at www.ti.com/tina-ti), creating a new macromodel based on the netlist, and placing a symbol to
instantiate the macromodel in a TINA9-TI circuit schematic. This procedure applies to TINA9-TI only.
If you have an earlier version of TINA-TI, see the app note Importing a SPICE Netlist into TINA7-TI
(lit number SLVA424).
The behavior of the macromodel can depend on the compatibility of the netlist entries with TINA-TI. It is
possible that some Spice-based netlists may contain syntax or executable statements that are not
compatible with TINA. If the Spice netlist is encrypted and cannot be imported directly into TINA, contact
the E2E and Simulation and Models Forum for support (www.e2e.ti.com).
The next section provides an example of the step-by-step procedure for importing a Spice netlist to create
a TINA-TI macromodel, and then creating an instance of the TINA macromodel on a circuit schematic.
The example uses the netlist of an OPA830, a low-power, high-speed op amp with a rail-to-rail output. For
additional TINA and/or simulation support, consult
the Simulation and Models E2E forum at
www.e2e.ti.com . For support on high speed amplifiers like the OPA830 consult the E2E High Speed
Amplifier Forum at www.e2e.ti.com.
Procedure .................................................................................................................... 2
Assigning a Symbol ......................................................................................................... 6
References ................................................................................................................. 19
Contents
List of Figures
Menu Tabs for Importing a Netlist as a *.CIR or *.LIB or .MOD File ................................................. 2
Netlist Editor Window Used to Check Netlist Compatibility with TINA ............................................... 3
New Macro Wizard Start Window......................................................................................... 4
New Macro Wizard Window with Entries ................................................................................ 5
List of Subcircuits Found in the Macromodel Netlist ................................................................... 6
Symbol Selection Using the Auto Generate Option .................................................................... 7
Initial Pop-up Window for Shape Selection From Internal Libraries.................................................. 8
List of Devices. TINA has attempted to select likely candidates by cross-referencing the netlist I/Os with
the internal symbol libraries. .............................................................................................. 9
Uncheck the Show Selected Shapes Box to Expand the Search of Internal Libraries. ........................ 10
Narrow the Search of the Symbol Libraries from all to one of the internal libraries, if the symbol list is too
long to be easily searched................................................................................................ 11
Narrowed the Search of the Symbol Libraries from All to one (TEXAS). .......................................... 12
Default Cross-Reference Between Symbol Pins and Netlist I/Os................................................... 13
Clicking on the Netlist’s VOUT pin moves it to the gray strip so it can then be placed on a different symbol
pin............................................................................................................................ 14
Initial Step to Add a Macro to a Schematic. ........................................................................... 15
Newly Created Macromodel Placed (Instantiated) in a Schematic Window. ..................................... 16
Final Schematic ........................................................................................................... 17
1
2
3
1
2
3
4
5
6
7
8
9
10
11
12
13
14
15
16
All trademarks are the property of their respective owners.
SLVA527–June 2012
Submit Documentation Feedback
Copyright © 2012, Texas Instruments Incorporated
Importing a SPICE NetList Into TINA9-TI
1
�
Procedure
www.ti.com
17
18
Netlist viewer window .................................................................................................... 18
Netlist editor display for an encrypted netlist .......................................................................... 19
List of Tables
1
Procedure
1.
Importing a SPICE netlist file.
The netlist in question must be configured using a SPICE subcircuit statement, and the netlist file must
have a .cir, .lib, or .mod extension. If the Spice netlist file has a different extension change the
extension to .cir, .lib, or .mod before trying to import it into TINA-TI. To illustrate the procedure, an
example is shown below using the netlist for the OPA830:
.SUBCKT OPA830 IN+ IN- VCC VEE VOUT
Note that this report does not address the details and best practices of generating Spice subcircuits.
For more information on this topic, see the References section.
2. Confirming that the SPICE netlist will compile in TINA.
Some SPICE netlists may contain statements and/or formatting that is incompatible with TINA. To
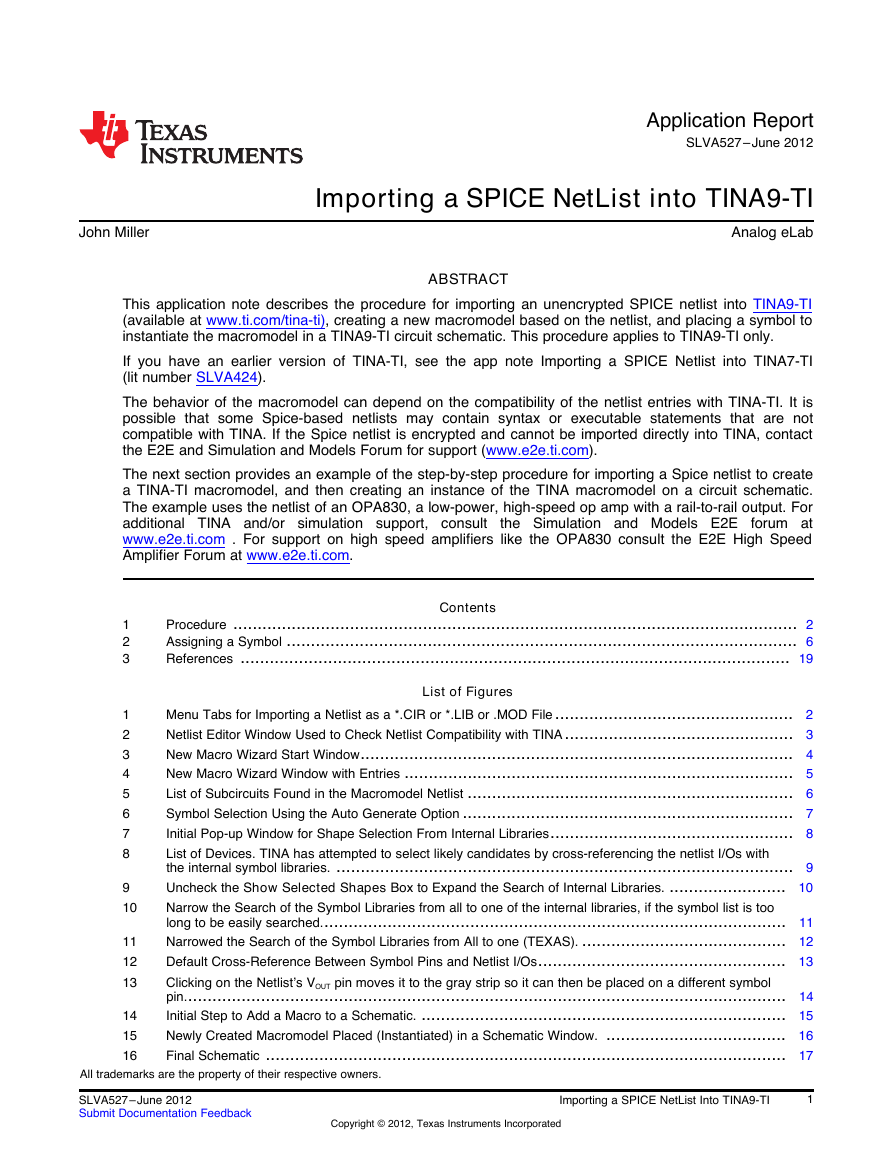
check for this, open TINA, and select the File/Import/Pspice Netlist (*.CIR) menu tab as shown in
Figure 1.
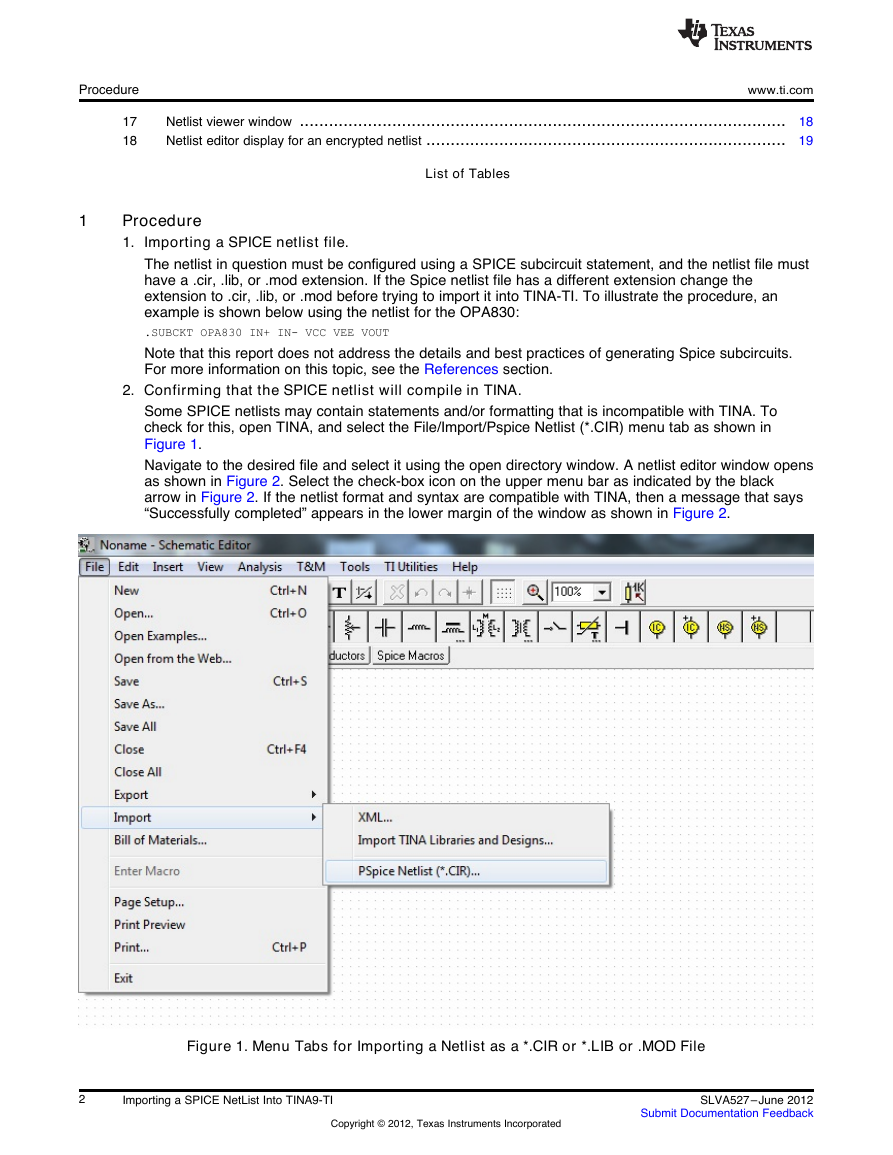
Navigate to the desired file and select it using the open directory window. A netlist editor window opens
as shown in Figure 2. Select the check-box icon on the upper menu bar as indicated by the black
arrow in Figure 2. If the netlist format and syntax are compatible with TINA, then a message that says
“Successfully completed” appears in the lower margin of the window as shown in Figure 2.
Figure 1. Menu Tabs for Importing a Netlist as a *.CIR or *.LIB or .MOD File
2
Importing a SPICE NetList Into TINA9-TI
Copyright © 2012, Texas Instruments Incorporated
SLVA527–June 2012
Submit Documentation Feedback
�
www.ti.com
Procedure
Figure 2. Netlist Editor Window Used to Check Netlist Compatibility with TINA
SLVA527–June 2012
Submit Documentation Feedback
Copyright © 2012, Texas Instruments Incorporated
Importing a SPICE NetList Into TINA9-TI
3
Click the check-box, and look for themessage in the lower margin.If the netlist is compatible withTINA,you will get a“successfully compiled”message”.�
Procedure
3. Creating the TINA-TI macromodel.
www.ti.com
Open TINA9-TI and select the Tools/New Macro Wizard menu tab. A window should appear, as shown
in Figure 3.
Figure 3. New Macro Wizard Start Window
Fill in an entry in the Macro Name field, and then click the folder icon to the right of the empty From
File field. A pop-up directory window opens. Navigate to the folder containing the Spice netlist file and
click on the file icon. For this example, the New Macro Wizard window should appear as shown in
Figure 4.
4
Importing a SPICE NetList Into TINA9-TI
Copyright © 2012, Texas Instruments Incorporated
SLVA527–June 2012
Submit Documentation Feedback
Enter the macromodel nameClick the folder icon andnavigate to the directorywith the netlist.�
www.ti.com
Procedure
Figure 4. New Macro Wizard Window with Entries
Leave the other fields as they are shown here and click the Next button. The next pop-up window
(Figure 5) shows the netlist. Click the arrow on the right side of the top text field, and a list of the
netlist’s subcircuits are displayed. Select the appropriate subcircuit that represents the macromodel
and click the Next button.
SLVA527–June 2012
Submit Documentation Feedback
Copyright © 2012, Texas Instruments Incorporated
Importing a SPICE NetList Into TINA9-TI
5
�
Assigning a Symbol
www.ti.com
Figure 5. List of Subcircuits Found in the Macromodel Netlist
Highlight the subcircuit that serves as the main call function for the macro.
2
Assigning a Symbol
The next step is to pick a symbol for the macromodel. There are two options for creating a macro symbol:
1. Let TINA auto generate a symbol – This option may be best for a unique model, or a model with a
large number of I/Os.
2. Pick a suitable symbol from the existing TINA symbol library – This option may be preferred if the
model is for a common device, such as a five-pin op amp.
In either case, the symbol may be modified later using the TINA9-TI symbol editor that is found in the
Windows\TINA9-TI start menu.
Highlight the subcircuit that serves as the main description of the model, and click the Next button as
shown in Figure 5.
6
Importing a SPICE NetList Into TINA9-TI
Copyright © 2012, Texas Instruments Incorporated
SLVA527–June 2012
Submit Documentation Feedback
Select the downward arrowand a drop-netlist subcircuits will appear.down list of the�
www.ti.com
2.1 Auto Generate a Symbol
Assigning a Symbol
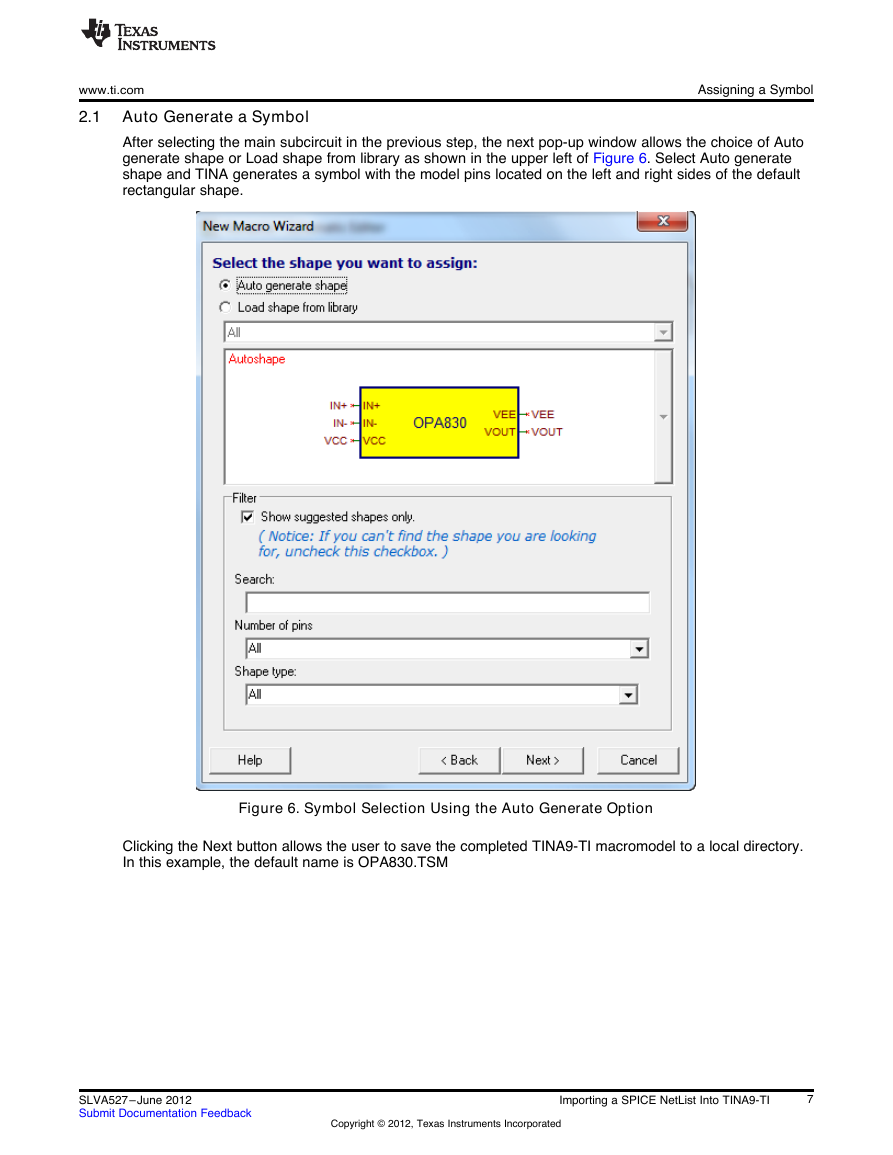
After selecting the main subcircuit in the previous step, the next pop-up window allows the choice of Auto
generate shape or Load shape from library as shown in the upper left of Figure 6. Select Auto generate
shape and TINA generates a symbol with the model pins located on the left and right sides of the default
rectangular shape.
Figure 6. Symbol Selection Using the Auto Generate Option
Clicking the Next button allows the user to save the completed TINA9-TI macromodel to a local directory.
In this example, the default name is OPA830.TSM
SLVA527–June 2012
Submit Documentation Feedback
Copyright © 2012, Texas Instruments Incorporated
Importing a SPICE NetList Into TINA9-TI
7
�
Assigning a Symbol
2.2
Load Shape From Library
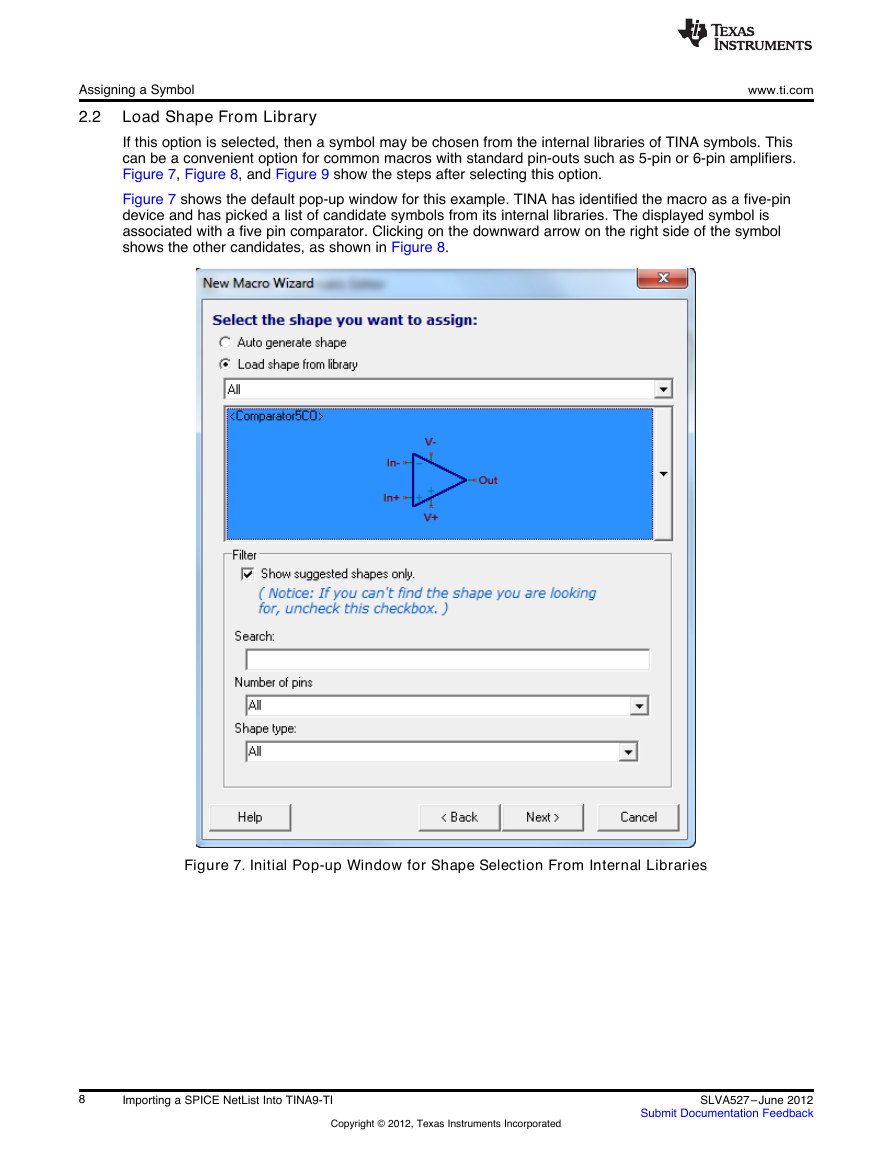
If this option is selected, then a symbol may be chosen from the internal libraries of TINA symbols. This
can be a convenient option for common macros with standard pin-outs such as 5-pin or 6-pin amplifiers.
Figure 7, Figure 8, and Figure 9 show the steps after selecting this option.
Figure 7 shows the default pop-up window for this example. TINA has identified the macro as a five-pin
device and has picked a list of candidate symbols from its internal libraries. The displayed symbol is
associated with a five pin comparator. Clicking on the downward arrow on the right side of the symbol
shows the other candidates, as shown in Figure 8.
www.ti.com
Figure 7. Initial Pop-up Window for Shape Selection From Internal Libraries
8
Importing a SPICE NetList Into TINA9-TI
Copyright © 2012, Texas Instruments Incorporated
SLVA527–June 2012
Submit Documentation Feedback
�




 2023年江西萍乡中考道德与法治真题及答案.doc
 2012年重庆南川中考生物真题及答案.doc
 2013年江西师范大学地理学综合及文艺理论基础考研真题.doc
 2020年四川甘孜小升初语文真题及答案I卷.doc
 2020年注册岩土工程师专业基础考试真题及答案.doc
 2023-2024学年福建省厦门市九年级上学期数学月考试题及答案.doc
 2021-2022学年辽宁省沈阳市大东区九年级上学期语文期末试题及答案.doc
 2022-2023学年北京东城区初三第一学期物理期末试卷及答案.doc
 2018上半年江西教师资格初中地理学科知识与教学能力真题及答案.doc
 2012年河北国家公务员申论考试真题及答案-省级.doc
 2020-2021学年江苏省扬州市江都区邵樊片九年级上学期数学第一次质量检测试题及答案.doc
 2022下半年黑龙江教师资格证中学综合素质真题及答案.doc