Ehy’re
Microsoft® Virtual Labs
A SharePoint Developer
Introduction – Web Parts
C#
�
A SharePoint Developer Introduction – Web Parts C#
Table of Contents
A SharePoint Developer Introduction – Web Parts C# ............................................................ 1
Exercise 1 Hello World ................................................................................................................................................. 2
Exercise 2 Web Part Interaction .................................................................................................................................. 10
Exercise 3 Connecting Web Parts ................................................................................................................................ 19
�
A SharePoint Developer Introduction – Web Parts C#
A SharePoint Developer Introduction – Web
Parts C#
Objectives
Web Parts are one of the core ASP.NET technologies used by SharePoint to
present dynamic information to users. They are the most common customization
created for SharePoint. A Web Part is a reusable component which exists on a
Web Part Page and can present any type of web-based information.
The objective of this lab is to learn about how to build Web Parts for use in the
SharePoint system.
After completing this lab you will be better able to:
• Create a basic SharePoint Web Part which displays information from
within the SharePoint site
• Create a more advanced Web Part utilizing a server postback and the
SPGridView control
• Create an advanced Web Part leveraging Web Part connection that
displays budget data
Estimated Time to
Complete This Lab
Computers used in this
Lab
60 Minutes
WSS
Page 1 of 37
�
A SharePoint Developer Introduction – Web Parts C#
Exercise 1
Hello World
Scenario
In this exercise, you will develop and deploy your first Web Part. This Web Part will:
• Display text on a label within a Web Part
• Allow the text on the label to be edited and colored
Tasks
Complete the following
tasks on:
WSS
1. Create a SharePoint
Web Part Solution
Detailed Steps
a. Open Visual Studio 2008 by going to the Start Menu | Programs | Microsoft Visual
Studio 2008 | Microsoft Visual Studio 2008.
b. From the menu, select File | New | Project.
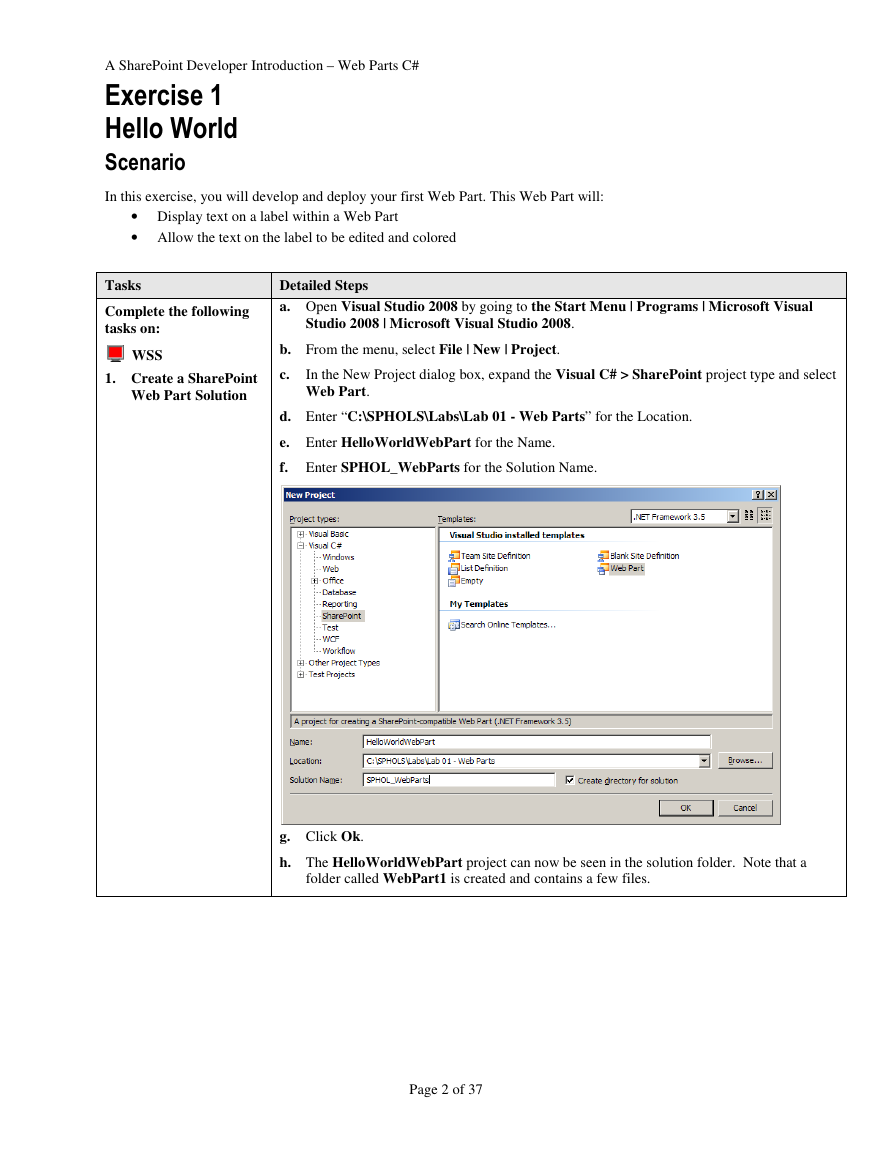
c.
In the New Project dialog box, expand the Visual C# > SharePoint project type and select
Web Part.
d. Enter “C:\SPHOLS\Labs\Lab 01 - Web Parts” for the Location.
e. Enter HelloWorldWebPart for the Name.
f. Enter SPHOL_WebParts for the Solution Name.
g. Click Ok.
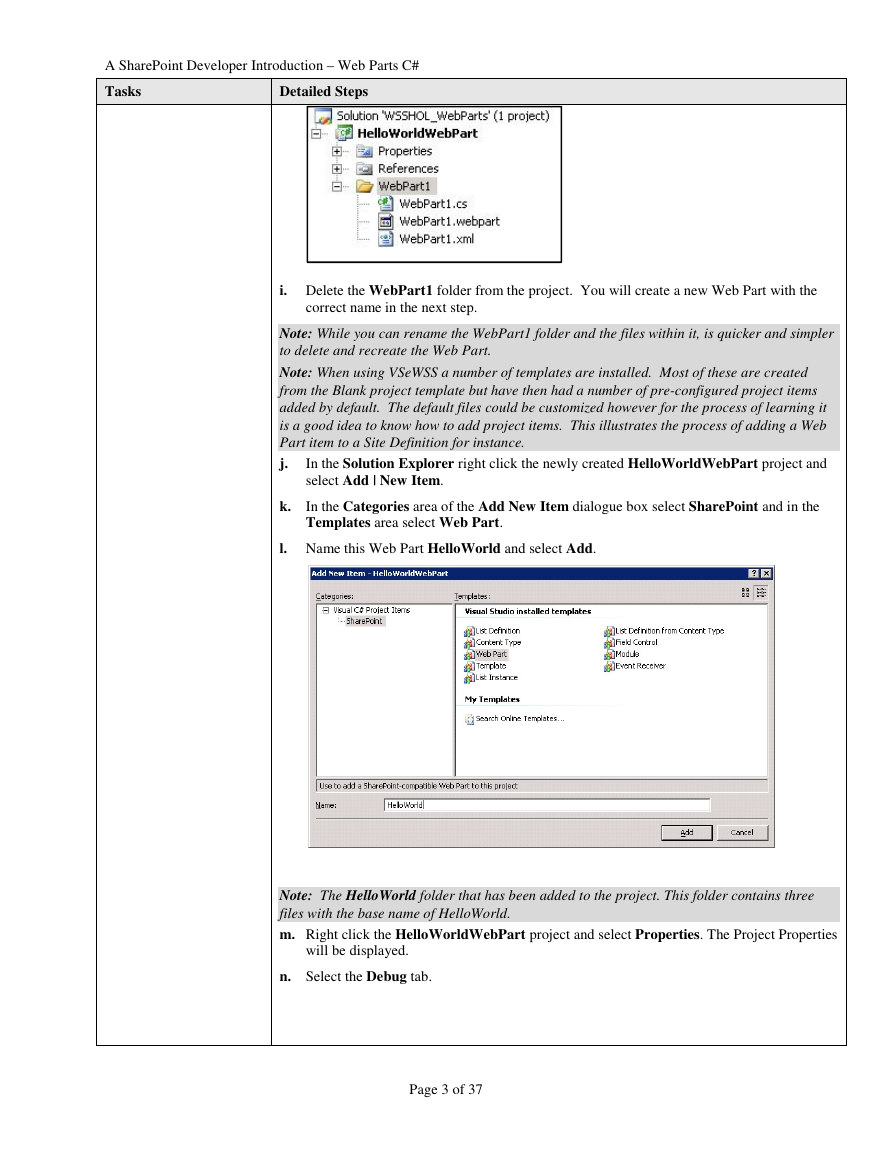
h. The HelloWorldWebPart project can now be seen in the solution folder. Note that a
folder called WebPart1 is created and contains a few files.
Page 2 of 37
�
A SharePoint Developer Introduction – Web Parts C#
Tasks
Detailed Steps
i. Delete the WebPart1 folder from the project. You will create a new Web Part with the
correct name in the next step.
Note: While you can rename the WebPart1 folder and the files within it, is quicker and simpler
to delete and recreate the Web Part.
Note: When using VSeWSS a number of templates are installed. Most of these are created
from the Blank project template but have then had a number of pre-configured project items
added by default. The default files could be customized however for the process of learning it
is a good idea to know how to add project items. This illustrates the process of adding a Web
Part item to a Site Definition for instance.
j.
k.
In the Solution Explorer right click the newly created HelloWorldWebPart project and
select Add | New Item.
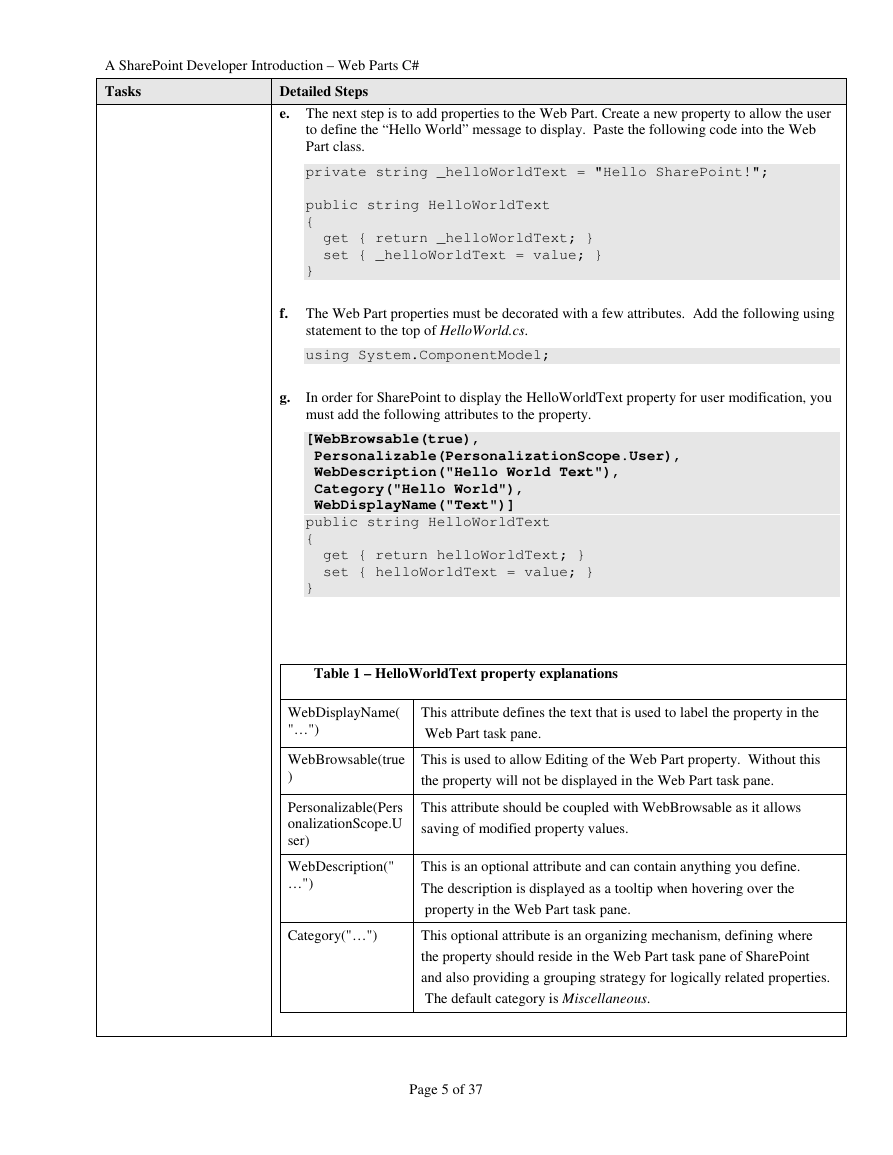
In the Categories area of the Add New Item dialogue box select SharePoint and in the
Templates area select Web Part.
l. Name this Web Part HelloWorld and select Add.
Note: The HelloWorld folder that has been added to the project. This folder contains three
files with the base name of HelloWorld.
m. Right click the HelloWorldWebPart project and select Properties. The Project Properties
will be displayed.
n. Select the Debug tab.
Page 3 of 37
�
A SharePoint Developer Introduction – Web Parts C#
Tasks
Detailed Steps
o. Set the Start URL to http://spvm. This is used by VSeWSS to determine the location of
SharePoint when deploying the solution.
2. Add Web Part
Customizations
Note: This task will describe the steps to add code to the Web Part. Properties of the Web Part
will be created, including settings which can be changed using the SharePoint browser-based
interface.
a. Open HelloWorld.webpart. This XML file contains the Web Part definition that will be
deployed to SharePoint.
b. Change the Description property to “A simple Hello World Web Part”.
c. Open the HelloWorld.cs file in Visual Studio and inspect the code. The
CreateChildControls method contains commented code which implements a simple way
to add a label control to the Web Part.
d. Uncomment the default code in the CreateChildControls method. The method should
now resemble the following code.
protected override void CreateChildControls()
{
base.CreateChildControls();
// TODO: add custom rendering code here.
Label label = new Label();
label.Text = "Hello World";
this.Controls.Add(label);
}
Note: CreateChildControls is an overridden method. HelloWorldWebPart requires this
method to provide a specific implementation in which controls are created.
Page 4 of 37
�
A SharePoint Developer Introduction – Web Parts C#
Tasks
Detailed Steps
e. The next step is to add properties to the Web Part. Create a new property to allow the user
to define the “Hello World” message to display. Paste the following code into the Web
Part class.
private string _helloWorldText = "Hello SharePoint!";
public string HelloWorldText
{
get { return _helloWorldText; }
set { _helloWorldText = value; }
}
f. The Web Part properties must be decorated with a few attributes. Add the following using
statement to the top of HelloWorld.cs.
using System.ComponentModel;
g.
In order for SharePoint to display the HelloWorldText property for user modification, you
must add the following attributes to the property.
[WebBrowsable(true),
Personalizable(PersonalizationScope.User),
WebDescription("Hello World Text"),
Category("Hello World"),
WebDisplayName("Text")]
public string HelloWorldText
{
get { return helloWorldText; }
set { helloWorldText = value; }
}
Table 1 – HelloWorldText property explanations
WebDisplayName(
"…")
WebBrowsable(true
)
Personalizable(Pers
onalizationScope.U
ser)
WebDescription("
…")
This attribute defines the text that is used to label the property in the
Web Part task pane.
This is used to allow Editing of the Web Part property. Without this
the property will not be displayed in the Web Part task pane.
This attribute should be coupled with WebBrowsable as it allows
saving of modified property values.
This is an optional attribute and can contain anything you define.
The description is displayed as a tooltip when hovering over the
property in the Web Part task pane.
Category("…")
This optional attribute is an organizing mechanism, defining where
the property should reside in the Web Part task pane of SharePoint
and also providing a grouping strategy for logically related properties.
The default category is Miscellaneous.
Page 5 of 37
�
A SharePoint Developer Introduction – Web Parts C#
Tasks
Detailed Steps
h. Next, a property should be added to allow the user to select a color for the message. This
will follow a similar process as the steps above.
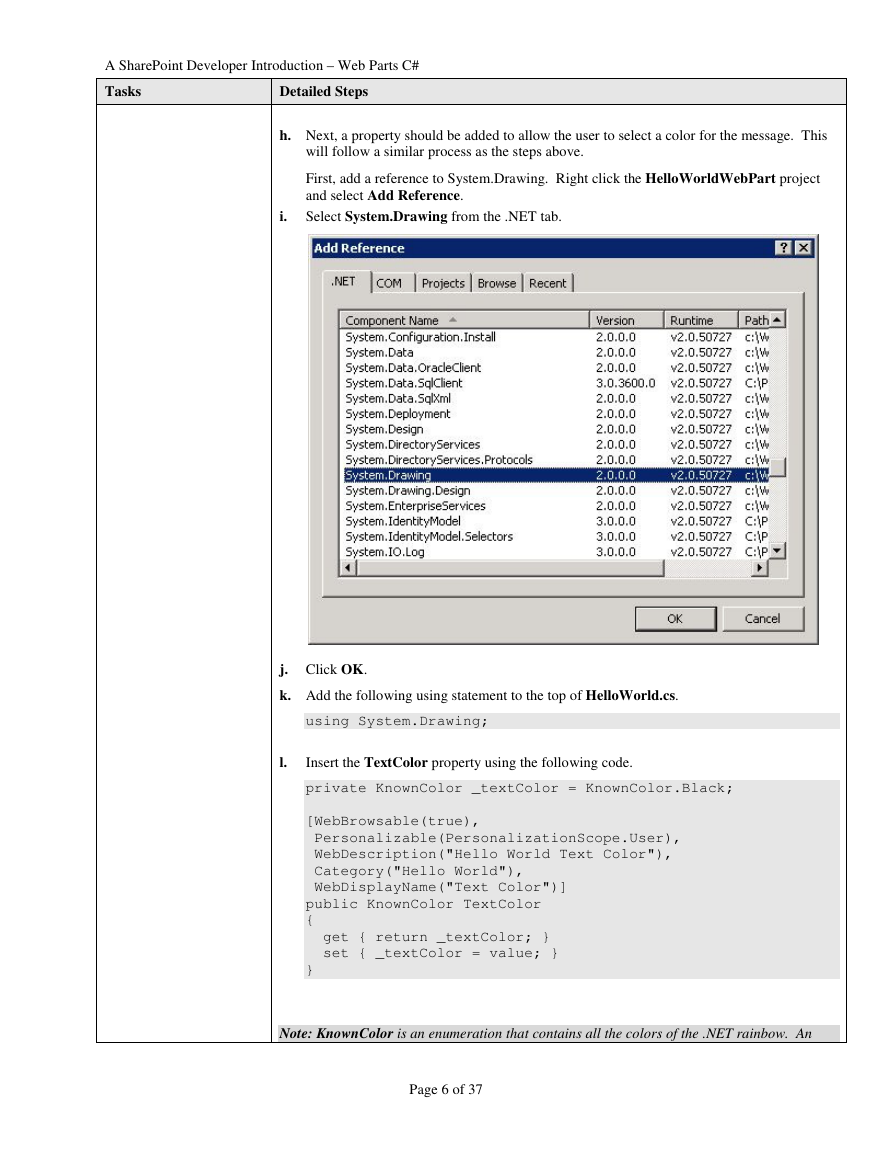
First, add a reference to System.Drawing. Right click the HelloWorldWebPart project
and select Add Reference.
i. Select System.Drawing from the .NET tab.
j. Click OK.
k. Add the following using statement to the top of HelloWorld.cs.
using System.Drawing;
Insert the TextColor property using the following code.
private KnownColor _textColor = KnownColor.Black;
[WebBrowsable(true),
Personalizable(PersonalizationScope.User),
WebDescription("Hello World Text Color"),
Category("Hello World"),
WebDisplayName("Text Color")]
public KnownColor TextColor
{
get { return _textColor; }
set { _textColor = value; }
}
l.
Note: KnownColor is an enumeration that contains all the colors of the .NET rainbow. An
Page 6 of 37
�





 2023年江西萍乡中考道德与法治真题及答案.doc
 2012年重庆南川中考生物真题及答案.doc
 2013年江西师范大学地理学综合及文艺理论基础考研真题.doc
 2020年四川甘孜小升初语文真题及答案I卷.doc
 2020年注册岩土工程师专业基础考试真题及答案.doc
 2023-2024学年福建省厦门市九年级上学期数学月考试题及答案.doc
 2021-2022学年辽宁省沈阳市大东区九年级上学期语文期末试题及答案.doc
 2022-2023学年北京东城区初三第一学期物理期末试卷及答案.doc
 2018上半年江西教师资格初中地理学科知识与教学能力真题及答案.doc
 2012年河北国家公务员申论考试真题及答案-省级.doc
 2020-2021学年江苏省扬州市江都区邵樊片九年级上学期数学第一次质量检测试题及答案.doc
 2022下半年黑龙江教师资格证中学综合素质真题及答案.doc