DIGITAL CAMERA
VH-510
Basic Manual
ENGLISH .................2
한국어 ....................10
中⽂(简体) .............18
中⽂(繁体) .............27
Bahasa Melayu .....35
INDONESIA ...........43
ไทย ........................51
Tiếng Việt ..............59
Basic_B_d4525.indb 1
Basic_B_d4525.indb 1
2012/03/05 13:07:53
2012/03/05 13:07:53
�
● Thank you for purchasing an Olympus digital camera. Before you start to use your new camera, please read these instructions
carefully to enjoy optimum performance and a longer service life. Keep this manual in a safe place for future reference.
● We recommend that you take test shots to get accustomed to your camera before taking important photographs.
● In the interest of continually improving products, Olympus reserves the right to update or modify information contained in this manual.
The camera you purchased is provided with the CD-ROM Instruction Manual. For detailed information on all features and
Provisions of warranty, please refer to the CD-ROM. Adobe Reader is required to view the Instruction Manual.
Insert the battery as illustrated with the C mark toward the
battery lock knob.
Damage to the battery exterior (scratches, etc.) may
produce heat or an explosion.
Insert the battery while sliding the battery lock knob in the
direction of the arrow.
Insert the card straight until it clicks into place.
Turn off the camera before opening the battery/card
compartment cover.
When using the camera, be sure to close and lock the
battery/card compartment cover.
Slide the battery lock knob in the direction of the arrow to
unlock, and then remove the battery.
Always use SD/SDHC/SDXC cards or Eye-Fi card with this
camera. Do not insert other types of memory cards.
Do not touch the contact area of the card directly.
3
11
2
Preparing the Camera
Inserting the battery and card
1
Battery/card
compartment cover
2
1
Battery/card compartment lock
2
Battery lock knob
Write-protect switch
2 EN
Basic_B_d4525.indb 2
Basic_B_d4525.indb 2
2012/03/05 13:07:54
2012/03/05 13:07:54
�
Charging the battery with the
included USB-AC adapter
The included F-2AC USB-AC adapter (hereafter referred to
as USB-AC adapter) differs depending on the region where
you purchased the camera. If you received a plug-in type
USB-AC adapter, plug it directly into AC outlet.
The included USB-AC adapter has been designed to be
used for charging and playback. Do not take pictures while
the USB-AC adapter is connected to the camera.
Connecting the camera
Multi-connector
If the indicator lamp does not light, the USB-AC adapter
is not connected to the camera correctly, or the battery,
camera, or USB-AC adapter may be broken.
Installing the PC software and
registering user
Installation of [ib] computer software using the supplied CD
is available on Windows computers only.
Windows
1 Insert the supplied CD in a CD-ROM drive.
Windows XP
● A “Setup” dialog will be displayed.
Windows Vista/Windows 7
● An Autorun dialog will be displayed. Click “OLYMPUS
Setup” to display the “Setup” dialog.
AC outlet
Connector cover
USB cable
(supplied)
or
If the “Setup” dialog is not displayed, select “My Computer”
(Windows XP) or “Computer” (Windows Vista/Windows 7)
from the start menu. Double-click the CD-ROM (OLYMPUS
Setup) icon to open the “OLYMPUS Setup” window and
then double-click “Launcher.exe”.
If a “User Account Control” dialog is displayed, click “Yes”
or “Continue”.
2 Register your Olympus product.
● Click the “Registration” button and follow the on-screen
instructions.
To register the camera must be connected to the computer.
If nothing is displayed on the camera screen even after
connecting the camera to the computer, the battery may
be exhausted. Charge the battery and then connect the
camera again.
3 Install the camera manual.
● Click the “Camera Instruction Manual” button and follow
the on-screen instructions.
The battery is not fully charged at shipment. Before use, be
sure to charge the battery until the indicator lamp turns off
(up to 3 hours).
Macintosh
Mac OS X v10.4.11–v10.7
1 Insert the supplied CD in a CD-ROM drive.
● Double-click the CD (OLYMPUS Setup) icon on the
desktop.
EN
3
Basic_B_d4525.indb 3
Basic_B_d4525.indb 3
2012/03/05 13:07:56
2012/03/05 13:07:56
�
2 Copy the camera manual.
● Click the “Camera Instruction Manual” button to open
the folder containing the camera manuals. Copy the
manual for your language to the computer.
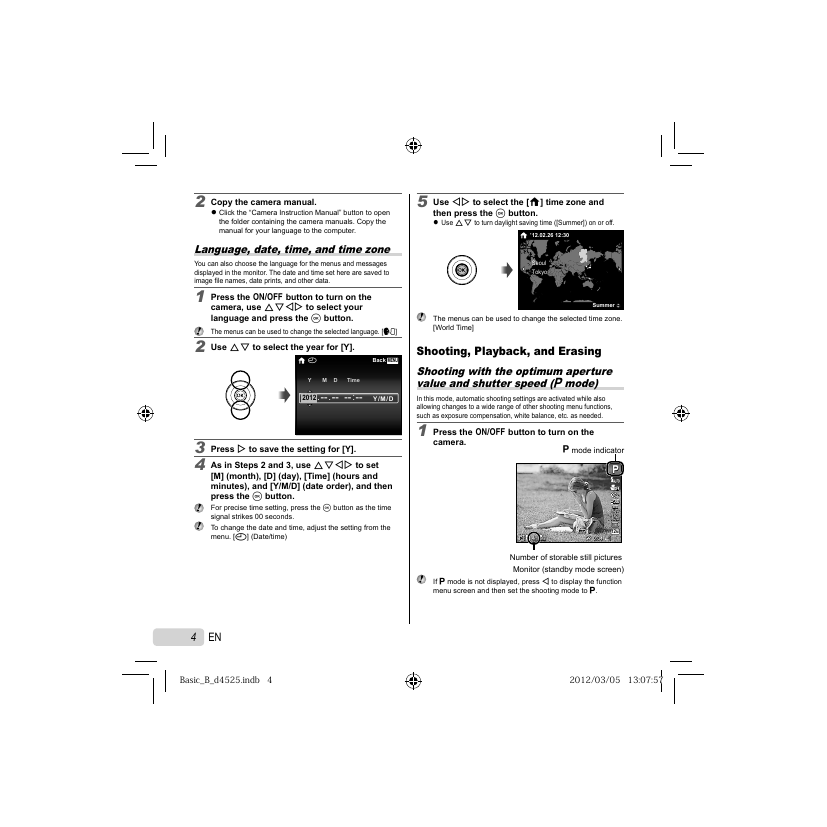
Language, date, time, and time zone
You can also choose the language for the menus and messages
displayed in the monitor. The date and time set here are saved to
image fi le names, date prints, and other data.
1 Press the n button to turn on the
camera, use FGHI to select your
language and press the A button.
The menus can be used to change the selected language. [l]
2 Use FG to select the year for [Y].
X
Back
MENU
Y
2012
.
Time
M D
-- -- -- --:
.
Y/M/D
3 Press I to save the setting for [Y].
4 As in Steps 2 and 3, use FGHI to set
[M] (month), [D] (day), [Time] (hours and
minutes), and [Y/M/D] (date order), and then
press the A button.
For precise time setting, press the A button as the time
signal strikes 00 seconds.
To change the date and time, adjust the setting from the
menu. [X] (Date/time)
4 EN
5 Use HI to select the [x] time zone and
then press the A button.
● Use FG to turn daylight saving time ([Summer]) on or off.
’12.02.26 12:30
Seoul
Tokyo
The menus can be used to change the selected time zone.
[World Time]
Summer
Shooting, Playback, and Erasing
Shooting with the optimum aperture
value and shutter speed (P mode)
In this mode, automatic shooting settings are activated while also
allowing changes to a wide range of other shooting menu functions,
such as exposure compensation, white balance, etc. as needed.
1 Press the n button to turn on the
camera.
P mode indicator
PP
0.00.0
WB
WB
AUTO
AUTO
ISO
ISO
AUTO
AUTO
12M
44 NORM
0:340:34
Number of storable still pictures
Monitor (standby mode screen)
If P mode is not displayed, press H to display the function
menu screen and then set the shooting mode to P.
Basic_B_d4525.indb 4
Basic_B_d4525.indb 4
2012/03/05 13:07:57
2012/03/05 13:07:57
�
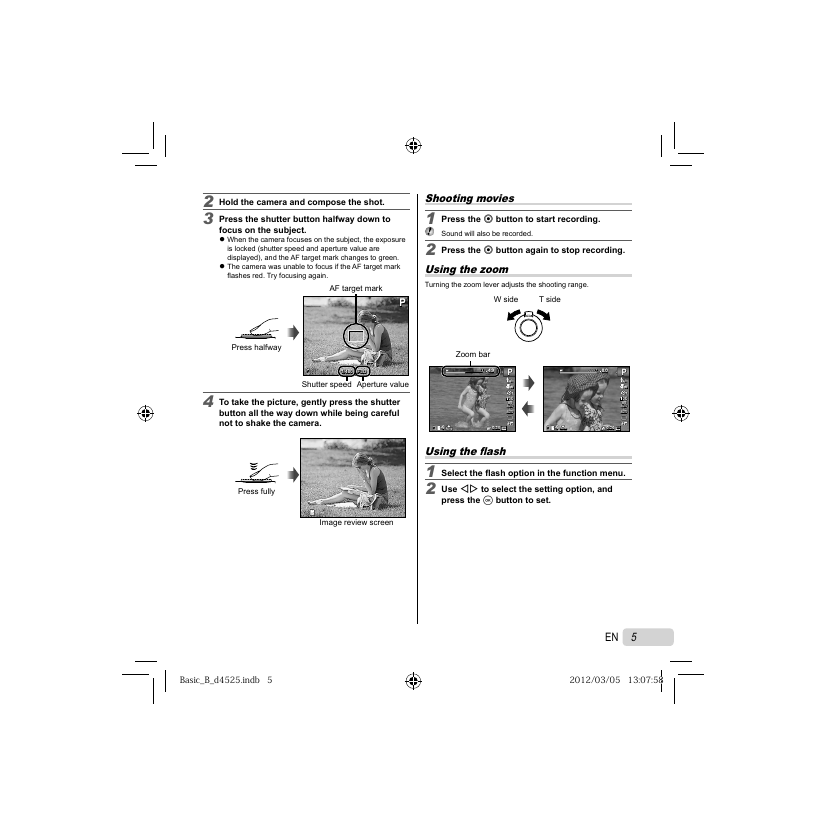
2 Hold the camera and compose the shot.
3 Press the shutter button halfway down to
focus on the subject.
● When the camera focuses on the subject, the exposure
is locked (shutter speed and aperture value are
displayed), and the AF target mark changes to green.
● The camera was unable to focus if the AF target mark
fl ashes red. Try focusing again.
AF target mark
PP
Press halfway
1/400
1/400
Shutter speed
F3.3F3.3
Aperture value
4 To take the picture, gently press the shutter
button all the way down while being careful
not to shake the camera.
Press fully
Image review screen
Shooting movies
1 Press the R button to start recording.
Sound will also be recorded.
2 Press the R button again to stop recording.
Using the zoom
Turning the zoom lever adjusts the shooting range.
W side
T side
Zoom bar
4.94.9
44
NORM
0:340:34
PP
0.00.0
WB
WB
AUTO
AUTO
ISO
ISO
AUTO
AUTO
12M
8.08.0
44
NORM
0:340:34
PP
0.00.0
WB
WB
AUTO
AUTO
ISO
ISO
AUTO
AUTO
12M
Using the fl ash
1 Select the fl ash option in the function menu.
2 Use HI to select the setting option, and
press the A button to set.
Basic_B_d4525.indb 5
Basic_B_d4525.indb 5
2012/03/05 13:07:58
2012/03/05 13:07:58
EN
5
�
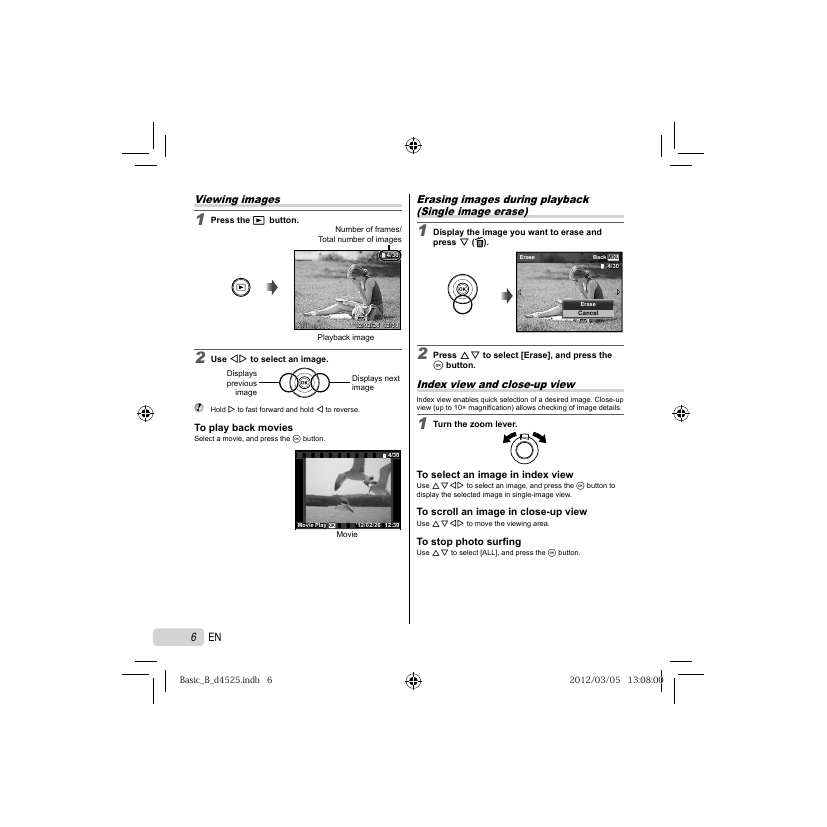
Viewing images
1 Press the q button.
Number of frames/
Total number of images
4/304/30
Erasing images during playback
(Single image erase)
1 Display the image you want to erase and
press G ().
Erase
Back
MENU
4/304/30
’12/02/26
’12/02/26 12:30
12:30
Playback image
2 Use HI to select an image.
Displays
previous
image
Displays next
image
Hold I to fast forward and hold H to reverse.
To play back movies
Select a movie, and press the A button.
4/304/30
Movie Play
Movie Play
OK
’12/02/26 12:30
’12/02/26 12:30
Movie
Erase
Cancel
2 Press FG to select [Erase], and press the
A button.
Index view and close-up view
Index view enables quick selection of a desired image. Close-up
view (up to 10× magnifi cation) allows checking of image details.
1 Turn the zoom lever.
To select an image in index view
Use FGHI to select an image, and press the A button to
display the selected image in single-image view.
To scroll an image in close-up view
Use FGHI to move the viewing area.
To stop photo surfi ng
Use FG to select [ALL], and press the A button.
6 EN
Basic_B_d4525.indb 6
Basic_B_d4525.indb 6
2012/03/05 13:08:00
2012/03/05 13:08:00
�
SAFETY PRECAUTIONS
CAUTION
RISK OF ELECTRIC SHOCK
DO NOT OPEN
CAUTION: TO REDUCE THE RISK OF ELECTRICAL
SHOCK, DO NOT REMOVE COVER (OR BACK).
NO USER-SERVICEABLE PARTS INSIDE.
REFER SERVICING TO QUALIFIED OLYMPUS
SERVICE PERSONNEL.
DANGER
WARNING
CAUTION
An exclamation mark enclosed in a triangle alerts
you to important operating and maintenance
instructions in the documentation provided with
the product.
If the product is used without observing the
information given under this symbol, serious injury
or death may result.
If the product is used without observing the
information given under this symbol, injury or death
may result.
If the product is used without observing the
information given under this symbol, minor personal
injury, damage to the equipment, or loss of valuable
data may result.
WARNING!
TO AVOID THE RISK OF FIRE OR ELECTRICAL SHOCK, NEVER
DISASSEMBLE, EXPOSE THIS PRODUCT TO WATER OR OPERATE IN
A HIGH HUMIDITY ENVIRONMENT.
General Precautions
Read All Instructions — Before you use the product, read all operating
instructions. Save all manuals and documentation for future reference.
Cleaning — Always unplug this product from the wall outlet before cleaning.
Use only a damp cloth for cleaning. Never use any type of liquid or aerosol
cleaner, or any type of organic solvent to clean this product.
Attachments — For your safety, and to avoid damaging the product, use only
accessories recommended by Olympus.
Water and Moisture — For precautions on products with weatherproof
designs, read the weatherproofi ng sections.
Location — To avoid damage to the product, mount the product securely on a
stable tripod, stand, or bracket.
Power Source — Connect this product only to the power source described
on the product label.
Lightning — If a lightning storm occurs while using a USB-AC adapter,
remove it from the wall outlet immediately.
Foreign Objects — To avoid personal injury, never insert a metal object into
the product.
Heat — Never use or store this product near any heat source such as a
radiator, heat register, stove, or any type of equipment or appliance that
generates heat, including stereo amplifi ers.
Handling the Camera
WARNING
• Do not use the camera near fl ammable or explosive gases.
• Do not use the fl ash and LED (including AF illuminator) on people
(infants, small children, etc.) at close range.
• You must be at least 1 m (3 ft.) away from the faces of your subjects.
Firing the fl ash too close to the subject’s eyes could cause a momentary
loss of vision.
• Keep young children and infants away from the camera.
• Always use and store the camera out of the reach of young children and
infants to prevent the following dangerous situations which could cause
serious injury:
• Becoming entangled in the camera strap, causing strangulation.
• Accidentally swallowing the battery, cards or other small parts.
• Accidentally fi ring the fl ash into their own eyes or those of another child.
• Accidentally being injured by the moving parts of the camera.
• Do not look at the sun or strong lights with the camera.
• Do not use or store the camera in dusty or humid places.
• Do not cover the fl ash with a hand while fi ring.
• Use SD/SDHC/SDXC memory cards or Eye-Fi cards only. Never use
other types of cards.
If you accidently insert another type of card into the camera, contact an
authorized distributor or service center. Do not try to remove the card by
force.
• If you fi nd that the USB-AC adapter is extremely hot or notice any
unusual odors, noise, or smoke around it, unplug the power plug from
wall outlet immediately and stop using it. Then, contact an authorized
distributor or service center.
CAUTION
• Stop using the camera immediately if you notice any unusual odors,
noise, or smoke around it.
• Never remove the batteries with bare hands, which may cause a fi re or
burn your hands.
• Never hold or operate the camera with wet hands.
• Do not leave the camera in places where it may be subject to extremely
high temperatures.
• Doing so may cause parts to deteriorate and, in some circumstances,
cause the camera to catch fi re. Do not use the charger or USB-AC
adapter if it is covered (such as a blanket). This could cause overheating,
resulting in fi re.
• Handle the camera with care to avoid getting a low-temperature burn.
• When the camera contains metal parts, overheating can result in a low-
temperature burn. Pay attention to the following:
• When used for a long period, the camera will get hot. If you hold on to the
camera in this state, a low-temperature burn may be caused.
• In places subject to extremely cold temperatures, the temperature of
the camera’s body may be lower than the environmental temperature. If
possible, wear gloves when handling the camera in cold temperatures.
• Be careful with the strap.
• Be careful with the strap when you carry the camera. It could easily catch
on stray objects and cause serious damage.
Basic_B_d4525.indb 7
Basic_B_d4525.indb 7
2012/03/05 13:08:02
2012/03/05 13:08:02
EN
7
�
• Before transporting the camera, remove a tripod and all other non-OLYMPUS
accessories.
Battery Handling Precautions
Follow these important guidelines to prevent batteries
from leaking, overheating, burning, exploding, or causing
electrical shocks or burns.
DANGER
• The camera uses a lithium ion battery specifi ed by Olympus. Charge the
battery with the specifi ed USB-AC adapter or charger. Do not use any other
USB-AC adapters or chargers.
• Never heat or incinerate batteries.
• Take precautions when carrying or storing batteries to prevent them from
coming into contact with any metal objects such as jewelry, pins, fasteners,
etc.
• Never store batteries where they will be exposed to direct sunlight, or
subjected to high temperatures in a hot vehicle, near a heat source, etc.
• To prevent causing battery leaks or damaging their terminals, carefully follow
all instructions regarding the use of batteries. Never attempt to disassemble
a battery or modify it in any way, solder, etc.
• If battery fl uid gets into your eyes, fl ush your eyes immediately with clear,
cold running water and seek medical attention immediately.
• Always store batteries out of the reach of small children. If a child
accidentally swallows a battery, seek medical attention immediately.
• If you cannot remove the battery from the camera, contact an authorized
distributor or service center. Do not try to remove the battery by force.
Damage to the battery exterior (scratches, etc.) may produce heat or an
explosion.
WARNING
• Keep batteries dry at all times.
• To prevent batteries from leaking, overheating, or causing a fi re or explosion,
use only batteries recommended for use with this product.
• Insert the battery carefully as described in the operating instructions.
• If rechargeable batteries have not been recharged within the specifi ed time,
stop charging them and do not use them.
• Do not use a battery if it is cracked or broken.
• If a battery leaks, becomes discolored or deformed, or becomes abnormal in
any other way during operation, stop using the camera.
• If a battery leaks fl uid onto your clothing or skin, remove the clothing and
fl ush the affected area with clean, running cold water immediately. If the fl uid
burns your skin, seek medical attention immediately.
• Never subject batteries to strong shocks or continuous vibration.
CAUTION
• Before loading, always inspect the battery carefully for leaks, discoloration,
warping, or any other abnormality.
• The battery may become hot during prolonged use. To avoid minor
burns, do not remove it immediately after using the camera.
• Always unload the battery from the camera before storing the camera for
a long period.
• This camera uses one Olympus lithium ion battery (LI-50B). No other type of
batteries can be used.
There is a risk of explosion if the battery is replaced with the incorrect
battery type.
8 EN
• When storing the battery for a long period, select a cool location for storage.
• Please recycle batteries to help save our planet’s resources. When you throw
away dead batteries, be sure to cover their terminals and always observe
local laws and regulations.
USB-AC adapter
• The included USB-AC adapter F-2AC is designed to be used only with this
camera. Other cameras cannot be charged with this USB-AC adapter.
• Do not connect the included USB-AC adapter F-2AC to equipment other
than this camera.
• For plug-in type USB-AC adapter:
The included USB-AC adapter F-2AC is intended to be correctly orientated in
a vertical or fl oor mount position.
Using a separately sold USB-AC
adapter
The USB-AC adapter F-3AC (sold separately) can be used with this camera.
Do not use any USB-AC adapter other than the dedicated one. When using
F-3AC, be sure to use the USB cable included with this camera.
Do not use any other USB-AC adapter with this camera.
Shooting is not available when using the F-3AC.
Using a separately sold charger
A charger (UC-50: sold separately) can be used to charge the battery.
Using your charger and USB-AC
adapter abroad
• The charger and USB-AC adapter can be used in most home electrical
sources within the range of 100 V to 240 V AC (50/60Hz) around the world.
However, depending on the country or area you are in, the AC wall outlet
may be shaped differently and the charger and USB-AC adapter may require
a plug adapter to match the wall outlet. For details, ask at your local electrical
shop or travel agent.
• Do not use travel voltage converters as they could damage your charger
and USB-AC adapter.
For customers in Asia
Provisions of warranty
1 lf this product proves to be defective, although it has been used properly
(in accordance with the written Handling Care and Operating instructions
supplied with it), during a period of up to one year from the date of purchase
this product will be repaired, or at Olympus’s option replaced, free of charge.
To claim under warranty the customer must take the product and this
Warranty certifi cate before the end of the one year warranty period to the
dealer where the product was purchased or any Olympus authorized service
station listed in the instructions and request the necessary repairs.
2 The customer shall transport the product to the dealer or Olympus
authorized service station at his own risk and shall be responsible for any
costs incurred in transporting the product.
Basic_B_d4525.indb 8
Basic_B_d4525.indb 8
2012/03/05 13:08:03
2012/03/05 13:08:03
�




 2023年江西萍乡中考道德与法治真题及答案.doc
 2012年重庆南川中考生物真题及答案.doc
 2013年江西师范大学地理学综合及文艺理论基础考研真题.doc
 2020年四川甘孜小升初语文真题及答案I卷.doc
 2020年注册岩土工程师专业基础考试真题及答案.doc
 2023-2024学年福建省厦门市九年级上学期数学月考试题及答案.doc
 2021-2022学年辽宁省沈阳市大东区九年级上学期语文期末试题及答案.doc
 2022-2023学年北京东城区初三第一学期物理期末试卷及答案.doc
 2018上半年江西教师资格初中地理学科知识与教学能力真题及答案.doc
 2012年河北国家公务员申论考试真题及答案-省级.doc
 2020-2021学年江苏省扬州市江都区邵樊片九年级上学期数学第一次质量检测试题及答案.doc
 2022下半年黑龙江教师资格证中学综合素质真题及答案.doc