2010年10月27日 10:22
D:\Backup\desktop\【Oracle RAC】Linux + Oracle 11g R2 RAC 安装配置详细过程.txt
作者:mfkqwyc86
QQ:113257174
itpub空间:http://space.itpub.net/9664900
环境:
Oracle Linux AS 5.5两台
Oracle 11g R2
1、IP规划
127.0.0.1 localhost.localdomain localhost
#public ip
192.168.10.211 rac1
192.168.10.212
rac2
#priv ip
10.10.10.211
10.10.10.212
rac1prv
rac2prv
#vip ip
192.168.10.213 rac1vip
rac2vip
192.168.10.214
#scan ip
192.168.10.215 racscan
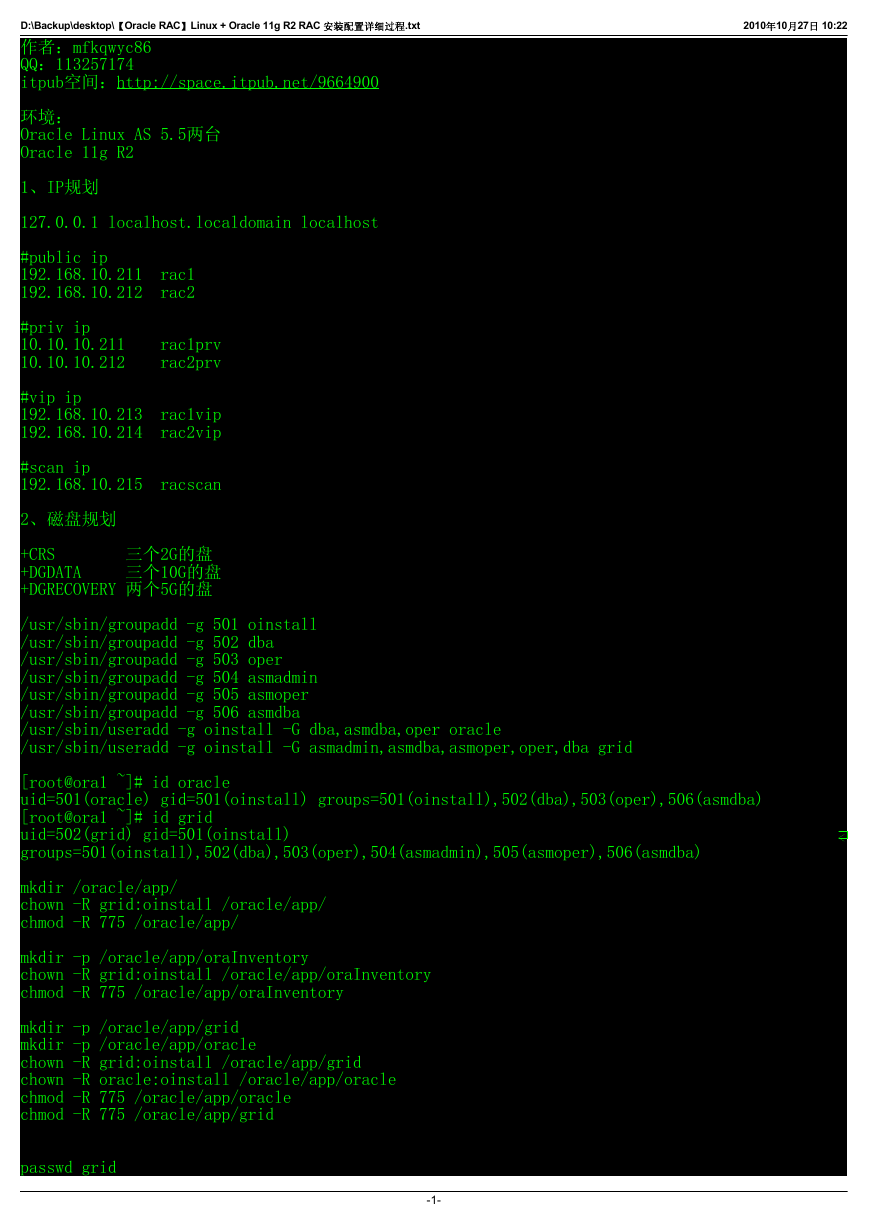
2、磁盘规划
+CRS 三个2G的盘
+DGDATA 三个10G的盘
+DGRECOVERY 两个5G的盘
/usr/sbin/groupadd -g 501 oinstall
/usr/sbin/groupadd -g 502 dba
/usr/sbin/groupadd -g 503 oper
/usr/sbin/groupadd -g 504 asmadmin
/usr/sbin/groupadd -g 505 asmoper
/usr/sbin/groupadd -g 506 asmdba
/usr/sbin/useradd -g oinstall -G dba,asmdba,oper oracle
/usr/sbin/useradd -g oinstall -G asmadmin,asmdba,asmoper,oper,dba grid
[root@ora1 ~]# id oracle
uid=501(oracle) gid=501(oinstall) groups=501(oinstall),502(dba),503(oper),506(asmdba)
[root@ora1 ~]# id grid
uid=502(grid) gid=501(oinstall)
groups=501(oinstall),502(dba),503(oper),504(asmadmin),505(asmoper),506(asmdba)
mkdir /oracle/app/
chown -R grid:oinstall /oracle/app/
chmod -R 775 /oracle/app/
mkdir -p /oracle/app/oraInventory
chown -R grid:oinstall /oracle/app/oraInventory
chmod -R 775 /oracle/app/oraInventory
mkdir -p /oracle/app/grid
mkdir -p /oracle/app/oracle
chown -R grid:oinstall /oracle/app/grid
chown -R oracle:oinstall /oracle/app/oracle
chmod -R 775 /oracle/app/oracle
chmod -R 775 /oracle/app/grid
passwd grid
-1-
�
D:\Backup\desktop\【Oracle RAC】Linux + Oracle 11g R2 RAC 安装配置详细过程.txt
2010年10月27日 10:22
passwd oracle
2、操作系统版本:
[root@rac1 ~]# lsb_release -a
LSB Version: :core-3.1-ia32:core-3.1-noarch:graphics-3.1-ia32:graphics-3.1-noarch
Distributor ID: EnterpriseEnterpriseServer
Description: Enterprise Linux Enterprise Linux Server release 5.5 (Carthage)
Release: 5.5
Codename: Carthage
[root@rac1 ~]# uname -a
Linux rac1 2.6.18-194.el5 #1 SMP Mon Mar 29 20:06:41 EDT 2010 i686 i686 i386 GNU/Linux
[root@rac1 ~]#
修改系统参数:
vi /etc/security/limits.conf
#ORACLE SETTING
grid soft nproc 2047
grid hard nproc 16384
grid soft nofile 1024
grid hard nofile 65536
oracle soft nproc 2047
oracle hard nproc 16384
oracle soft nofile 1024
oracle hard nofile 65536
vi /etc/pam.d/login
#ORACLE SETTING
session required pam_limits.so
# vi /etc/sysctl.conf
#ORACLE SETTING
fs.aio-max-nr = 1048576
fs.file-max = 6815744
kernel.shmall = 2097152
kernel.shmmax = 536870912
kernel.shmmni = 4096
kernel.sem = 250 32000 100 128
net.ipv4.ip_local_port_range = 9000 65500
net.core.rmem_default = 262144
net.core.rmem_max = 4194304
net.core.wmem_default = 262144
net.core.wmem_max = 1048586
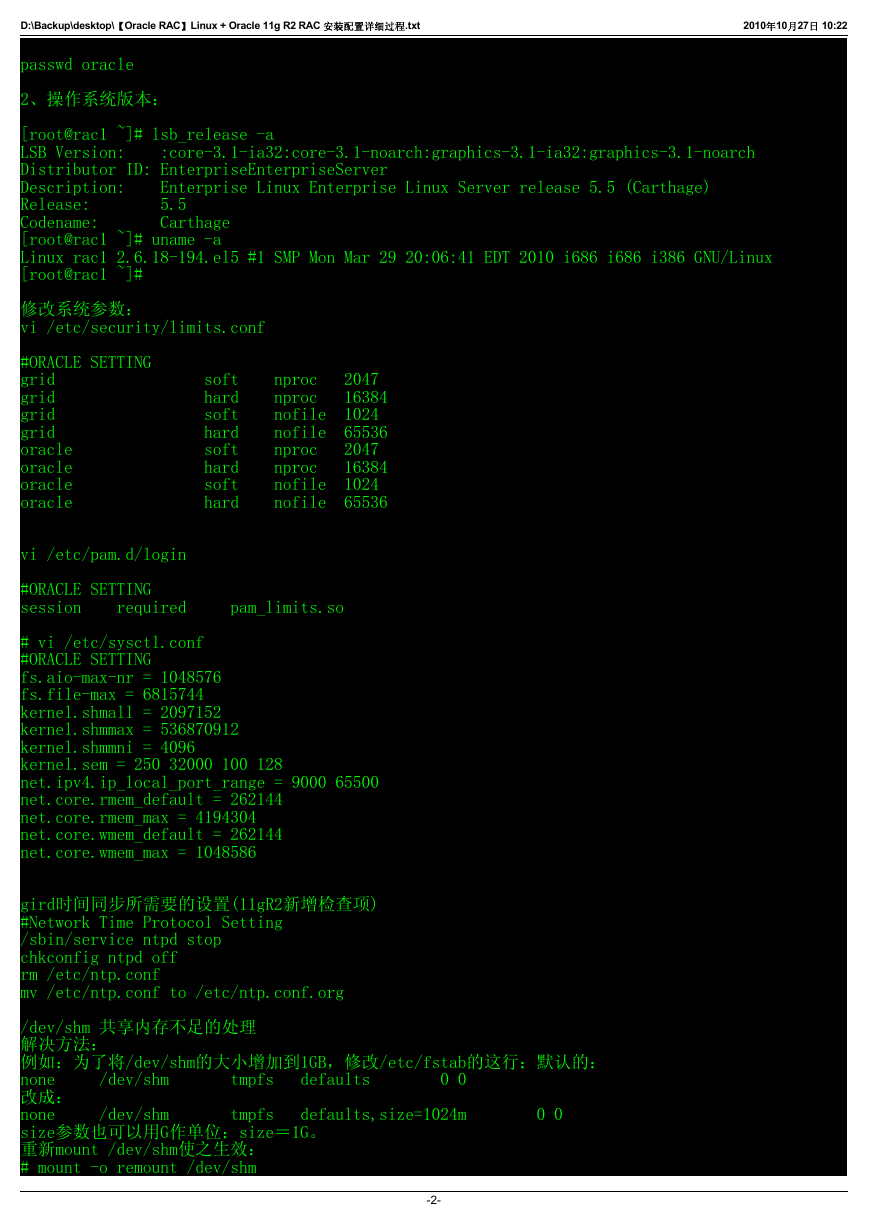
gird时间同步所需要的设置(11gR2新增检查项)
#Network Time Protocol Setting
/sbin/service ntpd stop
chkconfig ntpd off
rm /etc/ntp.conf
mv /etc/ntp.conf to /etc/ntp.conf.org
/dev/shm 共享内存不足的处理
解决方法:
例如:为了将/dev/shm的大小增加到1GB,修改/etc/fstab的这行:默认的:
none /dev/shm tmpfs defaults 0 0
改成:
none /dev/shm tmpfs defaults,size=1024m 0 0
size参数也可以用G作单位:size=1G。
重新mount /dev/shm使之生效:
# mount -o remount /dev/shm
-2-
�
2010年10月27日 10:22
D:\Backup\desktop\【Oracle RAC】Linux + Oracle 11g R2 RAC 安装配置详细过程.txt
或者:
# umount /dev/shm
# mount -a
马上可以用"df -h"命令检查变化。
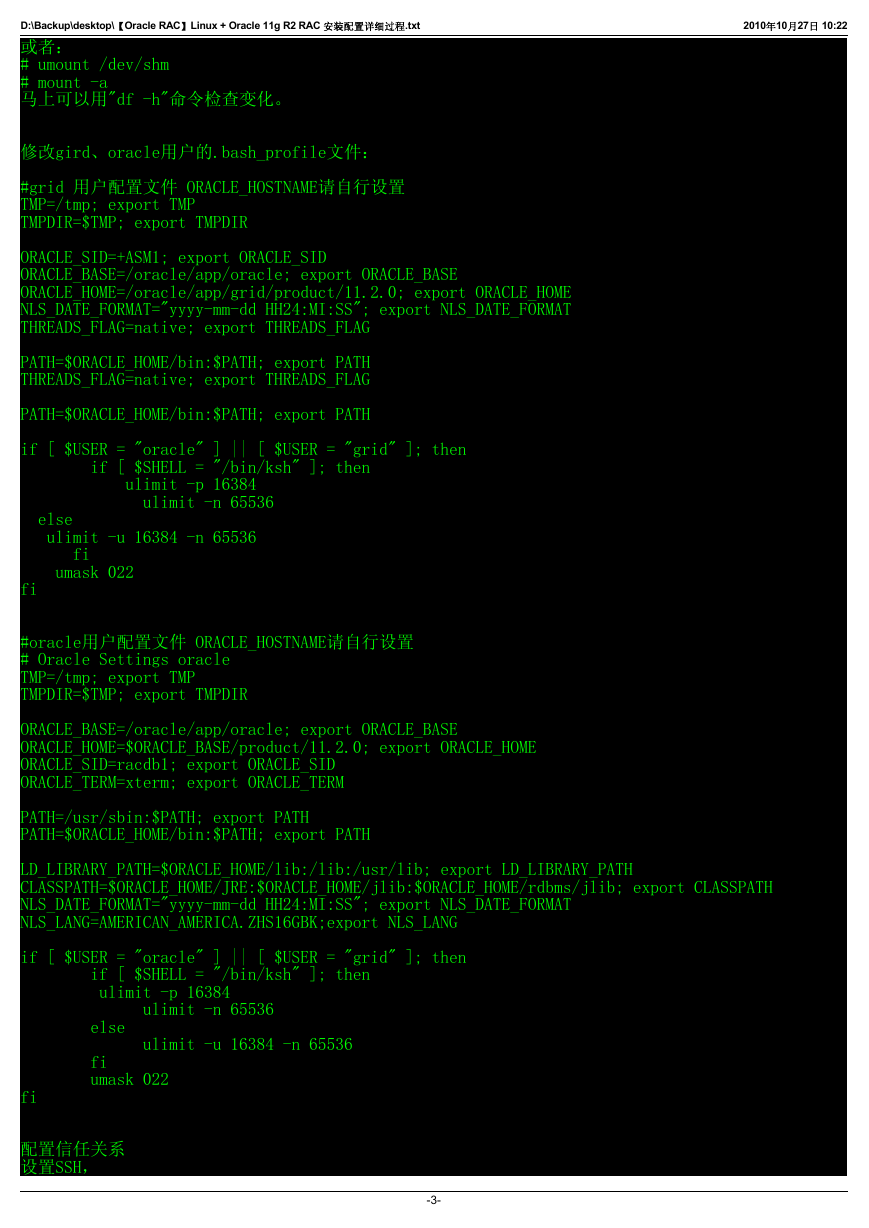
修改gird、oracle用户的.bash_profile文件:
#grid 用户配置文件 ORACLE_HOSTNAME请自行设置
TMP=/tmp; export TMP
TMPDIR=$TMP; export TMPDIR
ORACLE_SID=+ASM1; export ORACLE_SID
ORACLE_BASE=/oracle/app/oracle; export ORACLE_BASE
ORACLE_HOME=/oracle/app/grid/product/11.2.0; export ORACLE_HOME
NLS_DATE_FORMAT="yyyy-mm-dd HH24:MI:SS"; export NLS_DATE_FORMAT
THREADS_FLAG=native; export THREADS_FLAG
PATH=$ORACLE_HOME/bin:$PATH; export PATH
THREADS_FLAG=native; export THREADS_FLAG
PATH=$ORACLE_HOME/bin:$PATH; export PATH
if [ $USER = "oracle" ] || [ $USER = "grid" ]; then
if [ $SHELL = "/bin/ksh" ]; then
ulimit -p 16384
ulimit -n 65536
else
ulimit -u 16384 -n 65536
fi
umask 022
fi
#oracle用户配置文件 ORACLE_HOSTNAME请自行设置
# Oracle Settings oracle
TMP=/tmp; export TMP
TMPDIR=$TMP; export TMPDIR
ORACLE_BASE=/oracle/app/oracle; export ORACLE_BASE
ORACLE_HOME=$ORACLE_BASE/product/11.2.0; export ORACLE_HOME
ORACLE_SID=racdb1; export ORACLE_SID
ORACLE_TERM=xterm; export ORACLE_TERM
PATH=/usr/sbin:$PATH; export PATH
PATH=$ORACLE_HOME/bin:$PATH; export PATH
LD_LIBRARY_PATH=$ORACLE_HOME/lib:/lib:/usr/lib; export LD_LIBRARY_PATH
CLASSPATH=$ORACLE_HOME/JRE:$ORACLE_HOME/jlib:$ORACLE_HOME/rdbms/jlib; export CLASSPATH
NLS_DATE_FORMAT="yyyy-mm-dd HH24:MI:SS"; export NLS_DATE_FORMAT
NLS_LANG=AMERICAN_AMERICA.ZHS16GBK;export NLS_LANG
if [ $USER = "oracle" ] || [ $USER = "grid" ]; then
if [ $SHELL = "/bin/ksh" ]; then
ulimit -p 16384
ulimit -n 65536
else
ulimit -u 16384 -n 65536
fi
umask 022
fi
配置信任关系
设置SSH,
-3-
�
2010年10月27日 10:22
D:\Backup\desktop\【Oracle RAC】Linux + Oracle 11g R2 RAC 安装配置详细过程.txt
1).在主节点RAC1上以grid,oracle用户身份生成用户的公匙和私匙
# ping rac2-eth0
# ping rac2-eth1
# su - oracle
$ mkdir ~/.ssh
$ ssh-keygen -t rsa
$ ssh-keygen -t dsa
2).在副节点RAC2、RAC3上执行相同的操作,确保通信无阻
# ping rac1-eth0
# ping rac1-eth1
# su - oracle
$ mkdir ~/.ssh
$ ssh-keygen -t rsa
$ ssh-keygen -t dsa
3).在主节点RAC1上oracle用户执行以下操作
$ cat ~/.ssh/id_rsa.pub >> ./.ssh/authorized_keys
$ cat ~/.ssh/id_dsa.pub >> ./.ssh/authorized_keys
$ ssh rac2 cat ~/.ssh/id_rsa.pub >> ~/.ssh/authorized_keys
$ ssh rac2 cat ~/.ssh/id_dsa.pub >> ~/.ssh/authorized_keys
$ scp ~/.ssh/authorized_keys rac2:~/.ssh/authorized_keys
4).主节点RAC1上执行检验操作
$ ssh rac1 date
$ ssh rac2 date
$ ssh rac3 date
$ ssh rac1priv date
$ ssh rac2priv date
$ ssh rac3priv date
5).在副节点RAC2上执行检验操作
$ ssh rac1 date
$ ssh rac2 date
$ ssh rac3 date
$ ssh rac1priv date
$ ssh rac2priv date
$ ssh rac3priv date
安装ASM
oracleasm-2.6.18-194.el5-2.0.5-1.el5.i686.rpm
oracleasmlib-2.0.4-1.el5.i386.rpm
oracleasm-support-2.1.3-1.el5.i386.rpm
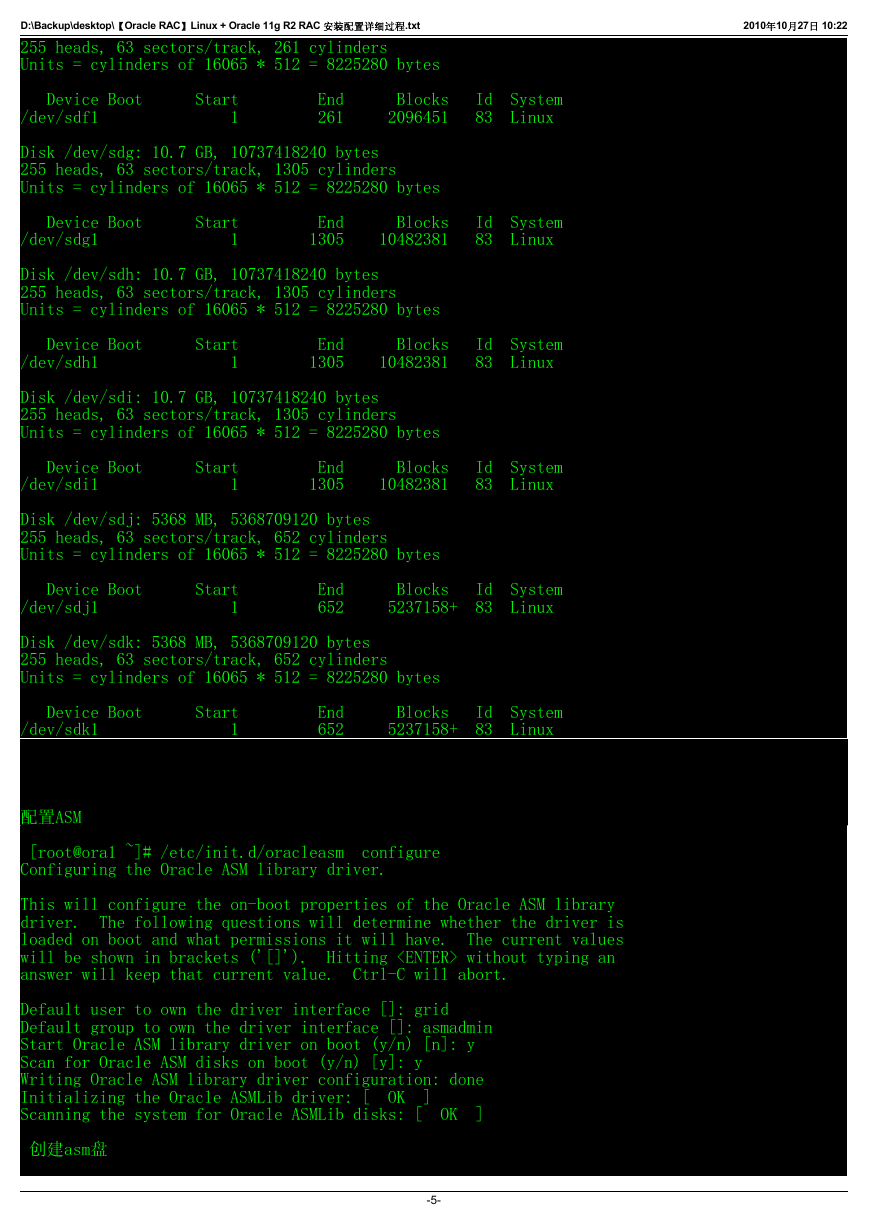
格式化硬盘
Disk /dev/sdd: 2147 MB, 2147483648 bytes
255 heads, 63 sectors/track, 261 cylinders
Units = cylinders of 16065 * 512 = 8225280 bytes
Device Boot Start End Blocks Id System
/dev/sdd1 1 261 2096451 83 Linux
Disk /dev/sde: 2147 MB, 2147483648 bytes
255 heads, 63 sectors/track, 261 cylinders
Units = cylinders of 16065 * 512 = 8225280 bytes
Device Boot Start End Blocks Id System
/dev/sde1 1 261 2096451 83 Linux
Disk /dev/sdf: 2147 MB, 2147483648 bytes
-4-
�
2010年10月27日 10:22
D:\Backup\desktop\【Oracle RAC】Linux + Oracle 11g R2 RAC 安装配置详细过程.txt
255 heads, 63 sectors/track, 261 cylinders
Units = cylinders of 16065 * 512 = 8225280 bytes
Device Boot Start End Blocks Id System
/dev/sdf1 1 261 2096451 83 Linux
Disk /dev/sdg: 10.7 GB, 10737418240 bytes
255 heads, 63 sectors/track, 1305 cylinders
Units = cylinders of 16065 * 512 = 8225280 bytes
Device Boot Start End Blocks Id System
/dev/sdg1 1 1305 10482381 83 Linux
Disk /dev/sdh: 10.7 GB, 10737418240 bytes
255 heads, 63 sectors/track, 1305 cylinders
Units = cylinders of 16065 * 512 = 8225280 bytes
Device Boot Start End Blocks Id System
/dev/sdh1 1 1305 10482381 83 Linux
Disk /dev/sdi: 10.7 GB, 10737418240 bytes
255 heads, 63 sectors/track, 1305 cylinders
Units = cylinders of 16065 * 512 = 8225280 bytes
Device Boot Start End Blocks Id System
/dev/sdi1 1 1305 10482381 83 Linux
Disk /dev/sdj: 5368 MB, 5368709120 bytes
255 heads, 63 sectors/track, 652 cylinders
Units = cylinders of 16065 * 512 = 8225280 bytes
Device Boot Start End Blocks Id System
/dev/sdj1 1 652 5237158+ 83 Linux
Disk /dev/sdk: 5368 MB, 5368709120 bytes
255 heads, 63 sectors/track, 652 cylinders
Units = cylinders of 16065 * 512 = 8225280 bytes
Device Boot Start End Blocks Id System
/dev/sdk1 1 652 5237158+ 83 Linux
配置ASM
[root@ora1 ~]# /etc/init.d/oracleasm configure
Configuring the Oracle ASM library driver.
This will configure the on-boot properties of the Oracle ASM library
driver. The following questions will determine whether the driver is
loaded on boot and what permissions it will have. The current values
will be shown in brackets ('[]'). Hitting without typing an
answer will keep that current value. Ctrl-C will abort.
Default user to own the driver interface []: grid
Default group to own the driver interface []: asmadmin
Start Oracle ASM library driver on boot (y/n) [n]: y
Scan for Oracle ASM disks on boot (y/n) [y]: y
Writing Oracle ASM library driver configuration: done
Initializing the Oracle ASMLib driver: [ OK ]
Scanning the system for Oracle ASMLib disks: [ OK ]
创建asm盘
-5-
�
D:\Backup\desktop\【Oracle RAC】Linux + Oracle 11g R2 RAC 安装配置详细过程.txt
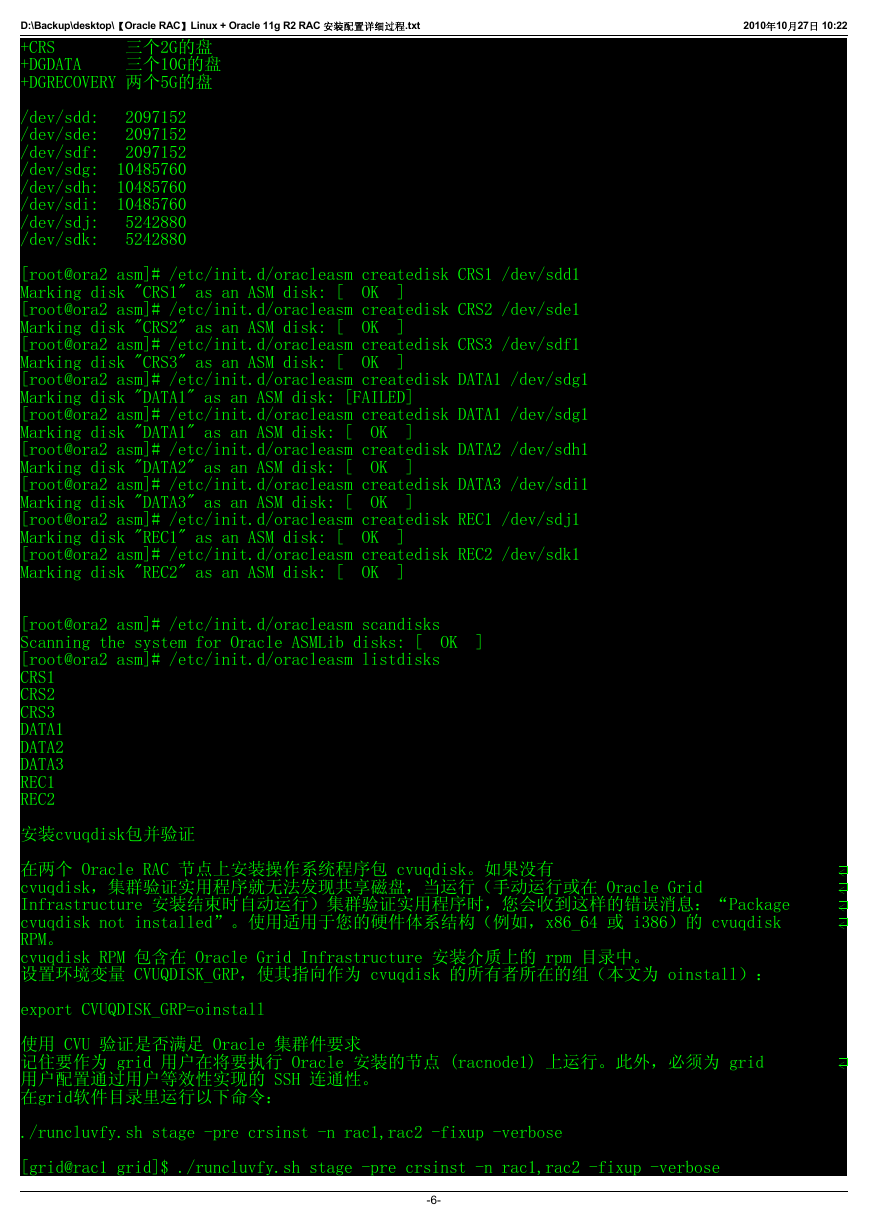
+CRS 三个2G的盘
+DGDATA 三个10G的盘
+DGRECOVERY 两个5G的盘
2010年10月27日 10:22
/dev/sdd: 2097152
/dev/sde: 2097152
/dev/sdf: 2097152
/dev/sdg: 10485760
/dev/sdh: 10485760
/dev/sdi: 10485760
/dev/sdj: 5242880
/dev/sdk: 5242880
[root@ora2 asm]# /etc/init.d/oracleasm createdisk CRS1 /dev/sdd1
Marking disk "CRS1" as an ASM disk: [ OK ]
[root@ora2 asm]# /etc/init.d/oracleasm createdisk CRS2 /dev/sde1
Marking disk "CRS2" as an ASM disk: [ OK ]
[root@ora2 asm]# /etc/init.d/oracleasm createdisk CRS3 /dev/sdf1
Marking disk "CRS3" as an ASM disk: [ OK ]
[root@ora2 asm]# /etc/init.d/oracleasm createdisk DATA1 /dev/sdg1
Marking disk "DATA1" as an ASM disk: [FAILED]
[root@ora2 asm]# /etc/init.d/oracleasm createdisk DATA1 /dev/sdg1
Marking disk "DATA1" as an ASM disk: [ OK ]
[root@ora2 asm]# /etc/init.d/oracleasm createdisk DATA2 /dev/sdh1
Marking disk "DATA2" as an ASM disk: [ OK ]
[root@ora2 asm]# /etc/init.d/oracleasm createdisk DATA3 /dev/sdi1
Marking disk "DATA3" as an ASM disk: [ OK ]
[root@ora2 asm]# /etc/init.d/oracleasm createdisk REC1 /dev/sdj1
Marking disk "REC1" as an ASM disk: [ OK ]
[root@ora2 asm]# /etc/init.d/oracleasm createdisk REC2 /dev/sdk1
Marking disk "REC2" as an ASM disk: [ OK ]
[root@ora2 asm]# /etc/init.d/oracleasm scandisks
Scanning the system for Oracle ASMLib disks: [ OK ]
[root@ora2 asm]# /etc/init.d/oracleasm listdisks
CRS1
CRS2
CRS3
DATA1
DATA2
DATA3
REC1
REC2
安装cvuqdisk包并验证
在两个 Oracle RAC 节点上安装操作系统程序包 cvuqdisk。如果没有
cvuqdisk,集群验证实用程序就无法发现共享磁盘,当运行(手动运行或在 Oracle Grid
Infrastructure 安装结束时自动运行)集群验证实用程序时,您会收到这样的错误消息:“Package
cvuqdisk not installed”。使用适用于您的硬件体系结构(例如,x86_64 或 i386)的 cvuqdisk
RPM。
cvuqdisk RPM 包含在 Oracle Grid Infrastructure 安装介质上的 rpm 目录中。
设置环境变量 CVUQDISK_GRP,使其指向作为 cvuqdisk 的所有者所在的组(本文为 oinstall):
export CVUQDISK_GRP=oinstall
使用 CVU 验证是否满足 Oracle 集群件要求
记住要作为 grid 用户在将要执行 Oracle 安装的节点 (racnode1) 上运行。此外,必须为 grid
用户配置通过用户等效性实现的 SSH 连通性。
在grid软件目录里运行以下命令:
./runcluvfy.sh stage -pre crsinst -n rac1,rac2 -fixup -verbose
[grid@rac1 grid]$ ./runcluvfy.sh stage -pre crsinst -n rac1,rac2 -fixup -verbose
-6-
�
D:\Backup\desktop\【Oracle RAC】Linux + Oracle 11g R2 RAC 安装配置详细过程.txt
2010年10月27日 10:22
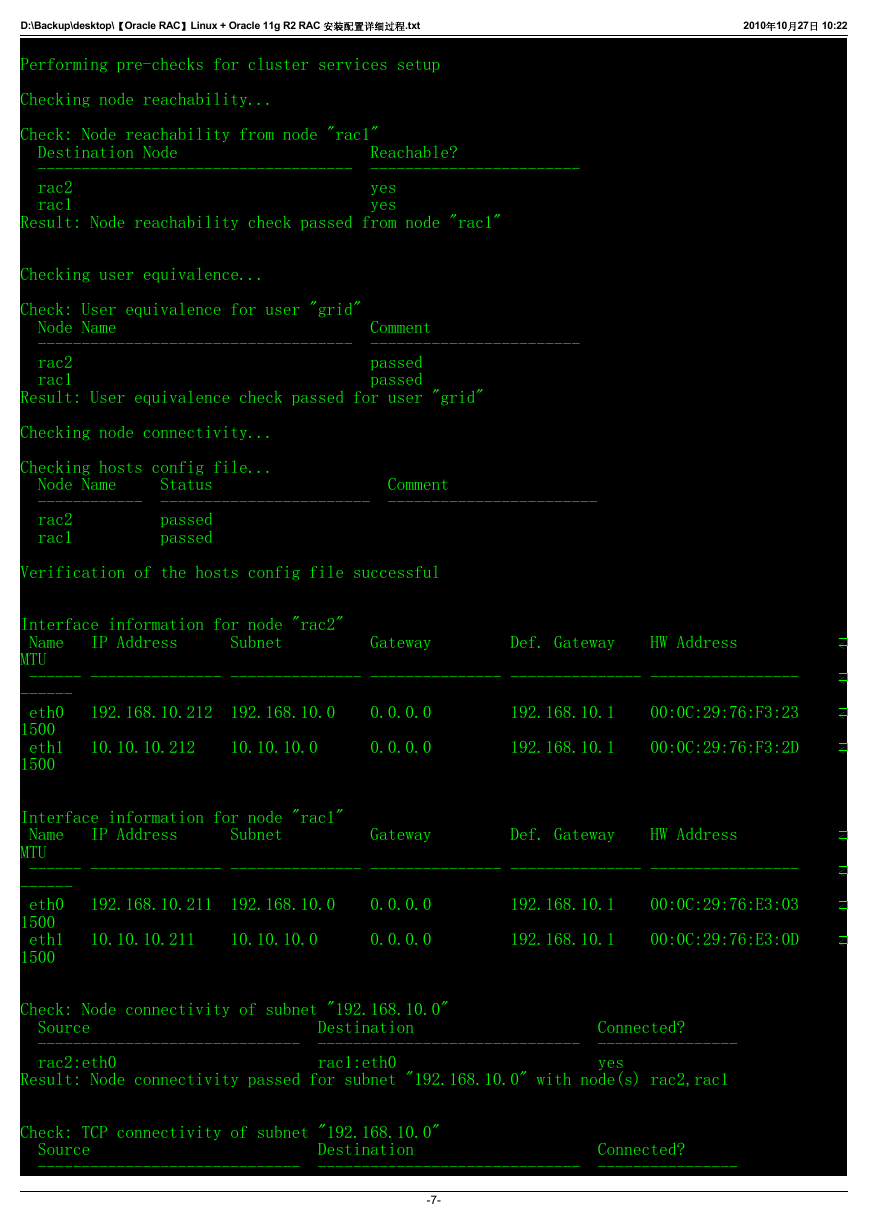
Performing pre-checks for cluster services setup
Checking node reachability...
Check: Node reachability from node "rac1"
Destination Node Reachable?
------------------------------------ ------------------------
rac2 yes
rac1 yes
Result: Node reachability check passed from node "rac1"
Checking user equivalence...
Check: User equivalence for user "grid"
Node Name Comment
------------------------------------ ------------------------
rac2 passed
rac1 passed
Result: User equivalence check passed for user "grid"
Checking node connectivity...
Checking hosts config file...
Node Name Status Comment
------------ ------------------------ ------------------------
rac2 passed
rac1 passed
Verification of the hosts config file successful
Interface information for node "rac2"
Name IP Address Subnet Gateway Def. Gateway HW Address
MTU
------ --------------- --------------- --------------- --------------- -----------------
------
eth0 192.168.10.212 192.168.10.0 0.0.0.0 192.168.10.1 00:0C:29:76:F3:23
1500
eth1 10.10.10.212 10.10.10.0 0.0.0.0 192.168.10.1 00:0C:29:76:F3:2D
1500
Interface information for node "rac1"
Name IP Address Subnet Gateway Def. Gateway HW Address
MTU
------ --------------- --------------- --------------- --------------- -----------------
------
eth0 192.168.10.211 192.168.10.0 0.0.0.0 192.168.10.1 00:0C:29:76:E3:03
1500
eth1 10.10.10.211 10.10.10.0 0.0.0.0 192.168.10.1 00:0C:29:76:E3:0D
1500
Check: Node connectivity of subnet "192.168.10.0"
Source Destination Connected?
------------------------------ ------------------------------ ----------------
rac2:eth0 rac1:eth0 yes
Result: Node connectivity passed for subnet "192.168.10.0" with node(s) rac2,rac1
Check: TCP connectivity of subnet "192.168.10.0"
Source Destination Connected?
------------------------------ ------------------------------ ----------------
-7-
�
D:\Backup\desktop\【Oracle RAC】Linux + Oracle 11g R2 RAC 安装配置详细过程.txt
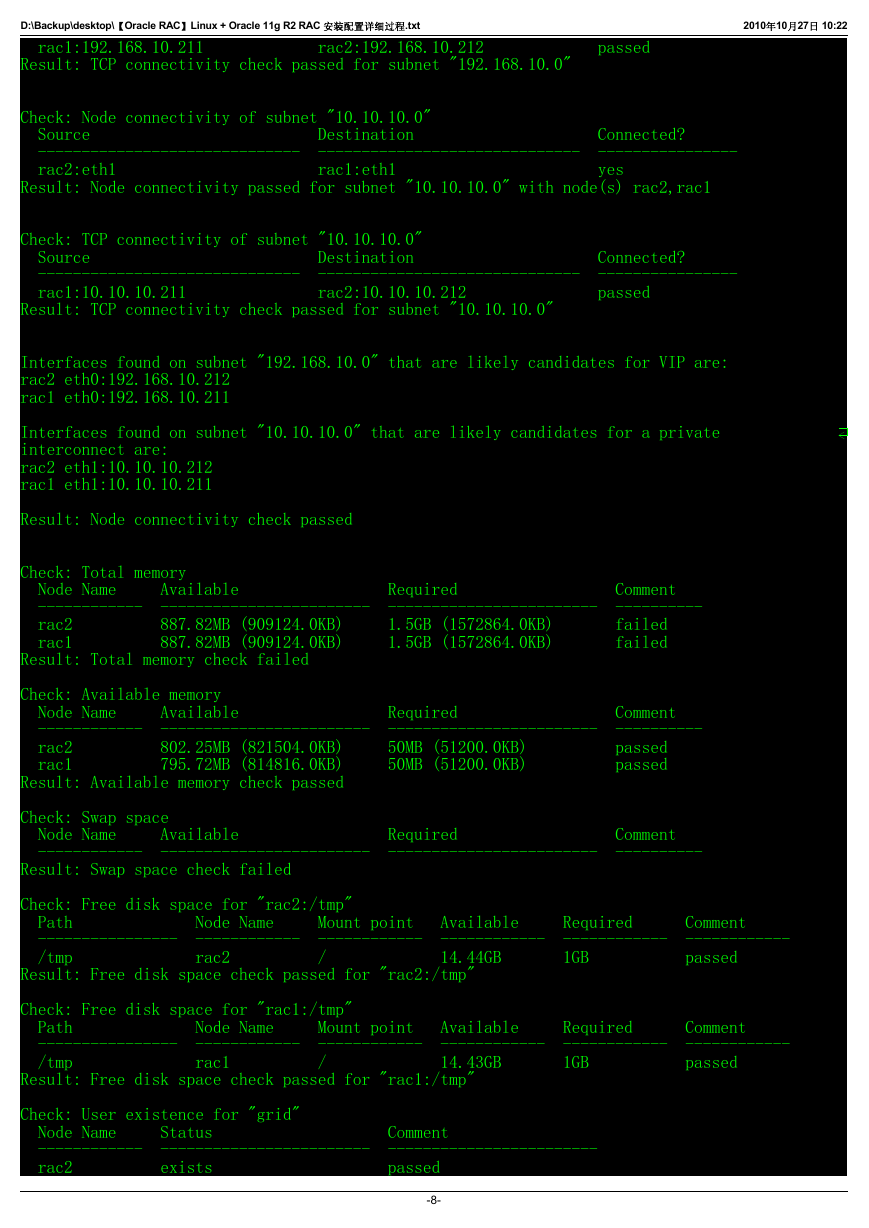
rac1:192.168.10.211 rac2:192.168.10.212 passed
Result: TCP connectivity check passed for subnet "192.168.10.0"
2010年10月27日 10:22
Check: Node connectivity of subnet "10.10.10.0"
Source Destination Connected?
------------------------------ ------------------------------ ----------------
rac2:eth1 rac1:eth1 yes
Result: Node connectivity passed for subnet "10.10.10.0" with node(s) rac2,rac1
Check: TCP connectivity of subnet "10.10.10.0"
Source Destination Connected?
------------------------------ ------------------------------ ----------------
rac1:10.10.10.211 rac2:10.10.10.212 passed
Result: TCP connectivity check passed for subnet "10.10.10.0"
Interfaces found on subnet "192.168.10.0" that are likely candidates for VIP are:
rac2 eth0:192.168.10.212
rac1 eth0:192.168.10.211
Interfaces found on subnet "10.10.10.0" that are likely candidates for a private
interconnect are:
rac2 eth1:10.10.10.212
rac1 eth1:10.10.10.211
Result: Node connectivity check passed
Check: Total memory
Node Name Available Required Comment
------------ ------------------------ ------------------------ ----------
rac2 887.82MB (909124.0KB) 1.5GB (1572864.0KB) failed
rac1 887.82MB (909124.0KB) 1.5GB (1572864.0KB) failed
Result: Total memory check failed
Check: Available memory
Node Name Available Required Comment
------------ ------------------------ ------------------------ ----------
rac2 802.25MB (821504.0KB) 50MB (51200.0KB) passed
rac1 795.72MB (814816.0KB) 50MB (51200.0KB) passed
Result: Available memory check passed
Check: Swap space
Node Name Available Required Comment
------------ ------------------------ ------------------------ ----------
Result: Swap space check failed
Check: Free disk space for "rac2:/tmp"
Path Node Name Mount point Available Required Comment
---------------- ------------ ------------ ------------ ------------ ------------
/tmp rac2 / 14.44GB 1GB passed
Result: Free disk space check passed for "rac2:/tmp"
Check: Free disk space for "rac1:/tmp"
Path Node Name Mount point Available Required Comment
---------------- ------------ ------------ ------------ ------------ ------------
/tmp rac1 / 14.43GB 1GB passed
Result: Free disk space check passed for "rac1:/tmp"
Check: User existence for "grid"
Node Name Status Comment
------------ ------------------------ ------------------------
rac2 exists passed
-8-
�



 2023年江西萍乡中考道德与法治真题及答案.doc
 2012年重庆南川中考生物真题及答案.doc
 2013年江西师范大学地理学综合及文艺理论基础考研真题.doc
 2020年四川甘孜小升初语文真题及答案I卷.doc
 2020年注册岩土工程师专业基础考试真题及答案.doc
 2023-2024学年福建省厦门市九年级上学期数学月考试题及答案.doc
 2021-2022学年辽宁省沈阳市大东区九年级上学期语文期末试题及答案.doc
 2022-2023学年北京东城区初三第一学期物理期末试卷及答案.doc
 2018上半年江西教师资格初中地理学科知识与教学能力真题及答案.doc
 2012年河北国家公务员申论考试真题及答案-省级.doc
 2020-2021学年江苏省扬州市江都区邵樊片九年级上学期数学第一次质量检测试题及答案.doc
 2022下半年黑龙江教师资格证中学综合素质真题及答案.doc