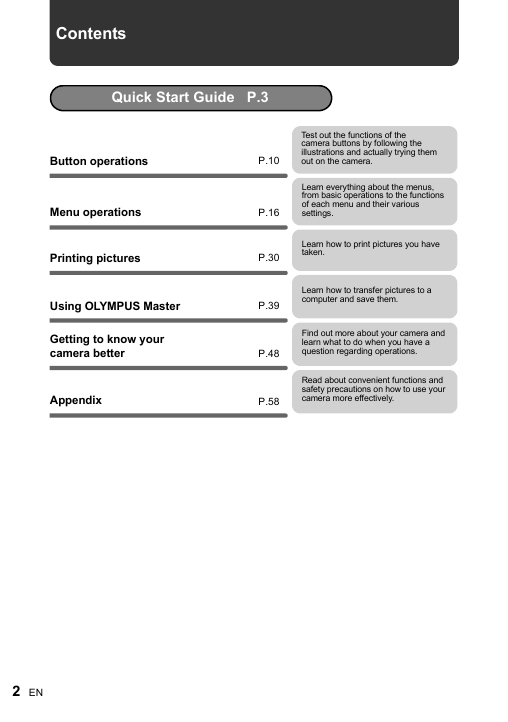
Button operations
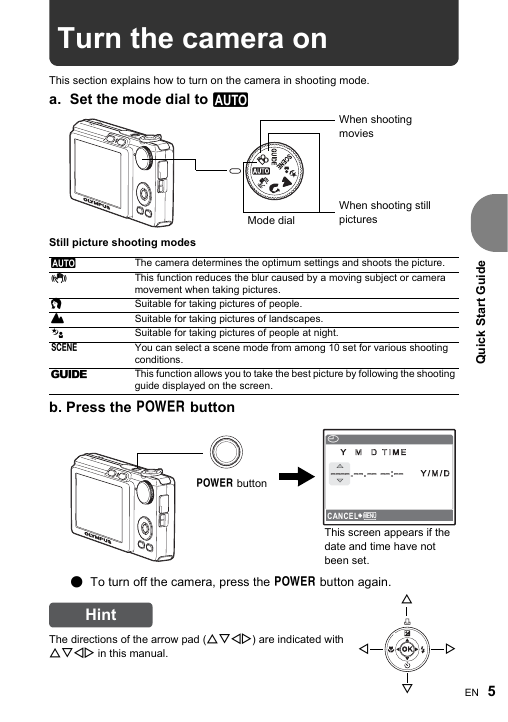
Turning the camera on and off
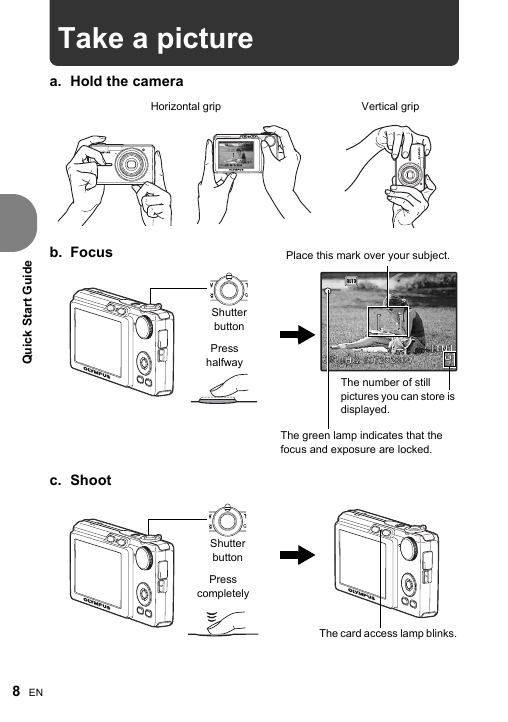
Shooting pictures
Selecting shooting mode/turning on the power
Selecting playback mode/turning on the power
Switching between shooting modes
Shooting pictures with automatic settings
Shooting pictures using digital image stabilization
Shooting pictures according to the situation
Shooting pictures by selecting a scene mode according to the situation
Follow the shooting guide to take better pictures
Recording movies
Zooming in and out while shooting or playing back pictures
Displaying the menu
Arrow pad
OK button
Changing picture brightness/Printing
Shooting pictures close to the subject
Self-timer shooting
Flash shooting
Erasing pictures
Menu operations
About the menus
Operation guide
Using the menus
Shooting mode menus
Changing the image quality
Creating a panoramic picture
Recording sound with still pictures
Recording movies with or without sound
Returning changed shooting functions to default settings
Selecting a scene mode according to the shooting situation
Setting to turn off operational sounds
Playback mode menu
Playing back pictures automatically
Playing back movies
PLAYBACK MENU
Protecting pictures
Rotating pictures
Adding sound to still pictures
Erase selected pictures/Erase all pictures
Erase by selecting single-frames
Erase all the pictures in the internal memory and the card
Reducing the size of pictures
Reviewing/registering your favorite pictures
Reviewing registered pictures
Registering your favorite picture
Making print reservations (DPOF)
SETUP menus
Formatting the internal memory/card
Copying pictures in the internal memory to the card
Selecting a display language
Adjusting the image processing function
Turning on the power with the shooting or playback button
Changing the monitor brightness
Adjusting the volume of beeps when buttons are pressed
Adjust the volume of camera warning sound
Adjusting the volume of the shutter button
Adjusting the volume during playback
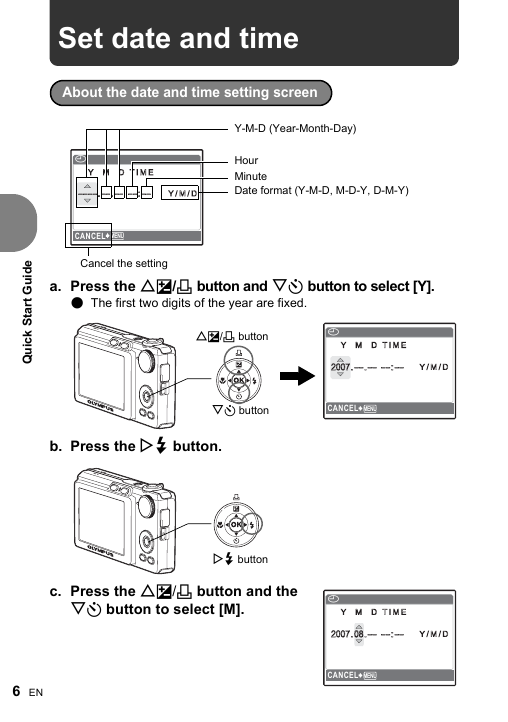
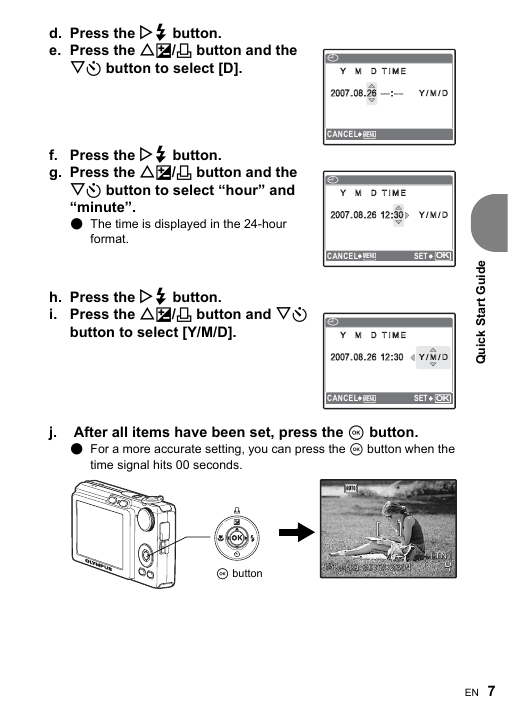
Setting the date and time
Playing back pictures on a TV
Printing pictures
Direct printing (PictBridge)
Printing pictures
Other print modes and print settings (CUSTOM PRINT)
Print settings (DPOF)
How to make print reservations
Single-frame reservation
All-frame reservation
Resetting print reservation data
Using OLYMPUS Master
Overview
Using OLYMPUS Master
What is OLYMPUS Master?
Install the OLYMPUS Master software
Connecting the camera to a computer
Start up the OLYMPUS Master software
Displaying camera images on a computer
Downloading and saving images
Viewing still pictures and movies
To download and save images to a computer without using OLYMPUS Master
To increase the number of languages
Getting to know your camera better
Shooting tips and information
Tips before you start taking pictures
The camera does not turn on even when a battery is loaded
No picture is taken when the shutter button is pressed
The date and time have not been set
Shooting tips
Focusing on the subject
Subjects that are difficult to focus on
Taking pictures without blurring
Taking pictures without the flash
The picture is too grainy
Taking pictures of a white beach or snow scene
Taking pictures of a subject against backlight
Additional shooting tips and information
Increasing the number of pictures that can be taken
Using a new card
Lamp indicators
Extending the useful life of the battery
Functions that cannot be selected from menus
Selecting the optimal image quality
To return the settings of functions to default settings
Playback tips
Playing back the pictures in the internal memory
Quickly displaying a desired picture
Erasing sound recorded to still pictures
Viewing pictures on a computer
Viewing the entire picture on a computer screen
When you get an error message on the camera...
Functions available in shooting modes and scene modes
Appendix
Camera care
Battery and charger
Useful use of the accessories
The card
AC adapter
SAFETY PRECAUTIONS
General Precautions
Product Handling Precautions
Battery Handling Precautions
Caution for Usage Environment
LCD Monitor
Legal and Other Notices
Disclaimer of Warranty
Warning
Copyright Notice
FCC Notice
For customers in North and South America
For customers in Europe
Trademarks
Specifications
Camera diagram
Camera
Monitor symbols and icons
Index


 2023年江西萍乡中考道德与法治真题及答案.doc
 2012年重庆南川中考生物真题及答案.doc
 2013年江西师范大学地理学综合及文艺理论基础考研真题.doc
 2020年四川甘孜小升初语文真题及答案I卷.doc
 2020年注册岩土工程师专业基础考试真题及答案.doc
 2023-2024学年福建省厦门市九年级上学期数学月考试题及答案.doc
 2021-2022学年辽宁省沈阳市大东区九年级上学期语文期末试题及答案.doc
 2022-2023学年北京东城区初三第一学期物理期末试卷及答案.doc
 2018上半年江西教师资格初中地理学科知识与教学能力真题及答案.doc
 2012年河北国家公务员申论考试真题及答案-省级.doc
 2020-2021学年江苏省扬州市江都区邵樊片九年级上学期数学第一次质量检测试题及答案.doc
 2022下半年黑龙江教师资格证中学综合素质真题及答案.doc