fi
Mv106
Operator’s Manual
�
Table of Contents
SAFETY ............................................................................................ i
Important Safety Instructions ............................................................................ i
When to Call Your Service Representative....................................................... ii
Power and Grounding ...................................................................................... iii
Cold Weather Power-up.................................................................................... iii
Thunderstorms .................................................................................................. iv
Symbols & Conventions Used In This Manual ................................................. iv
MACHINE LAYOUT.......................................................................... 1
Operation panel ................................................................................................ 1
Part Names ....................................................................................................... 2
FAXING........................................................................................... 3
Recommended Types of Document ................................................................ 4
Memory Transmission and Immediate Transmission ...................................... 6
Receiving Calls & Fax Messages (Faxes/Phone Calls) .................................. 11
Printing Received Messages that Have been Stored (Substitute Reception).. 14
Faxing a Page With Very Fine Detail ................................................................ 15
Optional Features for Transmission ................................................................. 16
Redialing .......................................................................................................... 19
Storing & Editing Fax Numbers (Functions 31 & 32)........................................ 21
Storing & Editing a Group of Fax Numbers (Function 33)................................ 23
Erasing Groups ................................................................................................. 25
Programming the Group Key ........................................................................... 25
Programming the Dial Option Key .................................................................... 26
Chain Dialing..................................................................................................... 27
Erasing a Stored Message Before It Is Sent (Functions 21 & 22).................... 28
Printing a Stored Message (Function 51) ......................................................... 29
Polling Reception (Function 11) ........................................................................ 30
Talking Before Sending a Fax (On Hook Dial) .................................................. 31
Sending a Fax using the Handset..................................................................... 31
OTHER FEATURES ............................................................................ 32
Verifying Communications, Errors, Counters, etc............................................. 32
Rejecting Messages From Certain Senders..................................................... 37
Saving Energy................................................................................................... 42
Tonal Signals..................................................................................................... 46
Copying ............................................................................................................. 47
MAINTAINING YOUR MACHINE .................................................... 48
Loading Paper in the Main Paper Tray ............................................................. 48
Replacing Toner Cassette ................................................................................ 49
Replacing the Photoconductor.......................................................................... 51
Daily Maintenance ............................................................................................ 53
v
�
TROUBLESHOOTING........................................................................54
If an Indicator Lights Up on the Operation Panel .............................................54
Other Possible Problems...................................................................................54
Clearing Document Jams ..................................................................................55
Clearing Copy Jams ..........................................................................................56
If Messages You Receive Don’t Fit on Your Paper............................................57
Communication problems..................................................................................57
Operational Difficulties.......................................................................................58
Displayed Error Messages ................................................................................62
Calling the Service Station ................................................................................63
TECHNICAL REFERENCE..................................................................64
Access Code for Functions 61 to 94 .................................................................64
User Parameters (Function 63) .........................................................................64
Adjusting the Volume of Various Features ........................................................69
Selecting the Display’s Language .....................................................................70
Counters (Function 94, see page 37.)...............................................................70
Entering Characters ..........................................................................................71
Document & Paper Specifications.....................................................................72
Capabilities ........................................................................................................73
Specifications.....................................................................................................74
INSTALLATION..................................................................................76
Machine Environment........................................................................................76
Installing the Photoconductor and Toner Cassette............................................78
Installing the Main Paper Tray ...........................................................................79
Attaching the Document Tray ...........................................................................79
Installing the Auto Document Table ...................................................................80
Installing the Copy Tray .....................................................................................80
Installing the Optional Paper Feed Unit.............................................................81
Setting the Paper Size.......................................................................................82
Setting the Paper ...............................................................................................83
Installing the Optional Memory Card .................................................................83
Connecting the Machine....................................................................................84
Connecting to the Phone Lines .........................................................................84
Connecting the Power .......................................................................................86
Initial Settings & Adjustments ............................................................................87
INDEX & GLOSSARY........................................................................93
Mini-Glossary.....................................................................................................95
vi
�
SAFETY
Important Safety Instructions
All safety messages in the main text of this manual are labeled WARNING or
CAUTION. These mean the following:
WARNING: Important information to alert you to a situation that might cause
serious injury and damage to your property if instructions are not
followed properly.
CAUTION: Important information that tells how to prevent damage to your
equipment or how to avoid a situation that might cause minor injury.
In addition to the warnings and cautions included in the text of this manual,
please read and observe the following safety instructions.
Save these instructions for later use.
Follow all warnings and cautions marked on the product.
1 Read all of these instructions.
2
3
4 Unplug this product from the wall outlet before cleaning. Do not use
liquid cleaners or aerosol cleaners. Use a damp cloth for cleaning.
5. Do not use this product near water.
6. Do not place this product on an unstable cart, stand, or table. The product
may fall, causing serious damage to the product or injuring the user.
7. Slots and openings in the cabinet and the back or bottom are provided
for ventilation; to ensure reliable operation of the product and to protect
it from overheating, these openings must not be blocked or covered.
The openings should never be blocked by placing the product on a bed,
sofa, rug, or other similar surface. This product should not be placed in a
built-in installation unless proper ventilation is provided.
8. This product should be operated from the type of power source
indicated on the marking label. If you are not sure of the type of power
available, consult an authorized sales person or your local power
company.
9. This product is equipped with a 3-wire grounding type plug, a plug having a
third (grounding) pin. This plug will only fit into a grounding-type power
outlet. This is a safety feature. If you are unable to insert the plug into the
outlet, contact your electrician to replace your obsolete outlet. Do not defeat
the purpose of the grounding type plug. (This does not apply in countries in
which the 2-wire, non-grounded type of plug is used.)
i
�
SAFETY
When to Call Your Service Representative
10. Do not allow anything to rest on the power cord. Do not locate this
11.
product where persons will walk on the cord.
If an extension cord is used with this product, make sure that the total of
the ampere ratings on the products plugged into the extension cord
does not exceed the extension cord ampere rating. Also, make sure that
the total of all products plugged into the wall outlet does not exceed 15
amperes.
12. Never push objects of any kind into this product through cabinet slots as
they may touch dangerous voltage points or short out parts that could
result in a risk of fire or electric shock. Never spill liquid of any kind on
the product.
13. Do not attempt to service this product yourself, as opening or removing
covers may expose you to dangerous voltage points or other risks.
Refer all servicing to qualified service personnel.
When to Call Your Service Representative
WARNING: Do not attempt any maintenance or troubleshooting other than
that mentioned in this manual. This machine contains a laser
beam generator and direct exposure to laser beams can cause
permanent eye damage.
Unplug this product from the wall outlet and refer servicing to qualified service
personnel under the following conditions:
A. When the power cord or plug is damaged or frayed.
B.
C.
D.
If liquid has been spilled into the product.
If the product has been exposed to rain or water.
If the product does not operate normally when the operating instructions
are followed. Adjust only those controls that are covered by the
operating instructions since improper adjustment of other controls may
result in damage and will often require extensive work by a qualified
technician to restore the product to normal operation.
If the product has been dropped or the cabinet has been damaged.
If the product exhibits a distinct change in performance, indicating a
need for service.
E.
F.
ii
�
Power and Grounding
SAFETY
Power and Grounding
Power Supply
1. Power requirements: 220-240 V, 50/60 Hz (Only 50 Hz is printed on the
rating plate of some machines.)
Insert the power plug securely into the wall socket.
2.
3. Make sure that the wall outlet is near the machine and readily
accessible.
4. Do not connect other equipment to the same socket.
5. Do not step on or set anything on the power cord.
6. Do not connect other equipment to the same extension cord.
7. Be sure that the power cord is not in a position where it would trip
someone.
8. The wall outlet must be easily accessible.
Grounding
Ground the machine and the lightning protection circuit in accordance with
regulations. Do not ground to gas or water pipes, or to a telephone ground
plug. Proper grounding is to the ground terminal of the power outlet. Be sure
that the ground terminal of the power outlet is properly grounded.
The lightning protection circuit for the machine requires the machine to be
properly grounded. If proper grounding is provided, about 90% of lightning
damage can be prevented. For safety, be sure to connect the machine to a
three-prong grounded outlet.
Cold Weather Power-up
Avoid raising the room temperature abruptly when it is below 14 C, or
condensation may form inside the machine.
1. Raise the room temperature to 10 C at less than 20 C per hour.
2. Wait for 30 to 60 minutes.
3. Turn the power on.
4. Do not use the machine near a humidifier.
iii
�
SAFETY
Thunderstorms
Thunderstorms
With proper grounding, about 90% of lightning damage can be prevented.
However, if possible, during severe electric storms turn the power switch off
and disconnect the power cord and telephone line cord.
GENERAL
1. Since some parts of the machine are supplied with high voltage, make
sure that you do not attempt any repairs or attempt to access any part of
the machine except those described in this manual.
2. Do not make modifications or replacements other than those mentioned
in this manual.
3. When not using the machine for a long period, disconnect the power
cord.
Ozone
The machine generates ozone during operation. Normally, the ozone level is
safe for operators. However, during a long copy run or while printing a long
message, ozone odor may appear; in such a case, ventilate the room.
Symbols & Conventions Used In This Manual
Documents: A document is anything you put on the feed table of your ma-
chine whether your are faxing it or copying it.
Prints:
A print is anything that comes out of the machine: a fax mes-
sage you received or a copy you made.
Procedures:
Procedures are described step by step. Perform them in or-
der. When you see an LCD display, it always shows what
comes after performing the step it accompanies. Other illus-
trations accompanying steps help you find the right key or
handle, or show you how to perform the step.
1 This is a step in a procedure.
%��$ � ##�$! ��$ %
%�� ��� ��$!����
iv
�
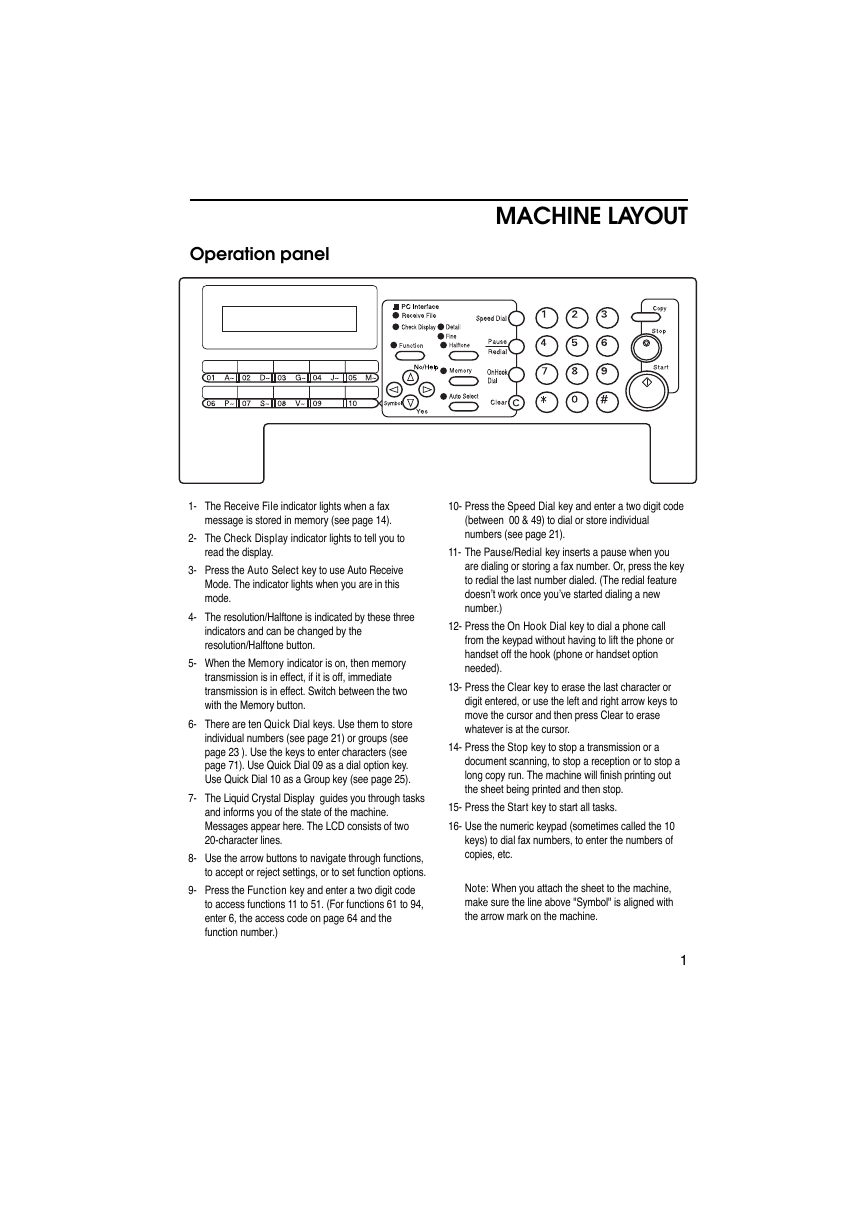
Operation panel
MACHINE LAYOUT
1- The Receive File indicator lights when a fax
message is stored in memory (see page 14).
2- The Check Display indicator lights to tell you to
read the display.
3- Press the Auto Select key to use Auto Receive
Mode. The indicator lights when you are in this
mode.
4- The resolution/Halftone is indicated by these three
indicators and can be changed by the
resolution/Halftone button.
5- When the Memory indicator is on, then memory
transmission is in effect, if it is off, immediate
transmission is in effect. Switch between the two
with the Memory button.
6- There are ten Quick Dial keys. Use them to store
individual numbers (see page 21) or groups (see
page 23 ). Use the keys to enter characters (see
page 71). Use Quick Dial 09 as a dial option key.
Use Quick Dial 10 as a Group key (see page 25).
7- The Liquid Crystal Display guides you through tasks
and informs you of the state of the machine.
Messages appear here. The LCD consists of two
20-character lines.
8- Use the arrow buttons to navigate through functions,
to accept or reject settings, or to set function options.
9- Press the Function key and enter a two digit code
to access functions 11 to 51. (For functions 61 to 94,
enter 6, the access code on page 64 and the
function number.)
10- Press the Speed Dial key and enter a two digit code
(between 00 & 49) to dial or store individual
numbers (see page 21).
11- The Pause/Redial key inserts a pause when you
are dialing or storing a fax number. Or, press the key
to redial the last number dialed. (The redial feature
doesn’t work once you’ve started dialing a new
number.)
12- Press the On Hook Dial key to dial a phone call
from the keypad without having to lift the phone or
handset off the hook (phone or handset option
needed).
13- Press the Clear key to erase the last character or
digit entered, or use the left and right arrow keys to
move the cursor and then press Clear to erase
whatever is at the cursor.
14- Press the Stop key to stop a transmission or a
document scanning, to stop a reception or to stop a
long copy run. The machine will finish printing out
the sheet being printed and then stop.
15- Press the Start key to start all tasks.
16- Use the numeric keypad (sometimes called the 10
keys) to dial fax numbers, to enter the numbers of
copies, etc.
Note: When you attach the sheet to the machine,
make sure the line above "Symbol" is aligned with
the arrow mark on the machine.
1
�





 2023年江西萍乡中考道德与法治真题及答案.doc
 2012年重庆南川中考生物真题及答案.doc
 2013年江西师范大学地理学综合及文艺理论基础考研真题.doc
 2020年四川甘孜小升初语文真题及答案I卷.doc
 2020年注册岩土工程师专业基础考试真题及答案.doc
 2023-2024学年福建省厦门市九年级上学期数学月考试题及答案.doc
 2021-2022学年辽宁省沈阳市大东区九年级上学期语文期末试题及答案.doc
 2022-2023学年北京东城区初三第一学期物理期末试卷及答案.doc
 2018上半年江西教师资格初中地理学科知识与教学能力真题及答案.doc
 2012年河北国家公务员申论考试真题及答案-省级.doc
 2020-2021学年江苏省扬州市江都区邵樊片九年级上学期数学第一次质量检测试题及答案.doc
 2022下半年黑龙江教师资格证中学综合素质真题及答案.doc