DAQ GETTING STARTED
Read Me First:
NI-DAQmx and DAQ Device Installation Guide
™
This document contains instructions in English, French, German, Japanese, Korean,
and Simplified Chinese.
Ce document contient des instructions en anglais, français, allemand, japonais,
coréen et chinois simplifié.
Dieses Dokument enthält Anweisungen in Englisch, Französisch, Deutsch,
Japanisch, Koreanisch und vereinfachtem Chinesisch.
, , , , , ( )
.
Install your software before installing new hardware.
Install Application Software
Install NI application software, such as NI LabVIEW, or another application
development environment (ADE), such as ANSI C or Visual Basic .NET.
Refer to the NI-DAQmx Readme on the software media for supported
application software and ADE versions.
Back up any applications before upgrading software or modifying the
application.
Install NI-DAQmx
Install NI-DAQmx driver software before installing new hardware devices so
Windows can detect them.
1.
Insert the software media. If the NI-DAQmx installer does not open
automatically, select Start»Run. Enter x:\autorun.exe, where x is
the drive letter. Complete the instructions.
2. Register your NI hardware online at ni.com/register when
prompted.
�
3. The last dialog box opens with the following options.
Restart Later to install more NI software or documentation. If you
are using a MXI-3 link from a PC to control a PXI chassis, exit and
install the MXI-3 software, available at ni.com/downloads, before
using the DAQ device.
Shut Down or Restart if you are ready to install your device.
Restart if you are using a system running the LabVIEW Real-Time
Module. Download NI-DAQmx to the target using MAX. Refer to
the Measurement & Automation Explorer Remote Systems Help by
selecting Help»Help Topics»Remote Systems in MAX.
If you have problems installing your software, go to ni.com/support/
daqmx.
Unpack and Install the Devices, Accessories, and Cables
Remove the packaging and inspect the device. Contact NI if the device is
damaged. Do not install a damaged device.
If you have more than one DAQ device to install, install them all now using
the procedure for your device type. If your system includes SCXI modules to
connect to DAQ devices, first install the DAQ components.
Caution The device is static sensitive. Always properly ground
yourself and the equipment when handling or connecting the
device.
For safety and compliance information, refer to the device documentation,
available at ni.com/manuals or on the NI-DAQmx software media.
The following symbols may be on your device.
This icon denotes a caution, which advises you of precautions to take
to avoid injury, data loss, or a system crash. When this symbol is
marked on the device, refer to the Read Me First: Safety and
Electromagnetic Compatibility document for precautions to take.
When this symbol is marked on a product, it denotes a warning
advising you to take precautions to avoid electrical shock.
When this symbol is marked on a product, it denotes a component
that may be hot. Touching this component may result in bodily
injury.
NI-DAQmx and DAQ Device Installation Guide
2
ni.com
�
CompactDAQ Devices
Complete the following steps to install a C Series I/O module in a
CompactDAQ system:
1. Attach a ring lug to a 14 AWG (1.6 mm) wire. Connect the ring lug to the
ground terminal on the side of the NI cDAQ chassis using the ground
screw. Attach the other end of the wire to the system safety ground.
Additionally, attach a wire with a ring lug to all other C Series I/O
module cable shields. You must connect this wire to the ground terminal
of the chassis using the ground screw.
Caution
If hazardous voltages, greater than 42.4 V or 60 VDC to
earth ground, are present, special safety guidelines apply. Refer to
the C Series module user guide before continuing.
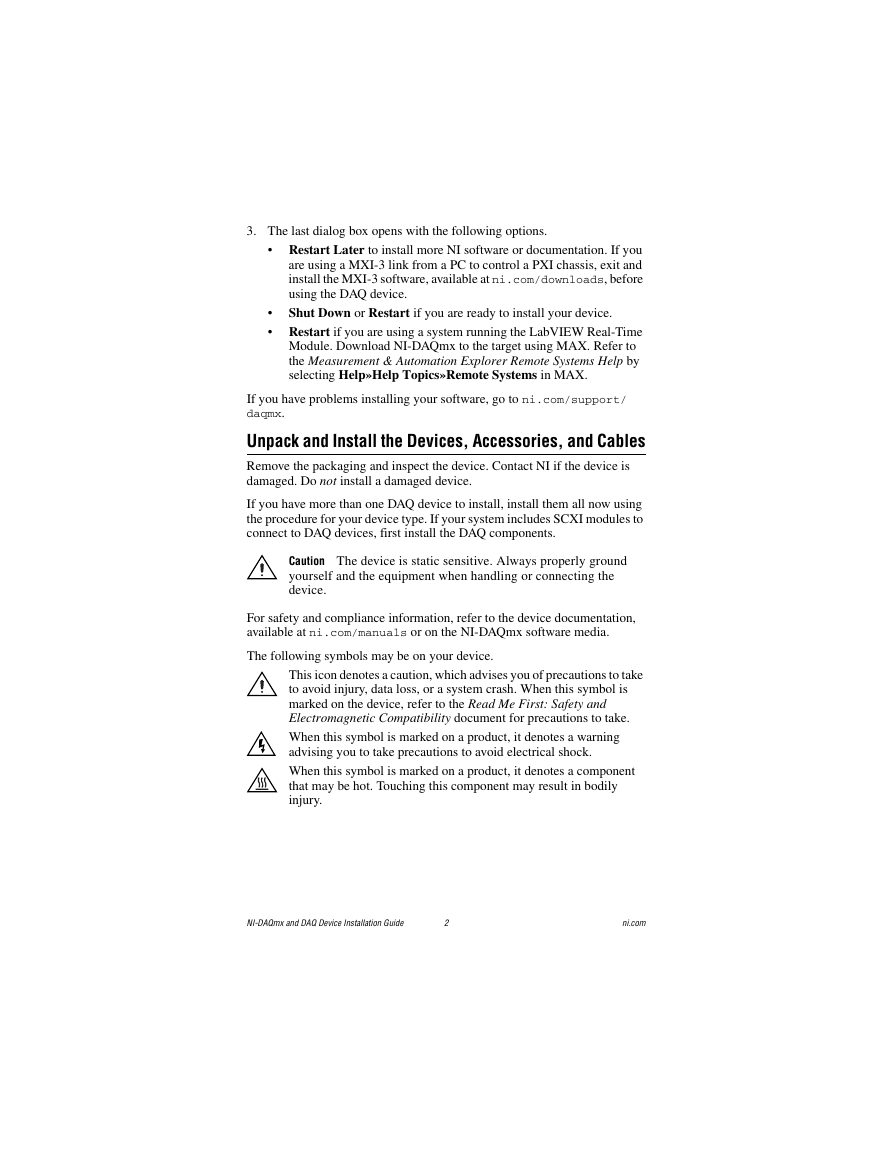
2.
Install C Series I/O modules. Squeeze both C Series I/O module latches,
insert each I/O module into an empty module slot, and press until both
latches lock the module in place. Refer to the C Series I/O module user
guide for more information, such as signal connections, safety
precautions, and module ratings.
2
1
.
1 USB or Ethernet Connector
2 C Series I/O Module
Figure 1. Setting up a cDAQ Chassis
3.
If you have a USB cDAQ chassis, connect the chassis using the USB
cable supplied with your chassis to any available USB port on your
computer system. If you have an Ethernet cDAQ chassis, connect the
chassis to your network using a CAT5e or crossover Ethernet cable. Refer
to the DAQ Getting Started Guide for network configuration information.
4. Connect the power source to the chassis. Most cDAQ chassis require an
external power supply that meets the specifications listed in the chassis
user documentation.
© National Instruments Corporation
3
NI-DAQmx and DAQ Device Installation Guide
�
PCI and PCI Express Devices
Complete the following steps to install a PCI and PCI Express device:
1. Power off and unplug the computer.
2. Remove the computer cover and/or the expansion slot cover.
3. Touch any metal part of the computer to discharge any static electricity.
3
1
2
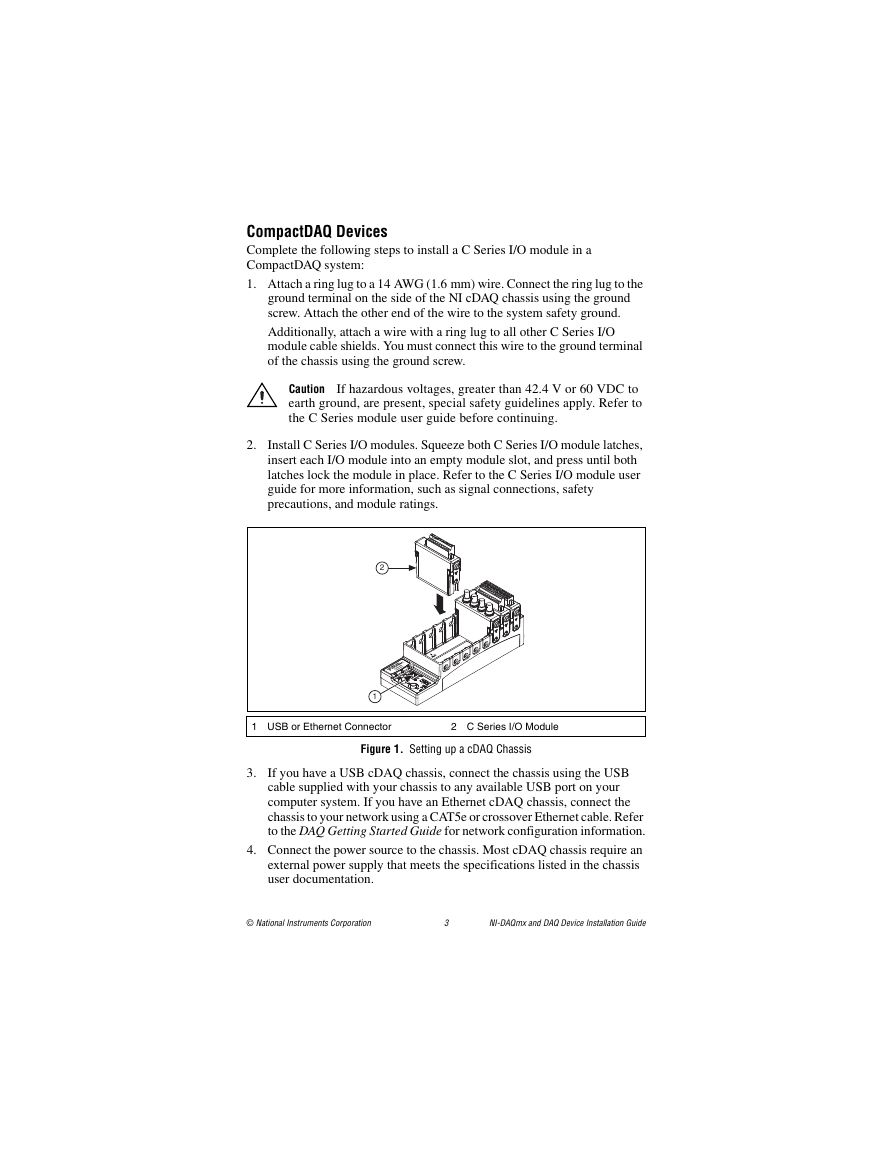
1 PCI/PCI Express DAQ Device
2 PCI/PCI Express System Slot
3 PC with PCI/PCI Express Slot
Figure 2. Installing a PCI/PCI Express Device
4.
Insert the device into the applicable PCI/PCI Express system slot. Gently
rock the device into place. Do not force the device into place.
Per the PCI standard, NI PCI DAQ devices with the Universal
PCI connector are supported in PCI-compliant buses, including PCI-X.
You cannot install PCI Express devices in PCI slots and vice versa.
PCI Express devices support up-plugging into a PCI Express slot of
higher lane width. For guidelines, refer to ni.com/pciexpress.
5. Secure the device mounting bracket to the computer back panel rail.
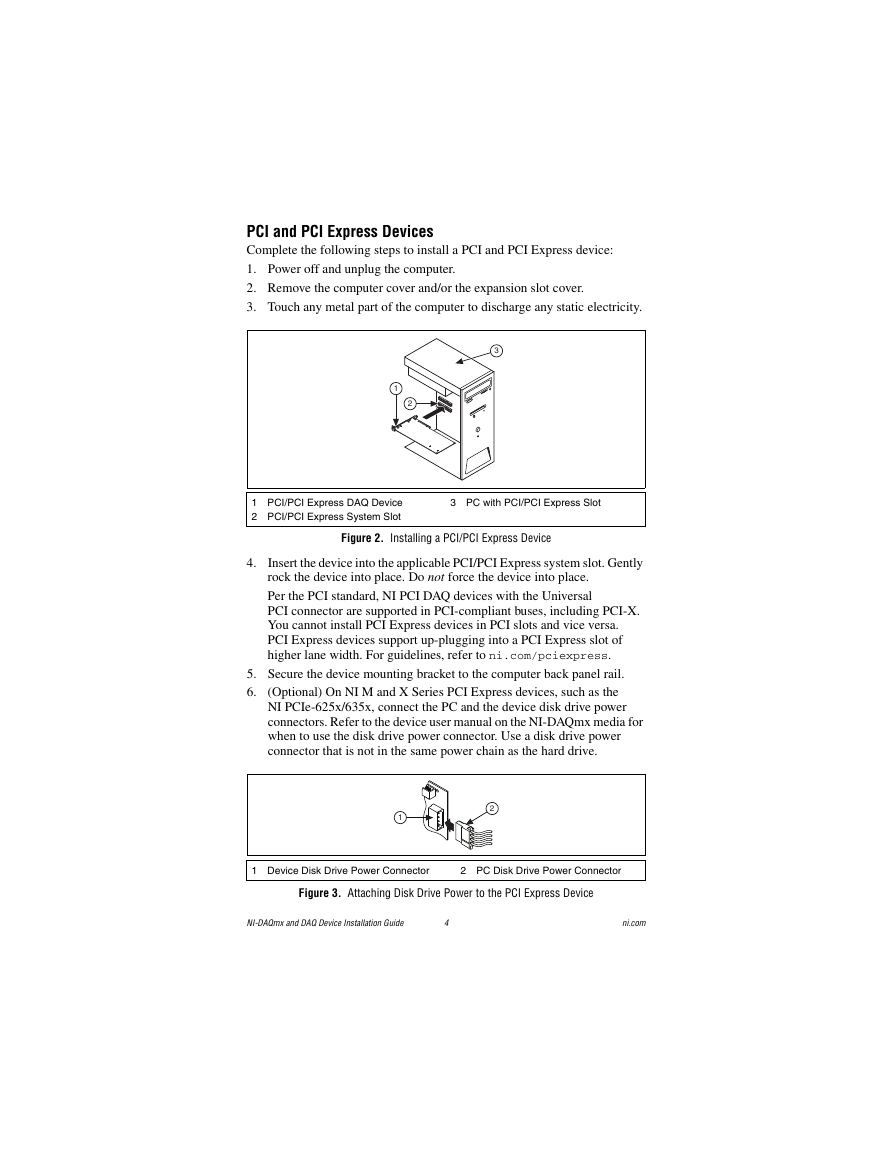
(Optional) On NI M and X Series PCI Express devices, such as the
6.
NI PCIe-625x/635x, connect the PC and the device disk drive power
connectors. Refer to the device user manual on the NI-DAQmx media for
when to use the disk drive power connector. Use a disk drive power
connector that is not in the same power chain as the hard drive.
1
2
1 Device Disk Drive Power Connector
2 PC Disk Drive Power Connector
Figure 3. Attaching Disk Drive Power to the PCI Express Device
NI-DAQmx and DAQ Device Installation Guide
4
ni.com
�
Connecting or disconnecting the disk drive power connector can affect
the analog performance of your device. To compensate for this,
NI recommends that you self-calibrate the PCI Express DAQ device in
MAX after connecting or disconnecting the disk drive power connector;
refer to the DAQ Getting Started Guide at Start»All Programs»
National Instruments»NI-DAQ»DAQ Getting Started Guide.
7. Replace the computer cover, if applicable.
8. Plug in and power on your computer.
PXI and PXI Express Devices
Complete the following steps to install a PXI and PXI Express device:
1. Power off and unplug the PXI/PXI Express chassis. Refer to your chassis
manual to install or configure the chassis.
Caution Refer to the Read Me First: Safety and Electromagnetic
Compatibility with your PXI/PXI Express chassis or device before
removing covers or connecting or disconnecting signal wires.
2
PXI-1000B
1
77
3
4
6
5
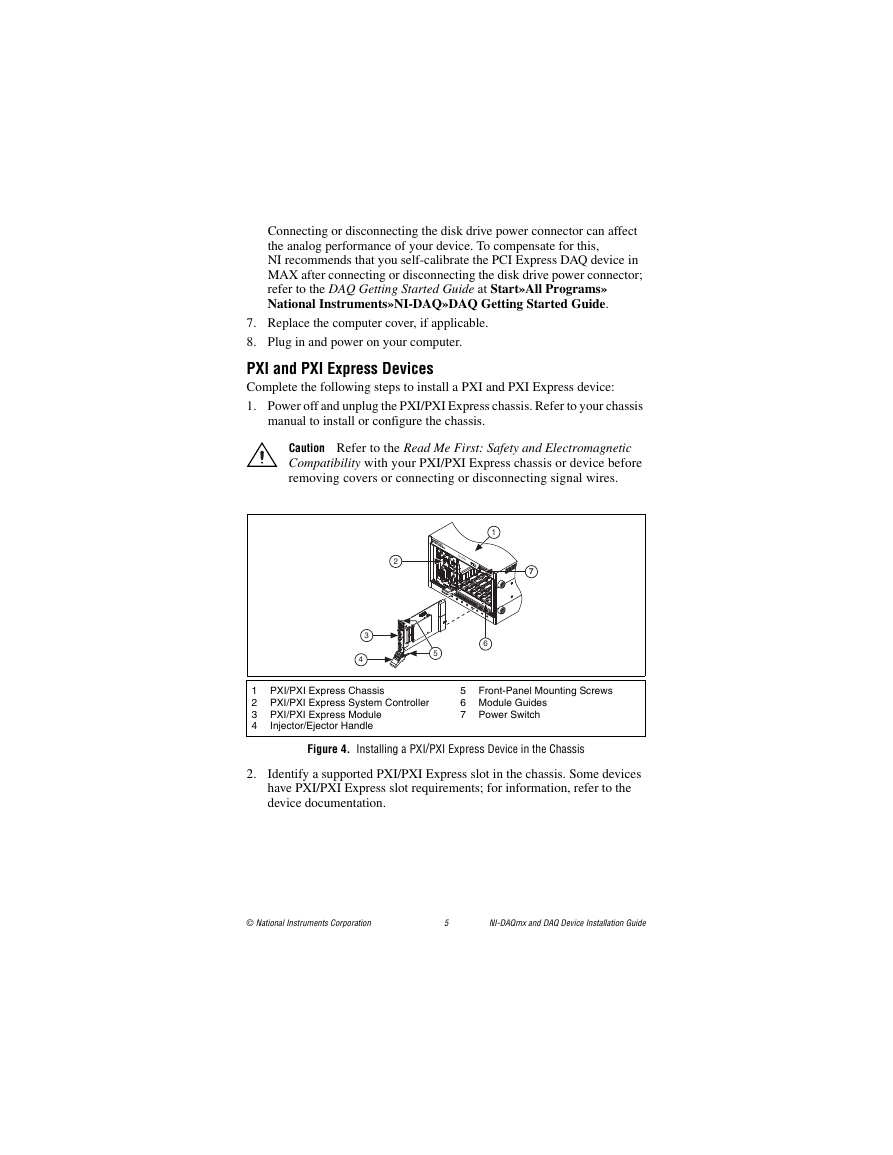
1 PXI/PXI Express Chassis
2 PXI/PXI Express System Controller
3 PXI/PXI Express Module
4
Injector/Ejector Handle
Front-Panel Mounting Screws
5
6 Module Guides
7 Power Switch
Figure 4. Installing a PXI/PXI Express Device in the Chassis
2.
Identify a supported PXI/PXI Express slot in the chassis. Some devices
have PXI/PXI Express slot requirements; for information, refer to the
device documentation.
© National Instruments Corporation
5
NI-DAQmx and DAQ Device Installation Guide
�
NI PXIe-1062Q
1
2
3
4
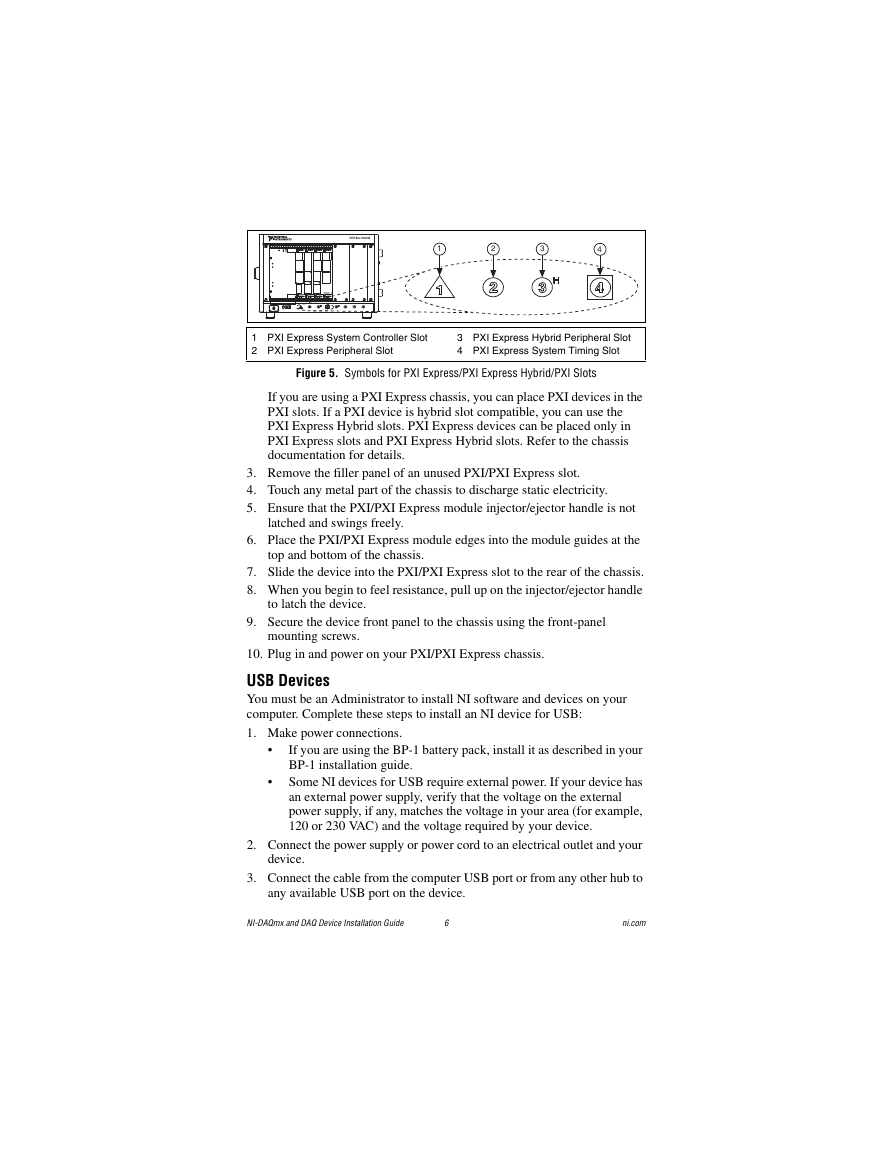
1 PXI Express System Controller Slot
2 PXI Express Peripheral Slot
3 PXI Express Hybrid Peripheral Slot
4 PXI Express System Timing Slot
Figure 5. Symbols for PXI Express/PXI Express Hybrid/PXI Slots
If you are using a PXI Express chassis, you can place PXI devices in the
PXI slots. If a PXI device is hybrid slot compatible, you can use the
PXI Express Hybrid slots. PXI Express devices can be placed only in
PXI Express slots and PXI Express Hybrid slots. Refer to the chassis
documentation for details.
3. Remove the filler panel of an unused PXI/PXI Express slot.
4. Touch any metal part of the chassis to discharge static electricity.
5. Ensure that the PXI/PXI Express module injector/ejector handle is not
latched and swings freely.
6. Place the PXI/PXI Express module edges into the module guides at the
top and bottom of the chassis.
7. Slide the device into the PXI/PXI Express slot to the rear of the chassis.
8. When you begin to feel resistance, pull up on the injector/ejector handle
to latch the device.
9. Secure the device front panel to the chassis using the front-panel
mounting screws.
10. Plug in and power on your PXI/PXI Express chassis.
USB Devices
You must be an Administrator to install NI software and devices on your
computer. Complete these steps to install an NI device for USB:
1. Make power connections.
If you are using the BP-1 battery pack, install it as described in your
BP-1 installation guide.
Some NI devices for USB require external power. If your device has
an external power supply, verify that the voltage on the external
power supply, if any, matches the voltage in your area (for example,
120 or 230 VAC) and the voltage required by your device.
2. Connect the power supply or power cord to an electrical outlet and your
device.
3. Connect the cable from the computer USB port or from any other hub to
any available USB port on the device.
NI-DAQmx and DAQ Device Installation Guide
6
ni.com
�
4.
If you have a USB device with a power switch, power on the device.
The computer should immediately detect your device.
When the computer recognizes a USB device, the LED on the device blinks
or lights up. Refer to the device documentation for LED pattern descriptions.
Windows Device Recognition
Windows versions earlier than Windows Vista recognize newly installed
devices when the computer restarts. Vista installs device software
automatically. If the Found New Hardware wizard opens, Install the
software automatically as recommended for each device.
NI Device Monitor
After Windows detects newly installed NI USB devices, NI Device Monitor
runs automatically at startup.
Make sure the NI Device Monitor icon, shown at left, is visible in the
taskbar notification area. Otherwise, the NI Device Monitor does not
open. To turn the NI Device Monitor on, unplug your device, restart
NI Device Monitor by selecting Start»All Programs»National
Instruments»NI-DAQ»NI Device Monitor, and plug in your
device.
The NI Device Monitor prompts you to select from the following options.
These options may vary, depending on the devices and software installed on
your system.
Begin a Measurement with This Device Using NI LabVIEW
SignalExpress—Opens an NI-DAQmx step that uses the channels from
your device in LabVIEW SignalExpress.
Begin an Application with This Device—Launches LabVIEW. Choose
this option if you have already configured your device in MAX.
Run Test Panels—Launches MAX test panels for your device.
Configure and Test This Device—Opens MAX.
Take No Action—Recognizes your device but does not launch an
application.
The following features are available by right-clicking the NI Device Monitor
icon:
Run at Startup—Runs NI Device Monitor at system startup (default).
Clear All Device Associations—Select to clear all actions set by the
Always Take This Action checkbox in the device auto-launch dialog
box.
Close—Turns off NI Device Monitor. To turn on NI Device Monitor,
select Start»All Programs»National Instruments»NI-DAQ»
NI Device Monitor.
© National Instruments Corporation
7
NI-DAQmx and DAQ Device Installation Guide
�
Accessories
Install accessories and/or terminal blocks according to the instructions in
their installation guides. For SCXI and SCC signal conditioning systems,
continue with the instructions in the DAQ Getting Started Guide.
Troubleshooting
If you have problems installing your software, go to ni.com/support/
daqmx. For hardware troubleshooting, go to ni.com/support and enter
your device name, or go to ni.com/kb.
If you need to return your National Instruments hardware for repair or device
calibration, go to ni.com/info and enter rdsenn to start the Return
Merchandise Authorization (RMA) process.
Go to ni.com/info and enter rddq8x for a complete listing of the
NI-DAQmx documents and their locations.
Next Step
To confirm your device is working properly and start your application, refer
to the DAQ Getting Started Guide. After you install NI-DAQmx, the
NI-DAQmx software documents are accessible from Start»All Programs»
National Instruments»NI-DAQ»NI-DAQmx document title. Additional
resources are online at ni.com/gettingstarted.
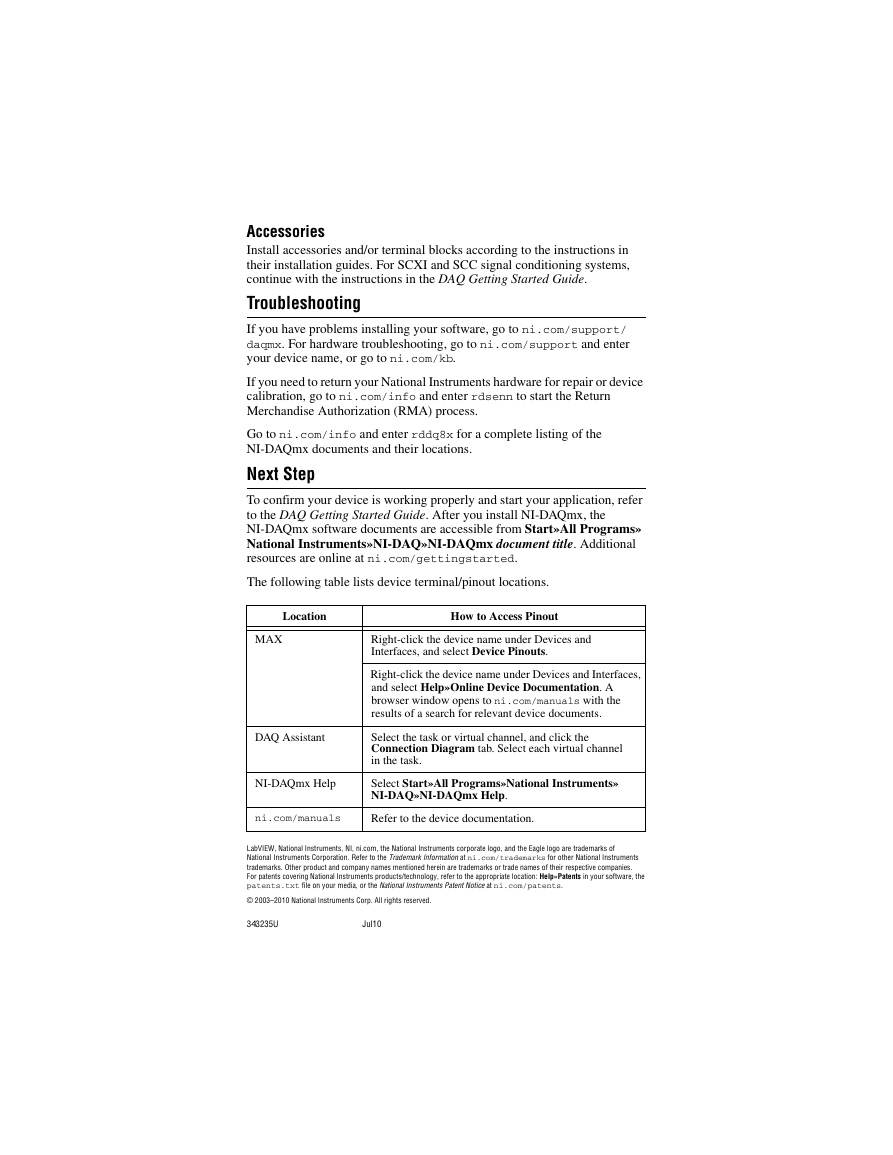
The following table lists device terminal/pinout locations.
Location
How to Access Pinout
MAX
Right-click the device name under Devices and
Interfaces, and select Device Pinouts.
Right-click the device name under Devices and Interfaces,
and select Help»Online Device Documentation. A
browser window opens to ni.com/manuals with the
results of a search for relevant device documents.
DAQ Assistant
Select the task or virtual channel, and click the
Connection Diagram tab. Select each virtual channel
in the task.
NI-DAQmx Help
Select Start»All Programs»National Instruments»
NI-DAQ»NI-DAQmx Help.
ni.com/manuals
Refer to the device documentation.
LabVIEW, National Instruments, NI, ni.com, the National Instruments corporate logo, and the Eagle logo are trademarks of
National Instruments Corporation. Refer to the Trademark Information at ni.com/trademarks for other National Instruments
trademarks. Other product and company names mentioned herein are trademarks or trade names of their respective companies.
For patents covering National Instruments products/technology, refer to the appropriate location: Help»Patents in your software, the
patents.txt file on your media, or the National Instruments Patent Notice at ni.com/patents.
© 2003–2010 National Instruments Corp. All rights reserved.
33235U
Jul10
�



 2023年江西萍乡中考道德与法治真题及答案.doc
 2012年重庆南川中考生物真题及答案.doc
 2013年江西师范大学地理学综合及文艺理论基础考研真题.doc
 2020年四川甘孜小升初语文真题及答案I卷.doc
 2020年注册岩土工程师专业基础考试真题及答案.doc
 2023-2024学年福建省厦门市九年级上学期数学月考试题及答案.doc
 2021-2022学年辽宁省沈阳市大东区九年级上学期语文期末试题及答案.doc
 2022-2023学年北京东城区初三第一学期物理期末试卷及答案.doc
 2018上半年江西教师资格初中地理学科知识与教学能力真题及答案.doc
 2012年河北国家公务员申论考试真题及答案-省级.doc
 2020-2021学年江苏省扬州市江都区邵樊片九年级上学期数学第一次质量检测试题及答案.doc
 2022下半年黑龙江教师资格证中学综合素质真题及答案.doc