DLP Projector Flash-Tool (splash logo) User Guide
Ver 5.02
The document is to describe a Windows application software “Flash-Tool” for projector
firmware. Its main purpose is to provide a detailed procedure of upgrading the application
software of a DLP projector. The system requirement and the installation procedure of
“Flash-Tool” are also included in the document.
NOTE:
User must have administrative privileges on the target computer in order to
install the driver. (The installation target directory must not be write-protected.)
User also required having the basic knowledge of Windows application installation.
Attention: This utility is for DLPTM DDP2000/3020 series projectors only.
System Requirement:
IBM compatible PC.
Windows XP operating system (English).
Projector with Flash-Tool USB driver installed
Install Flash-Tool to PC
Execute the file of “Digital Zoom Projector Flash Tool Vx.y.msi”.
Note: If your projector USB driver is not installed yet, please refer to the USB driver installation
guide for further details.
1/1
�
Start with Flash-tool
The section is to illustrate the procedure to upgrade the application software of a DLP
projector.
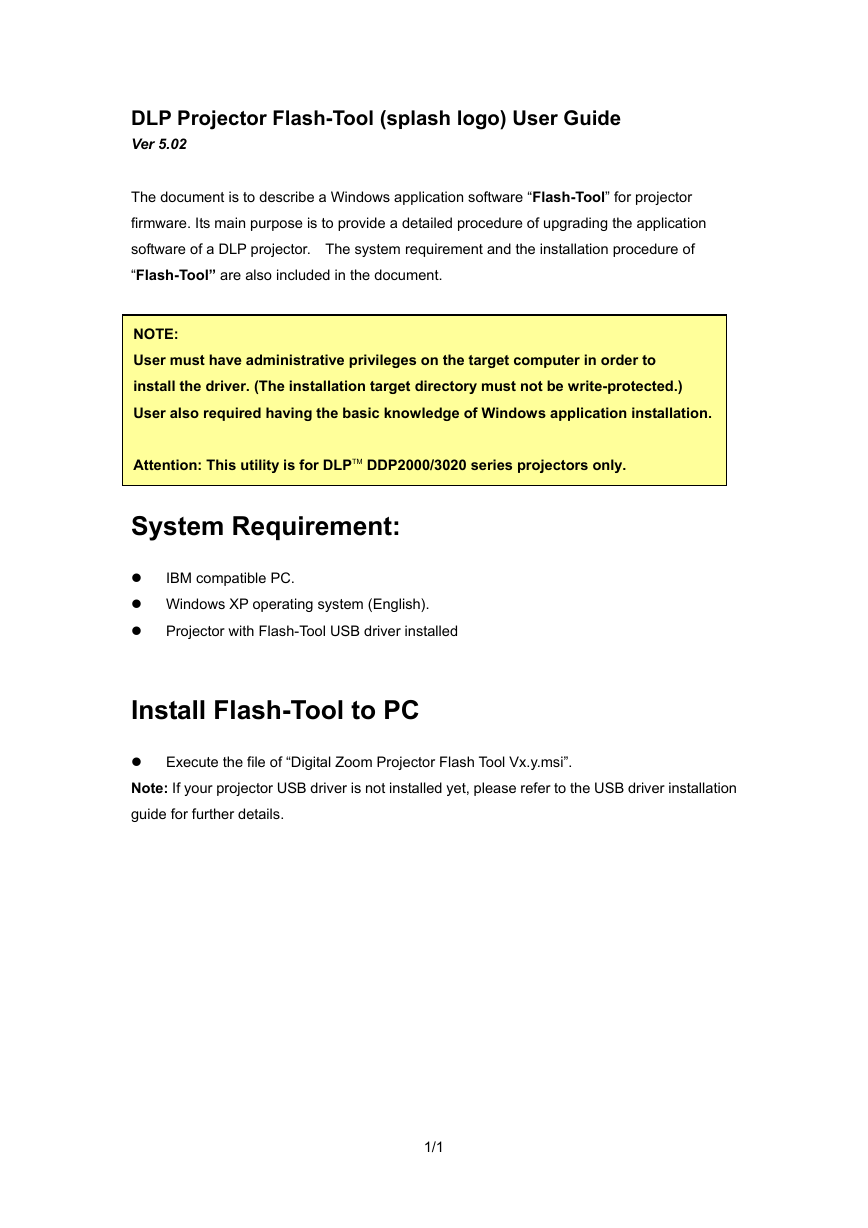
Step 1: Launch the “FlashTool.exe” from installed shortcut at
Program > Digital Zoom Projector> Launch FlasTool.exe or click on the “Launch
FlashTool.exe” shortcut icon on the desktop.
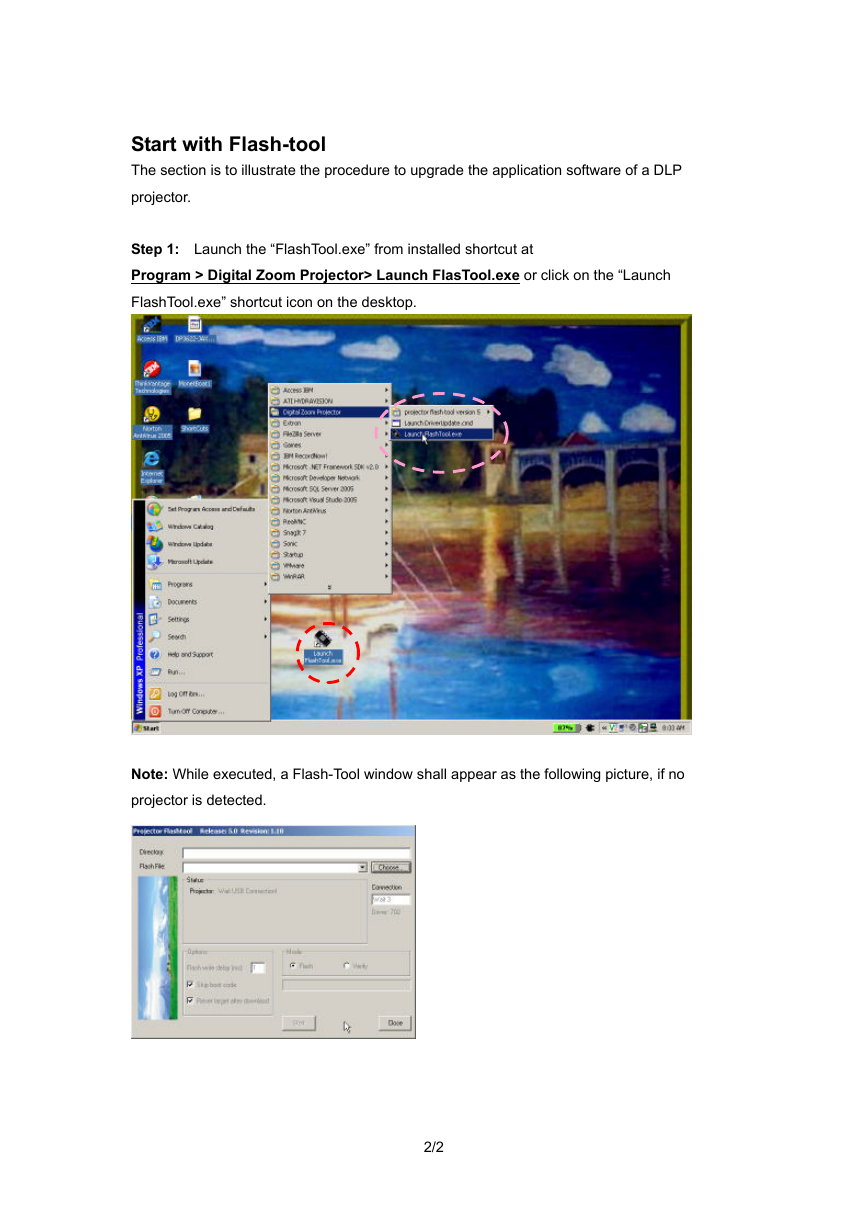
Note: While executed, a Flash-Tool window shall appear as the following picture, if no
projector is detected.
2/2
�
Step 2: Make sure that the USB cable is firmly connected between projector and computer
Step 3: Connect the power cord to the projector, and move the power switch in its ON
position (if available) so that projector is in STAND BY mode.
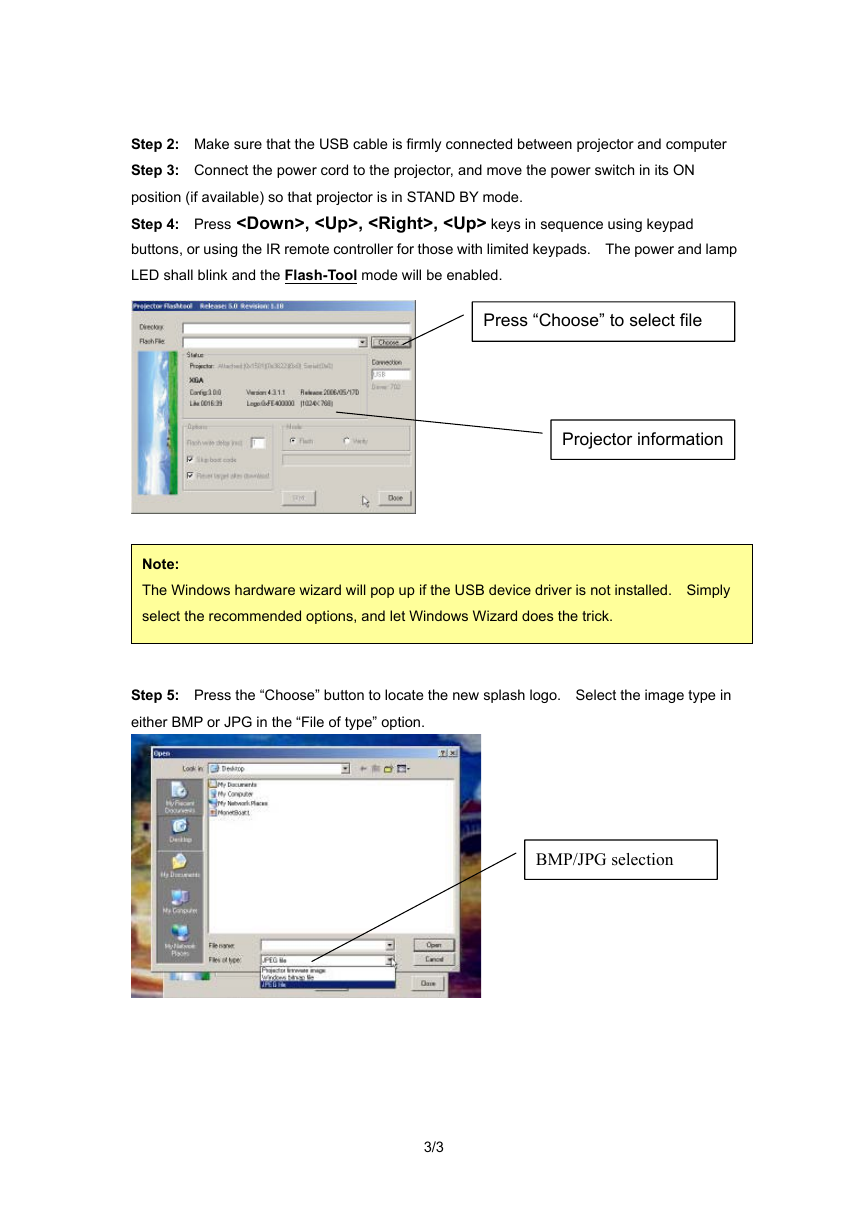
Step 4: Press , , , keys in sequence using keypad
buttons, or using the IR remote controller for those with limited keypads. The power and lamp
LED shall blink and the Flash-Tool mode will be enabled.
Press “Choose” to select file
Projector information
Note:
The Windows hardware wizard will pop up if the USB device driver is not installed. Simply
select the recommended options, and let Windows Wizard does the trick.
.
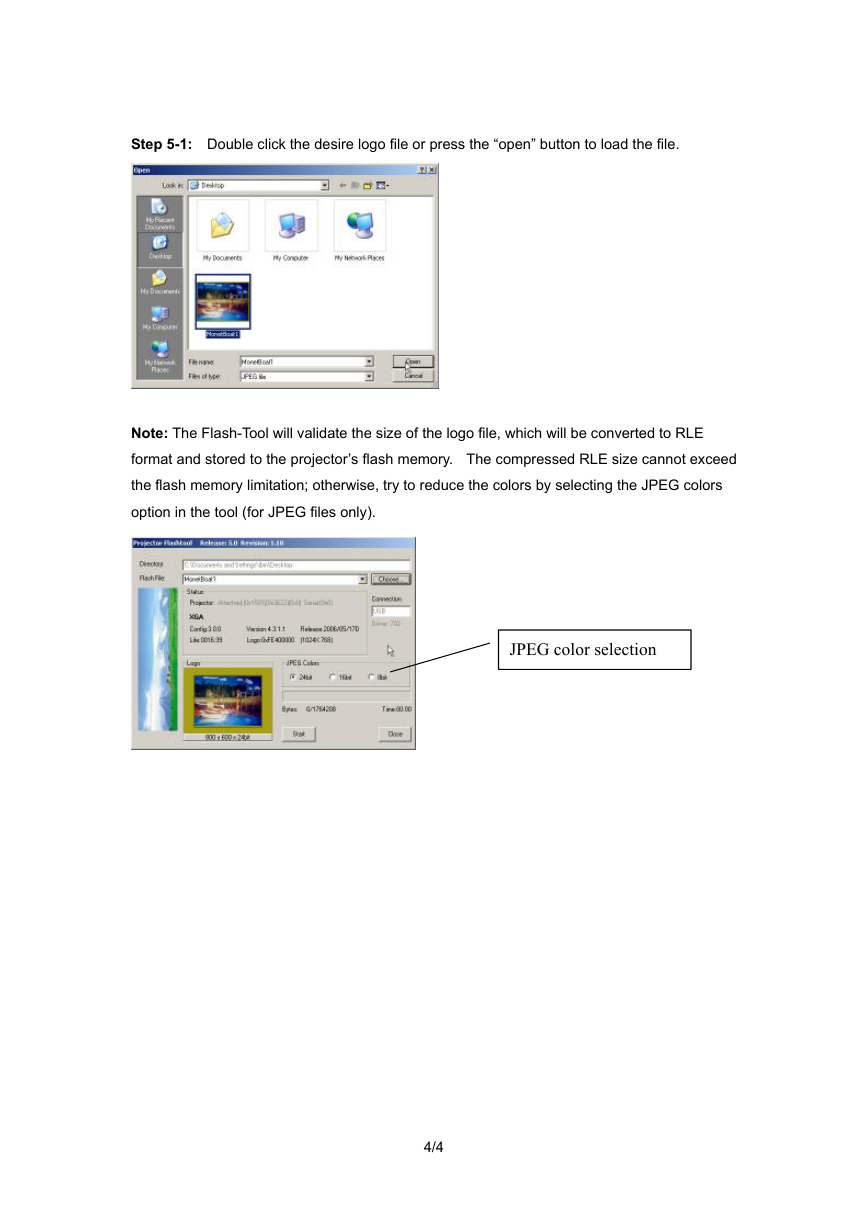
Step 5: Press the “Choose” button to locate the new splash logo. Select the image type in
either BMP or JPG in the “File of type” option.
BMP/JPG selection
3/3
�
Step 5-1: Double click the desire logo file or press the “open” button to load the file.
Note: The Flash-Tool will validate the size of the logo file, which will be converted to RLE
format and stored to the projector’s flash memory. The compressed RLE size cannot exceed
the flash memory limitation; otherwise, try to reduce the colors by selecting the JPEG colors
option in the tool (for JPEG files only).
JPEG color selection
4/4
�
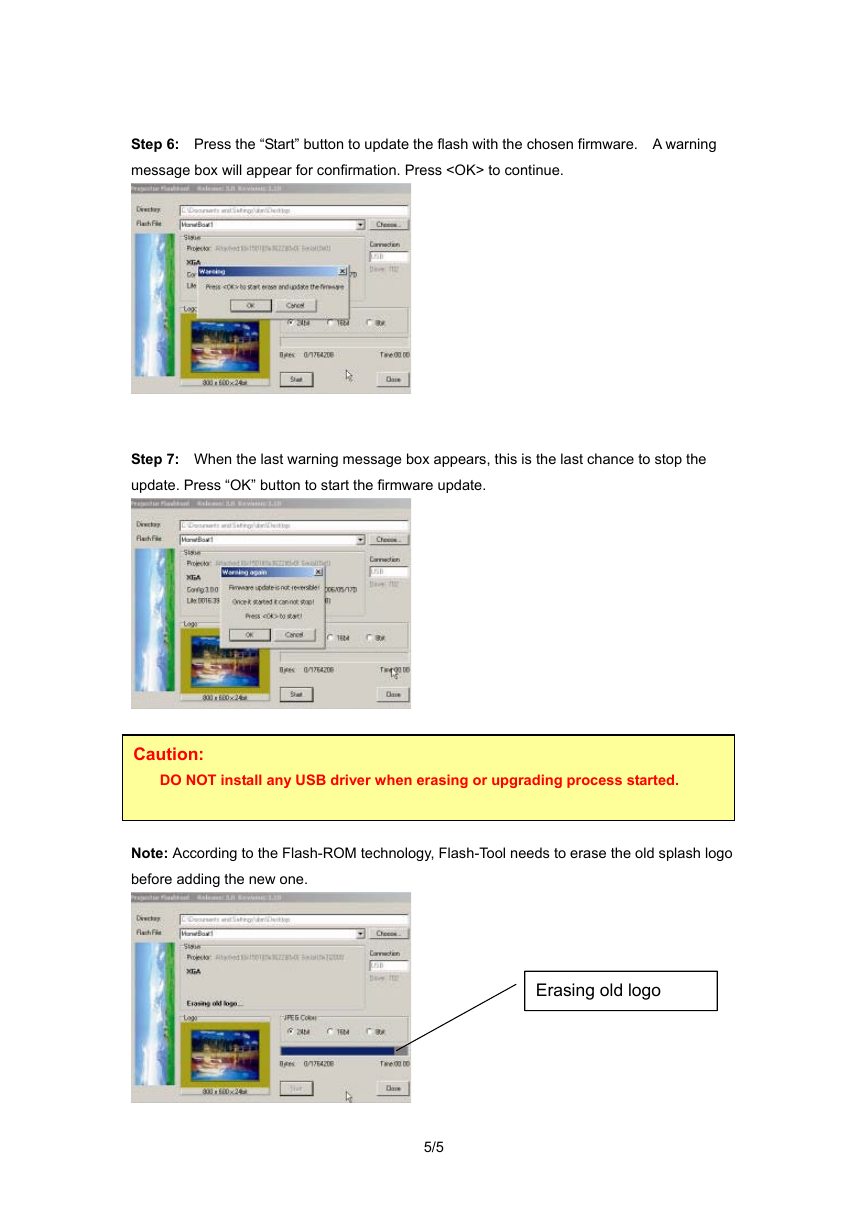
Step 6: Press the “Start” button to update the flash with the chosen firmware. A warning
message box will appear for confirmation. Press to continue.
Step 7: When the last warning message box appears, this is the last chance to stop the
update. Press “OK” button to start the firmware update.
Caution:
DO NOT install any USB driver when erasing or upgrading process started.
Note: According to the Flash-ROM technology, Flash-Tool needs to erase the old splash logo
before adding the new one.
Erasing old logo
5/5
�
Caution:
DO NOT install any USB driver when erasing or upgrading process started.
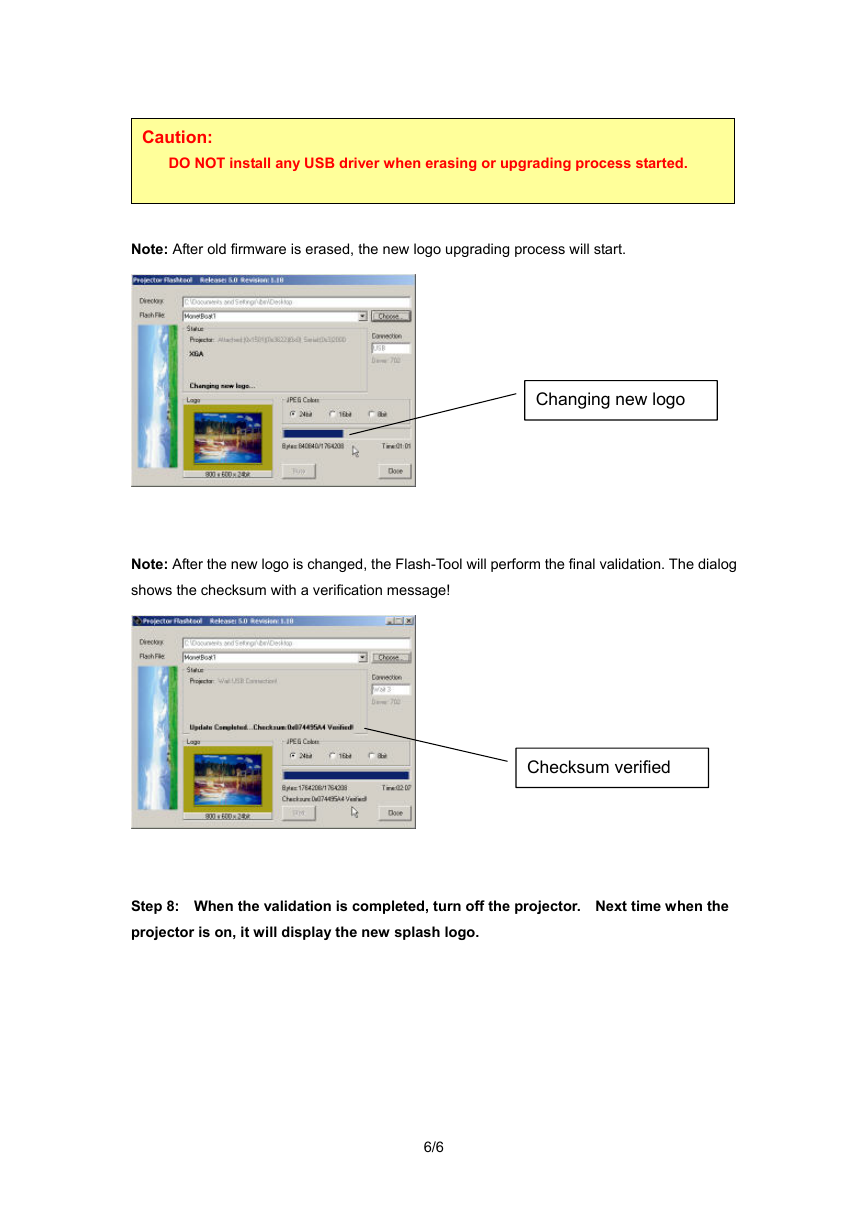
Note: After old firmware is erased, the new logo upgrading process will start.
Changing new logo
Note: After the new logo is changed, the Flash-Tool will perform the final validation. The dialog
shows the checksum with a verification message!
Checksum verified
Step 8: When the validation is completed, turn off the projector. Next time when the
projector is on, it will display the new splash logo.
6/6
�


 2023年江西萍乡中考道德与法治真题及答案.doc
 2012年重庆南川中考生物真题及答案.doc
 2013年江西师范大学地理学综合及文艺理论基础考研真题.doc
 2020年四川甘孜小升初语文真题及答案I卷.doc
 2020年注册岩土工程师专业基础考试真题及答案.doc
 2023-2024学年福建省厦门市九年级上学期数学月考试题及答案.doc
 2021-2022学年辽宁省沈阳市大东区九年级上学期语文期末试题及答案.doc
 2022-2023学年北京东城区初三第一学期物理期末试卷及答案.doc
 2018上半年江西教师资格初中地理学科知识与教学能力真题及答案.doc
 2012年河北国家公务员申论考试真题及答案-省级.doc
 2020-2021学年江苏省扬州市江都区邵樊片九年级上学期数学第一次质量检测试题及答案.doc
 2022下半年黑龙江教师资格证中学综合素质真题及答案.doc