�
New_English_Omicron_13pg.fm Page 1 Tuesday, March 23, 2004 6:47 PM
Your Player At A Glance
EN
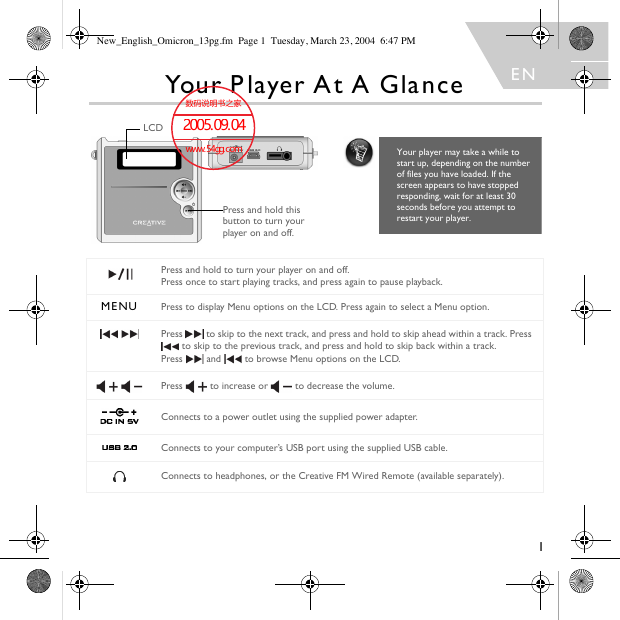
LCD
Your player may take a while to
start up, depending on the number
of files you have loaded. If the
screen appears to have stopped
responding, wait for at least 30
seconds before you attempt to
restart your player.
Press and hold this
button to turn your
player on and off.
Press and hold to turn your player on and off.
Press once to start playing tracks, and press again to pause playback.
MENU
Press to display Menu options on the LCD. Press again to select a Menu option.
Press
to skip to the next track, and press and hold to skip ahead within a track. Press
to skip to the previous track, and press and hold to skip back within a track.
Press
and
to browse Menu options on the LCD.
Press
to increase or
to decrease the volume.
Connects to a power outlet using the supplied power adapter.
Connects to your computer’s USB port using the supplied USB cable.
Connects to headphones, or the Creative FM Wired Remote (available separately).
1
�
New_English_Omicron_13pg.fm Page 2 Tuesday, March 23, 2004 6:47 PM
Getting Started
Step 1
Install Software
Do not connect your player to your computer before
installing the software.
1.
2. The disc supports Windows Autoplay mode and starts running automatically. If not, click
Insert the Installation CD into your CD-ROM/DVD-ROM drive.
Start → Run. In the Open box, type d:\ctrun\ctrun.exe (replace d:\ with the drive letter
of your CD-ROM/DVD-ROM drive), and then click the OK button.
Follow the instructions on the screen to complete the installation.
Creative MediaSource™ and Windows 98 SE drivers (only if applicable) will be installed on
your computer.
3.
4. When prompted, restart your computer.
2
�
New_English_Omicron_13pg.fm Page 3 Tuesday, March 23, 2004 6:47 PM
Step 2
Charge the Battery
Do not charge your player’s battery via the USB port
until after you have installed the software.
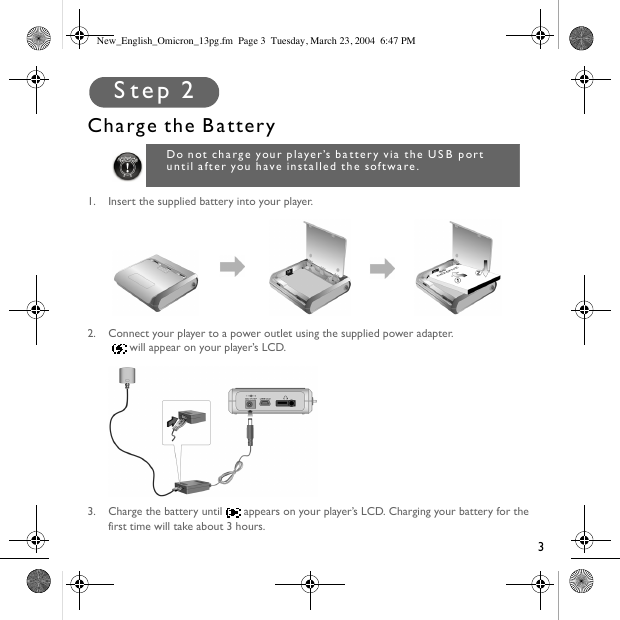
1.
Insert the supplied battery into your player.
2. Connect your player to a power outlet using the supplied power adapter.
will appear on your player’s LCD.
3. Charge the battery until
appears on your player’s LCD. Charging your battery for the
first time will take about 3 hours.
3
�
New_English_Omicron_13pg.fm Page 4 Tuesday, March 23, 2004 6:47 PM
For owners of the 1.5/4.0GB Creative NOMAD MuVo² player
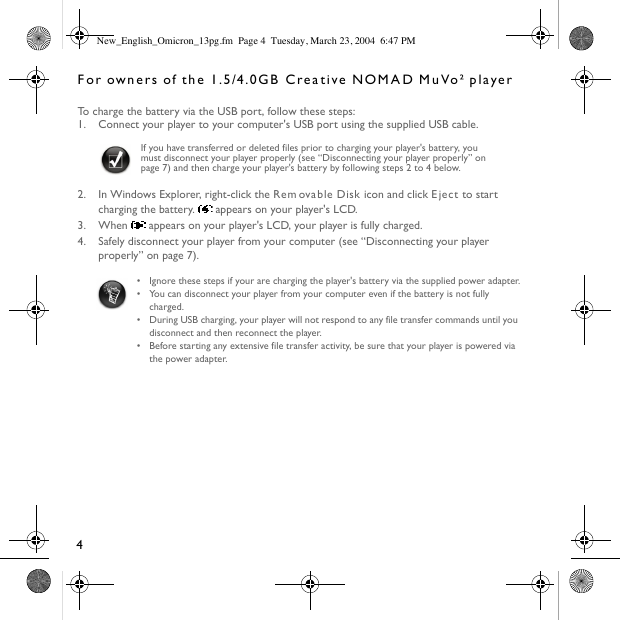
To charge the battery via the USB port, follow these steps:
1. Connect your player to your computer's USB port using the supplied USB cable.
If you have transferred or deleted files prior to charging your player's battery, you
must disconnect your player properly (see “Disconnecting your player properly” on
page 7) and then charge your player's battery by following steps 2 to 4 below.
2.
In Windows Explorer, right-click the Removable Disk icon and click Eject to start
charging the battery.
appears on your player's LCD.
3. When
4.
appears on your player's LCD, your player is fully charged.
Safely disconnect your player from your computer (see “Disconnecting your player
properly” on page 7).
Ignore these steps if your are charging the player's battery via the supplied power adapter.
You can disconnect your player from your computer even if the battery is not fully
charged.
During USB charging, your player will not respond to any file transfer commands until you
disconnect and then reconnect the player.
Before starting any extensive file transfer activity, be sure that your player is powered via
the power adapter.
4
�
New_English_Omicron_13pg.fm Page 5 Tuesday, March 23, 2004 6:47 PM
Step 3
Transfer Songs
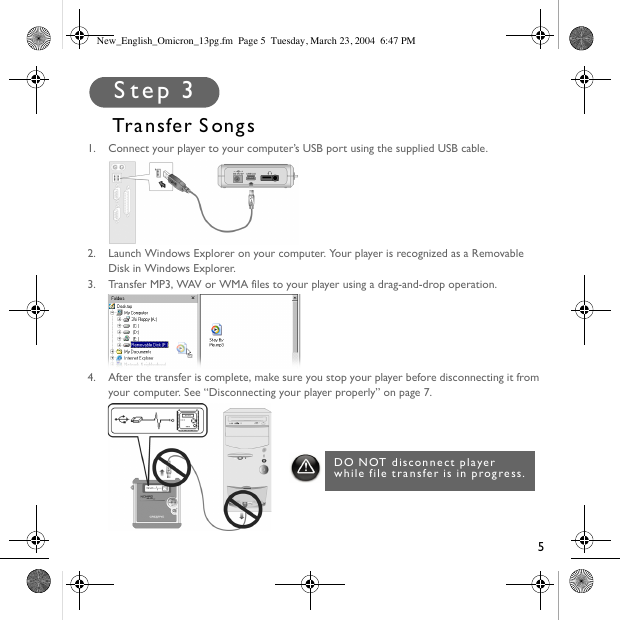
1. Connect your player to your computer’s USB port using the supplied USB cable.
2.
Launch Windows Explorer on your computer. Your player is recognized as a Removable
Disk in Windows Explorer.
3. Transfer MP3, WAV or WMA files to your player using a drag-and-drop operation.
4. After the transfer is complete, make sure you stop your player before disconnecting it from
your computer. See “Disconnecting your player properly” on page 7.
DO NOT disconnect player
while file transfer is in progress.
5
�
New_English_Omicron_13pg.fm Page 6 Tuesday, March 23, 2004 6:47 PM
Warning! To prevent data loss, your player must be
disconnected in a proper manner. See “Disconnecting
your player properly” on page 7.
Creative MediaSource
For more advanced song management tasks, such as creating and managing playlists, you can use
Creative MediaSource Organizer. Creative MediaSource Player/Organizer is your digital music
center for playing, creating, organizing and transferring digital music. To launch Creative
MediaSource Player/Organizer, double-click the Creative MediaSource Player/Organizer
icon
on your desktop
Step 4
Play Songs
Press and hold
.
until your player turns on.
Press
Press
to start playing the songs that you transferred to your player.
to increase or
to decrease the volume.
1.
2.
3.
4. After you have finished using your player, press and hold
until your player turns off.
You can play all music from the player's root folder.
1.
2.
Press MENU.
Press
to browse to the Folder (Root)
option, and press
.
If you cannot locate the Folder (Root) option in the main menu:
1.
2.
3.
4.
Press MENU.
Press
Press MENU to select this option.
Browse to the Folder (Root)
to browse to the Browser option.
option, and press
.
6
�



 2023年江西萍乡中考道德与法治真题及答案.doc
 2012年重庆南川中考生物真题及答案.doc
 2013年江西师范大学地理学综合及文艺理论基础考研真题.doc
 2020年四川甘孜小升初语文真题及答案I卷.doc
 2020年注册岩土工程师专业基础考试真题及答案.doc
 2023-2024学年福建省厦门市九年级上学期数学月考试题及答案.doc
 2021-2022学年辽宁省沈阳市大东区九年级上学期语文期末试题及答案.doc
 2022-2023学年北京东城区初三第一学期物理期末试卷及答案.doc
 2018上半年江西教师资格初中地理学科知识与教学能力真题及答案.doc
 2012年河北国家公务员申论考试真题及答案-省级.doc
 2020-2021学年江苏省扬州市江都区邵樊片九年级上学期数学第一次质量检测试题及答案.doc
 2022下半年黑龙江教师资格证中学综合素质真题及答案.doc