logo资料库

Mamiya数码相机-645 AF说明书.pdf

第1页 / 共44页
第2页 / 共44页
第3页 / 共44页
第4页 / 共44页
第5页 / 共44页
第6页 / 共44页
第7页 / 共44页
第8页 / 共44页
资料共44页,剩余部分请下载后查看
Cover
Introduction
Names of Parts & Function
Right & Left side
Back, Bottom, Top
Main Liquid Crystal Display
Magazine LCD
Viewfinder with LCD readouts on bottom
Contents
Basic Operation
Inserting the Batteries
Diopter Adjustment
Attaching/Removing the Lens
Installing the Battery in the Magazine
Setting the Film Speed
Attaching/Detaching the Magazine
Loading Film in the Magazine
Shutter Release Button/Holding the Camera
Taking Photos in the Full Automatic Mode
Removing a partially exposed film roll
Auto Focus Function
Single Focus Mode
Continuous Focus Mode
Manual Focus Mode
Manual Focusing using the focus mark
Subjects With Which Auto Focusing May Not Work
Using the Focus Lock Function
AF Supplemental Infrared Light
Camera Operation Test
Exposure Modes
Program AE
Shifting the Program
Aperture Priority AE
Shutter Priority AE
Manual Mode
X Mode
Time Mode
Exposure Metering & Film Advance Modes
Average Exposure Metering Mode
Spot Exposure Metering Mode
Adverage/Spot Auto Switching Exposure Metering Mode
Exposure Compensation
Single-Frame Mode/Continuous Mode
Additional Shooting Modes
Auto Bracketing Mode
Multiple Exposure Mode
Self Timer Mode
Applied Photography
Extended Exposure Modes
AE Lock Mode
Taking Photos with the Mirror Up
Depth of Field
Infrared Photography
Flash Photography
Depth of Field Preview/Eyepiece Shutter
Changing the Focusing Screen
Using the M645 Manual Focus Lenses
External Power Supply
Data, Electronic Functions, & Miscellaneous
Electronic Dial Operations
Front/Rear Dial Lock Mechanisms
Superimposing Data
Changing the Viewfinder Display in the Manual Mode "M"
Error Messages
If the shutter cannot be released
Strap/Using a Tripod/Auxiliary Release Contact
Specifications of 645AF
Common Sense Camera Care & Practice
Liquid Crystal Display

Special Advice To Professional Photographers Your Mamiya 645 AF is designed for heavy professional use and will give you a long service life if properly maintained. Your camera and lenses have many moving parts which require periodic lubrication. Its electronic components, too, are subject to wear and tear and are affected by ambient conditions like dust, sand, sea air, heat and moisture. If cameras had odometers like automobiles, it would be easier to specify servicing schedules. May we suggest that if you shoot thousands of film rolls per year, you send your equipment annually for servicing by the Mamiya distributor in your country. Congratulations on your purchase of the Mamiya 645 AF Camera. Mamiya pioneered the 645 SLR system camera three decades ago and the Mamiya 645 AF, with its TTL auto-focus, auto-exposure, auto-flash and auto- film winding features, is the latest Mamiya master piece and reflects its long tradition of medium format camera expertise. Combining 35mm handling ease and speed with the advantages of an almost 3x larger image size, it is a full-featured camera, utilizing many digital controls, LCD displays and is ready for the age of digital photography. Its high-tech focal plane shutter with speeds to 1/4000 sec. permits sync flash up to 1/125 sec. and has an exclusive "Safety Retraction" feature, which protects it against accidental damage. The AE Prism Finder with its many features, protected by a sturdy magnesium housing, and also the Power Drive Grip, are now integral components of the diecast aluminum camera body, designed for heavy professional use. All the many features, safety interlocks and other important information are covered in detail in these instructions. It is imperative that you read them thoroughly before you put your camera to work, in order to ensure proper operation and maximum results. Note: In order to acquaint yourself with the functions of the camera, you will want to practice without film. Please see bottom of page 37 how the camera can be tested without film. 1 2
Hot shoe (Page 63) Exposure mode dial lock release button (Page 39) Exposure mode setting dial (Page 39) Auto focus supplemental infrared light emission window (Page 36) Strap lug (Page 80) Dark Slide (Page 20) Names of Parts and Functions Exposure compensation dial lock release button (Page 46) Exposure compensation dial (Page 46) Eyepiece Shutter Lever (Page 66) Main Liquid Crystal Display (LCD) (Page 6) Rear dial (Page 71) Strap mount (Page 80) Front dial (Page 71) Shutter release mode selector lever (Page 47) Depth of field preview button (Page 66) Congratulations on your purchase of the Mamiya 645AF and welcome to the world-wide family of happy Mamiya camera owners! Lens Release Button (Page 15) Exposure metering mode selector lever (Page 45) Rubber eye piece Diopter adjustment dial (Page 13) Magazine release button (Page 20) Magazine cover release button (Page 21) Magazine cover lock button (Page 21) Magazine lock button (Page 20) Synchro terminal (Page 65) Mirror up lever (Page 59) Auxiliary release socket (Page 80)
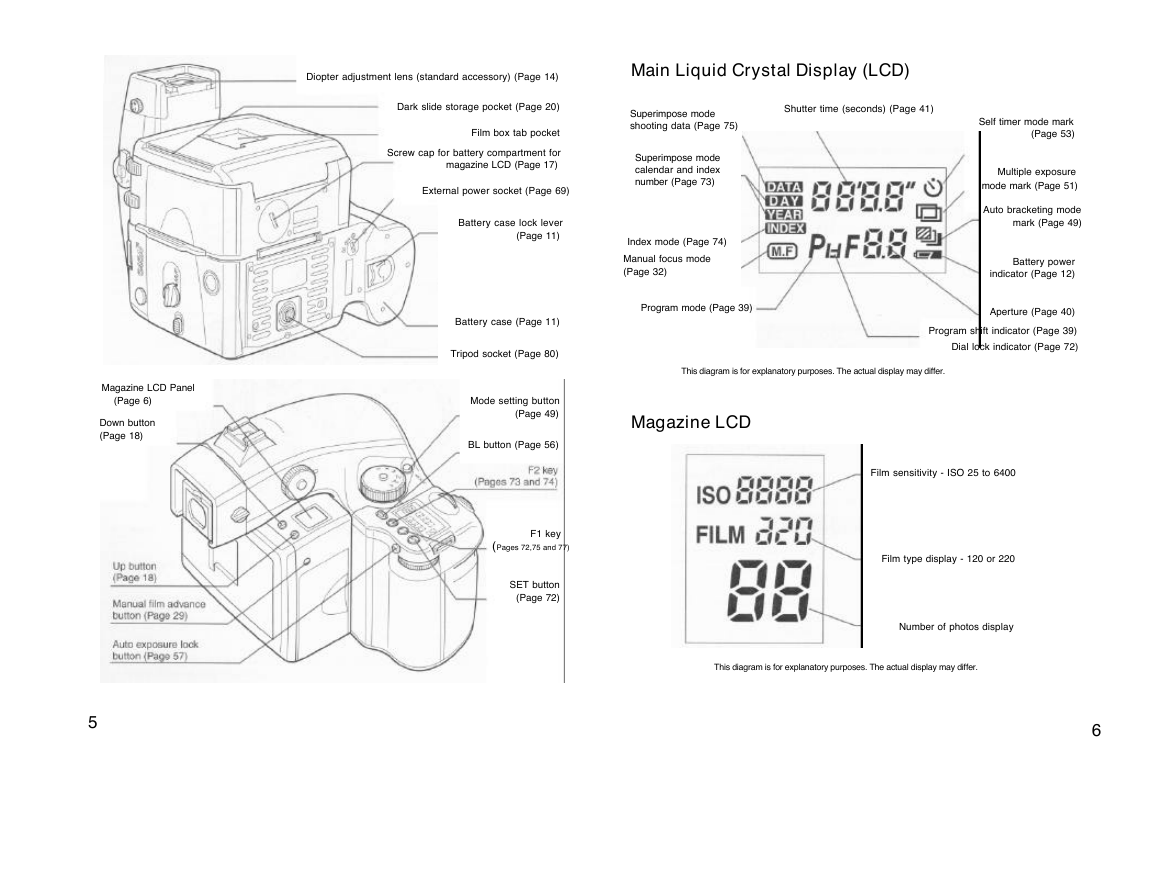
Diopter adjustment lens (standard accessory) (Page 14) Main Liquid Crystal Display (LCD) Dark slide storage pocket (Page 20) Film box tab pocket Screw cap for battery compartment for magazine LCD (Page 17) External power socket (Page 69) Battery case lock lever (Page 11) Superimpose mode shooting data (Page 75) Superimpose mode calendar and index number (Page 73) Index mode (Page 74) Manual focus mode (Page 32) Program mode (Page 39) Shutter time (seconds) (Page 41) Self timer mode mark (Page 53) Multiple exposure mode mark (Page 51) Auto bracketing mode mark (Page 49) Battery power indicator (Page 12) Aperture (Page 40) Program shift indicator (Page 39) Dial lock indicator (Page 72) Magazine LCD Panel (Page 6) Down button (Page 18) Battery case (Page 11) Tripod socket (Page 80) Mode setting button (Page 49) BL button (Page 56) (Pages 72,75 and 77) F1 key SET button (Page 72) This diagram is for explanatory purposes. The actual display may differ. Magazine LCD Film sensitivity - ISO 25 to 6400 Film type display - 120 or 220 Number of photos display This diagram is for explanatory purposes. The actual display may differ.
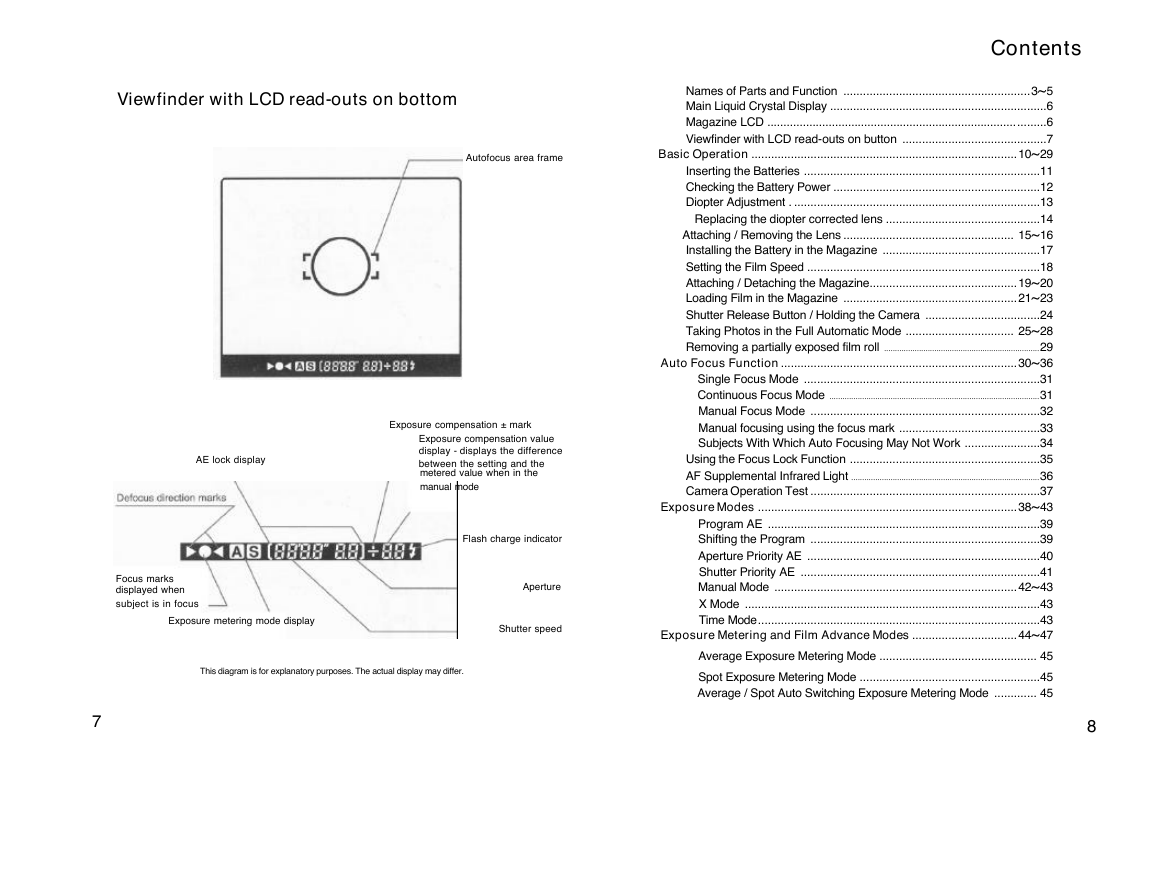
Viewfinder with LCD read-outs on bottom Autofocus area frame AE lock display Focus marks displayed when subject is in focus Exposure metering mode display Exposure compensation ± mark Exposure compensation value display - displays the difference between the setting and the metered value when in the manual mode Flash charge indicator Aperture Shutter speed This diagram is for explanatory purposes. The actual display may differ. Contents Names of Parts and Function .........................................................3~5 Main Liquid Crystal Display ..................................................................6 Magazine LCD ......................................................................................6 Viewfinder with LCD read-outs on button ............................................7 Basic Operation .................................................................................10~29 Inserting the Batteries ........................................................................11 Checking the Battery Power ...............................................................12 Diopter Adjustment . ...........................................................................13 Replacing the diopter corrected lens ...............................................14 Attaching / Removing the Lens .................................................... 15~16 Installing the Battery in the Magazine ................................................17 Setting the Film Speed .......................................................................18 Attaching / Detaching the Magazine.............................................19~20 Loading Film in the Magazine .....................................................21~23 Shutter Release Button / Holding the Camera ...................................24 Taking Photos in the Full Automatic Mode ................................. 25~28 Removing a partially exposed film roll .......................................................................29 Auto Focus Function ........................................................................30~36 Single Focus Mode ........................................................................31 Continuous Focus Mode ................................................................................................31 Manual Focus Mode ......................................................................32 Manual focusing using the focus mark ...........................................33 Subjects With Which Auto Focusing May Not Work .......................34 Using the Focus Lock Function ..........................................................35 AF Supplemental Infrared Light ......................................................................................36 Camera Operation Test ......................................................................37 Exposure Modes ...............................................................................38~43 Program AE ...................................................................................39 Shifting the Program ......................................................................39 Aperture Priority AE .......................................................................40 Shutter Priority AE .........................................................................41 Manual Mode ..........................................................................42~43 X Mode ..........................................................................................43 Time Mode......................................................................................43 Exposure Metering and Film Advance Modes ................................44~47 Average Exposure Metering Mode ................................................ 45 Spot Exposure Metering Mode .......................................................45 Average / Spot Auto Switching Exposure Metering Mode ............. 45
Exposure Compensation ....................................................................46 Single-Frame Mode / Continuous Mode .............................................47 Additional Shooting Modes ...............................................................48~53 Auto Bracketing Mode .................................................................49~50 Multiple Exposure Mode ..............................................................51~52 Self Timer Mode .................................................................................53 Applied Photography .........................................................................54~69 Extended Exposure Modes .........................................................55~56 AE Lock Mode .............................................................................57~58 Taking Photos with the Mirror Up ................................................59~60 Depth of field ......................................................................................61 Infrared Photography . ........................................................................62 Flash Photography ......................................................................63~65 Metz Flash SCA3951 System Functions ........................................64 Flash Photography with Flashes other than Metz Flashes .............65 Depth of Field Preview /Eyepiece Shutter ..........................................66 Changing The Focusing Screen .........................................................67 Using the M645 Manual Focus Lenses ..............................................68 External Power Supply .......................................................................69 Date, Electronic Functions, and Miscellaneous ...............................70~86 Electronic Dial Operations ..................................................................71 Front / Rear Dial Lock Mechanisms ...................................................72 Superimposing Data ....................................................................73~76 Setting the Date and Time .............................................................73 Setting the Index Number ..............................................................74 Selecting the Data to be Superimposed .........................................75 Data superimpose modes ..............................................................75 Checking the data to be superimposed ..........................................76 Changing the Viewfinder Display in the Manual Mode "M" .................77 Error Messages ..................................................................................78 If the shutter cannot be released ........................................................79 Strap / Using a Tripod / Auxiliary Release Contact ............................80 Specifications of 645AF ...............................................................81~82 Common Sense Camera Care and Practice ................................83~85 The Importance of Proper Maintenance .........................................84 Batteries Care ................................................................................84 After-Sale Servicing .......................................................................85 Liquid Crystal Display .........................................................................86 This section describes basic camera operations, how to load film and basic full automatic photography. When we refer to "left or right" we assume you are holding the camera in shooting position.
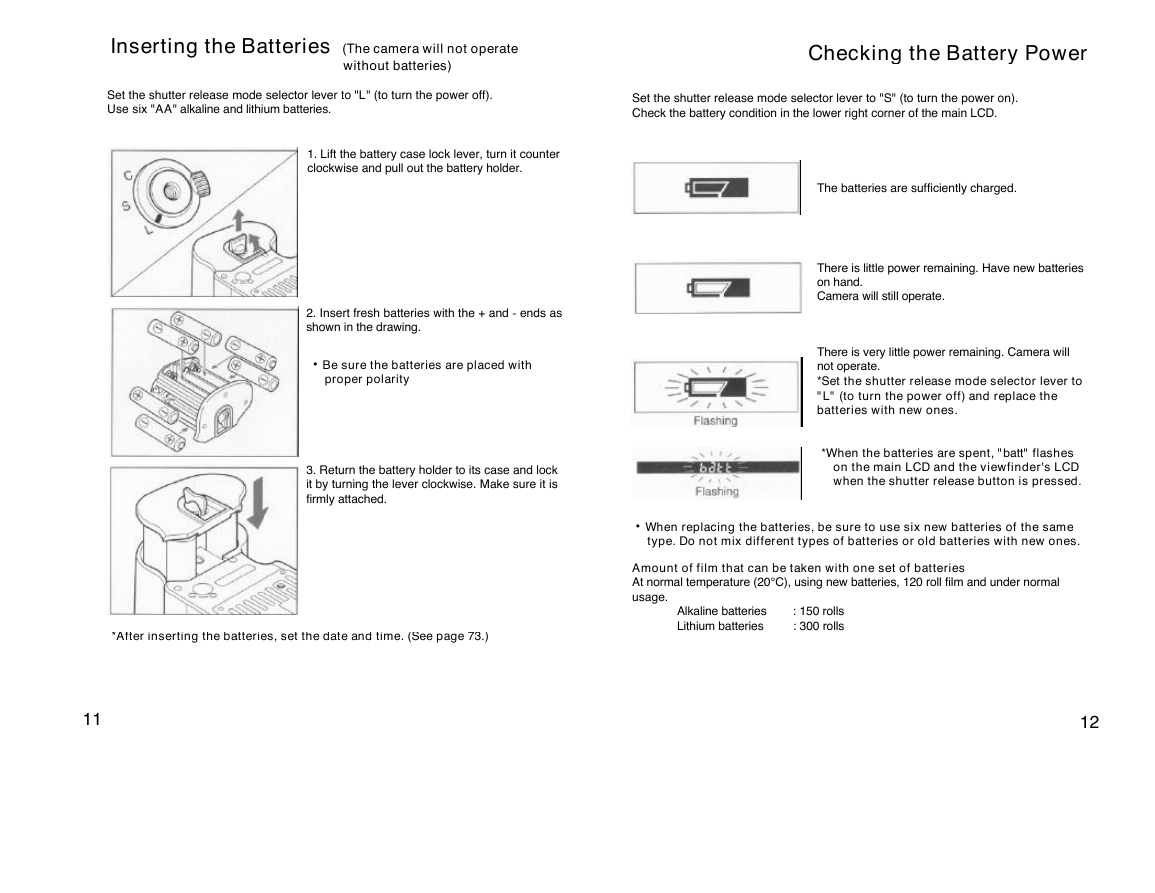
Inserting the Batteries (The camera will not operate without batteries) Checking the Battery Power Set the shutter release mode selector lever to "L" (to turn the power off). Use six "AA" alkaline and lithium batteries. Set the shutter release mode selector lever to "S" (to turn the power on). Check the battery condition in the lower right corner of the main LCD. 1. Lift the battery case lock lever, turn it counter clockwise and pull out the battery holder. 2. Insert fresh batteries with the + and - ends as shown in the drawing. Be sure the batteries are placed with proper polarity 3. Return the battery holder to its case and lock it by turning the lever clockwise. Make sure it is firmly attached. *After inserting the batteries, set the date and time. (See page 73.) The batteries are sufficiently charged. There is little power remaining. Have new batteries on hand. Camera will still operate. There is very little power remaining. Camera will not operate. *Set the shutter release mode selector lever to "L" (to turn the power off) and replace the batteries with new ones. *When the batteries are spent, "batt" flashes on the main LCD and the viewfinder's LCD when the shutter release button is pressed. When replacing the batteries, be sure to use six new batteries of the same type. Do not mix different types of batteries or old batteries with new ones. Amount of film that can be taken with one set of batteries At normal temperature (20°C), using new batteries, 120 roll film and under normal usage. Alkaline batteries : 150 rolls Lithium batteries : 300 rolls
Diopter Adjustment Look through the viewfinder and make sure that the focus frame (Rectangle with Circle) is in sharp focus. If it is not, turn the diopter adjustment dial in the "-" direction if you are nearsighted, in the "+" direction if you are farsighted. If this is not sufficient you may require an optional diopter corrected lens. See below. Replacing the diopter corrected lens 1. Remove the lens supplied with the finder by pulling it downward. *Point the camera at a bright, plain object such as a white wall when making this adjustment. Range of adjustment of diopter corrected lenses (Optional accessory) 2. Push the replacement diopter corrected lens upward into the viewfinder's eyepiece frame until it clicks into place. *If there is dirt or dust on the lens surface, remove it with a blower or sweep it off gently with a lens brush. *If there are fingerprints or dirt on the lens surface, wipe it off with a piece of clean, soft gauze. *Using solvents could discolor the diopter corrected lens frame.
分享到:
收藏