logo资料库

JVC数码摄像机-GZ-N1说明书.pdf

第1页 / 共133页
第2页 / 共133页
第3页 / 共133页
第4页 / 共133页
第5页 / 共133页
第6页 / 共133页
第7页 / 共133页
第8页 / 共133页
资料共133页,剩余部分请下载后查看
Getting Started
Verifying the Accessories
Charging the Battery Pack
Using the Hand Strap
Using the Built-in Tilt Stand
Inserting an SD Card
Types of Usable SD Card
Using the Touch Screen
Adjusting the Touch Panel
Names of Buttons and Functions on the LCD Monitor
Clock Setting
Resetting the Clock
Changing the Display Language
Holding this Unit
Tripod Mounting
Using this Unit Overseas
Charging the Battery Pack Overseas
Setting the Clock to Local Time when Traveling
Setting Daylight Saving Time
Optional Accessories
Recording
Taking Videos in Auto Mode
Capturing Still Images During Video Recording
Taking Still Images in Auto Mode
Zooming
Manual Recording
Adjusting Focus Manually (FOCUS)
Adjusting Brightness
Setting Backlight Compensation
Setting White Balance
Taking Close-up Shots (TELE MACRO)
Recording with Effects
Recording Images Like an Old Black and White Photo (GRAINY MONOCHROME)
Recording Food Images (FOOD)
Recording Images of a Baby (BABY)
Capturing Subjects Clearly (TOUCH PRIORITY AE/AF)
Capturing Smiles Automatically (SMILE SHOT)
Registering Human Face Personal Authentication Information
Setting SMILE% DISPLAY
Editing the Registered Face Information
Reducing Camera Shake
Recording at Intervals (TIME-LAPSE RECORDING)
Using the Self-timer
Recording Videos with Date and Time
Checking the Camera Settings
Checking the Remaining Recording Time
Playback
Playing Back Videos
Normal Playback
Checking the Recording Date and Other Information
DIGEST PLAYBACK
PLAYBACK PLAYLIST
PLAYBACK OTHER FILE
Playing Back Still Images
Slideshow Playback
Connecting to and Viewing on TV
Connecting via the HDMI Mini Connector
Connecting via the AV Connector
Playing Back a DVD or Blu-ray Disc Created on this Unit
Digest Playback on a Blu-ray or DVD Player
Editing
Deleting Unwanted Files
Deleting the Currently Displayed File
Deleting Selected Files
Protecting Files
Protecting/Releasing Protection of the Currently Displayed File
Protecting/Releasing Protection of Selected Files
Capturing a Still Image in the Video During Playback
Combining Videos Recorded by Seamless Recording
Capturing a Required Part in the Video (TRIMMING)
Deleting Playlists
Copying
Creating Discs with a BD Writer (External Blu-ray Drive)
Preparing a BD Writer (External Blu-ray Drive)
Creating a Disc
Playing Back with a BD Writer (External Blu-ray Drive)
Creating Discs with a DVD Writer
Preparing a DVD Writer (CU-VD3)
Preparing a DVD Writer (CU-VD50)
Creating a Disc
Playing Back with a DVD Writer
Dubbing Files to a Disc by Connecting to a Blu-ray Recorder
Dubbing Files to a Disc by Connecting to a DVD Recorder
Dubbing Files to a VHS Tape by Connecting to a VCR
Using a USB External Hard Disk Drive
Preparing a USB External Hard Disk Drive
Copying All Files
Playing Back Files in the USB External Hard Disk Drive
Deleting Folders in the USB External Hard Disk Drive
Formatting the USB External Hard Disk Drive
Importing Files from the USB External Hard Disk Drive
Copying Files to an SD Card
Copying to Windows PC
Verifying System Requirements (Guideline)
Installing the Provided Software (Built-in)
Backing Up All Files
Organizing Files
Recording Videos to Discs
Backing Up Files Without Using Provided Software
List of Files and Folders
Copying to Mac Computer
Settings Menu
Operating the Menu
Operating the Top Menu
RECORD SETTING Menu (video)
RECORD SETTING Menu (still image)
PLAYBACK SETTING Menu (video)
EDIT Menu (video)
PLAYBACK SETTING Menu (still image)
EDIT Menu (still image)
SETUP (video/still image)
CONNECTION SETTINGS (video/still image)
USB CONNECTION MENU
Names of Parts
Indications on the LCD monitor
Troubleshooting
When the unit is not working properly
Battery Pack
Recording
SD Card
Playback
Editing/Copying
Computer
Screen/Image
Other Problems
Error Message?
Maintenance
Specifications
Trademarks
CAMCORDER GZ-N1 Detailed User Guide LYT2705-005A
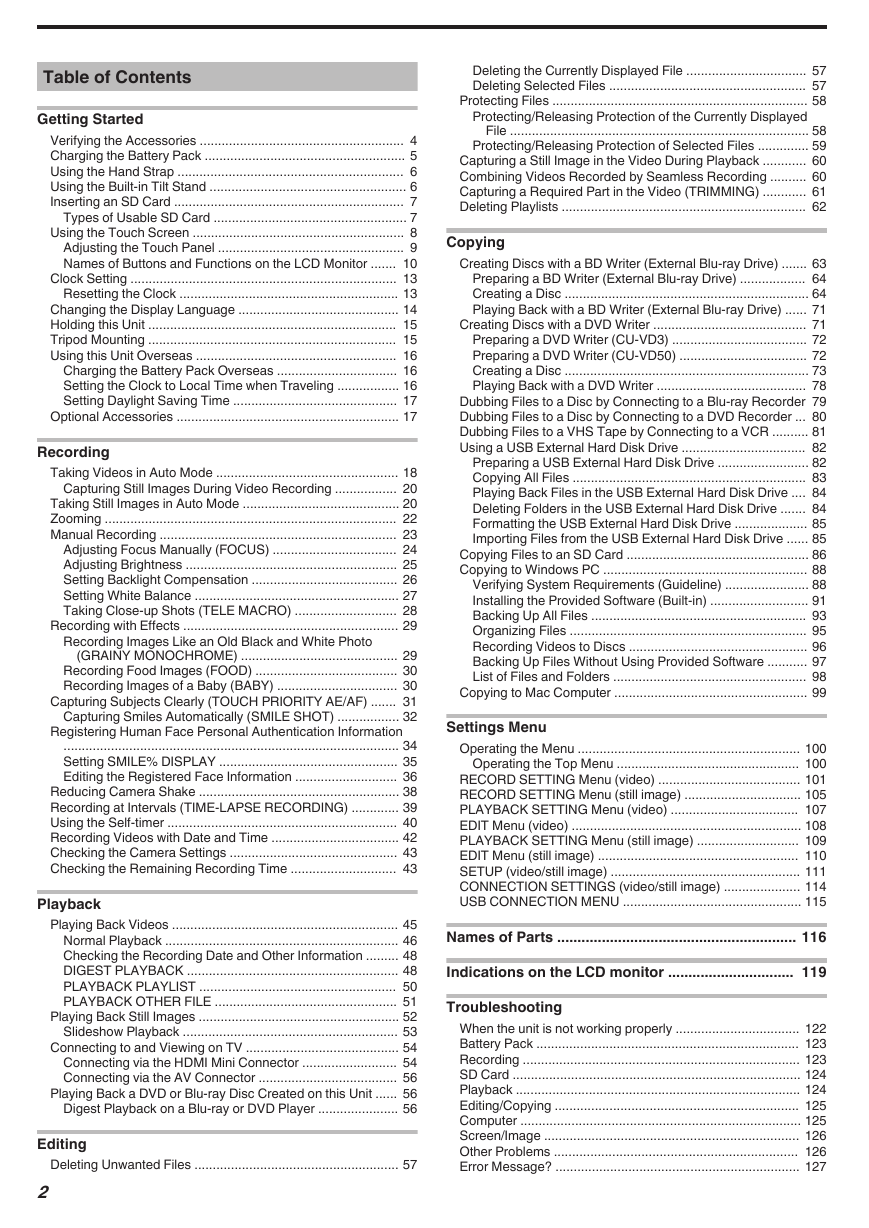
Table of Contents Getting Started Verifying the Accessories ........................................................ 4 Charging the Battery Pack ....................................................... 5 Using the Hand Strap .............................................................. 6 Using the Built-in Tilt Stand ...................................................... 6 Inserting an SD Card ............................................................... 7 Types of Usable SD Card ..................................................... 7 Using the Touch Screen .......................................................... 8 Adjusting the Touch Panel ................................................... 9 Names of Buttons and Functions on the LCD Monitor ....... 10 Clock Setting ......................................................................... 13 Resetting the Clock ............................................................ 13 Changing the Display Language ............................................ 14 Holding this Unit .................................................................... 15 Tripod Mounting .................................................................... 15 Using this Unit Overseas ....................................................... 16 Charging the Battery Pack Overseas ................................. 16 Setting the Clock to Local Time when Traveling ................. 16 Setting Daylight Saving Time ............................................. 17 Optional Accessories ............................................................. 17 Recording Taking Videos in Auto Mode .................................................. 18 Capturing Still Images During Video Recording ................. 20 Taking Still Images in Auto Mode ........................................... 20 Zooming ................................................................................ 22 Manual Recording ................................................................. 23 Adjusting Focus Manually (FOCUS) .................................. 24 Adjusting Brightness .......................................................... 25 Setting Backlight Compensation ........................................ 26 Setting White Balance ........................................................ 27 Taking Close-up Shots (TELE MACRO) ............................ 28 Recording with Effects ........................................................... 29 Recording Images Like an Old Black and White Photo (GRAINY MONOCHROME) ........................................... 29 Recording Food Images (FOOD) ....................................... 30 Recording Images of a Baby (BABY) ................................. 30 Capturing Subjects Clearly (TOUCH PRIORITY AE/AF) ....... 31 Capturing Smiles Automatically (SMILE SHOT) ................. 32 Registering Human Face Personal Authentication Information ............................................................................................ 34 Setting SMILE% DISPLAY ................................................. 35 Editing the Registered Face Information ............................ 36 Reducing Camera Shake ....................................................... 38 Recording at Intervals (TIME-LAPSE RECORDING) ............. 39 Using the Self-timer ............................................................... 40 Recording Videos with Date and Time ................................... 42 Checking the Camera Settings .............................................. 43 Checking the Remaining Recording Time ............................. 43 Playback Playing Back Videos .............................................................. 45 Normal Playback ................................................................ 46 Checking the Recording Date and Other Information ......... 48 DIGEST PLAYBACK .......................................................... 48 PLAYBACK PLAYLIST ...................................................... 50 PLAYBACK OTHER FILE .................................................. 51 Playing Back Still Images ....................................................... 52 Slideshow Playback ........................................................... 53 Connecting to and Viewing on TV .......................................... 54 Connecting via the HDMI Mini Connector .......................... 54 Connecting via the AV Connector ...................................... 56 Playing Back a DVD or Blu-ray Disc Created on this Unit ...... 56 Digest Playback on a Blu-ray or DVD Player ...................... 56 Editing Deleting Unwanted Files ........................................................ 57 2 Deleting the Currently Displayed File ................................. 57 Deleting Selected Files ...................................................... 57 Protecting Files ...................................................................... 58 Protecting/Releasing Protection of the Currently Displayed File .................................................................................. 58 Protecting/Releasing Protection of Selected Files .............. 59 Capturing a Still Image in the Video During Playback ............ 60 Combining Videos Recorded by Seamless Recording .......... 60 Capturing a Required Part in the Video (TRIMMING) ............ 61 Deleting Playlists ................................................................... 62 Copying Creating Discs with a BD Writer (External Blu-ray Drive) ....... 63 Preparing a BD Writer (External Blu-ray Drive) .................. 64 Creating a Disc ................................................................... 64 Playing Back with a BD Writer (External Blu-ray Drive) ...... 71 Creating Discs with a DVD Writer .......................................... 71 Preparing a DVD Writer (CU-VD3) ..................................... 72 Preparing a DVD Writer (CU-VD50) ................................... 72 Creating a Disc ................................................................... 73 Playing Back with a DVD Writer ......................................... 78 Dubbing Files to a Disc by Connecting to a Blu-ray Recorder 79 Dubbing Files to a Disc by Connecting to a DVD Recorder ... 80 Dubbing Files to a VHS Tape by Connecting to a VCR .......... 81 Using a USB External Hard Disk Drive .................................. 82 Preparing a USB External Hard Disk Drive ......................... 82 Copying All Files ................................................................ 83 Playing Back Files in the USB External Hard Disk Drive .... 84 Deleting Folders in the USB External Hard Disk Drive ....... 84 Formatting the USB External Hard Disk Drive .................... 85 Importing Files from the USB External Hard Disk Drive ...... 85 Copying Files to an SD Card .................................................. 86 Copying to Windows PC ........................................................ 88 Verifying System Requirements (Guideline) ....................... 88 Installing the Provided Software (Built-in) ........................... 91 Backing Up All Files ........................................................... 93 Organizing Files ................................................................. 95 Recording Videos to Discs ................................................. 96 Backing Up Files Without Using Provided Software ........... 97 List of Files and Folders ..................................................... 98 Copying to Mac Computer ..................................................... 99 Settings Menu Operating the Menu ............................................................. 100 Operating the Top Menu .................................................. 100 RECORD SETTING Menu (video) ....................................... 101 RECORD SETTING Menu (still image) ................................ 105 PLAYBACK SETTING Menu (video) ................................... 107 EDIT Menu (video) ............................................................... 108 PLAYBACK SETTING Menu (still image) ............................ 109 EDIT Menu (still image) ....................................................... 110 SETUP (video/still image) .................................................... 111 CONNECTION SETTINGS (video/still image) ..................... 114 USB CONNECTION MENU ................................................. 115 Names of Parts ........................................................... 116 Indications on the LCD monitor ............................... 119 Troubleshooting When the unit is not working properly .................................. 122 Battery Pack ........................................................................ 123 Recording ............................................................................ 123 SD Card ............................................................................... 124 Playback .............................................................................. 124 Editing/Copying ................................................................... 125 Computer ............................................................................. 125 Screen/Image ...................................................................... 126 Other Problems ................................................................... 126 Error Message? ................................................................... 127
Maintenance ............................................................... 129 Specifications ............................................................. 130 Trademarks ................................................................. 132 3
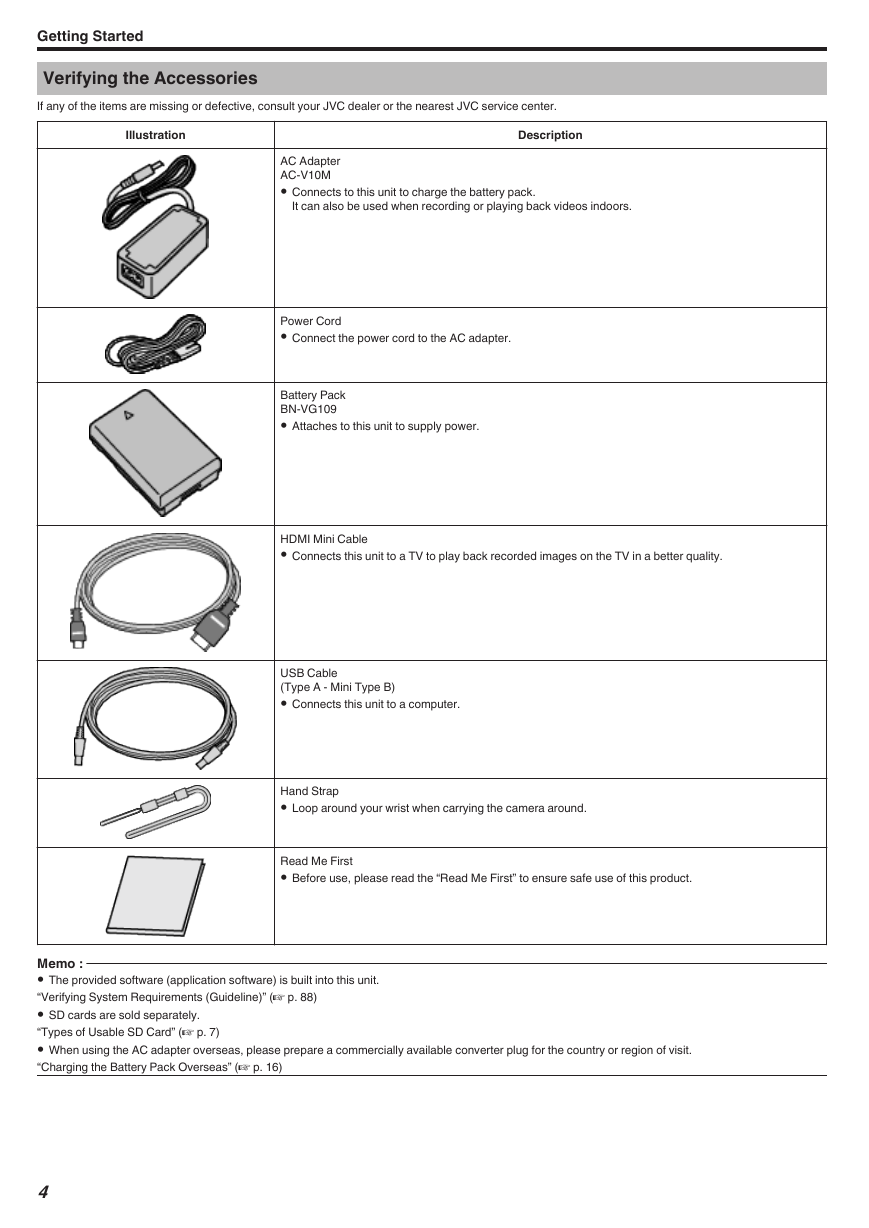
Getting Started Verifying the Accessories If any of the items are missing or defective, consult your JVC dealer or the nearest JVC service center. Illustration Description AC Adapter AC-V10M 0 Connects to this unit to charge the battery pack. It can also be used when recording or playing back videos indoors. Power Cord 0 Connect the power cord to the AC adapter. Battery Pack BN-VG109 0 Attaches to this unit to supply power. HDMI Mini Cable 0 Connects this unit to a TV to play back recorded images on the TV in a better quality. USB Cable (Type A - Mini Type B) 0 Connects this unit to a computer. Hand Strap 0 Loop around your wrist when carrying the camera around. Read Me First 0 Before use, please read the “Read Me First” to ensure safe use of this product. Memo : 0 The provided software (application software) is built into this unit. “Verifying System Requirements (Guideline)” (A p. 88) 0 SD cards are sold separately. “Types of Usable SD Card” (A p. 7) 0 When using the AC adapter overseas, please prepare a commercially available converter plug for the country or region of visit. “Charging the Battery Pack Overseas” (A p. 16) 4 . . . . . . .
Charging the Battery Pack Charge the battery pack immediately after purchase and when the remaining battery power is low. The battery pack is not charged at the time of purchase. 1 Attach the battery pack. Getting Started Rechargeable Batteries: 0 When using the battery in a low temperature environment (10°C or below), the operating time may be shortened, or it may not function properly. When using this unit outdoors in the winter weather, warm the battery, such as by placing it in the pocket, before attaching it. (Keep away from direct contact with a warm pack.) 0 Do not expose the battery to excessive heat, such as direct sunlight or fire. 0 After removing the battery, store it in a dry place between 15°C to 25°C. 0 Keep a 30 % battery level (X) if the battery pack is not to be used for a long period of time. In addition, fully charge and then fully discharge the battery pack every 6 months, then continue to store it at a 30 % battery level (X). Memo : 0 You can connect this unit to the AC adapter to record for long hours indoors. (Battery charging begins when the LCD monitor is closed.) 0 Align the top of the battery with the mark on this unit, and slide in until the battery clicks into place. 2 Connect the AC adapter to the DC connector. Detaching the Battery Pack To detach the battery pack, perform the above steps in reverse order. 3 Plug in the power. Slide the battery release lever to detach the battery from this unit. Approximate Battery Charging Time (Using AC Adapter) Battery Pack Charging time 0 The CHARGE lamp lights up when charging is in progress. It goes out when charging is finished. (If the CHARGE lamp is blinking, refer to the “Caution” below.) Warning 0 Make sure not to insert the battery pack in the wrong direction. performance cannot be guaranteed. It may cause damage to the unit and battery pack. Caution : Be sure to use JVC battery packs. 0 If you use any other battery packs besides JVC battery packs, safety and 0 Charging time: Approx. 2 h 20 m (using supplied battery pack) * The charging time is when the unit is used at 25°C. If the battery pack is charged outside the room temperature range of 10°C to 35°C, charging may take a longer time or it may not start. The CHARGE lamp blinks slowly as a notification if charging does not start. 0 If malfunctions (overvoltage, etc) occur, or if any battery manufactured other than JVC is attempted for battery charge, charging stops. In these cases, CHARGE lamp blinks quickly for notification. Be sure to use the supplied AC adapter. 0 If you use any other AC adapters besides the supplied AC adapter, malfunctions may occur. 0 You can record or play back videos while the AC adapter is connected. (Battery charging cannot be performed during recording or playback.) Remove the battery when the unit is to be used for a long time. Performance of the battery may drop if it is left attached to the unit. 2 h 20 m BN-VG109 (Supplied) BN-VG119 BN-VG129 BN-VG138 0 When the battery life is reached, the recording time becomes shorter even 3 h 30 m 4 h 50 m 6 h 10 m if the battery pack is fully charged. (Replace the battery pack with a new one.) * The charging time is when the unit is used at 25°C. If the battery pack is charged outside the room temperature range of 10°C to 35°C, charging may take a longer time or it may not start. The recordable and playable time may also be shortened under some usage conditions such as at low temperature. “Approximate Recording Time (Using Battery)” (A p. 44) 5 . . . .
Getting Started Using the Hand Strap A Thread the thin cord loop of the strap through the strap mount on the B Thread the other end of the strap through the thin cord loop and tighten C Adjust the length of the belt and loop it around your wrist. camera. the strap. Using the Built-in Tilt Stand You can use the stand to place the camera on the floor or table to shoot from a low angle or when taking a selfie. A Place your finger at the indent of the stand located at the bottom of this B Move your finger in the direction of the arrow. unit. 0 The front edge of the stand lifts up. C Lift the stand upright. D Slide the stand in the direction of the arrow to the position indicated by the line in the figure. 0 If the stand does not move, do not force it. Proceed to step 5. E Tilt the stand as shown in the figure. F Place the camera as shown in the figure. o Storing the stand Slide the edge of the stand towards the direction of the battery; align the marks on the camera and the stand to store the stand. When the built-in tilt stand is removed A Attach the protrusion on one side of the stand as shown in the figure. B Push in the protrusion on the other side in the direction of the arrow to attach the stand. Caution : 0 To prevent the stand from damaging, it is designed to come off when the load applied exceeds a certain level. 0 Reattach the stand immediately to avoid losing it or accidentally swallowing it. 0 If you have lost the stand, consult your nearest JVC service center. 6 . . . .
Inserting an SD Card When a commercially available SD card is inserted, recordings can still be made to the card without stopping when the remaining recording time on the built-in memory runs out. “Types of Usable SD Card” (A p. 7) “Approximate Video Recording Time” (A p. 44) 1 Close the LCD monitor. 2 Open the SD card cover. Getting Started Removing the Card Push the SD card inward once, then pull it out straight. Types of Usable SD Card The following SD cards can be used on this unit. Operations are confirmed on the SD cards from the following manufacturers. 0 Panasonic 0 TOSHIBA 0 SanDisk SD Card 3 Insert an SD card. SDHC Card 0 This unit supports 256 MB to 2 GB SD cards. 0 Use a Class 4 or higher compatible SD card (2 GB) for video recording. 0 Use a Class 4 or higher compatible SDHC card (4 GB to 32 GB) for video recording. Warning SDXC Card It may cause damage to the unit and SD card. 0 Make sure not to insert the SD card in the wrong direction. 0 Turn off the power of this unit before inserting or removing an SD card. 0 Do not touch the metal contact area when inserting the SD card. 0 Do not use miniSD cards or microSD cards. It may cause damage to the unit and SD card. Memo : 0 When “SEAMLESS RECORDING” is set to “ON”, recordings can still be made to the SD card without stopping when the remaining recording time on the built-in memory runs out. “ SEAMLESS RECORDING ” (A p. 103) 0 Both videos and still images can be recorded on one SD card. It is 0 To record to the SD card, it is necessary to perform media settings. 0 To use SD cards that have been used on other devices, it is necessary to recommended to confirm the video operation of the SD card before usage. format (initialize) the SD card using “FORMAT SD CARD” from media settings. “ FORMAT SD CARD ” (A p. 113) 0 Use a Class 4 or higher compatible SDXC card (Max. 128 GB) for video recording. 7 . . . . . . .
Getting Started Memo : 0 Using SD cards (including SDHC/SDXC cards) other than those specified above may result in recording failure or data loss. 0 This unit is not guaranteed to operate with all SD cards. Some SD cards may not work due to specification changes, etc. 0 Do not use a miniSD card or microSD card (even if the card is inserted in an adapter). It may cause malfunction. 0 To record videos with “VIDEO QUALITY” set to “UXP”, use of a Class 6 or higher compliant SDHC/SDXC card is recommended. 0 Class 4 and Class 6 are guaranteed to have a minimum transfer rate of 4 MB/s and 6 MB/s respectively during reading or writing of data. 0 You can also use a Class 10 compliant SDHC/SDXC card. 0 Both videos and still images can be recorded on one SD card. It is 0 To protect the data, do not touch the terminals of the SD card. 0 UHS-I SDHC/SDXC cards can be used in the same manner as standard recommended to confirm the video operation of the SD card before usage. SDHC/SDXC cards. UHS Speed Class is not supported. may not be played back or edited on this unit. playing back and/or editing on other devices. 0 An SD card which is used for recording and/or editing on other devices 0 An SD card which is used for recording on this unit may not be used for When your computer cannot recognize the SDXC card Confirm and update the OS of your computer. Windows Vista higher. from the following URL. 0 Make sure that the operating system version is SP1 or 0 Download and install the updating program (KB975823) 32 bit version http://www.microsoft.com/downloads/details.aspx? displaylang=ja&FamilyID=2d1abe01-0942-4f8a- abb2-2ad529de00a1 http://www.microsoft.com/downloads/en/details.aspx? FamilyID=2d1abe01-0942-4f8a-abb2-2ad529de00a1 64 bit version http://www.microsoft.com/downloads/details.aspx? displaylang=ja&FamilyID=7d54c53f-017c-4ea5- ae08-34c3452ba315 http://www.microsoft.com/downloads/en/details.aspx? FamilyID=7d54c53f-017c-4ea5-ae08-34c3452ba315 Using the Touch Screen Icon operation buttons, thumbnails, and menu items are displayed on the touch screen according to the mode in use. 0 There are two ways to operate the touch screen, namely “tap” and “drag”. The following are some examples. A Tap the displayed button (icon) or thumbnail (file) on the touch screen to make selection. B Drag the thumbnails on the touch screen to search for the desired file. Memo : 0 The touch screen of this unit is pressure-sensitive. When the touch screen does not respond smoothly, apply slightly more force to your fingertip. 0 Tap the buttons (icons) on the touch screen accurately. The buttons may not respond if they are not tapped on the right area. 0 Do not press or rub with excessive force. 0 Do not operate the touch screen using an object with a sharp tip. 0 Pressing two or more places at a time may cause a malfunction. 0 Perform “TOUCH SCREEN ADJUST” if the reactive area of the screen is misaligned with the touched area. (Adjust by lightly tapping with a corner of an SD card, etc. Do not press with an object with a sharp tip or do not press hard.) “Adjusting the Touch Panel” (A p. 9) Windows 7 Download and install the updating program (KB976422) from the following URL. 32 bit version http://www.microsoft.com/downloads/details.aspx? displaylang=ja&FamilyID=3ee91fc2-a9bc-4ee1- aca3-2a9aff5915ea http://www.microsoft.com/downloads/en/details.aspx? FamilyID=3ee91fc2-a9bc-4ee1-aca3-2a9aff5915ea 64 bit version http://www.microsoft.com/downloads/details.aspx? displaylang=ja&FamilyID=73f766dd-7127-4445- b860-47084587155f http://www.microsoft.com/downloads/en/details.aspx? FamilyID=73f766dd-7127-4445-b860-47084587155f Not compatible. Update the OS version to 10.6.5 or later. Mac OS X 10.4 Tiger / Mac OS X 10.5 Leopard Mac OS X 10.6 Snow Leopard 8 .
分享到:
收藏