Quick Operation
(English)
DZ-HS903
DZ-HS803
DZ-HS903
DZ-HS803
�
Quick Operation (English)
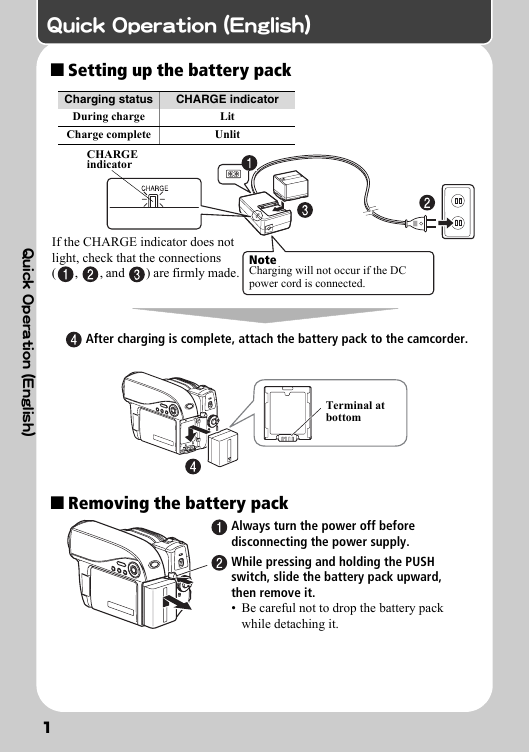
Setting up the battery pack
Charging status
CHARGE indicator
During charge
Charge complete
CHARGE
indicator
Lit
Unlit
If the CHARGE indicator does not
light, check that the connections
(
) are firmly made.
, and
,
Note
Charging will not occur if the DC
power cord is connected.
After charging is complete, attach the battery pack to the camcorder.
i
Q
u
c
k
O
p
e
r
a
t
o
n
(
i
E
n
g
l
i
s
h
)
Terminal at
bottom
Removing the battery pack
Always turn the power off before
disconnecting the power supply.
While pressing and holding the PUSH
switch, slide the battery pack upward,
then remove it.
• Be careful not to drop the battery pack
while detaching it.
1
�
Turning on the Power
1
2
1 Turn on the power.
Press and hold the lock button, and turn the power switch to the
desired mode.
2 Open the LCD
monitor.
i
Q
u
c
k
O
p
e
r
a
t
o
n
(
i
E
n
g
l
i
s
h
)
2
�
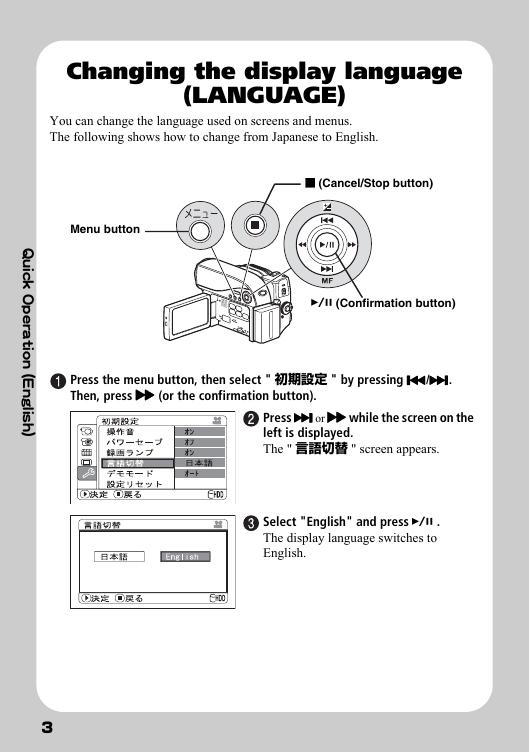
Changing the display language
(LANGUAGE)
You can change the language used on screens and menus.
The following shows how to change from Japanese to English.
Menu button
C (Cancel/Stop button)
A (Confirmation button)
Press the menu button, then select " 初期設定 " by pressing f/e.
Then, press c (or the confirmation button).
Press e or c while the screen on the
left is displayed.
The " 言語切替 " screen appears.
Select "English" and press A .
The display language switches to
English.
i
Q
u
c
k
O
p
e
r
a
t
o
n
(
i
E
n
g
l
i
s
h
)
3
�
Setting the Date and Time
Press the menu button, then select "Date Setup" by pressing f/e.
Then, press c to select "Date Set" and press c again.
Select each item by pressing d/c
and set the correct value by pressing
f/e.
• Repeat this step until year, month,
date, hour, minute, and AM/PM are
correctly set.
Press the confirmation button.
The confirmation screen appears.
Press d to select "YES", then press
the confirmation button to confirm.
• If you select “No” and press e, the
screen returns to step
.
i
Q
u
c
k
O
p
e
r
a
t
o
n
(
i
E
n
g
l
i
s
h
)
4
�
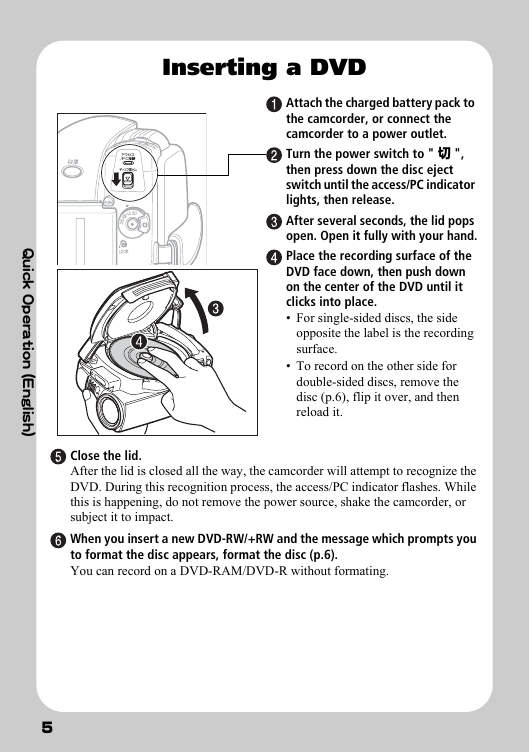
Inserting a DVD
Attach the charged battery pack to
the camcorder, or connect the
camcorder to a power outlet.
Turn the power switch to " 切 ",
then press down the disc eject
switch until the access/PC indicator
lights, then release.
After several seconds, the lid pops
open. Open it fully with your hand.
Place the recording surface of the
DVD face down, then push down
on the center of the DVD until it
clicks into place.
• For single-sided discs, the side
opposite the label is the recording
surface.
• To record on the other side for
double-sided discs, remove the
disc (p.6), flip it over, and then
reload it.
Close the lid.
After the lid is closed all the way, the camcorder will attempt to recognize the
DVD. During this recognition process, the access/PC indicator flashes. While
this is happening, do not remove the power source, shake the camcorder, or
subject it to impact.
When you insert a new DVD-RW/+RW and the message which prompts you
to format the disc appears, format the disc (p.6).
You can record on a DVD-RAM/DVD-R without formating.
i
Q
u
c
k
O
p
e
r
a
t
o
n
(
i
E
n
g
l
i
s
h
)
5
�
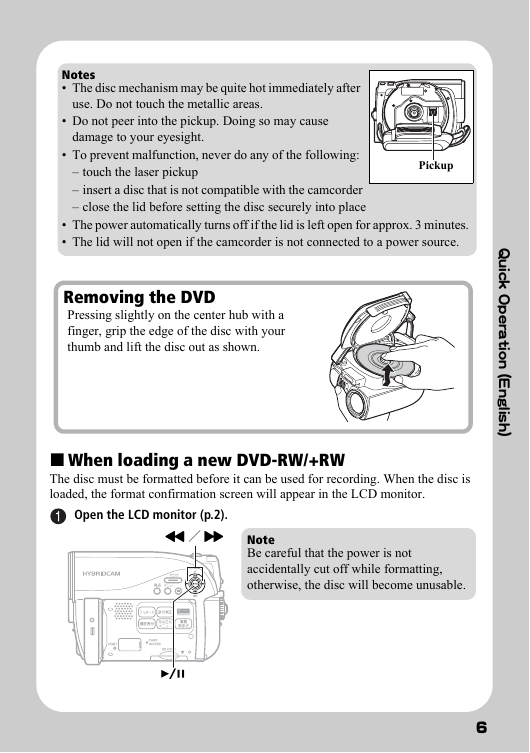
Notes
• The disc mechanism may be quite hot immediately after
use. Do not touch the metallic areas.
• Do not peer into the pickup. Doing so may cause
damage to your eyesight.
• To prevent malfunction, never do any of the following:
– touch the laser pickup
– insert a disc that is not compatible with the camcorder
– close the lid before setting the disc securely into place
Pickup
• The power automatically turns off if the lid is left open for approx. 3 minutes.
• The lid will not open if the camcorder is not connected to a power source.
Removing the DVD
Pressing slightly on the center hub with a
finger, grip the edge of the disc with your
thumb and lift the disc out as shown.
When loading a new DVD-RW/+RW
The disc must be formatted before it can be used for recording. When the disc is
loaded, the format confirmation screen will appear in the LCD monitor.
Open the LCD monitor (p.2).
d / c Note
Be careful that the power is not
accidentally cut off while formatting,
otherwise, the disc will become unusable.
A
i
Q
u
c
k
O
p
e
r
a
t
o
n
(
i
E
n
g
l
i
s
h
)
6
�
Select "YES" by pressing d, then press the confirmation button.
Format DVD
All data will be deleted.
Format the DVD now?
YES
NO
ENTER
• When using a DVD-RW, proceed to
step
.
• When using a +RW, formatting will
start. Skip step
.
(When using a DVD-RW)
The recording format selection screen appears.
Select “VR Mode” or “VF Mode” by pressing d/c, then press the
confirmation button.
Format DVD
DVD Format.
Select record format.
VR Mode
VF Mode
ENTER
VR Mode
After recording, you can perform various
editing functions, such as choosing or
deleting scenes. You can play back the
disc in a device that supports an 8cm
DVD-RW (VR Mode) after finalizing the
disc.
VF (Video) Mode
Although editing cannot be done on the
camcorder, you can play back the disc on
other DVD devices after finalizing the disc.
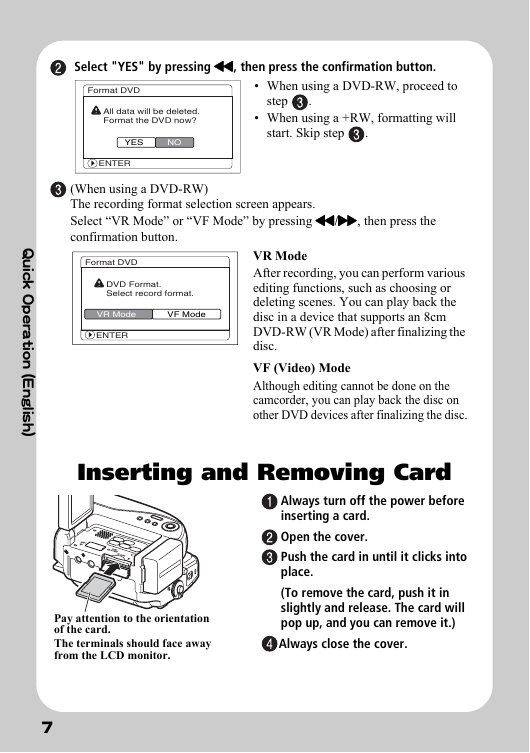
Inserting and Removing Card
Always turn off the power before
inserting a card.
Open the cover.
Push the card in until it clicks into
place.
(To remove the card, push it in
slightly and release. The card will
pop up, and you can remove it.)
Always close the cover.
Pay attention to the orientation
of the card.
The terminals should face away
from the LCD monitor.
i
Q
u
c
k
O
p
e
r
a
t
o
n
(
i
E
n
g
l
i
s
h
)
7
�




 2023年江西萍乡中考道德与法治真题及答案.doc
 2012年重庆南川中考生物真题及答案.doc
 2013年江西师范大学地理学综合及文艺理论基础考研真题.doc
 2020年四川甘孜小升初语文真题及答案I卷.doc
 2020年注册岩土工程师专业基础考试真题及答案.doc
 2023-2024学年福建省厦门市九年级上学期数学月考试题及答案.doc
 2021-2022学年辽宁省沈阳市大东区九年级上学期语文期末试题及答案.doc
 2022-2023学年北京东城区初三第一学期物理期末试卷及答案.doc
 2018上半年江西教师资格初中地理学科知识与教学能力真题及答案.doc
 2012年河北国家公务员申论考试真题及答案-省级.doc
 2020-2021学年江苏省扬州市江都区邵樊片九年级上学期数学第一次质量检测试题及答案.doc
 2022下半年黑龙江教师资格证中学综合素质真题及答案.doc