Welcome
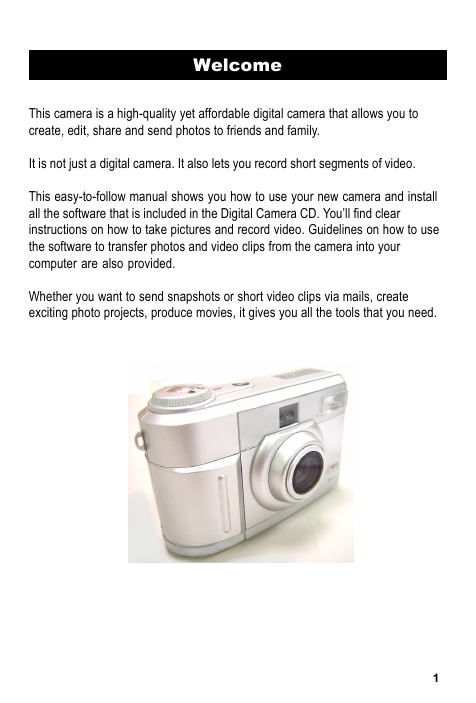
This camera is a high-quality yet affordable digital camera that allows you to
create, edit, share and send photos to friends and family.
It is not just a digital camera. It also lets you record short segments of video.
This easy-to-follow manual shows you how to use your new camera and install
all the software that is included in the Digital Camera CD. Youll find clear
instructions on how to take pictures and record video. Guidelines on how to use
the software to transfer photos and video clips from the camera into your
computer are also provided.
Whether you want to send snapshots or short video clips via mails, create
exciting photo projects, produce movies, it gives you all the tools that you need.
1
�
Contents
Know Your Camera ................................................................................................................ 3
Camera Controls .................................................................................................................... 3
Digital Interface Compartment ................................................................................................. 5
Preparing Your Camera .......................................................................................................... 6
Start Using Your Camera ........................................................................................................ 6
Formatting the SD Card .......................................................................................................... 7
Shooting Photos...................................................................................................................... 7
Choosing Photo Resolution .................................................................................................... 8
Taking Close-ups, Portrait and Distant Pictures ...................................................................... 8
Previewing Photos ................................................................................................................. 9
Viewing Photos ...................................................................................................................... 9
Creating Slide Shows for your photos .................................................................................... 9
Deleting Photos ..................................................................................................................... 10
Camea Settings .................................................................................................................... 11
Printing Photos...................................................................................................................... 12
Hooking Up to Your Computer .............................................................................................. 13
Hooking Up to Your TV/VCR ................................................................................................ 13
Recording Video ................................................................................................................... 14
Installing Software................................................................................................................. 15
Downloading photos ............................................................................................................. 16
Appendix: Camera Specifications ........................................................................................ 17
2
�
Know Your Camera
This is not your traditional camera. This
is a “digital camera”. A digital camera
allows you to take pictures without the
use of film.
Eliminate developing costs by
downloading the photos to your PC. You
can send your photos via email, upload
them to your web site.
Now, familiarize yourself with the camera
controls.
Camera Controls
Top of Digital Camera
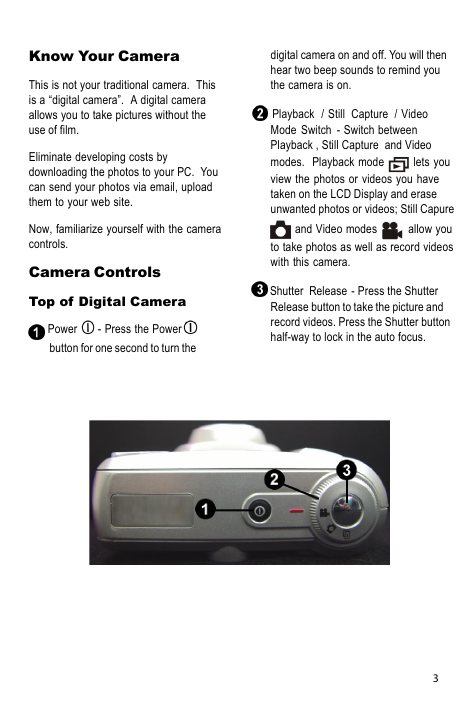
- Press the Power
Power
button for one second to turn the
digital camera on and off. You will then
hear two beep sounds to remind you
the camera is on.
lets you
Playback / Still Capture / Video
Mode Switch - Switch between
Playback , Still Capture and Video
modes. Playback mode
view the photos or videos you have
taken on the LCD Display and erase
unwanted photos or videos; Still Capure
allow you
to take photos as well as record videos
with this camera.
and Video modes
Shutter Release - Press the Shutter
Release button to take the picture and
record videos. Press the Shutter button
half-way to lock in the auto focus.
3
�
Front of Digital Camera
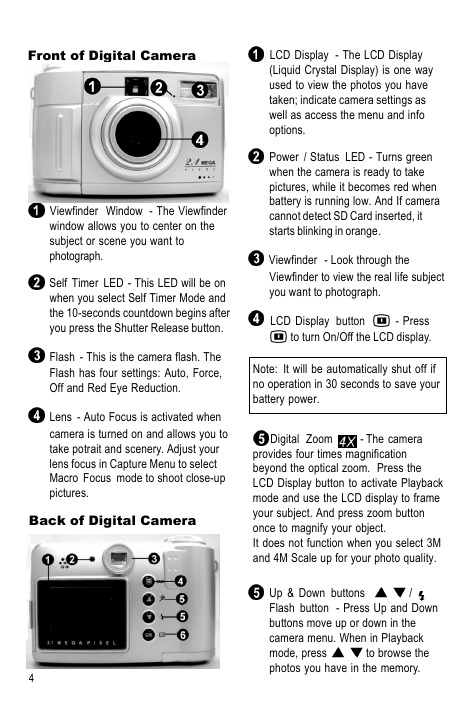
Viewfinder Window - The Viewfinder
window allows you to center on the
subject or scene you want to
photograph.
Self Timer LED - This LED will be on
when you select Self Timer Mode and
the 10-seconds countdown begins after
you press the Shutter Release button.
Flash - This is the camera flash. The
Flash has four settings: Auto, Force,
Off and Red Eye Reduction.
Lens - Auto Focus is activated when
camera is turned on and allows you to
take potrait and scenery. Adjust your
lens focus in Capture Menu to select
Macro Focus mode to shoot close-up
pictures.
Back of Digital Camera
LCD Display - The LCD Display
(Liquid Crystal Display) is one way
used to view the photos you have
taken; indicate camera settings as
well as access the menu and info
options.
Power / Status LED - Turns green
when the camera is ready to take
pictures, while it becomes red when
battery is running low. And If camera
cannot detect SD Card inserted, it
starts blinking in orange.
- Look through the
Viewfinder
Viewfinder to view the real life subject
you want to photograph.
LCD Display button
- Press
to turn On/Off the LCD display.
Note: It will be automatically shut off if
no operation in 30 seconds to save your
battery power.
Digital Zoom
- The camera
provides four times magnification
beyond the optical zoom. Press the
LCD Display button to activate Playback
mode and use the LCD display to frame
your subject. And press zoom button
once to magnify your object.
It does not function when you select 3M
and 4M Scale up for your photo quality.
/
Up & Down buttons
Flash button - Press Up and Down
buttons move up or down in the
camera menu. When in Playback
mode, press
to browse the
photos you have in the memory.
4
�
Menu / OK - Press this button to
open the camera menu on the LCD.
Press OK to select a menu option or
setting or reply to a screen message.
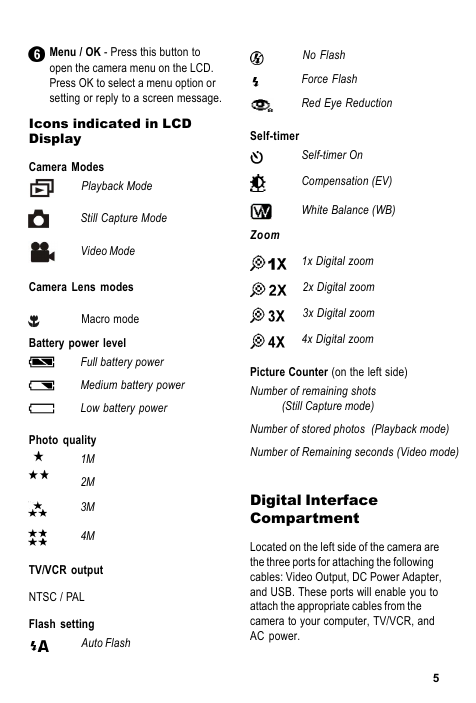
Icons indicated in LCD
Display
Self-timer
Camera Modes
Playback Mode
Still Capture Mode
Video Mode
Camera Lens modes
Macro mode
Battery power level
Full battery power
Medium battery power
Low battery power
Photo quality
1M
2M
3M
4M
TV/VCR output
NTSC / PAL
Flash setting
Auto Flash
No Flash
Force Flash
Red Eye Reduction
Self-timer On
Compensation (EV)
White Balance (WB)
1x Digital zoom
2x Digital zoom
3x Digital zoom
4x Digital zoom
Zoom
Picture Counter (on the left side)
Number of remaining shots
(Still Capture mode)
Number of stored photos (Playback mode)
Number of Remaining seconds (Video mode)
Digital Interface
Compartment
Located on the left side of the camera are
the three ports for attaching the following
cables: Video Output, DC Power Adapter,
and USB. These ports will enable you to
attach the appropriate cables from the
camera to your computer, TV/VCR, and
AC power.
5
�
Step 2 Open the memory compartment
cover located at the right side of your
camera and insert the SD memory card.
When inserting, hold the memory card so
that its pin connector is pointing towards
the camera. Also, the back side of the
memory card should be facing the back
side of the camera.
Then, push the memory card all the way
into the memory compartment and close
the cover.
Note: 1. This camera comes with built-in
8Mbyte internal NAND Flash memory.
You dont necessarily add extra memory.
2. To remove the SD card, push the SD
card once and the card will be ejected
from the memory compartment.
Step 3 Attach the wrist strap to the strap
holder at the side of the camera.
Start Using Your Camera
Step 1 Press the Power
button to turn
on the camera. A green light just beside
the Viewfinder then lights up.
Step 2 The LCD Display will be turned on
automatically.
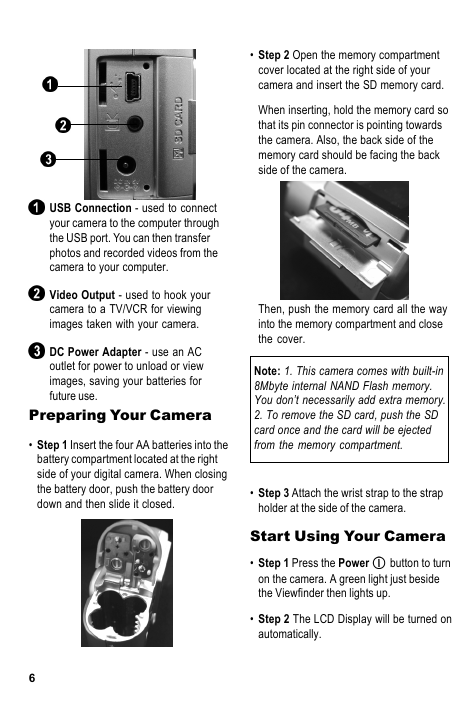
USB Connection - used to connect
your camera to the computer through
the USB port. You can then transfer
photos and recorded videos from the
camera to your computer.
Video Output - used to hook your
camera to a TV/VCR for viewing
images taken with your camera.
DC Power Adapter - use an AC
outlet for power to unload or view
images, saving your batteries for
future use.
Preparing Your Camera
Step 1 Insert the four AA batteries into the
battery compartment located at the right
side of your digital camera. When closing
the battery door, push the battery door
down and then slide it closed.
6
�
Formatting the SD Card
It is best to format your SD memory card
before using it to store pictures.
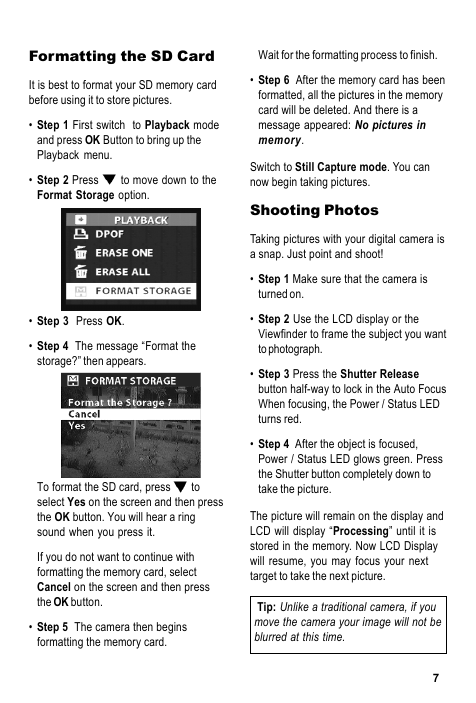
Step 1 First switch to Playback mode
and press OK Button to bring up the
Playback menu.
Step 2 Press
Format Storage option.
to move down to the
Step 3 Press OK.
Step 4 The message Format the
storage? then appears.
to
To format the SD card, press
select Yes on the screen and then press
the OK button. You will hear a ring
sound when you press it.
If you do not want to continue with
formatting the memory card, select
Cancel on the screen and then press
the OK button.
Step 5 The camera then begins
formatting the memory card.
Wait for the formatting process to finish.
Step 6 After the memory card has been
formatted, all the pictures in the memory
card will be deleted. And there is a
message appeared: No pictures in
memory.
Switch to Still Capture mode. You can
now begin taking pictures.
Shooting Photos
Taking pictures with your digital camera is
a snap. Just point and shoot!
Step 1 Make sure that the camera is
turned on.
Step 2 Use the LCD display or the
Viewfinder to frame the subject you want
tophotograph.
Step 3 Press the Shutter Release
button half-way to lock in the Auto Focus
When focusing, the Power / Status LED
turns red.
Step 4 After the object is focused,
Power / Status LED glows green. Press
the Shutter button completely down to
take the picture.
The picture will remain on the display and
LCD will display Processing until it is
stored in the memory. Now LCD Display
will resume, you may focus your next
target to take the next picture.
Tip: Unlike a traditional camera, if you
move the camera your image will not be
blurred at this time.
7
�
Choosing Photo
Resolution
Photo resolution deals with the size of the
picture. One of the features available in this
camera is the ability to adjust the photo
output quality. You can select the specific
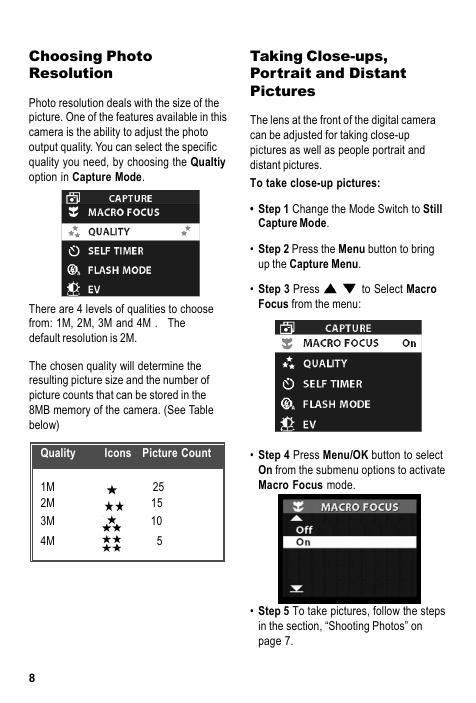
quality you need, by choosing the Qualtiy
option in Capture Mode.
There are 4 levels of qualities to choose
from: 1M, 2M, 3M and 4M . The
default resolution is 2M.
The chosen quality will determine the
resulting picture size and the number of
picture counts that can be stored in the
8MB memory of the camera. (See Table
below)
Quality
Icons Picture Count
25
15
10
5
1M
2M
3M
4M
8
Taking Close-ups,
Portrait and Distant
Pictures
The lens at the front of the digital camera
can be adjusted for taking close-up
pictures as well as people portrait and
distant pictures.
To take close-up pictures:
Step 1 Change the Mode Switch to Still
Capture Mode.
Step 2 Press the Menu button to bring
up the Capture Menu.
Step 3 Press
Focus from the menu:
to Select Macro
Step 4 Press Menu/OK button to select
On from the submenu options to activate
Macro Focus mode.
Step 5 To take pictures, follow the steps
in the section, Shooting Photos on
page 7.
�


 2023年江西萍乡中考道德与法治真题及答案.doc
 2012年重庆南川中考生物真题及答案.doc
 2013年江西师范大学地理学综合及文艺理论基础考研真题.doc
 2020年四川甘孜小升初语文真题及答案I卷.doc
 2020年注册岩土工程师专业基础考试真题及答案.doc
 2023-2024学年福建省厦门市九年级上学期数学月考试题及答案.doc
 2021-2022学年辽宁省沈阳市大东区九年级上学期语文期末试题及答案.doc
 2022-2023学年北京东城区初三第一学期物理期末试卷及答案.doc
 2018上半年江西教师资格初中地理学科知识与教学能力真题及答案.doc
 2012年河北国家公务员申论考试真题及答案-省级.doc
 2020-2021学年江苏省扬州市江都区邵樊片九年级上学期数学第一次质量检测试题及答案.doc
 2022下半年黑龙江教师资格证中学综合素质真题及答案.doc