122mm+-2
User Manual
This manual can guide you to proper operation
and correct setting. Please read it carefully and
optimize the performance in accordance with
your preference.
E NS S
E NS S
O
O
R
R
D
D
CC
CC
L
L
E
E
N
N
5
5
.3
.3
:
:
1
1
m
m
S
S
f
f
=
=
5. 6 m
5. 6 m
165mm
+-2
D
D
CC
CC
L
L
E
E
N
N
5
5
.3
.3
:
:
1
1
m
m
R4040164
E NS S
E NS S
O
O
R
R
S
S
f
f
=
=
5. 6 m
5. 6 m
�
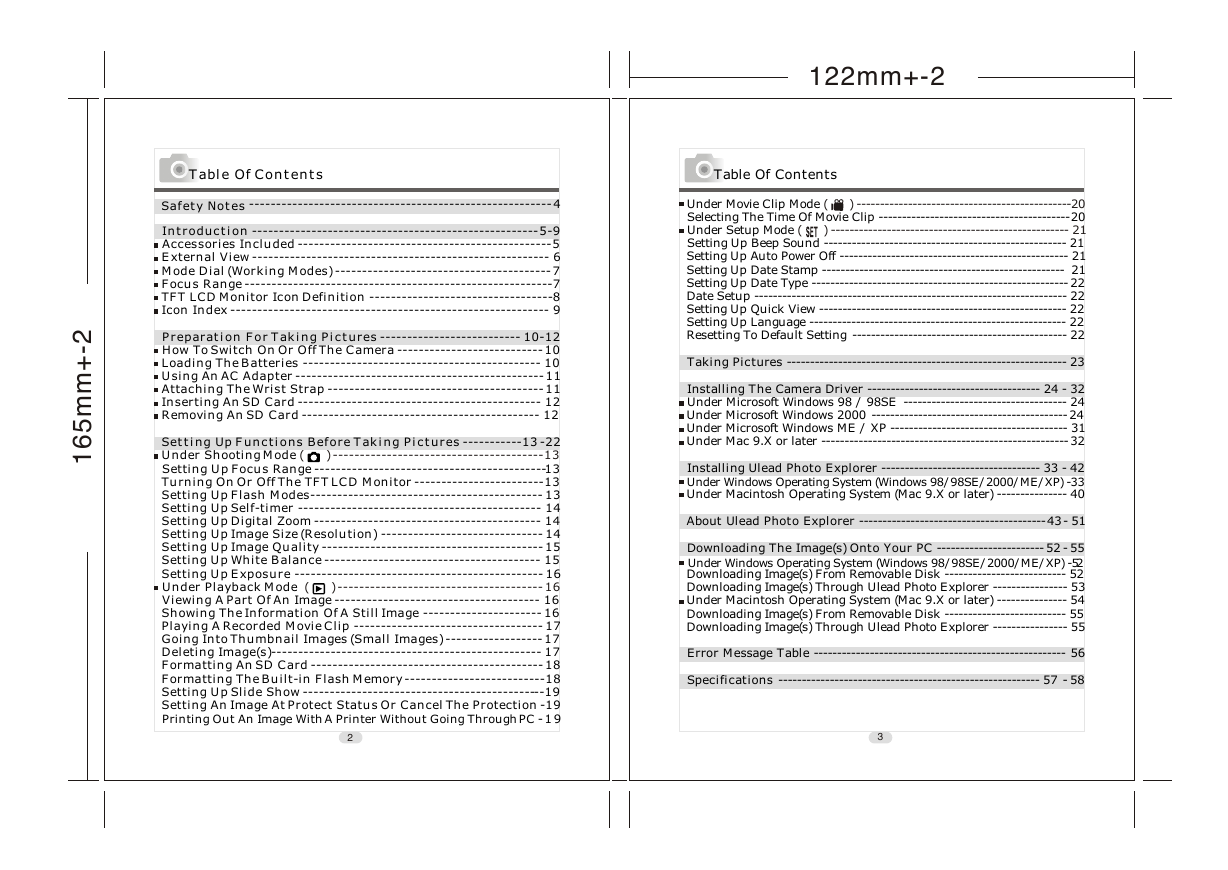
Table Of Contents
Safety Notes
-------------------------------------------------------- 4
2
-
+
m
m
5
6
1
Introduction ----------------------------------------------------- 5-9
Accessories Included ----------------------------------------------- 5
External View ------------------------------------------------------- 6
Mode Dial (Working Modes) ---------------------------------------- 7
Focus Range --------------------------------------------------------- 7
TFT LCD Monitor Icon Definition ---------------------------------- 8
Icon Index ----------------------------------------------------------- 9
Preparation For Taking Pictures -------------------------- 10 -12
How To Switch On Or Off The Camera --------------------------- 10
Loading The Batteries -------------------------------------------- 10
Using An AC Adapter ---------------------------------------------- 11
Attaching The Wrist Strap ---------------------------------------- 11
Inserting An SD Card --------------------------------------------- 12
Removing An SD Card -------------------------------------------- 12
Setting Up Functions Before Taking Pictures -----------13 -22
( ) --------------------------------------- 13
Under Shooting Mode
Setting Up Focus Range -------------------------------------------1 3
Turning On Or Off The TFT LCD Monitor ------------------------ 13
Setting Up Flash Modes------------------------------------------- 13
Setting Up Self-timer --------------------------------------------- 14
Setting Up Digital Zoom ------------------------------------------ 14
Setting Up Image Size (Resolution) ------------------------------ 14
Setting Up Image Quality ----------------------------------------- 15
Setting Up White Balance ---------------------------------------- 15
Setting Up Exposure ---------------------------------------------- 16
( ) -------------------------------------- 16
Under Playback Mode
Viewing A Part Of An Image -------------------------------------- 16
Showing The Information Of A Still Image ---------------------- 16
Playing A Recorded Movie Clip ----------------------------------- 17
Going Into Thumbnail Images (Small Images) ------------------ 17
Deleting Image(s) -------------------------------------------------- 17
Formatting An SD Card ------------------------------------------- 18
Formatting The Built-in Flash Memory --------------------------18
Setting Up Slide Show ---------------------------------------------19
Setting An Image At Protect Status Or Cancel The Protection -19
Printing Out An Image With A Printer Without Going Through PC - 1 9
2
122mm+-2
Table Of Contents
( ) ----------------------------------------------2 0
Under Movie Clip Mode
Selecting The Time Of Movie Clip ----------------------------------------- 20
( ) --------------------------------------------------- 21
Under Setup Mode
Setting Up Beep Sound ---------------------------------------------------- 21
Setting Up Auto Power Off ------------------------------------------------- 21
Setting Up Date Stamp ---------------------------------------------------- 21
Setting Up Date Type ------------------------------------------------------- 22
Date Setup ------------------------------------------------------------------- 22
Setting Up Quick View ----------------------------------------------------- 22
Setting Up Language ------------------------------------------------------- 22
Resetting To Default Setting ---------------------------------------------- 22
Taking Pictures ------------------------------------------------------------ 23
Installing The Camera Driver ------------------------------------- 24 - 32
Under Microsoft Windows 98 / 98SE ----------------------------------- 24
Under Microsoft Windows 2000 ------------------------------------------ 24
Under Microsoft Windows ME / XP -------------------------------------- 31
Under Mac 9.X or later ----------------------------------------------------- 32
Installing Ulead Photo Explorer ---------------------------------- 33 - 42
Under Windows Operating System (Windows 98/98SE/2000/ME/XP) -33
Under Macintosh Operating System (Mac 9.X or later) --------------- 40
About Ulead Photo Explorer ---------------------------------------- 43 - 51
Downloading The Image(s) Onto Your PC ----------------------- 52 - 55
Under Windows Operating System (Windows 98/98SE/2000/ME/XP) -5 2
Downloading Image(s) From Removable Disk -------------------------- 52
Downloading Image(s) Through Ulead Photo Explorer ---------------- 53
Under Macintosh Operating System (Mac 9.X or later) --------------- 54
Downloading Image(s) From Removable Disk -------------------------- 55
Downloading Image(s) Through Ulead Photo Explorer ---------------- 55
Error Message Table ------------------------------------------------------ 56
Specifications -------------------------------------------------------- 57 - 58
3
�
Safety Notes
2
-
+
m
m
5
6
1
Do not try to open the camera by yourself which may cause
damage to the camera or electric shock.
Do not fire the flash in a close distance (less than 1 meter) to
human eyes.
Keep the camera away from the reach of children or animals to
prevent them from swallowing the batteries or small
accessories.
Avoid using the camera if any form of liquid enters the camera.
If it happens, switch off the camera and contact the company
that you bought this camera from for help.
Do not operate this camera with wet hands which may cause
electric shock.
Do not place or store the camera in a high temperature
environment which may cause damage to the camera.
Do not mix to use different types of batteries or new and old
batteries.
Take out the batteries to avoid electricity leakage which may
damage the camera when the camera is not in use for a long
period.
Unplug the camera from the adapter (if used) to avoid damage to
the camera if the camera is not to be used in a long period.
It's normal that the temperature of the camera body rises after
using for a long period.
122mm+-2
Introduction
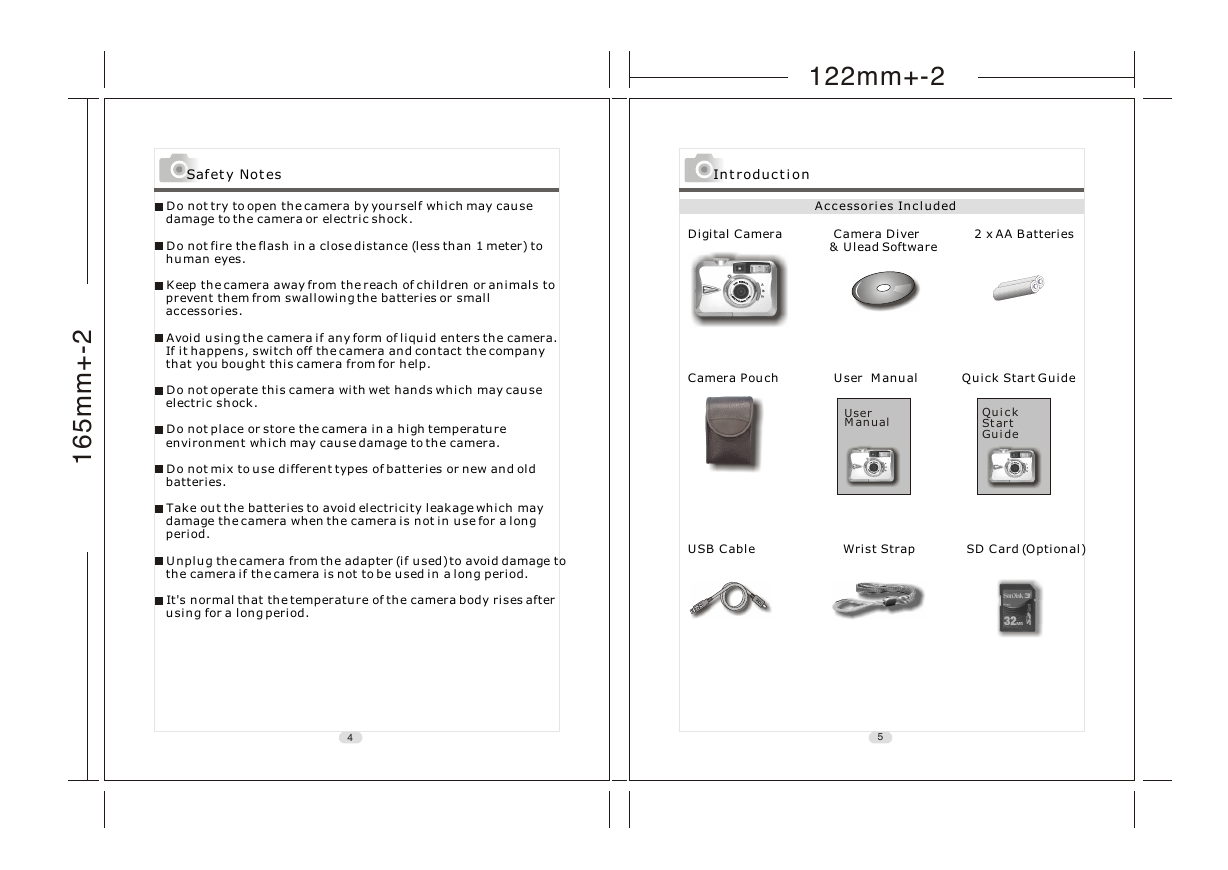
Accessories Included
Safety Notes
Digital Camera Camera Diver 2 x AA Batteries
& Ulead Software
Camera Pouch User Manual Quick Start Guide
User
Manual
Quick
Start
Guide
USB Cable Wrist Strap SD Card (Optional)
4
5
�
2
-
+
m
m
5
6
1
Introduction
Top
Safety Notes
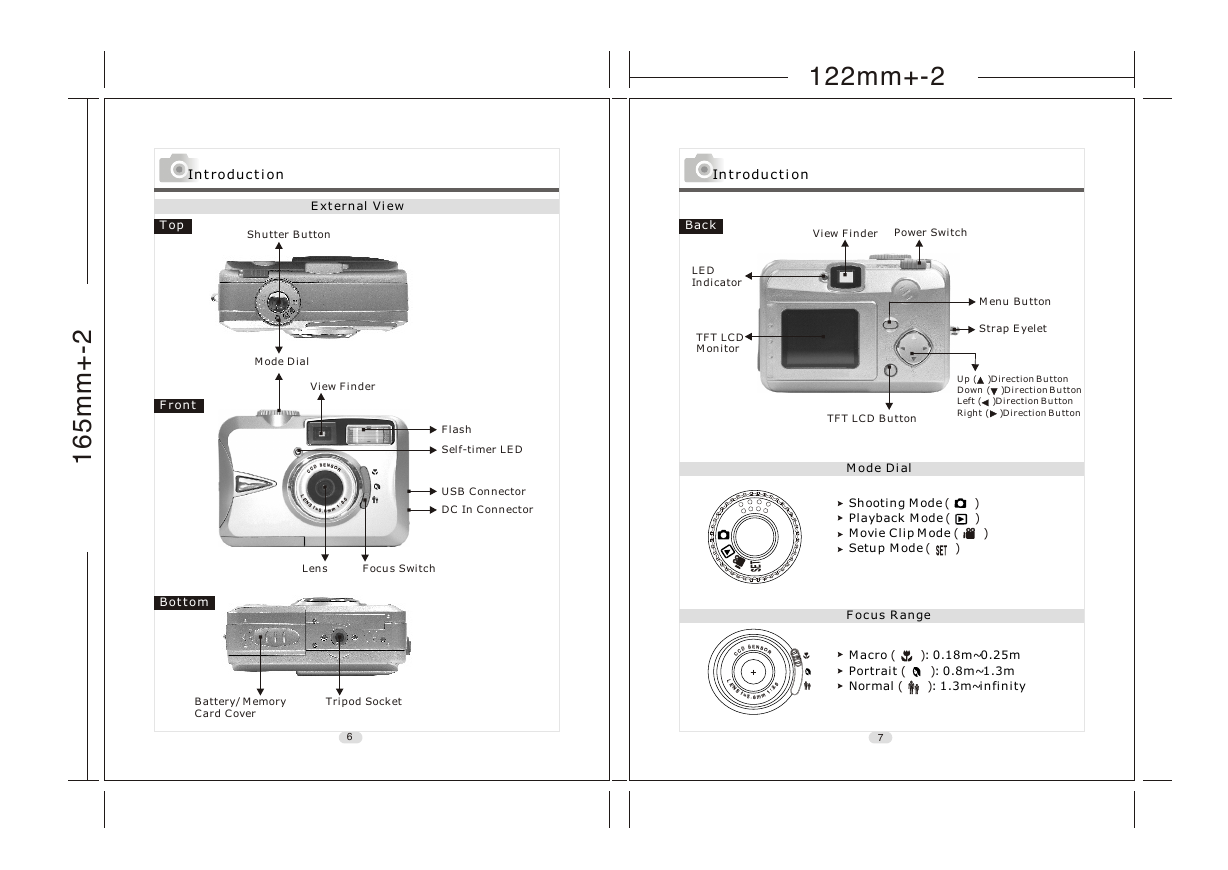
External View
Shutter Button
Mode Dial
View Finder
Front
E NS S
E NS S
O
O
R
R
D
D
CC
CC
L
L
E
E
N
N
5
5
.3
.3
:
:
1
1
m
m
S
S
f
f
=
=
5. 6 m
5. 6 m
Lens
Focus Switch
Bottom
Battery/Memory
Card Cover
Tripod Socket
6
122mm+-2
Introduction
Flash
Self-timer LED
USB Connector
DC In Connector
Back
LED
Indicator
TFT LCD
Monitor
D
D
CC
CC
L
L
E
E
N
N
E NS S
E NS S
O
O
R
R
5
5
.3
.3
:
:
1
1
m
m
S
S
f
f
=
=
5. 6 m
5. 6 m
View Finder
Power Switch
Menu Button
Strap Eyelet
Up ( )Direction Button
Down ( )Direction Button
Left ( )Direction Button
Right ( )Direction Button
TFT LCD Button
Mode Dial
Shooting Mode
Playback Mode
Movie Clip Mode
Setup Mode
( )
( )
( )
( )
Focus Range
Macro
Portrait
Normal
( )
: 0.18m~0.25m
: 0.8m~1.3m
: 1.3m~infinity
( )
( )
7
�
Introduction
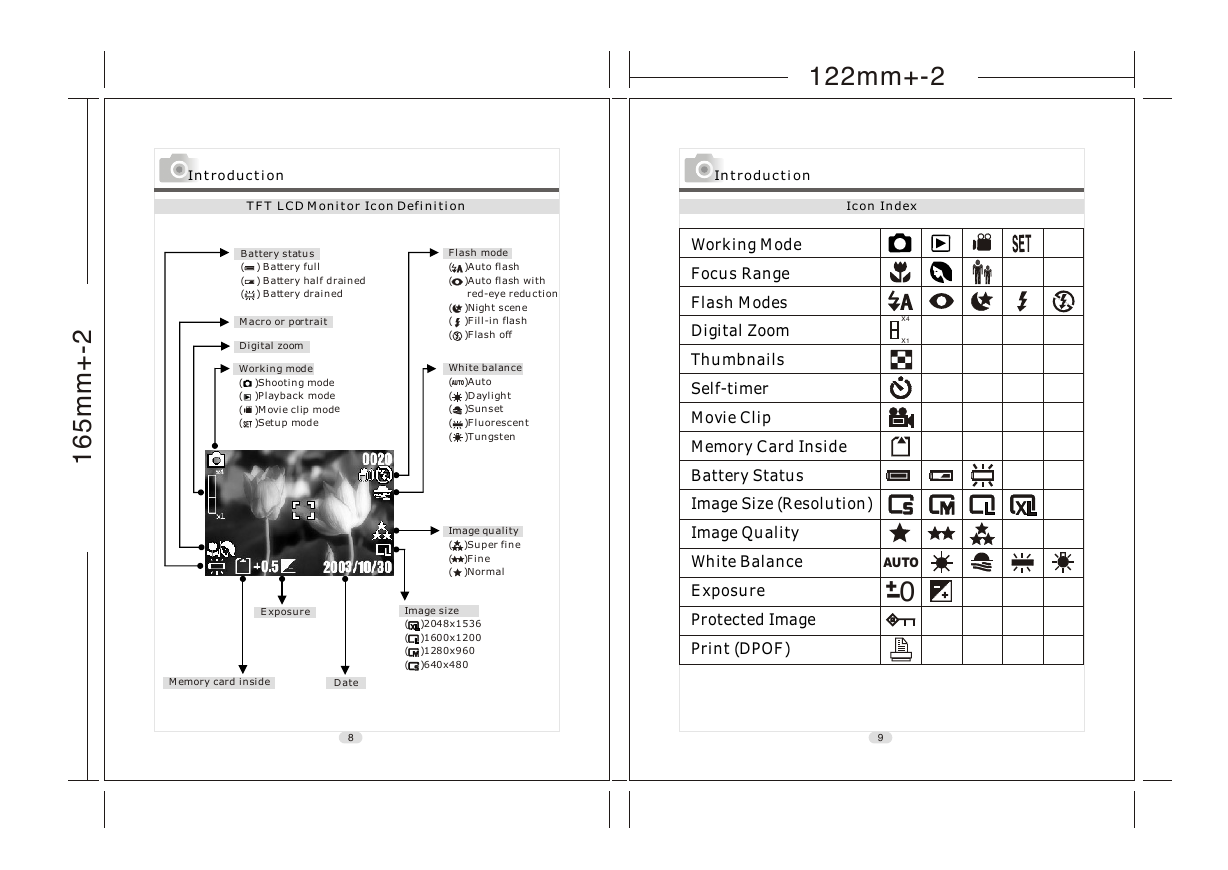
TFT LCD Monitor Icon Definition
Safety Notes
Battery status
( ) Battery full
( ) Battery half drained
( ) Battery drained
Macro or portrait
Digital zoom
Working mode
( )Shooting mode
( )Playback mode
( )Movie clip mode
( )Setup mode
Flash mode
( )Auto flash
( )Auto flash with
red-eye reduction
( )Night scene
( )Fill-in flash
( )Flash off
White balance
( )Auto
AUTO
( )Daylight
( )Sunset
( )Fluorescent
( )Tungsten
2
-
+
m
m
5
6
1
Image quality
)Super fine
(
(
)Fine
)Normal
(
Image size
( )2048x1536
( )1600x1200
( )1280x960
( )640x480
Exposure
Memory card inside
Date
122mm+-2
Introduction
Safety Notes
Icon Index
Working Mode
Focus Range
Flash Modes
Digital Zoom
Thumbnails
Self-timer
Movie Clip
Memory Card Inside
Battery Status
Image Size (Resolution)
Image Quality
White Balance
Exposure
Protected Image
Print (DPOF)
X4
X1
AUTO
+-0
+
8
9
�
2
-
+
m
m
5
6
1
Preparation For Taking Pictures
How to Switch On Or Off The Camera
Safety Notes
To switch on the camera, slide the Power Switch to the side and
hold it for 1 second.
To switch off the camera, slide the Power Switch to the side and
hold it for 1 second again.
Loading the Batteries
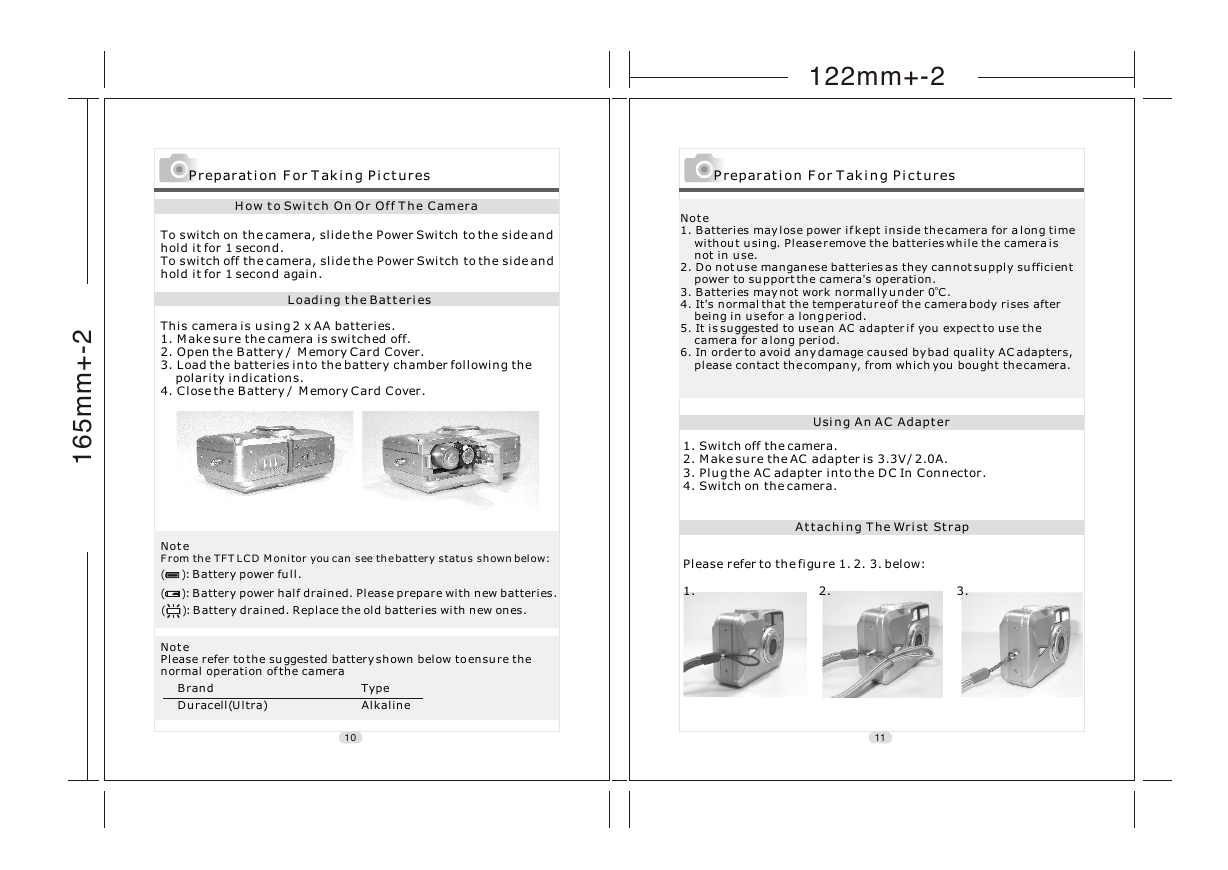
This camera is using 2 x AA batteries.
1. Make sure the camera is switched off.
2. Open the Battery / Memory Card Cover.
3. Load the batteries into the battery chamber following the
polarity indications.
4. Close the Battery / Memory Card Cover.
122mm+-2
Preparation For Taking Pictures
Note
1. Batteries may lose power if kept inside the camera for a long time
without using. Please remove the batteries while the camera is
not in use.
2. Do not use manganese batteries as they cannot supply sufficient
power to support the camera's operation.
3. Batteries may not work normally under 0 C.
4. It's normal that the temperature of the camera body rises after
being in use for a long period.
5. It is suggested to use an AC adapter if you expect to use the
camera for a long period.
6. In order to avoid any damage caused by bad quality AC adapters,
please contact the company, from which you bought the camera.
o
Using An AC Adapter
1. Switch off the camera.
2. Make sure the AC adapter is 3.3V/2.0A.
3. Plug the AC adapter into the DC In Connector.
4. Switch on the camera.
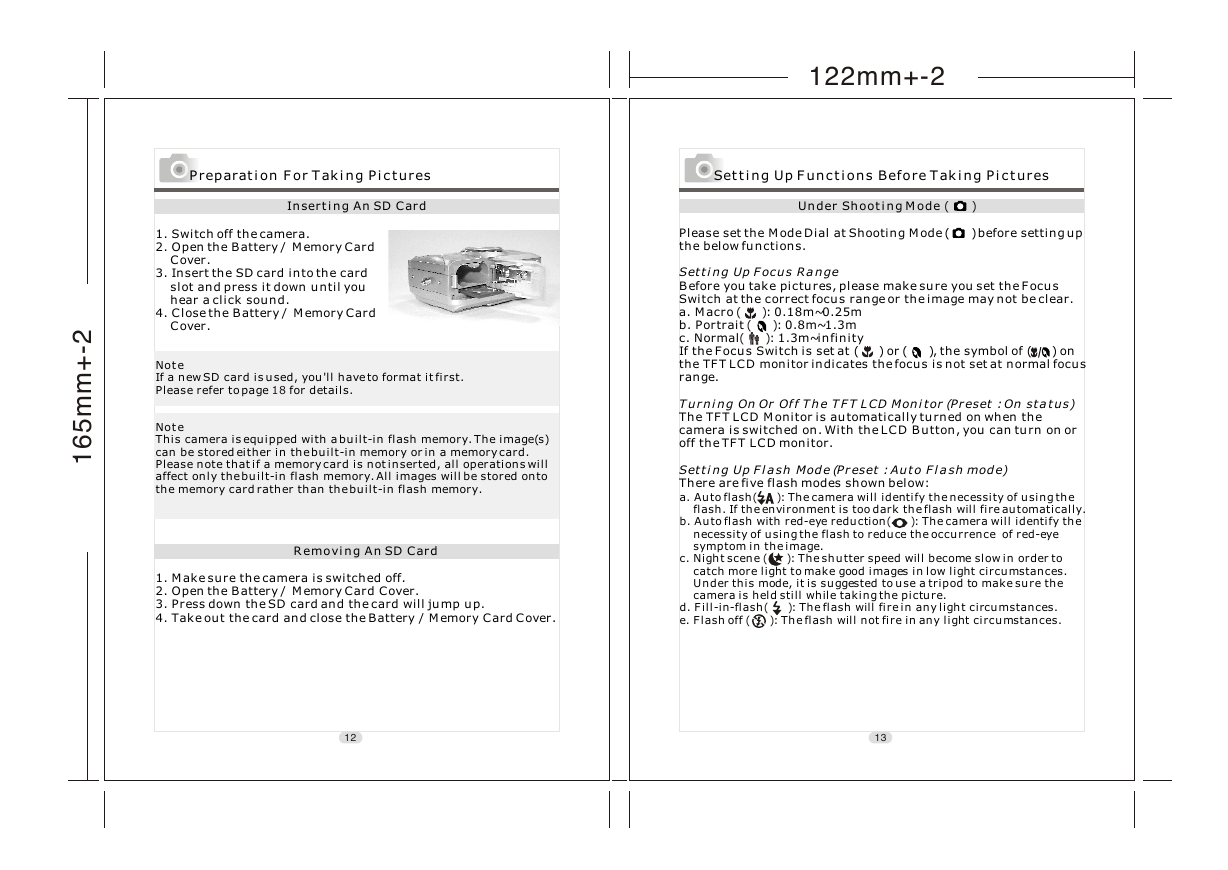
Attaching The Wrist Strap
Please refer to the figure 1. 2. 3. below:
1. 2. 3.
Note
From the TFT LCD Monitor you can see the battery status shown below:
(
)
)
(
(
)
: Battery power full.
: Battery power half drained. Please prepare with new batteries.
: Battery drained. Replace the old batteries with new ones.
Note
Please refer to the suggested battery shown below to ensure the
normal operation of the camera
Brand Type
Duracell(Ultra) Alkaline
10
11
�
122mm+-2
Preparation For Taking Pictures
Setting Up Functions Before Taking Pictures
Inserting An SD Card
Under Shooting Mode
( )
2
-
+
m
m
5
6
1
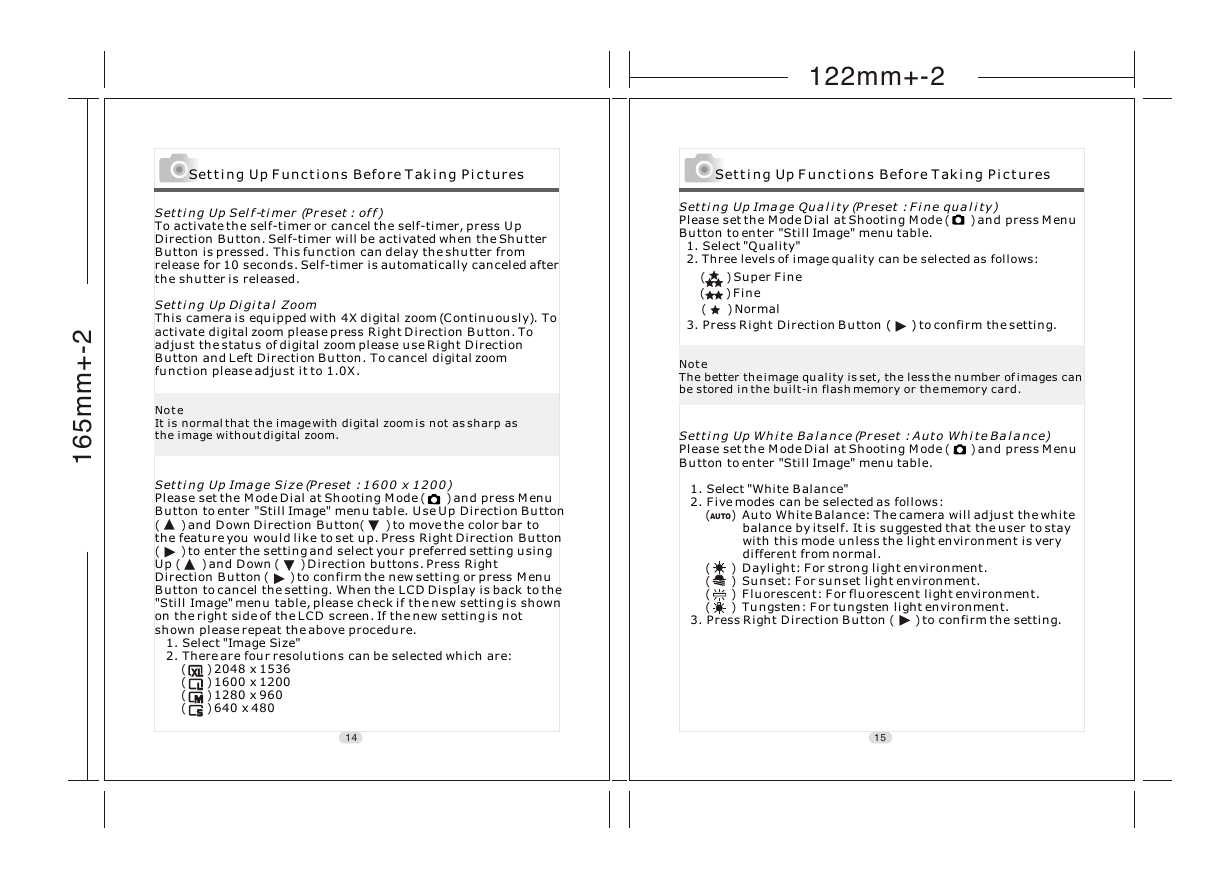
1. Switch off the camera.
2. Open the Battery / Memory Card
Cover.
3. Insert the SD card into the card
slot and press it down until you
hear a click sound.
4. Close the Battery / Memory Card
Cover.
Note
If a new SD card is used, you'll have to format it first.
Please refer to page
for details.
18
Note
This camera is equipped with a built-in flash memory. The image(s)
can be stored either in the built-in memory or in a memory card.
Please note that if a memory card is not inserted, all operations will
affect only the built-in flash memory. All images will be stored onto
the memory card rather than the built-in flash memory.
Removing An SD Card
1. Make sure the camera is switched off.
2. Open the Battery / Memory Card Cover.
3. Press down the SD card and the card will jump up.
4. Take out the card and close the Battery / Memory Card Cover.
Please set the Mode Dial at Shooting Mode ( ) before setting up
the below functions.
( )
Setting Up Focus Range
Before you take pictures, please make sure you set the Focus
Switch at the correct focus range or the image may not be clear.
a. Macro
b. Portrait
c. Normal
If the Focus Switch is set at ( ) or ( ), the symbol of ( ) on
the TFT LCD monitor indicates the focus is not set at normal focus
range.
: 0.18m~0.25m
: 0.8m~1.3m
: 1.3m~infinity
( )
( )
Turning On Or Off The TFT LCD Monitor (Preset : On status)
The TFT LCD Monitor is automatically turned on when the
camera is switched on. With the LCD Button, you can turn on or
off the TFT LCD monitor.
: The camera will identify the necessity of using the
Setting Up Flash Mode (Preset : Auto Flash mode)
There are five flash modes shown below:
a. Auto flash
flash. If the environment is too dark the flash will fire automatically.
b. Auto flash with red-eye reduction
necessity of using the flash to reduce the occurrence of red-eye
symptom in the image.
c. Night scene
: The shutter speed will become slow in order to
catch more light to make good images in low light circumstances.
Under this mode, it is suggested to use a tripod to make sure the
camera is held still while taking the picture.
d. Fill-in-flash
e. Flash off
: The flash will fire in any light circumstances.
: The flash will not fire in any light circumstances.
: The camera will identify the
( )
( )
( )
( )
( )
12
13
�
Setting Up Functions Before Taking Pictures
Setting Up Functions Before Taking Pictures
122mm+-2
Setting Up Self-timer (Preset : off)
To activate the self-timer or cancel the self-timer, press Up
Direction Button. Self-timer will be activated when the Shutter
Button is pressed. This function can delay the shutter from
release for 10 seconds. Self-timer is automatically canceled after
the shutter is released.
Setting Up Digital Zoom
This camera is equipped with 4X digital zoom (Continuously). To
activate digital zoom please press Right Direction Button. To
adjust the status of digital zoom please use Right Direction
Button and Left Direction Button. To cancel digital zoom
function please adjust it to 1.0X.
Note
It is normal that the image with digital zoom is not as sharp as
the image without digital zoom.
2
-
+
m
m
5
6
1
( )
to move the color bar to
and Down Direction Button
Direction buttons. Press Right
Setting Up Image Size (Preset : 1600 x 1200)
( )
Please set the Mode Dial at Shooting Mode
and press Menu
Button to enter "Still Image" menu table. Use Up Direction Button
( )
the feature you would like to set up. Press Right Direction Button
( )
to enter the setting and select your preferred setting using
( )
( )
Up
and Down
( )
Direction Button
Button to cancel the setting. When the LCD Display is back to the
"Still Image" menu table, please check if the new setting is shown
on the right side of the LCD screen. If the new setting is not
shown please repeat the above procedure.
1. Select "Image Size"
2. There are four resolutions can be selected which are:
2048 x 1536
1600 x 1200
1280 x 960
640 x 480
to confirm the new setting or press Menu
( )
( )
( )
( )
( )
Setting Up Image Quality (Preset : Fine quality)
Please set the Mode Dial at Shooting Mode
Button to enter "Still Image" menu table.
1. Select "Quality"
2. Three levels of image quality can be selected as follows:
)
(
Super Fine
)
(
Fine
)
(
Normal
3. Press Right Direction Button ( ) to confirm the setting.
and press Menu
Note
The better the image quality is set, the less the number of images can
be stored in the built-in flash memory or the memory card.
Setting Up White Balance (Preset : Auto White Balance)
Please set the Mode Dial at Shooting Mode
Button to enter "Still Image" menu table.
( )
and press Menu
( )
AUTO
1. Select "White Balance"
2. Five modes can be selected as follows:
Auto White Balance: The camera will adjust the white
balance by itself. It is suggested that the user to stay
with this mode unless the light environment is very
different from normal.
3. Press Right Direction Button
Daylight: For strong light environment.
Sunset: For sunset light environment.
Fluorescent: For fluorescent light environment.
Tungsten: For tungsten light environment.
to confirm the setting.
( )
( )
( )
( )
( )
14
15
�



 2023年江西萍乡中考道德与法治真题及答案.doc
 2012年重庆南川中考生物真题及答案.doc
 2013年江西师范大学地理学综合及文艺理论基础考研真题.doc
 2020年四川甘孜小升初语文真题及答案I卷.doc
 2020年注册岩土工程师专业基础考试真题及答案.doc
 2023-2024学年福建省厦门市九年级上学期数学月考试题及答案.doc
 2021-2022学年辽宁省沈阳市大东区九年级上学期语文期末试题及答案.doc
 2022-2023学年北京东城区初三第一学期物理期末试卷及答案.doc
 2018上半年江西教师资格初中地理学科知识与教学能力真题及答案.doc
 2012年河北国家公务员申论考试真题及答案-省级.doc
 2020-2021学年江苏省扬州市江都区邵樊片九年级上学期数学第一次质量检测试题及答案.doc
 2022下半年黑龙江教师资格证中学综合素质真题及答案.doc