TomTom Start
�
1.
Getting started
Getting started
Mounting your navigation device
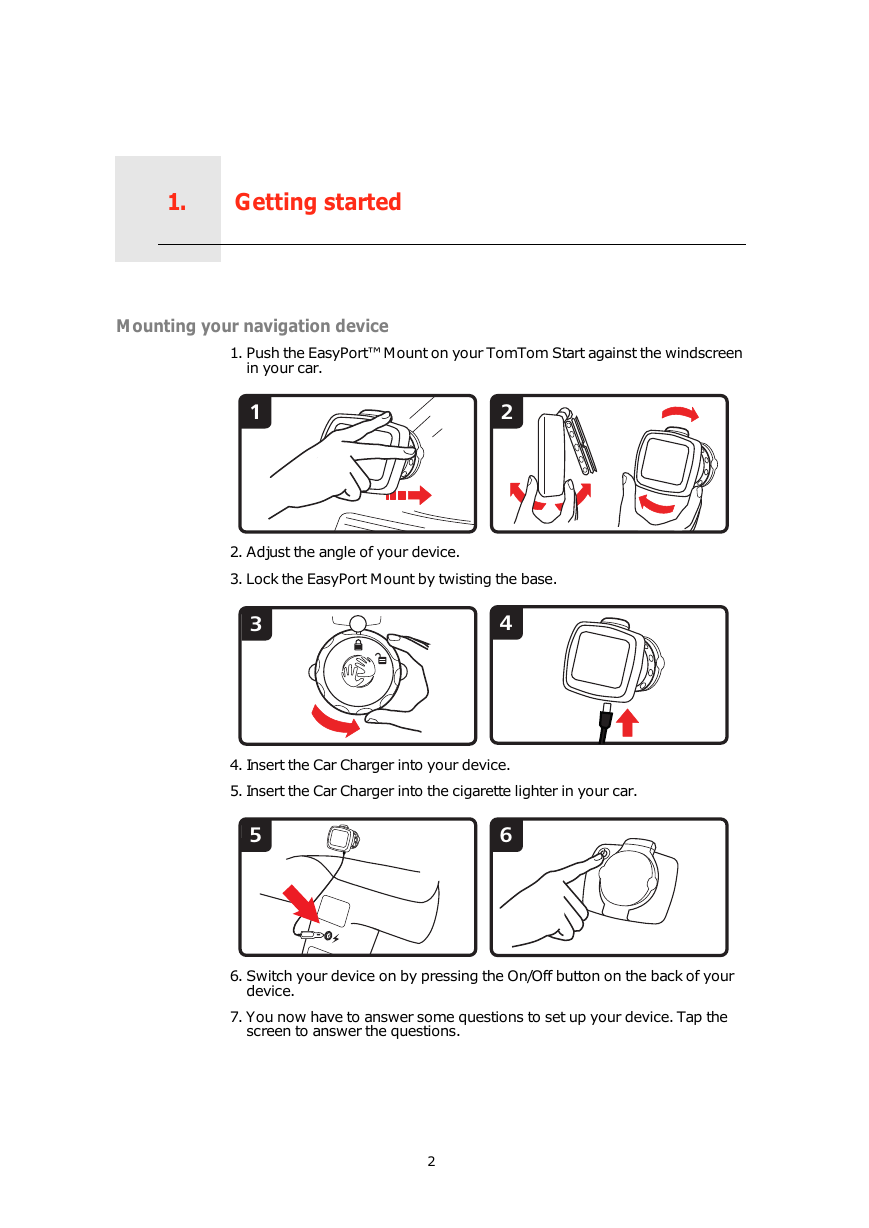
1. Push the EasyPort™ Mount on your TomTom Start against the windscreen
in your car.
1
2
2. Adjust the angle of your device.
3. Lock the EasyPort Mount by twisting the base.
3
4
4. Insert the Car Charger into your device.
5. Insert the Car Charger into the cigarette lighter in your car.
5
6
6. Switch your device on by pressing the On/Off button on the back of your
device.
7. You now have to answer some questions to set up your device. Tap the
screen to answer the questions.
2
�
7
8
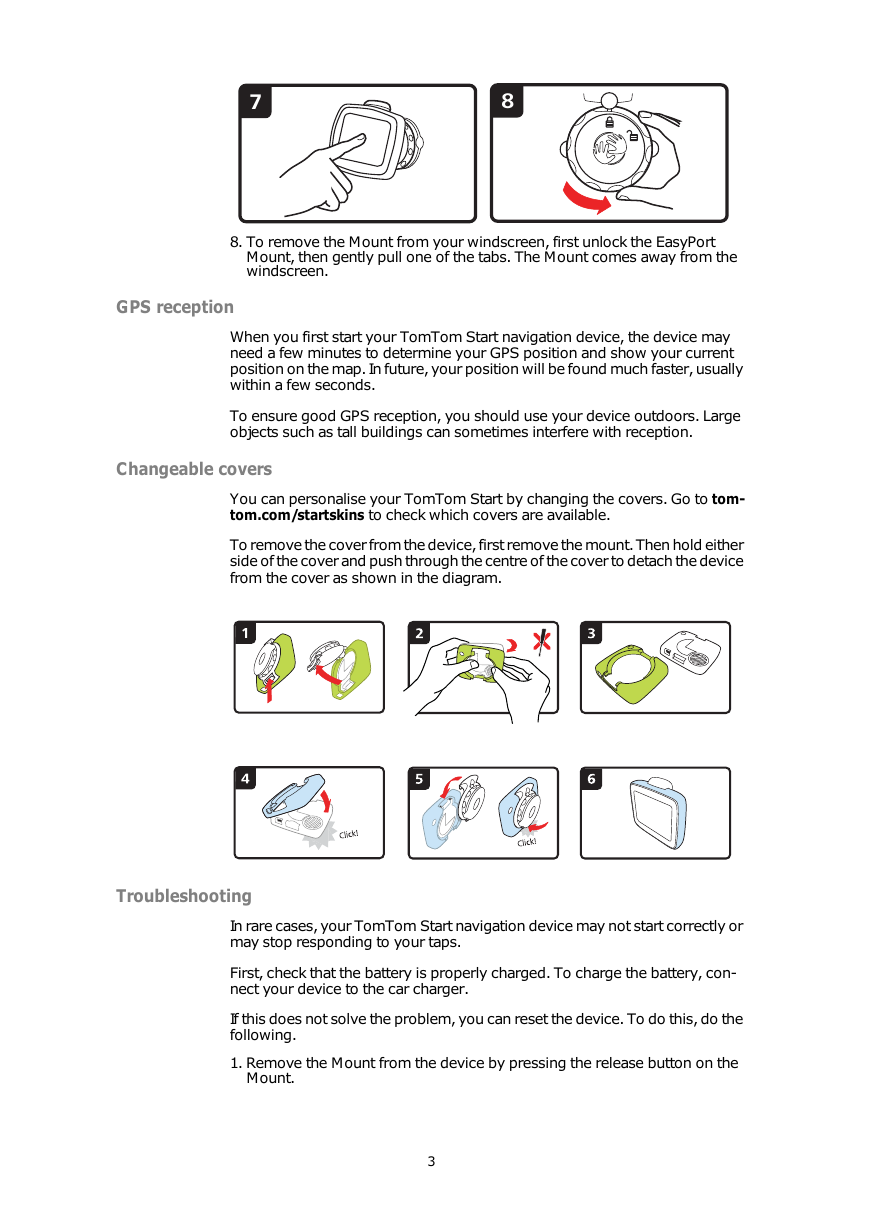
8. To remove the Mount from your windscreen, first unlock the EasyPort
Mount, then gently pull one of the tabs. The Mount comes away from the
windscreen.
GPS reception
When you first start your TomTom Start navigation device, the device may
need a few minutes to determine your GPS position and show your current
position on the map. In future, your position will be found much faster, usually
within a few seconds.
To ensure good GPS reception, you should use your device outdoors. Large
objects such as tall buildings can sometimes interfere with reception.
Changeable covers
You can personalise your TomTom Start by changing the covers. Go to tom-
tom.com/startskins to check which covers are available.
To remove the cover from the device, first remove the mount. Then hold either
side of the cover and push through the centre of the cover to detach the device
from the cover as shown in the diagram.
Troubleshooting
In rare cases, your TomTom Start navigation device may not start correctly or
may stop responding to your taps.
First, check that the battery is properly charged. To charge the battery, con-
nect your device to the car charger.
If this does not solve the problem, you can reset the device. To do this, do the
following.
1. Remove the Mount from the device by pressing the release button on the
Mount.
3
�
2. Pull the back cover off the device by holding either side of the cover and
pushing the device through the centre of the cover.
3. Use a straightened paper clip, or something similar, to push the reset but-
ton. The reset button is on the bottom of your device.
1
2
3
4
�
2.
Driving View
Driving View
The Driving View shows your current location on the map together with
detailed information such as current speed and route instructions.
Tap the centre of the screen at any time to open the Main Menu.
A Your current position.
B The name of the next major road or road sign information, if applicable.
C Your speed and the speed limit, if known.
Tap this panel on the status bar to adjust the volume.
When the volume control is displayed, the next route instruction is spoken.
This is a useful way to hear and adjust the current volume level.
D Next route instruction.
Tap this panel on the status bar to switch between 2D and 3D views of the
Driving View.
E The name of the street you are on.
F Information about your journey: journey time, remaining distance and
arrival time.
Tap this panel on the status bar to see a route summary.
5
�
3.
Main Menu
Main Menu
The Main Menu is the starting point for planning a route, looking at a map or
changing your device settings.
To open the Main Menu from the Driving View, tap the centre of the Driving
View screen.
To return to the Driving View from the Main Menu, tap done.
Main Menu buttons
Plan route
Change route
Browse map
Sound
sound
The following buttons are shown on the Main Menu.
Tap this button to plan a new route.
This button is shown when you have not planned a route.
Tap this button to plan a new route.
This button is shown when you have planned a route.
Tap this button to look at the map.
Tap this button to turn the sound off.
6
�
Tap this button to turn the sound on.
sound
Night /Day
Tap this button to set the night colour scheme, which reduces the bright-
ness of the screen and shows the map using dark colours.
night
This is useful when driving at night or in dark environments such as long
tunnels.
Tap this button to set the day colour scheme, which increases the bright-
ness of the screen and shows the map using bright colours.
day
Options
options
Help
help
Tap this button to adjust the settings for your device.
For more information, see the chapters Options and Advanced settings.
Tap this button to see the contact details and plan a route to an emergency
services centre or another specialist service such as a veterinary service.
For more information, see the chapter Help.
7
�
4.
Browse Map
Browse Map
To look at the map in the same way as you might look at a traditional paper
map, tap Browse map in the Main Menu.
You can use your finger to move the map by touching the screen and sliding
your finger across the screen.
A The scale bar
B Marker
Markers point to your current location, your home location and your desti-
nation. The marker shows the distance to the location.
Tap a marker to centre the map on the location pointed to by the marker.
C GPS button
Tap this button to centre the map on your current position.
D The POI button
Tap this button to select which POIs are shown.
E The cursor
F The Find button
Tap this button to find specific addresses.
G The Cursor button
Tap this button to plan a route to the cursor position, create a Favourite at
the cursor position or find a Point of Interest near to the cursor position.
H The zoom bar
8
�


 2023年江西萍乡中考道德与法治真题及答案.doc
 2012年重庆南川中考生物真题及答案.doc
 2013年江西师范大学地理学综合及文艺理论基础考研真题.doc
 2020年四川甘孜小升初语文真题及答案I卷.doc
 2020年注册岩土工程师专业基础考试真题及答案.doc
 2023-2024学年福建省厦门市九年级上学期数学月考试题及答案.doc
 2021-2022学年辽宁省沈阳市大东区九年级上学期语文期末试题及答案.doc
 2022-2023学年北京东城区初三第一学期物理期末试卷及答案.doc
 2018上半年江西教师资格初中地理学科知识与教学能力真题及答案.doc
 2012年河北国家公务员申论考试真题及答案-省级.doc
 2020-2021学年江苏省扬州市江都区邵樊片九年级上学期数学第一次质量检测试题及答案.doc
 2022下半年黑龙江教师资格证中学综合素质真题及答案.doc