DVR 943HDv2
Digital Video Recorder
User Manual
© 2009-2011 Sakar International, Inc. All rights reserved.
Windows and the Windows logo are registered trademarks of Microsoft Corporation.
All other trademarks are the property of their respective companies.
�
Contents
Introduction ................................................................................................................................ 3
What‟s Included ......................................................................................................................... 3
Parts of the Camera ................................................................................................................... 4
Initial Camera Setup .................................................................................................................. 5
Main Camera Modes ................................................................................................................. 8
Camera Technical Specifications ............................................................................................... 9
Computer System Requirements – WINDOWS OS ................................................................. 10
Computer System Requirements – MAC OS ........................................................................... 10
Using Your Digital Camcorder .................................................................................................. 11
Changing Camera Mode .......................................................................................................... 11
Navigating the Menus .............................................................................................................. 12
Video Capture Mode ................................................................................................................ 13
Video Playback Mode .............................................................................................................. 28
Photo Capture Mode ................................................................................................................ 32
Photo Playback Mode .............................................................................................................. 50
Connecting the Digital Video Camera to a TV or HDTV ........................................................... 56
Installing the Software.............................................................................................................. 58
Connecting the Camera to the Computer ................................................................................ 59
Getting Photos and Videos from your Camera to Your Computer............................................ 60
Get started! .............................................................................................................................. 61
Transferring Images Manually ................................................................................................. 62
Camera Maintenance .............................................................................................................. 63
Sakar Warranty Card ............................................................................................................... 64
Technical Support .................................................................................................................... 65
Troubleshooting ....................................................................................................................... 65
2
�
Introduction
Thank you for purchasing this digital video recorder. Everything you need to take quality digital
photos and videos is included with your camera.
Vivitar makes capturing those special moments as easy as possible.
Please read this manual carefully first in order to get the most out of your digital camera.
Note:
A Class 4 SD card or higher is required.
Most SD cards have a symbol with a “C” and a number within. Make sure the number
inside is a 4 or higher,
.
Your digital video recorder supports a Class 4 SD Memory Card - up to 32GB.
In order to use your digital video recorder normally, it is strongly recommended to insert
the SD Memory card before use.
Class 4 SD Memory cards are not included and need to be purchased separately.
What’s Included
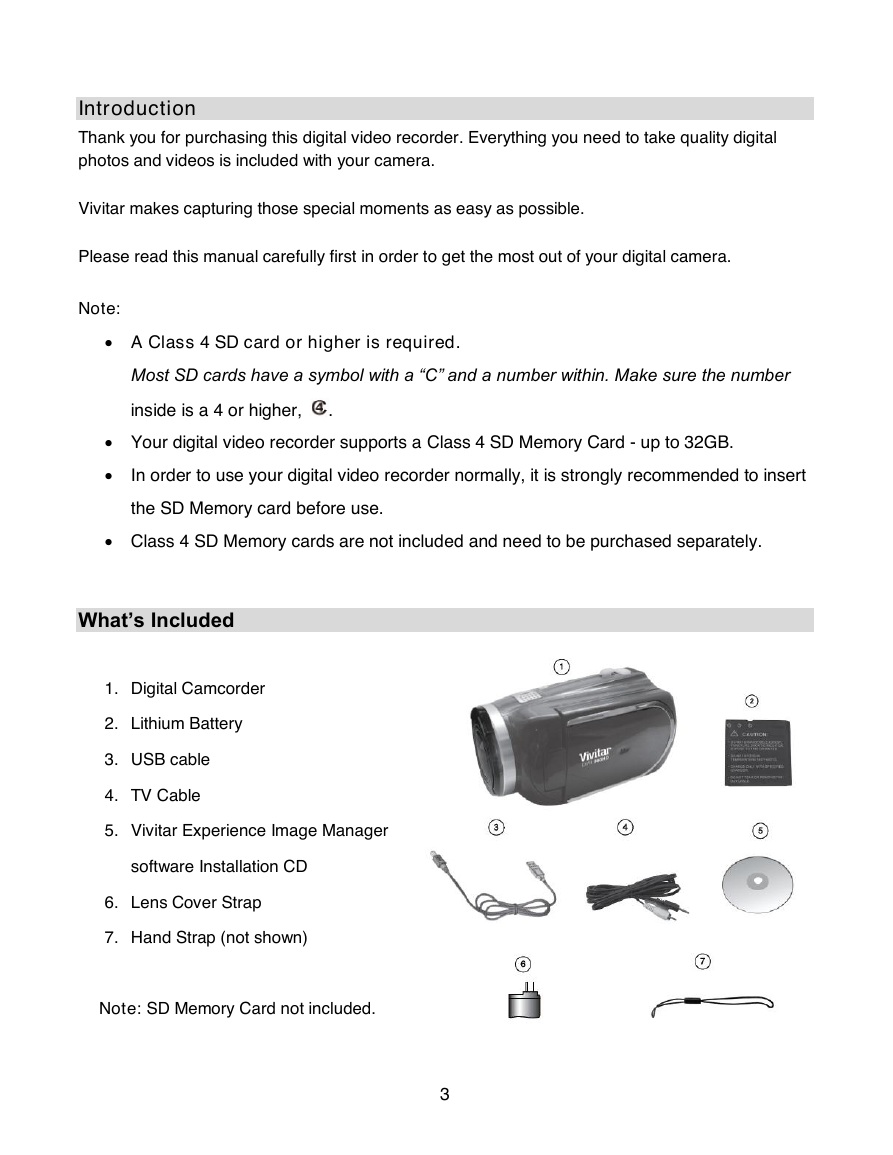
1. Digital Camcorder
2. Lithium Battery
3. USB cable
4. TV Cable
5. Vivitar Experience Image Manager
software Installation CD
6. Lens Cover Strap
7. Hand Strap (not shown)
Note: SD Memory Card not included.
3
�
Parts of the Camera
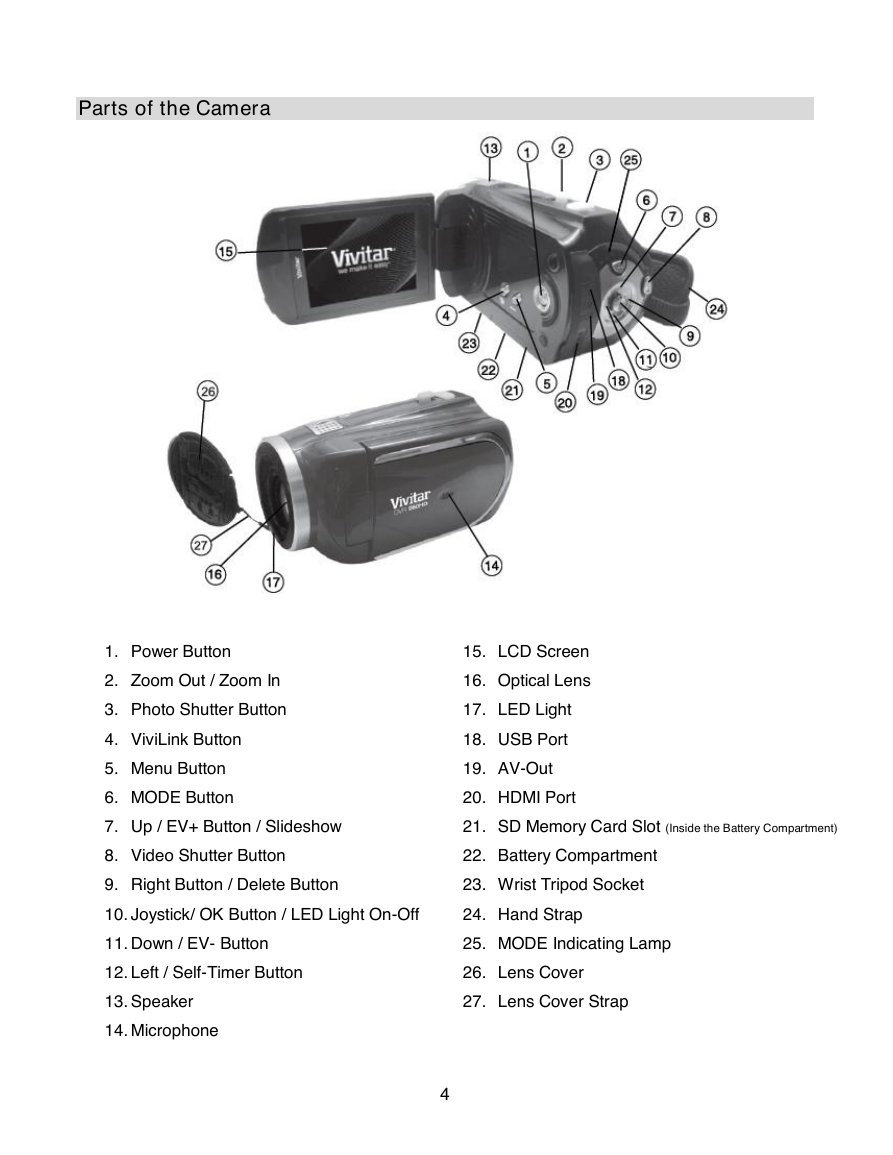
1. Power Button
2. Zoom Out / Zoom In
3. Photo Shutter Button
4. ViviLink Button
5. Menu Button
6. MODE Button
15. LCD Screen
16. Optical Lens
17. LED Light
18. USB Port
19. AV-Out
20. HDMI Port
7. Up / EV+ Button / Slideshow
21. SD Memory Card Slot (Inside the Battery Compartment)
8. Video Shutter Button
22. Battery Compartment
9. Right Button / Delete Button
23. Wrist Tripod Socket
10. Joystick/ OK Button / LED Light On-Off
24. Hand Strap
11. Down / EV- Button
25. MODE Indicating Lamp
12. Left / Self-Timer Button
26. Lens Cover
13. Speaker
14. Microphone
27. Lens Cover Strap
4
�
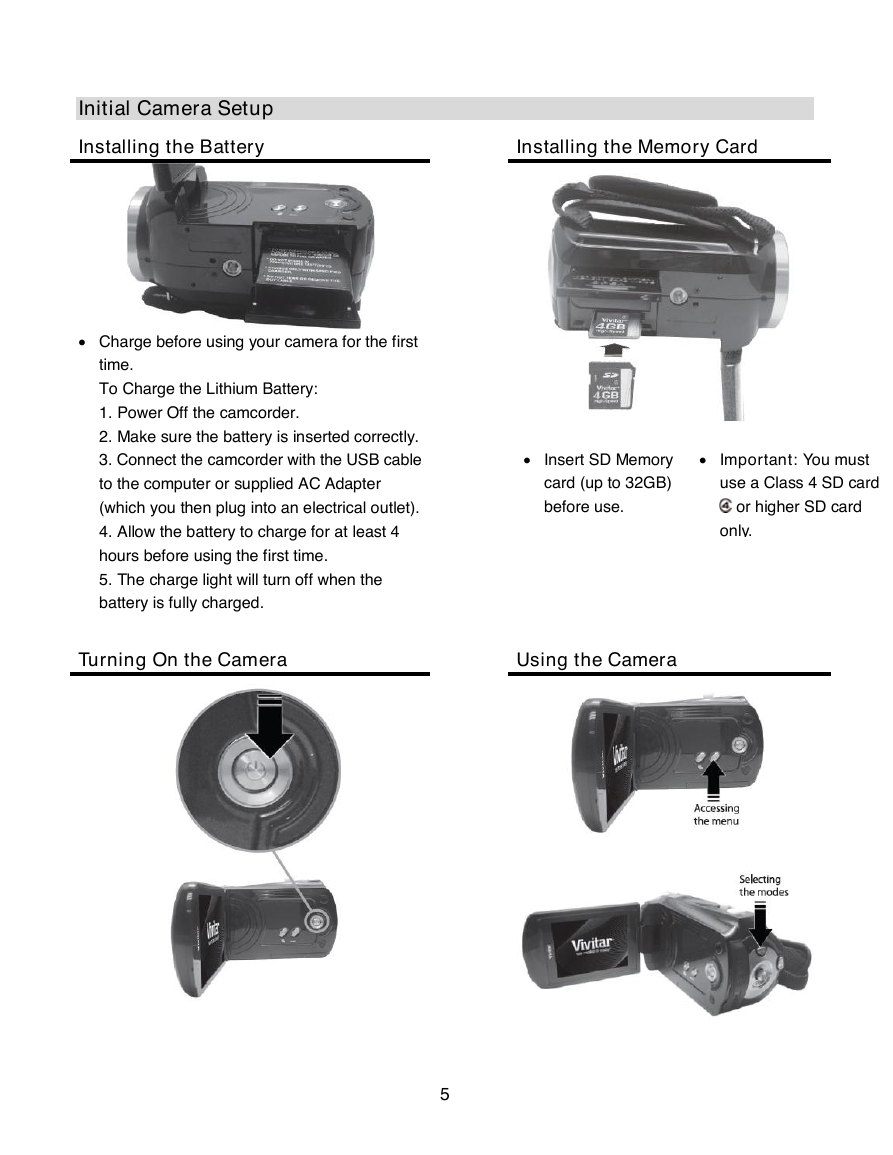
Initial Camera Setup
Installing the Battery
Installing the Memory Card
Charge before using your camera for the first
time.
To Charge the Lithium Battery:
1. Power Off the camcorder.
2. Make sure the battery is inserted correctly.
3. Connect the camcorder with the USB cable
Insert SD Memory
Important: You must
to the computer or supplied AC Adapter
card (up to 32GB)
use a Class 4 SD card
(which you then plug into an electrical outlet).
before use.
or higher SD card
4. Allow the battery to charge for at least 4
hours before using the first time.
5. The charge light will turn off when the
battery is fully charged.
Turning On the Camera
5
only.
Using the Camera
�
When powering the digital video recorder ON for the first time the digital video recorder will take
you through the initial setup.
Powering the Digital Video Recorder ON
1. Make sure the lithium battery has been charged and inserted properly.
To charge the lithium battery:
- Connect the USB cable (supplied) to camcorder and the other end of the cable either to
your computer USB slot or to the supplied AC Adapter (which you then plug into an electrical
outlet).
- Charge light will turn off when battery is fully charged.
2. Make sure an SD card has been properly inserted into your digital video recorder (inserted
until a click sound is heard).
Note:
After the digital video recorder is powered on, an SD icon will appear on the LCD
display. If you do not see the SD icon on the display, please check if the card was
inserted properly.
Important - You must use a Class 4 SD card
or higher SD card only. Insert SD
Memory Card (up to 32GB) before use.
Make sure the SD card is not locked (check the lock switch on the side of the SD
card). If the SD card is locked this will prevent the camera from saving captured
photos to the SD card.
3. Flip open the LCD screen and press the POWER button
, located on the inside wall, to
turn on the digital video recorder.
Setting the Language
1. You will first be prompted to select a language for the camera. The Language selection
menu will appear. Select the language of your choice and press the OK button to confirm the
selection.
2. After selecting a language, you will be asked if you would like to continue with the initial
6
�
camera setup. A message will appear: “Continue with Camera Setup?” Select “Yes” to
continue or “No” to exit the setup.
Note:
If you select “Cancel” and decide to leave the camera setup, the camera will be set
to its default settings. These settings can be adjusted at any time manually using
the menus in the camera.
Setting the Date and Time
The next step in the initial camera setup is to set the date and time on the camera.
Set the Date and Time as Desired and press the OK button to confirm the selection and move to the
next part of the camera setup.
Setting the ViviLink Default Option
Once the Language has been set, you will be asked to “Confirm ViviLink Photo and Video Social
Network site” to set the default ViviLink destination for photos and videos taken with your camera.
The ViviLink technology allows you to quickly and easily upload your camera‟s photos and videos to
the social networks of your choice with the accompanying software application.
1. First you will be asked to choose the default ViviLink social network for Photos.
2. Highlight the desired default social network and press the OK button to confirm the selection.
3. Next you will be asked to choose the default ViviLink social network for Videos.
4. Highlight the desired default social network and press the OK button to confirm the selection.
5. After the ViviLink Video option is confirmed the camera is now ready to use.
7
�
Main Camera Modes
Your camera has different modes for the various camera functions.
You can switch modes by pressing the MODE button on your camera after the camera has been
powered ON.
Video Capture Mode
Use this mode to capture videos with your digital camera.
This is the default mode when the camera is powered ON.
To take a video, aim your camera as desired and press the Video Shutter button to start the
record. A red record indicator will appear on the LCD screen while record is in progress. To
stop the record, press the Video Shutter button again. The video will be automatically saved
to your camera‟s memory card.
To access the various menus for the Video Capture mode, press the MENU button while in
the Video Capture mode.
Photo Capture Mode
Use this mode to capture pictures with your camera.
After turning on your camera, press the MODE button once to open the Photo Capture mode.
To take a picture, aim your camera as desired and press the Photo Shutter button.
The picture will be automatically saved to your camera‟s memory card.
To access the various menus for the Photo Capture mode, press the MENU button while in
the Photo Capture mode.
Playback Mode (Photos & Videos)
Use this mode to view and manage the photos and videos on your camera.
After turning on your camera, press the MODE button twice to open the Playback mode for
photos and videos. You can scroll through the photos and videos that you‟ve previously taken
to view, edit or delete them as desired.
To access the various menus for the Playback mode for photos and videos, press the MENU
button while in the Playback mode.
8
�


 2023年江西萍乡中考道德与法治真题及答案.doc
 2012年重庆南川中考生物真题及答案.doc
 2013年江西师范大学地理学综合及文艺理论基础考研真题.doc
 2020年四川甘孜小升初语文真题及答案I卷.doc
 2020年注册岩土工程师专业基础考试真题及答案.doc
 2023-2024学年福建省厦门市九年级上学期数学月考试题及答案.doc
 2021-2022学年辽宁省沈阳市大东区九年级上学期语文期末试题及答案.doc
 2022-2023学年北京东城区初三第一学期物理期末试卷及答案.doc
 2018上半年江西教师资格初中地理学科知识与教学能力真题及答案.doc
 2012年河北国家公务员申论考试真题及答案-省级.doc
 2020-2021学年江苏省扬州市江都区邵樊片九年级上学期数学第一次质量检测试题及答案.doc
 2022下半年黑龙江教师资格证中学综合素质真题及答案.doc