Table Maintenance Generator and
its Modifications
Applies to:
SAP ECC (6.0). For more information, visit the ABAP homepage.
Summary
This article contains the procedure of implementation of table maintenance generator for custom tables and
also explains some modifications available in the table maintenance generator
Author:
Nimisha Agarwal
Company: Infosys Technologies Limited
Created on: 31 May 2010
Author Bio
Nimisha Agarwal is working with Infosys Technolofies Limited from last 1.5 years. She has got
experience in various projects in SAP ABAP.
SAP COMMUNITY NETWORK
SDN - sdn.sap.com | BPX - bpx.sap.com | BOC - boc.sap.com | UAC - uac.sap.com
© 2010 SAP AG
1
�
Table Maintenance Generator and its Modifications
Table of Contents
Introduction ......................................................................................................................................................... 3
Reasons to use Table Maintenance Generator .............................................................................................. 3
Prerequisite to Create Table Maintenance Generator for a Custom Table .................................................... 3
Creation of Table Maintenance Generator for a Custom Table ......................................................................... 4
Maintaining the Table Through SM30 ................................................................................................................ 8
Modifications in Table Maintenance Generator .................................................................................................. 9
Maintenance Screens: .................................................................................................................................... 9
Events ........................................................................................................................................................... 13
Difference Between Event ‘05’ and ‘21’ ..................................................................................................................... 24
Disclaimer and Liability Notice .......................................................................................................................... 25
SAP COMMUNITY NETWORK
SDN - sdn.sap.com | BPX - bpx.sap.com | BOC - boc.sap.com | UAC - uac.sap.com
© 2010 SAP AG
2
�
Table Maintenance Generator and its Modifications
Introduction
Table Maintenance Generator (TMG) is a tool which is used to create equipment by which customized
tables created by end users can be changed as required, such as making an entry to that table, deleting an
entry, modifying an existing entry etc.
Table Maintenance generator can be created using transaction SE54 or SE11.
A table maintenance generator is used to create table maintenance program to add, modify or delete
records in the database tables. It is generated to maintain customizing data with these maintenance dialogs.
We can check the table maintenance dialog in SM30 or SE16. In SM30, We have display and maintain
options. Display option is used to view the table contents and maintain option is used to maintain the entries
in the table.
Reasons to use Table Maintenance Generator
There are different reasons due to which table maintenance generator is used.
1.
In the production system, end-users will not be having access to transaction codes like SE11 and
SE16. Therefore, developers will not be having access to many transaction codes including the
above SE11 and SE16.
So in order to edit or create the contents of a database table, we should go for table maintenance
generator.
2. With the help of table maintenance generator, we can edit or create multiple entries at a time.
3. Various events can be added to the table maintenance generator to maintain the entries. These
events get triggered while maintaining the entries in the table. They help in enhancing the
functionality of the table maintenance.
Prerequisite to Create Table Maintenance Generator for a Custom Table
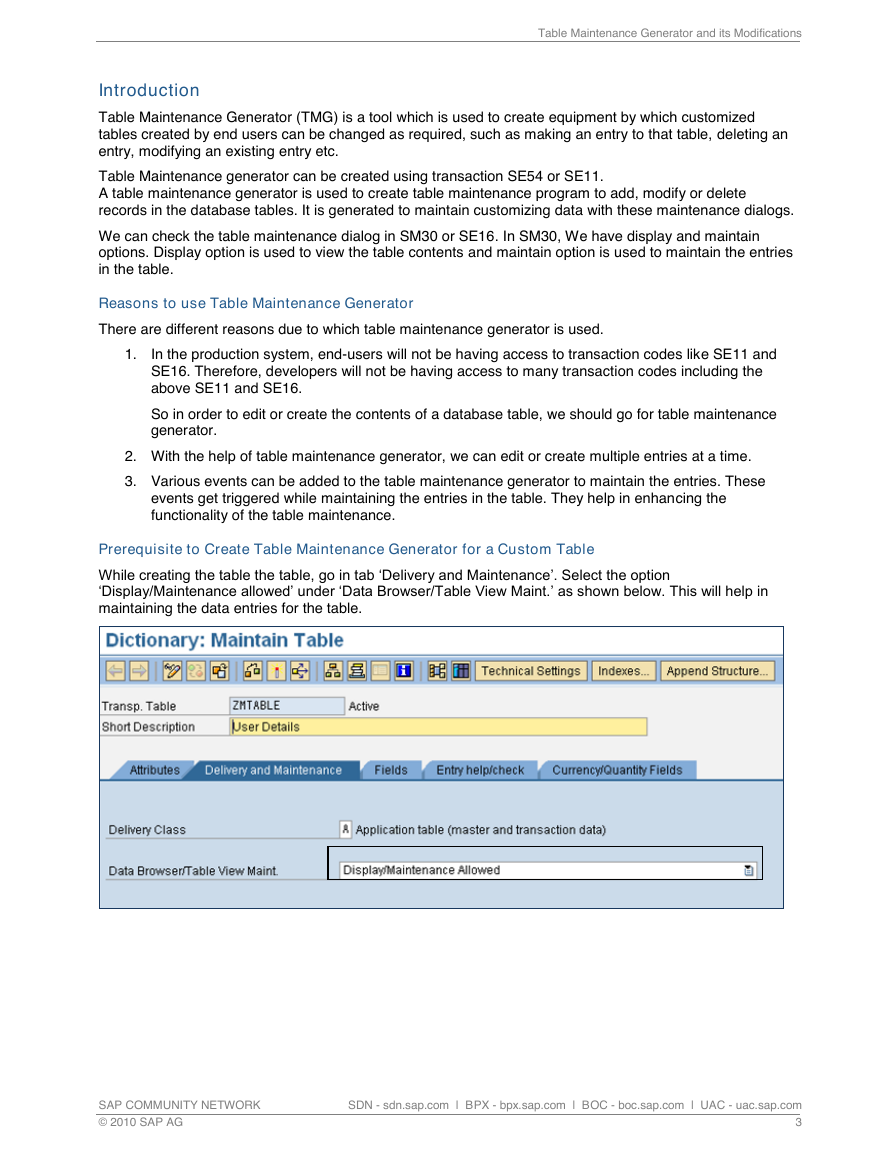
While creating the table the table, go in tab ‘Delivery and Maintenance’. Select the option
‘Display/Maintenance allowed’ under ‘Data Browser/Table View Maint.’ as shown below. This will help in
maintaining the data entries for the table.
SAP COMMUNITY NETWORK
SDN - sdn.sap.com | BPX - bpx.sap.com | BOC - boc.sap.com | UAC - uac.sap.com
© 2010 SAP AG
3
�
Table Maintenance Generator and its Modifications
Creation of Table Maintenance Generator for a Custom Table
Steps:
1. Let us take an example of a custom table ZMTABLE to implement the table maintenance generator
and its events.
2. Go to Utilities Table Maintenance Generator.
SAP COMMUNITY NETWORK
SDN - sdn.sap.com | BPX - bpx.sap.com | BOC - boc.sap.com | UAC - uac.sap.com
© 2010 SAP AG
4
�
Table Maintenance Generator and its Modifications
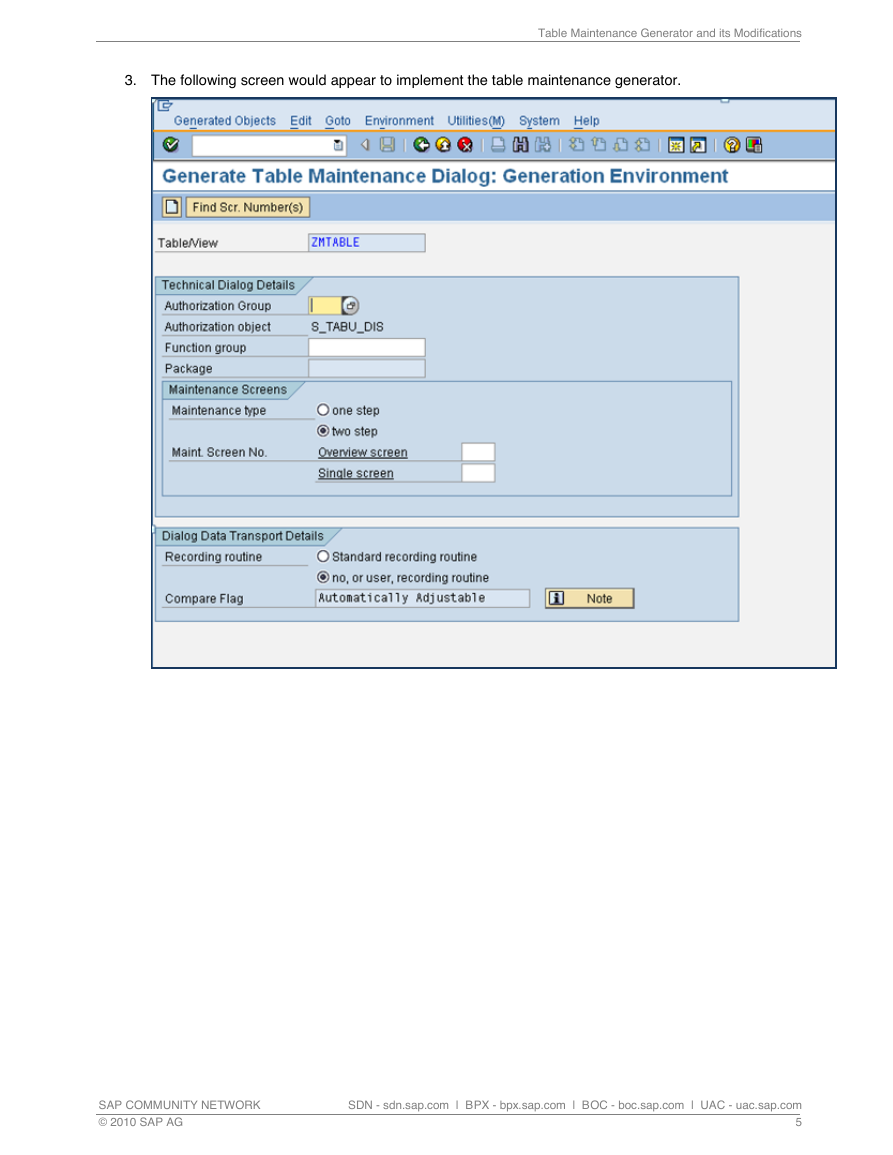
3. The following screen would appear to implement the table maintenance generator.
SAP COMMUNITY NETWORK
SDN - sdn.sap.com | BPX - bpx.sap.com | BOC - boc.sap.com | UAC - uac.sap.com
© 2010 SAP AG
5
�
Table Maintenance Generator and its Modifications
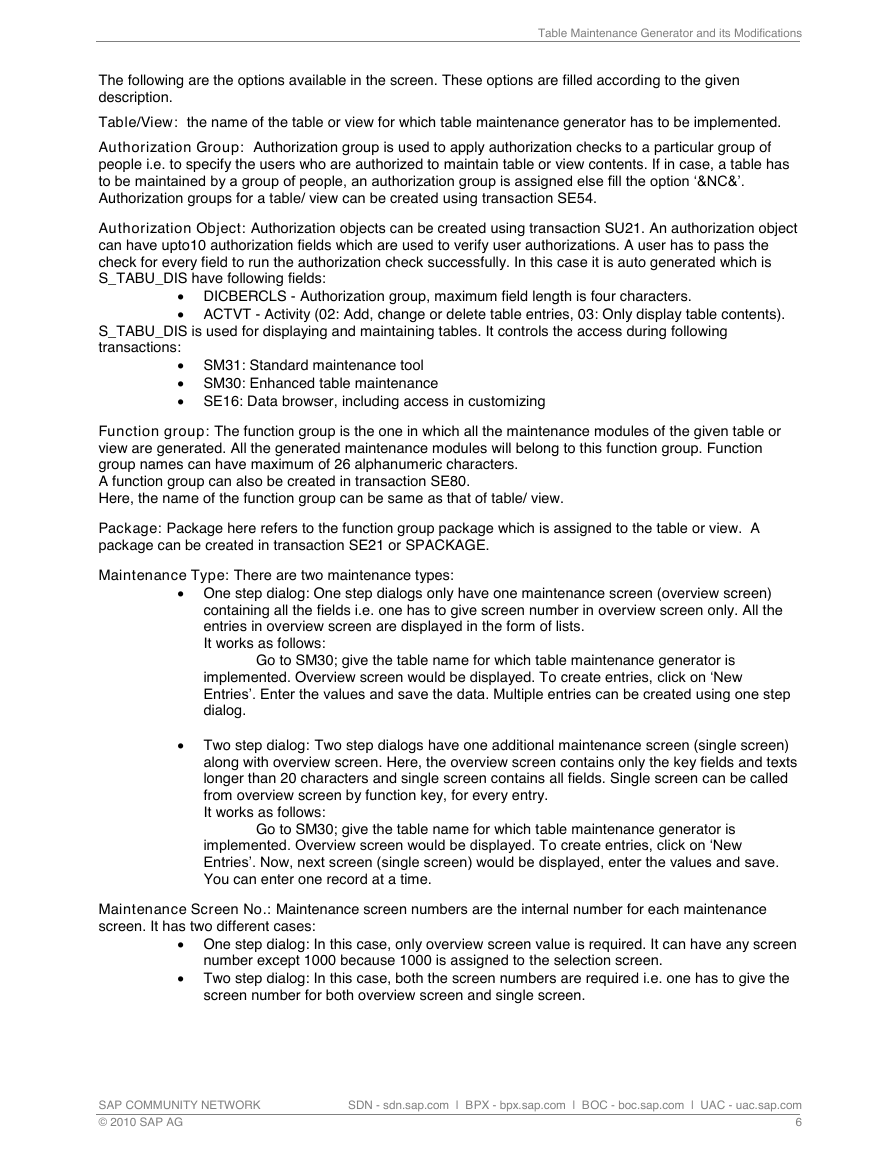
The following are the options available in the screen. These options are filled according to the given
description.
Table/View: the name of the table or view for which table maintenance generator has to be implemented.
Authorization Group: Authorization group is used to apply authorization checks to a particular group of
people i.e. to specify the users who are authorized to maintain table or view contents. If in case, a table has
to be maintained by a group of people, an authorization group is assigned else fill the option ‘&NC&’.
Authorization groups for a table/ view can be created using transaction SE54.
Authorization Object: Authorization objects can be created using transaction SU21. An authorization object
can have upto10 authorization fields which are used to verify user authorizations. A user has to pass the
check for every field to run the authorization check successfully. In this case it is auto generated which is
S_TABU_DIS have following fields:
DICBERCLS - Authorization group, maximum field length is four characters.
ACTVT - Activity (02: Add, change or delete table entries, 03: Only display table contents).
S_TABU_DIS is used for displaying and maintaining tables. It controls the access during following
transactions:
SM31: Standard maintenance tool
SM30: Enhanced table maintenance
SE16: Data browser, including access in customizing
Function group: The function group is the one in which all the maintenance modules of the given table or
view are generated. All the generated maintenance modules will belong to this function group. Function
group names can have maximum of 26 alphanumeric characters.
A function group can also be created in transaction SE80.
Here, the name of the function group can be same as that of table/ view.
Package: Package here refers to the function group package which is assigned to the table or view. A
package can be created in transaction SE21 or SPACKAGE.
Maintenance Type: There are two maintenance types:
One step dialog: One step dialogs only have one maintenance screen (overview screen)
containing all the fields i.e. one has to give screen number in overview screen only. All the
entries in overview screen are displayed in the form of lists.
It works as follows:
implemented. Overview screen would be displayed. To create entries, click on ‘New
Entries’. Enter the values and save the data. Multiple entries can be created using one step
dialog.
Go to SM30; give the table name for which table maintenance generator is
Two step dialog: Two step dialogs have one additional maintenance screen (single screen)
along with overview screen. Here, the overview screen contains only the key fields and texts
longer than 20 characters and single screen contains all fields. Single screen can be called
from overview screen by function key, for every entry.
It works as follows:
Go to SM30; give the table name for which table maintenance generator is
implemented. Overview screen would be displayed. To create entries, click on ‘New
Entries’. Now, next screen (single screen) would be displayed, enter the values and save.
You can enter one record at a time.
Maintenance Screen No.: Maintenance screen numbers are the internal number for each maintenance
screen. It has two different cases:
One step dialog: In this case, only overview screen value is required. It can have any screen
number except 1000 because 1000 is assigned to the selection screen.
Two step dialog: In this case, both the screen numbers are required i.e. one has to give the
screen number for both overview screen and single screen.
SAP COMMUNITY NETWORK
SDN - sdn.sap.com | BPX - bpx.sap.com | BOC - boc.sap.com | UAC - uac.sap.com
© 2010 SAP AG
6
�
Table Maintenance Generator and its Modifications
Recording Routine: It gives the option which recording routine should be used to record the changes to
table contents. It can be done automatically and manually.
There are two types of recording routines:
Standard routines: More functionality can be added to the standard routines using individual
routines. We can create individual routines via menu function Environment Modification Events.
It concerns the events 10, 11 and 12.
No, or user, recording routine: In this case, it’s up to the users choice whether he wants the
recording or not.
Compare Flag: This flag indicates whether the maintenance transaction allows the (checked) activation of
Business Configuration Sets (BC Sets), and the adjustment. This is the case if the maintenance transaction
can run in the background.
The following settings are available for the flag:
No Information
Not adjustable
Adjustments in Dialog
Automatically Adjustable
All the fields are filled according to the above mentioned description. Then click on ‘Create’.
The Table Maintenance Generator has been implemented successfully.
SAP COMMUNITY NETWORK
SDN - sdn.sap.com | BPX - bpx.sap.com | BOC - boc.sap.com | UAC - uac.sap.com
© 2010 SAP AG
7
�
Table Maintenance Generator and its Modifications
Maintaining the Table Through SM30
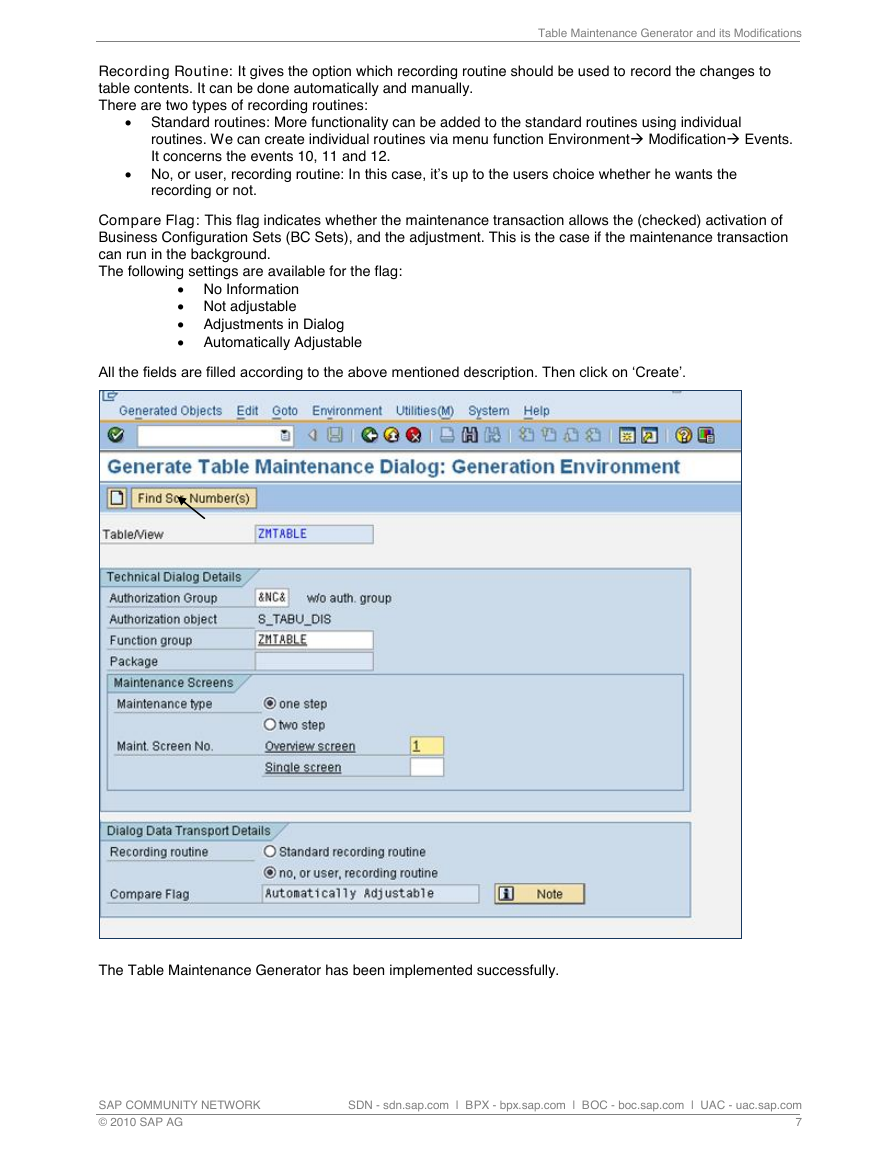
1. Go to SM30, give table name and click on ‘Maintain’.
2. The following screen would appear. You can click on ‘New Entries’ to make the entries to the table.
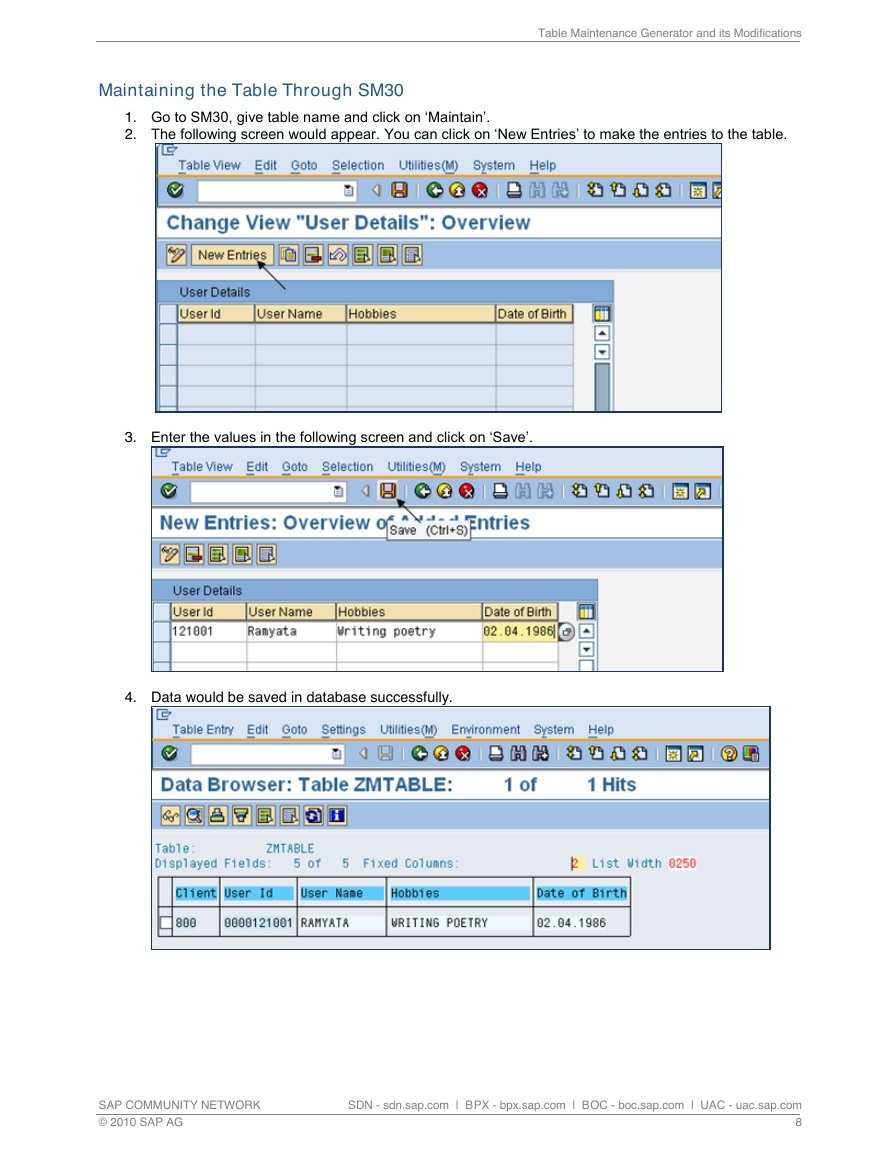
3. Enter the values in the following screen and click on ‘Save’.
4. Data would be saved in database successfully.
SAP COMMUNITY NETWORK
SDN - sdn.sap.com | BPX - bpx.sap.com | BOC - boc.sap.com | UAC - uac.sap.com
© 2010 SAP AG
8
�



 2023年江西萍乡中考道德与法治真题及答案.doc
 2012年重庆南川中考生物真题及答案.doc
 2013年江西师范大学地理学综合及文艺理论基础考研真题.doc
 2020年四川甘孜小升初语文真题及答案I卷.doc
 2020年注册岩土工程师专业基础考试真题及答案.doc
 2023-2024学年福建省厦门市九年级上学期数学月考试题及答案.doc
 2021-2022学年辽宁省沈阳市大东区九年级上学期语文期末试题及答案.doc
 2022-2023学年北京东城区初三第一学期物理期末试卷及答案.doc
 2018上半年江西教师资格初中地理学科知识与教学能力真题及答案.doc
 2012年河北国家公务员申论考试真题及答案-省级.doc
 2020-2021学年江苏省扬州市江都区邵樊片九年级上学期数学第一次质量检测试题及答案.doc
 2022下半年黑龙江教师资格证中学综合素质真题及答案.doc