L
G
-
M
S
6
9
0
Optimus M
Printed in Korea
P/NO : MMBB0394701(1.0) H
�
Copyright ©2010 LG Electronics, Inc. All rights reserved.
LG and the LG logo are registered trademarks of LG
Group and its related entities. All other trademarks are the
property of their respective owners.
�
Contents
1
Contents . . . . . . . . . . . . . . . . . . . . . . . . . . . . . . . . . . . . . . . . .1
The Basics . . . . . . . . . . . . . . . . . . . . . . . . . . . . . . . . . . . . . . .2
Connecting to Networks and Devices . . . . . . . . . . . . . . . .28
Placing and Receiving Calls . . . . . . . . . . . . . . . . . . . . . . . .34
Web . . . . . . . . . . . . . . . . . . . . . . . . . . . . . . . . . . . . . . . . . . .40
Communication . . . . . . . . . . . . . . . . . . . . . . . . . . . . . . . . . .49
Entertainment . . . . . . . . . . . . . . . . . . . . . . . . . . . . . . . . . . . .78
Tools . . . . . . . . . . . . . . . . . . . . . . . . . . . . . . . . . . . . . . . . . . .90
Homescreen . . . . . . . . . . . . . . . . . . . . . . . . . . . . . . . . . . . . .95
Important Health Information and Safety Precautions . . .96
Technical Details . . . . . . . . . . . . . . . . . . . . . . . . . . . . . . . . .102
Safety . . . . . . . . . . . . . . . . . . . . . . . . . . . . . . . . . . . . . . . . .105
Specifications . . . . . . . . . . . . . . . . . . . . . . . . . . . . . . . . . . .122
FAQ . . . . . . . . . . . . . . . . . . . . . . . . . . . . . . . . . . . . . . . . . . .124
FAQ(Updated) . . . . . . . . . . . . . . . . . . . . . . . . . . . . . . . . . . .135
LIMITED WARRANTY STATEMENT . . . . . . . . . . . . . . . .143
NOTE
The user interface of Google applications (Google Search, Google Maps,
Navigation, etc.) can vary depending on its software version.
WARNING
With the Android operating system, some available Market applications only operate
correctly with phones that have a specific screen resolution. Please be advised that some
of the applications on the Android Market may not be available for your phone due an LCD
resolution requirement that does not match your phone. In addition, please be aware that
3rd party applications with programming defects may cause issues with your phone,
including lock ups and resets.
�
2 The Basics
Phone Overview
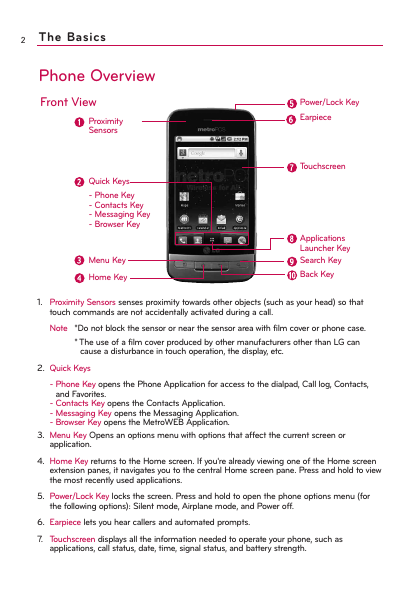
Front View
Proximity
Sensors
Quick Keys
- Phone Key
- Contacts Key
- Messaging Key
- Browser Key
Menu Key
Home Key
Power/Lock Key
Earpiece
Touchscreen
Applications
Launcher Key
Search Key
Back Key
1. Proximity Sensors senses proximity towards other objects (such as your head) so that
touch commands are not accidentally activated during a call.
Note *Do not block the sensor or near the sensor area with film cover or phone case.
* The use of a film cover produced by other manufacturers other than LG can
cause a disturbance in touch operation, the display, etc.
2. Quick Keys
- Phone Key opens the Phone Application for access to the dialpad, Call log, Contacts,
and Favorites.
- Contacts Key opens the Contacts Application.
- Messaging Key opens the Messaging Application.
- Browser Key opens the MetroWEB Application.
3. Menu Key Opens an options menu with options that affect the current screen or
application.
4. Home Key returns to the Home screen. If you're already viewing one of the Home screen
extension panes, it navigates you to the central Home screen pane. Press and hold to view
the most recently used applications.
5. Power/Lock Key locks the screen. Press and hold to open the phone options menu (for
the following options): Silent mode, Airplane mode, and Power off.
6. Earpiece lets you hear callers and automated prompts.
7. Touchscreen displays all the information needed to operate your phone, such as
applications, call status, date, time, signal status, and battery strength.
�
The Basics
3
8. Applications Launcher Key opens the Launch screen, where you can view installed
applications.
9. Search Key opens Quick Search BoxTM from the Home screen to search the phone and
the web. In many applications, you may touch this key to search within the application
itself. Touch and hold to open Google search by voice.
10. Back Key returns to the previous screen. Also closes pop-up display items such as menus
and dialog boxes.
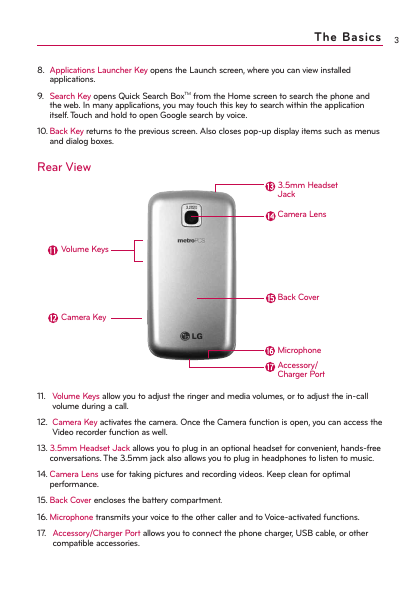
Rear View
Volume Keys
Camera Key
3.5mm Headset
Jack
Camera Lens
Back Cover
Microphone
Accessory/
Charger Port
11. Volume Keys allow you to adjust the ringer and media volumes, or to adjust the in-call
volume during a call.
12. Camera Key activates the camera. Once the Camera function is open, you can access the
Video recorder function as well.
13. 3.5mm Headset Jack allows you to plug in an optional headset for convenient, hands-free
conversations. The 3.5mm jack also allows you to plug in headphones to listen to music.
14. Camera Lens use for taking pictures and recording videos. Keep clean for optimal
performance.
15. Back Cover encloses the battery compartment.
16. Microphone transmits your voice to the other caller and to Voice-activated functions.
17. Accessory/Charger Port allows you to connect the phone charger, USB cable, or other
compatible accessories.
�
The Basics
4
Installing the Battery and microSD Card
NOTE It is important to fully charge the battery before initial use of the phone.
The phone comes with a rechargeable battery. Keep the battery
charged while not in use in order to maximize talk, use, and standby
time. The battery charge level is shown at the top of the screen.
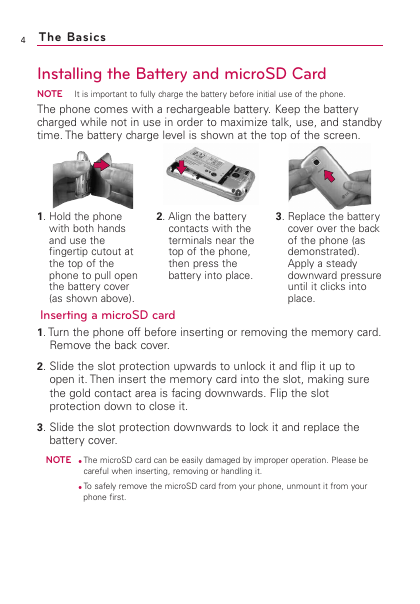
1. Hold the phone
with both hands
and use the
fingertip cutout at
the top of the
phone to pull open
the battery cover
(as shown above).
2. Align the battery
contacts with the
terminals near the
top of the phone,
then press the
battery into place.
3. Replace the battery
cover over the back
of the phone (as
demonstrated).
Apply a steady
downward pressure
until it clicks into
place.
Inserting a microSD card
1. Turn the phone off before inserting or removing the memory card.
Remove the back cover.
2. Slide the slot protection upwards to unlock it and flip it up to
open it. Then insert the memory card into the slot, making sure
the gold contact area is facing downwards. Flip the slot
protection down to close it.
3. Slide the slot protection downwards to lock it and replace the
battery cover.
NOTE G The microSD card can be easily damaged by improper operation. Please be
careful when inserting, removing or handling it.
G To safely remove the microSD card from your phone, unmount it from your
phone first.
�
5
WARNING! On the Android OS 2.2, you can download applications from Android
Market and can store them on microSD card as well as on the device. Due
to this feature, if you skip the unmount procedure, it can cause an error
because information between microSD card and the device is accorded
properly. In worst case, the microSD card can be corrupted or damaged.
Charging the Phone
Your Optimus M device comes with a wall/USB charger and a USB
cable which connect together to charge your phone. To charge your
phone:
NOTICE
Please use only an approved charging accessory to charge your LG phone.
Improper handling of the charging port, as well as the use of an incompatible charger,
may cause damage to your phone and void the warranty.
1. Connect the wall/USB charger and USB cable. When
connecting, as shown, the LG logo on the USB cable should
face toward you.
USB Cable
Wall/USB charger
2. Plug the USB cable (as shown below) into the phone's
charger port.
�
The Basics
6
Charging with USB
You can use your computer to charge your phone. To be able to
charge with the USB cable, you need to have the necessary USB
drivers installed on your PC first. Connect one end of the USB
cable to the charger port on your phone and connect the other
end to a USB port on your PC. It is best to use the rear USB port
when connecting to a desktop PC. The USB hub should be
powered by an external power source.
NOTES G Low-power USB ports are not supported, such as the USB port on your
keyboard or bus-powered USB hub.
G LG USB Driver is downloadable from the following site:
http://www.lgmobilephones.com > Click Mobile Support > Select the
Carrier(Metro PCS) > Select the Model > Click USB Cable Driver to
download.
Optimizing Battery Life
You can extend your battery's life between charges by turning off
features that run in the background. You can also monitor how
applications and system resources consume battery power.
Tips to extend the life of your battery
䊳 Turn off radio communications that you aren't using.
If you aren't using Wi-Fi, Bluetooth, or GPS, use the Settings
menu to turn them off. (Note that the GPS receiver is only
turned on when you're using an application that makes use
of it.)
䊳 Turn down screen brightness and set a shorter screen timeout.
䊳 If you don't need them, turn off automatic syncing for Gmail,
Calendar, Contacts, and other applications.
䊳 Use the Power Control widget to control the wireless
connections, GPS connection, Bluetooth power, display
brightness, and syncing activity.
�




 2023年江西萍乡中考道德与法治真题及答案.doc
 2012年重庆南川中考生物真题及答案.doc
 2013年江西师范大学地理学综合及文艺理论基础考研真题.doc
 2020年四川甘孜小升初语文真题及答案I卷.doc
 2020年注册岩土工程师专业基础考试真题及答案.doc
 2023-2024学年福建省厦门市九年级上学期数学月考试题及答案.doc
 2021-2022学年辽宁省沈阳市大东区九年级上学期语文期末试题及答案.doc
 2022-2023学年北京东城区初三第一学期物理期末试卷及答案.doc
 2018上半年江西教师资格初中地理学科知识与教学能力真题及答案.doc
 2012年河北国家公务员申论考试真题及答案-省级.doc
 2020-2021学年江苏省扬州市江都区邵樊片九年级上学期数学第一次质量检测试题及答案.doc
 2022下半年黑龙江教师资格证中学综合素质真题及答案.doc