7. Level 2 Repair
7-2. Disassembly
1
1) Put the device in the chamber for
5 minutes under 70~80℃.
2) Detech the Back Glass.
2
Unscrew 13 Point.
※ Caution
1) Be care of scratch and time
※ Caution
1) Be care of scratch
3
Disassemble the REAR.
4
Detach coaxial cable and connector.
(5 Point)
※ Caution
1) Be care of REAR damage
※ Caution
1) Be care of connector/cable damage
Confidential and proprietary-the contents in this service guide subject to change without prior notice.
Distribution, transmission, or infringement of any content or data from this document without Samsung’s written authorization is strictly prohibited.
7-1
www.cpu999.com�
Level 2 Repair
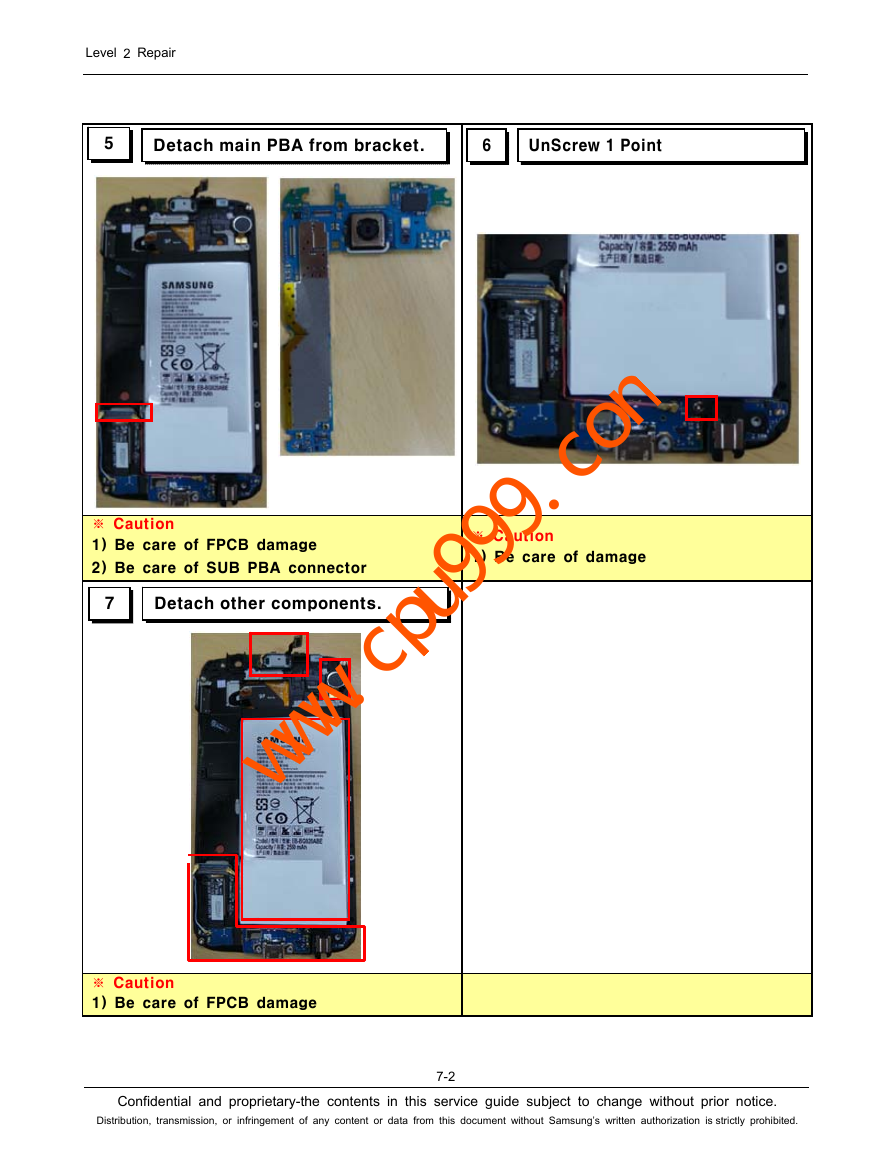
5
Detach main PBA from bracket.
6
UnScrew 1 Point
※ Caution
1) Be care of FPCB damage
2) Be care of SUB PBA connector
7
Detach other components.
※ Caution
1) Be care of damage
※ Caution
1) Be care of FPCB damage
Confidential and proprietary-the contents in this service guide subject to change without prior notice.
Distribution, transmission, or infringement of any content or data from this document without Samsung’s written authorization is strictly prohibited.
7-2
www.cpu999.com�
Level 2 Repair
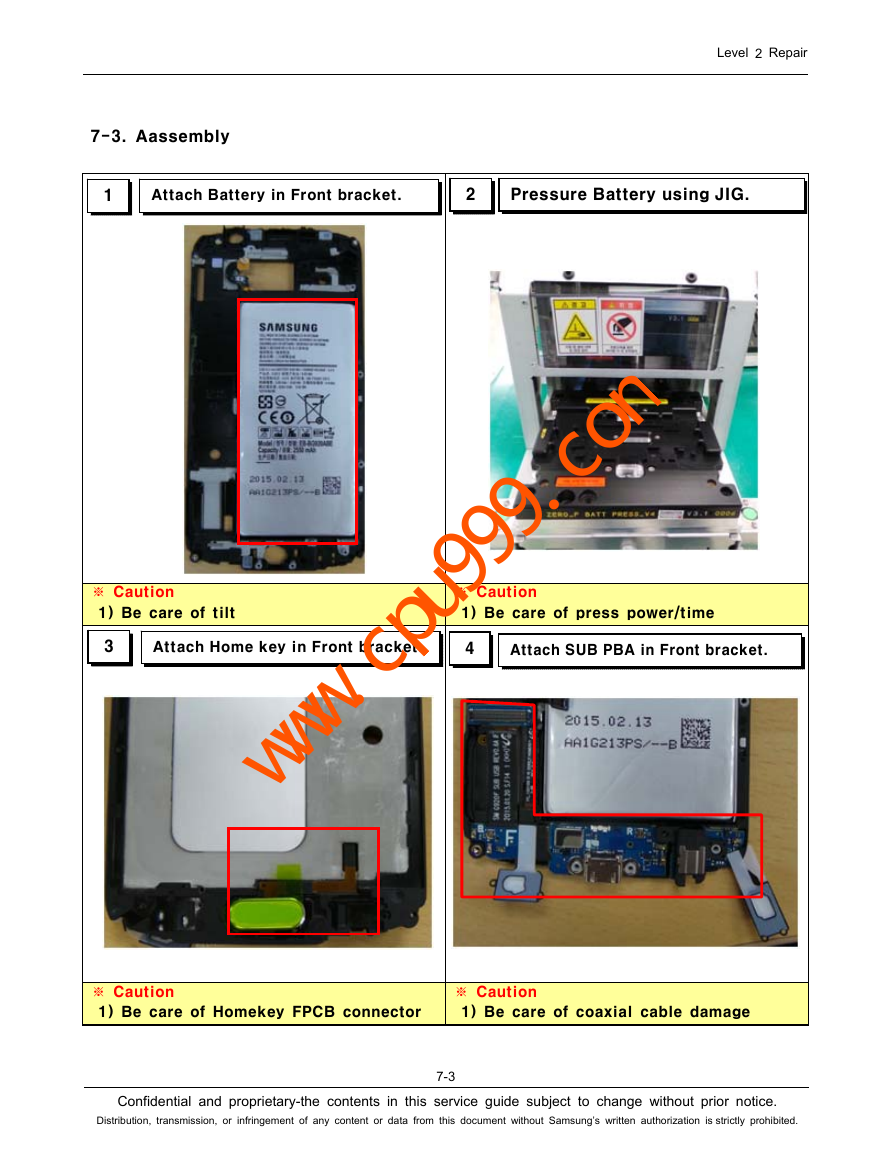
7-3. Aassembly
1
Attach Battery in Front bracket.
2
Pressure Battery using JIG.
※ Caution
1) Be care of tilt
※ Caution
1) Be care of press power/time
3
Attach Home key in Front bracket.
Attach SUB PBA in Front bracket.
4
※ Caution
1) Be care of Homekey FPCB connector
※ Caution
1) Be care of coaxial cable damage
Confidential and proprietary-the contents in this service guide subject to change without prior notice.
Distribution, transmission, or infringement of any content or data from this document without Samsung’s written authorization is strictly prohibited.
7-3
www.cpu999.com�
Level 2 Repair
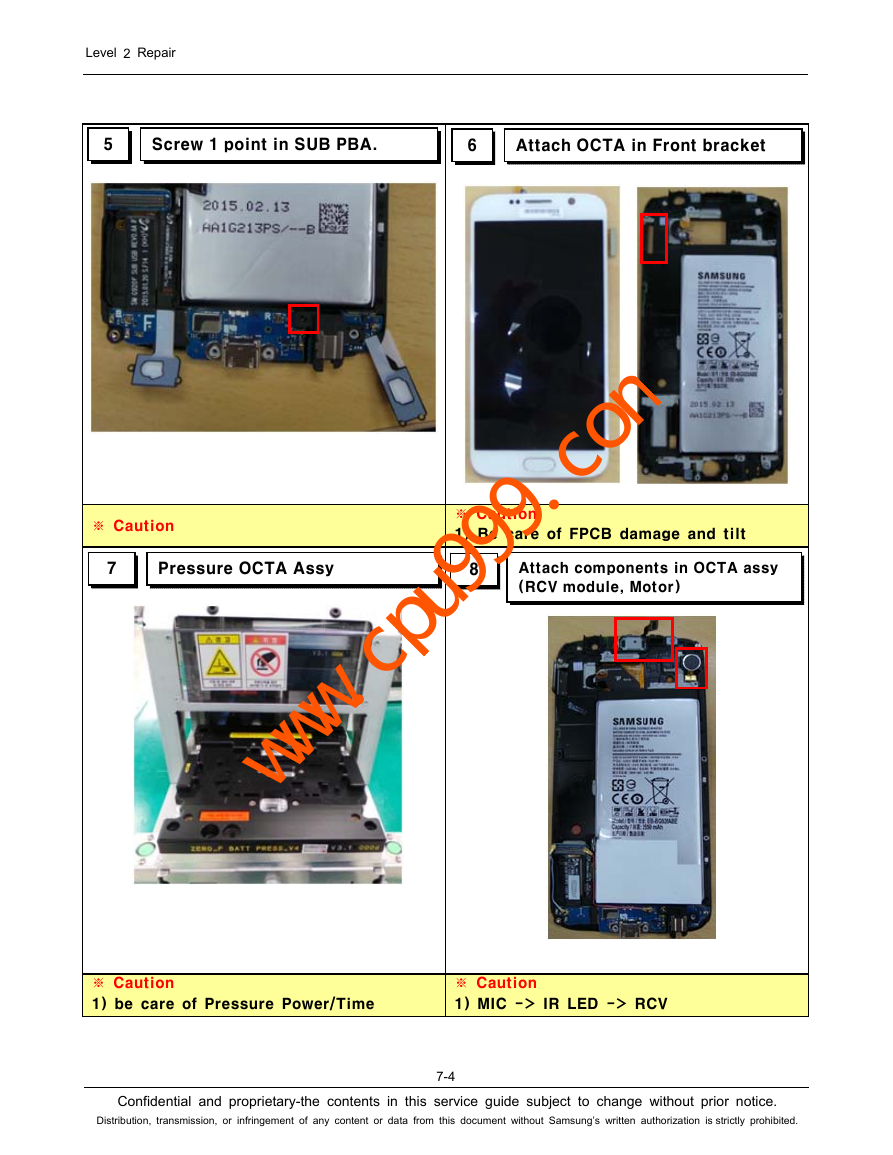
5
Screw 1 point in SUB PBA.
6
Attach OCTA in Front bracket
※ Caution
※ Caution
1) Be care of FPCB damage and tilt
7
Pressure OCTA Assy
8
Attach components in OCTA assy
(RCV module, Motor)
※ Caution
1) be care of Pressure Power/Time
※ Caution
1) MIC -> IR LED -> RCV
Confidential and proprietary-the contents in this service guide subject to change without prior notice.
Distribution, transmission, or infringement of any content or data from this document without Samsung’s written authorization is strictly prohibited.
7-4
www.cpu999.com�
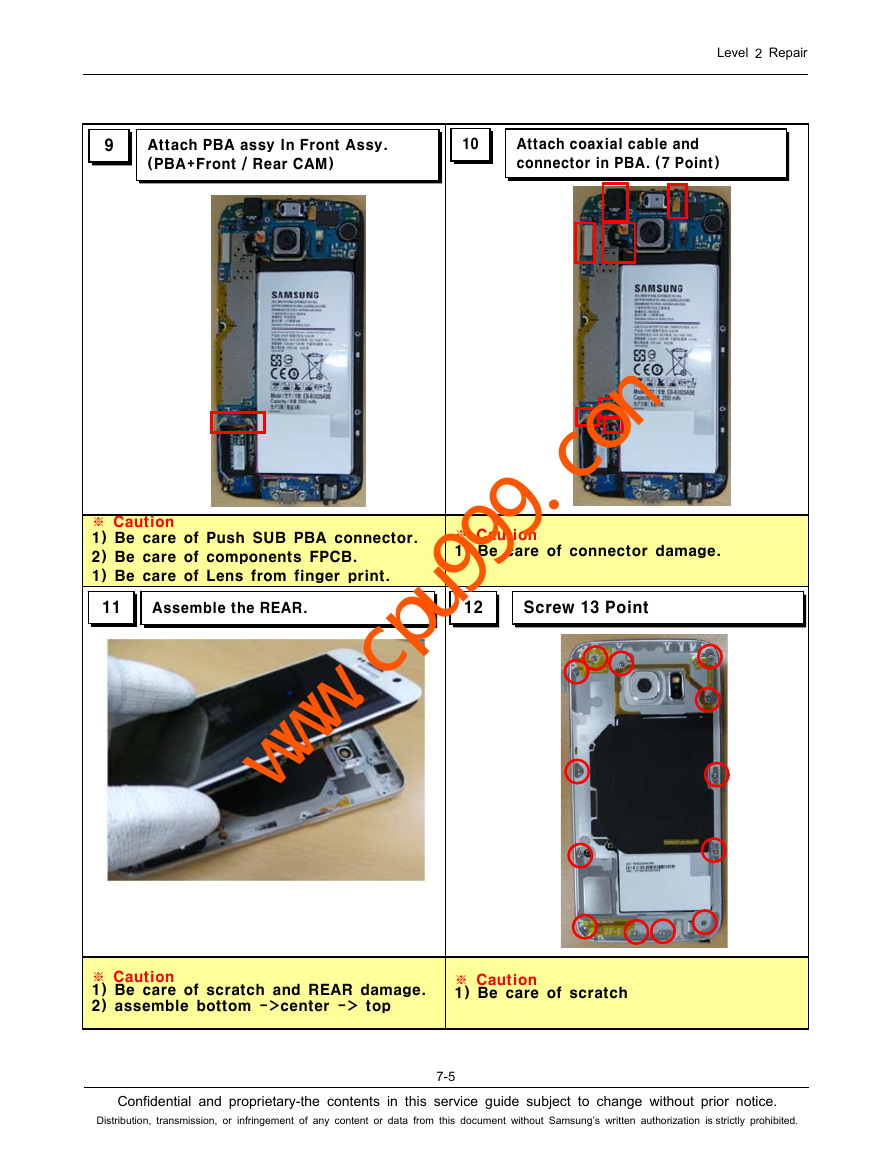
9
Attach PBA assy In Front Assy.
(PBA+Front / Rear CAM)
10
Attach coaxial cable and
connector in PBA. (7 Point)
Level 2 Repair
※ Caution
1) Be care of Push SUB PBA connector.
2) Be care of components FPCB.
1) Be care of Lens from finger print.
※ Caution
1) Be care of connector damage.
11
Assemble the REAR.
12
Screw 13 Point
※ Caution
1) Be care of scratch and REAR damage.
2) assemble bottom ->center -> top
※ Caution
1) Be care of scratch
Confidential and proprietary-the contents in this service guide subject to change without prior notice.
Distribution, transmission, or infringement of any content or data from this document without Samsung’s written authorization is strictly prohibited.
7-5
www.cpu999.com�
Level 2 Repair
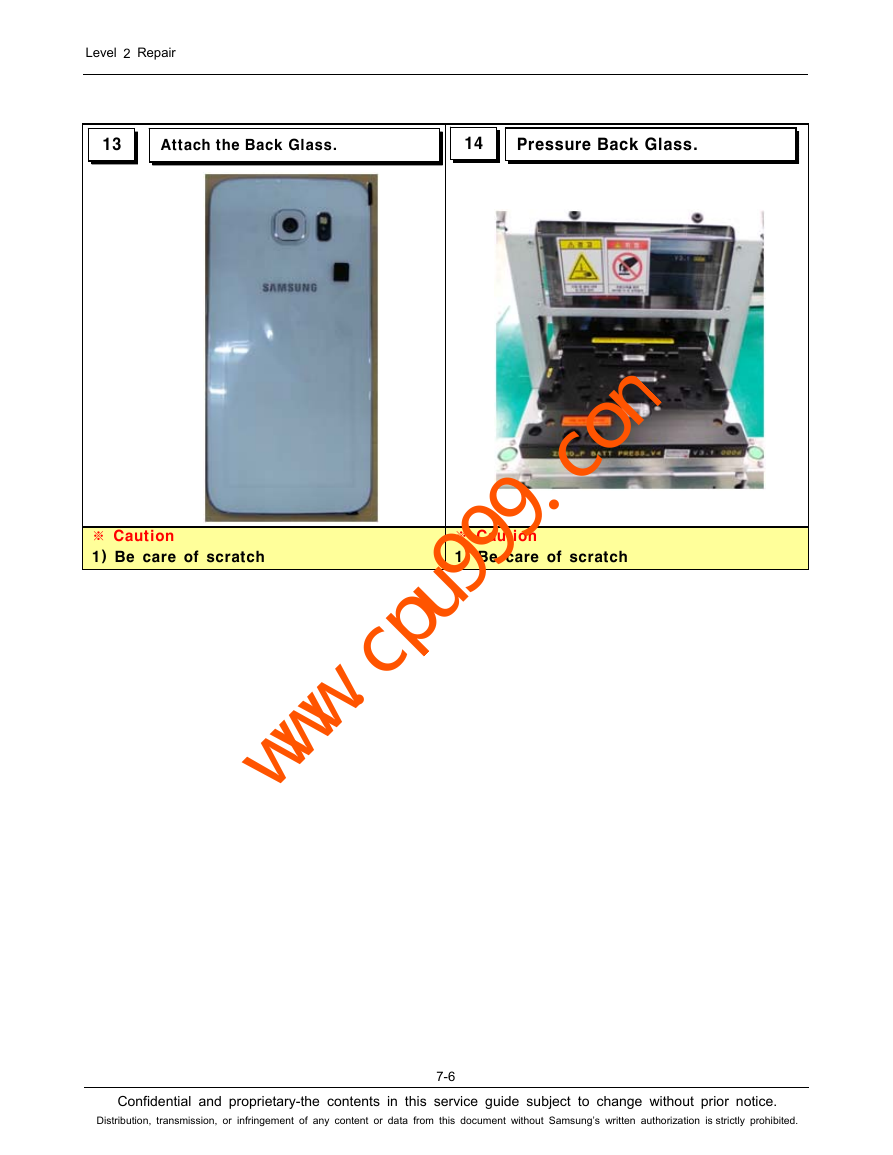
13
Attach the Back Glass.
14
Pressure Back Glass.
※ Caution
1) Be care of scratch
※ Caution
1) Be care of scratch
Confidential and proprietary-the contents in this service guide subject to change without prior notice.
Distribution, transmission, or infringement of any content or data from this document without Samsung’s written authorization is strictly prohibited.
7-6
www.cpu999.com�



 2023年江西萍乡中考道德与法治真题及答案.doc
 2012年重庆南川中考生物真题及答案.doc
 2013年江西师范大学地理学综合及文艺理论基础考研真题.doc
 2020年四川甘孜小升初语文真题及答案I卷.doc
 2020年注册岩土工程师专业基础考试真题及答案.doc
 2023-2024学年福建省厦门市九年级上学期数学月考试题及答案.doc
 2021-2022学年辽宁省沈阳市大东区九年级上学期语文期末试题及答案.doc
 2022-2023学年北京东城区初三第一学期物理期末试卷及答案.doc
 2018上半年江西教师资格初中地理学科知识与教学能力真题及答案.doc
 2012年河北国家公务员申论考试真题及答案-省级.doc
 2020-2021学年江苏省扬州市江都区邵樊片九年级上学期数学第一次质量检测试题及答案.doc
 2022下半年黑龙江教师资格证中学综合素质真题及答案.doc