®
Personal Computer
Reference Manual
CF-47 Series
Contents
Read Me First ...................................................... 2
Key Combinations ..............................................4
LED Indicators ....................................................5
Touch Pad (Advanced) .................................................. 6
Suspend/Hibernation Functions .......................7
Security Measures ............................................ 10
Computing on the Road ................................... 16
Battery Power ................................................... 20
CD-ROM Drive ................................................... 23
SuperDiskTM Drive............................................. 25
PC Cards ........................................................... 26
RAM Module...................................................... 28
Port Replicator .................................................. 29
Printer ................................................................ 30
External Display ............................................... 31
Modem ............................................................... 32
LAN .................................................................... 33
Hard Disk Drive ................................................. 35
Setup Utility ...................................................... 37
Technical Information ...................................... 43
List of Error Codes ........................................... 45
DMI Viewer ........................................................ 47
Dealing With Problems (Advanced) ........................48
NT
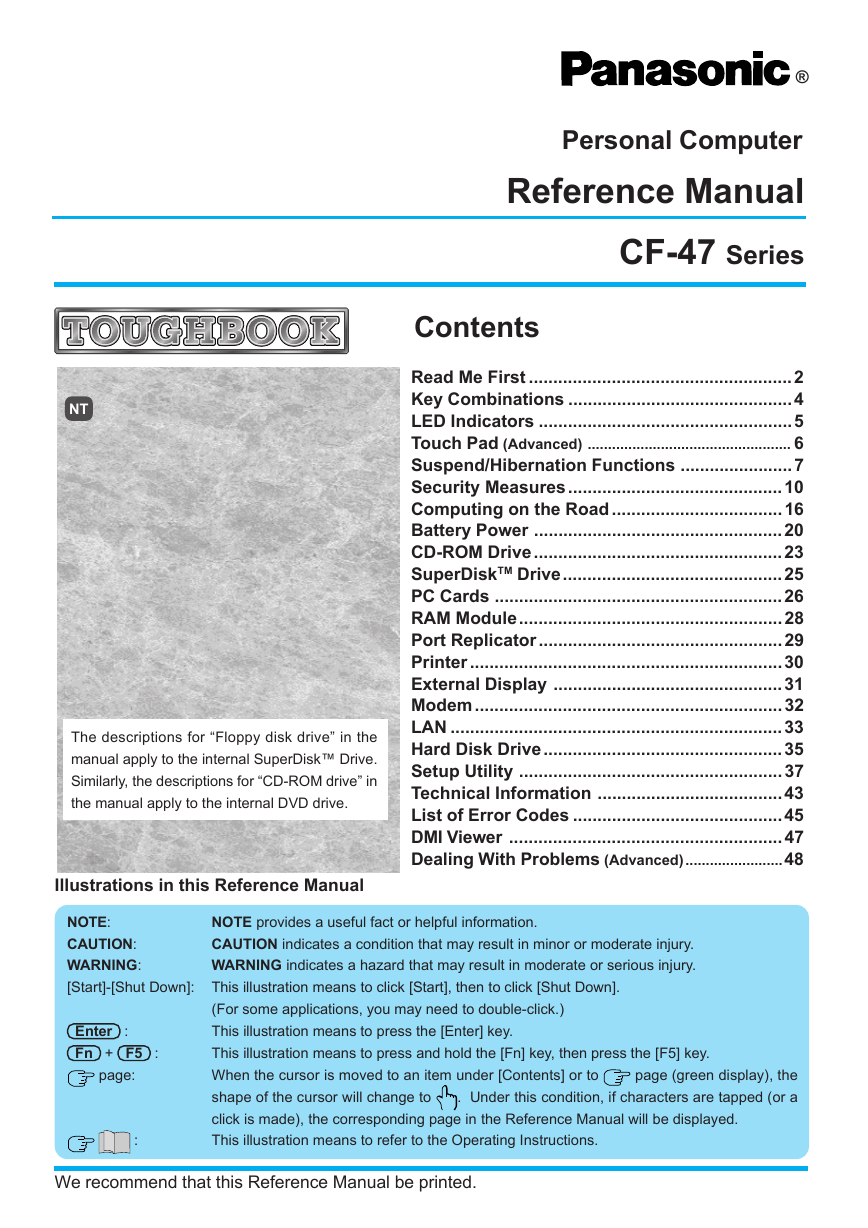
The descriptions for “Floppy disk drive” in the
manual apply to the internal SuperDisk™ Drive.
Similarly, the descriptions for “CD-ROM drive” in
the manual apply to the internal DVD drive.
Illustrations in this Reference Manual
NOTE:
CAUTION:
WARNING:
[Start]-[Shut Down]: This illustration means to click [Start], then to click [Shut Down].
NOTE provides a useful fact or helpful information.
CAUTION indicates a condition that may result in minor or moderate injury.
WARNING indicates a hazard that may result in moderate or serious injury.
Enter :
Fn + F5 :
page:
:
(For some applications, you may need to double-click.)
This illustration means to press the [Enter] key.
This illustration means to press and hold the [Fn] key, then press the [F5] key.
When the cursor is moved to an item under [Contents] or to
shape of the cursor will change to
click is made), the corresponding page in the Reference Manual will be displayed.
This illustration means to refer to the Operating Instructions.
page (green display), the
. Under this condition, if characters are tapped (or a
We recommend that this Reference Manual be printed.
�
Read Me First
Saving Data on the Hard Disk
2
) is on.
Do not expose your computer to shock.
Please use care when handling your computer, shock may damage your hard disk
or make your software applications and data unusable.
Do not power down your computer while software applications are running or
HDD indicator (
Properly shut Windows* down to avoid problems ([Start]-[Shut Down] ).
Save all valuable data to floppy disks.
Backing up data to floppy disks will limit damage should trouble occur to your com-
puter or should you inadvertently change or erase data.
Use the security function for all important data. (
Hard Disk Lock
When the Hard Disk Lock is set to [Enable], it is impossible to read/write data from/to
the hard disk when the hard disk is installed in a different computer, since a password
is also set for the hard disk. When the hard disk is returned to the original computer, you
can read/write data as before. In this case, however, make the settings in the Setup
Utility exactly the same as they were before the hard disk was removed. (Note that this
Hard Disk Lock does not guarantee the complete protection of data.) (
page 13)
page 10)
Saving Data on Floppy Disks
* This computer uses Microsoft® Windows® NT Operating System.
) is on.
Do not power down your computer or press the floppy disk drive eject button
while the FDD indicator (
Doing so may damage the data on the floppy disk and render the disk useless.
Use care when handling floppy disks.
To protect the data on your floppy disks or to prevent a floppy disk from becoming
stuck in your computer, avoid the following:
• Sliding the shutter on the floppy disk manually.
• Exposing the disk to a magnetic field.
• Storing the disk in locations prone to high temperatures, low pitched noise, dampness,
or dust.
• Applying more than one label on the disk.
Confirm the contents of a floppy disk before formatting it.
Confirm that no important data is on the disk, because all data on the disk will be erased.
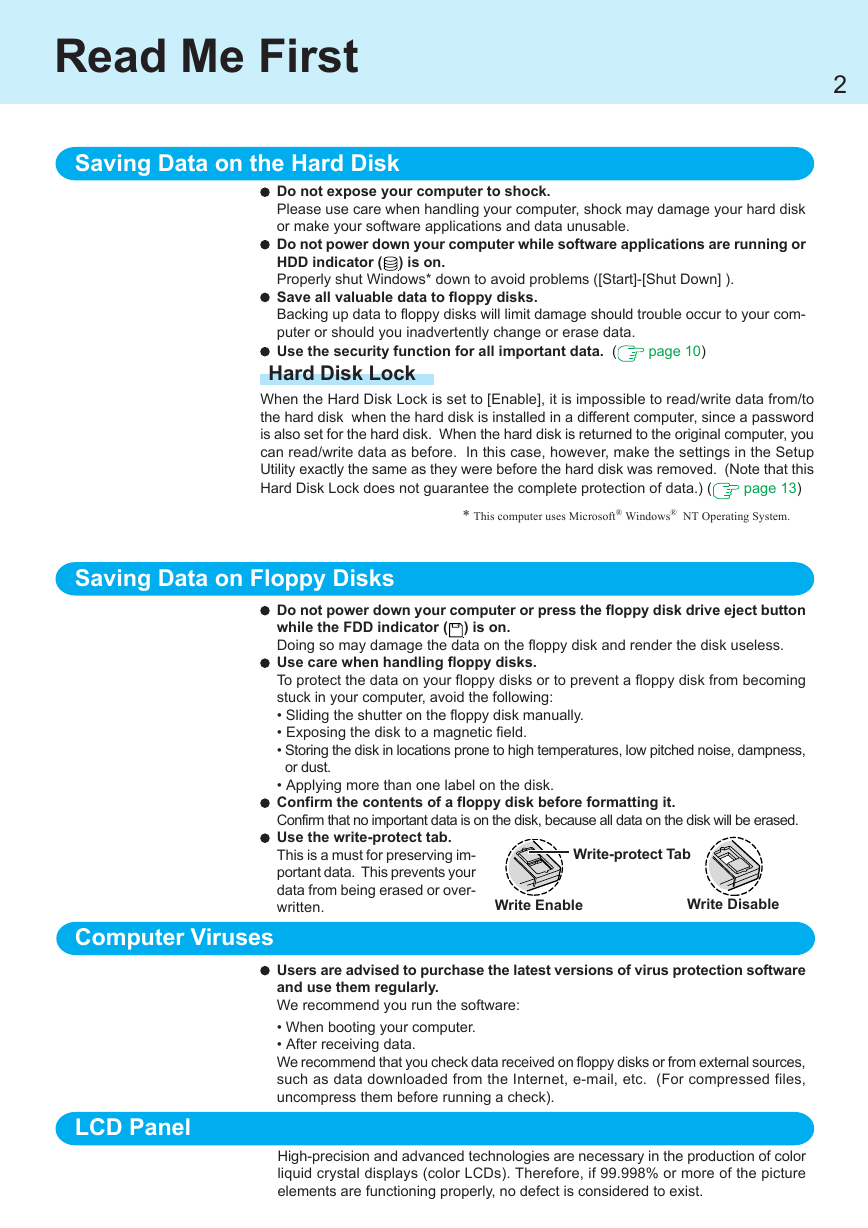
Use the write-protect tab.
This is a must for preserving im-
portant data. This prevents your
data from being erased or over-
written.
Write-protect Tab
Write Disable
Write Enable
Computer Viruses
LCD Panel
Users are advised to purchase the latest versions of virus protection software
and use them regularly.
We recommend you run the software:
• When booting your computer.
• After receiving data.
We recommend that you check data received on floppy disks or from external sources,
such as data downloaded from the Internet, e-mail, etc. (For compressed files,
uncompress them before running a check).
High-precision and advanced technologies are necessary in the production of color
liquid crystal displays (color LCDs). Therefore, if 99.998% or more of the picture
elements are functioning properly, no defect is considered to exist.
�
Read Me First
Usage Environment
Environment
3
Place the computer on a flat stable surface.
In use:
Temperature:
Humidity:
5 °C to 35 °C {41 °F to 95 °F}
30% to 80% RH (No condensation)
Not in use: Temperature:
-20 °C to 60 °C {-4 °F to 140 °F}
Humidity:
30% to 90% RH (No condensation)
Places not to use your computer
Such areas may result in damage to the computer.
Areas with electronic equipment
Handling
These areas may interfere with your display or cause your computer to produce strange
sounds.
Areas with extremely high/low temperatures
Do not leave things near the computer that are sensitive to heat. During operation, the
computer may become warm.
This computer has been designed so as to minimize shock to the LCD and hard disk drive,
the leakage of liquid (e.g., water) from the keyboard, etc., but no warranty is provided against
such trouble. Therefore, as a precision instrument, be extremely careful in the handling.
Do not drop or hit your computer against solid objects.
Do not stand the computer on its side or allow it to tip over. When the computer receives
extremely strong shock after falling, the hard disk or floppy disk drive, etc., may become
inoperable.
Do not carry your computer when it is ON.
Remove all cables before transporting your computer.
We recommend preparing a fully charged battery (and optional charger, if possible).
When transporting spare batteries inside a package, briefcase, etc., it is recommended
that the batteries be stored in a plastic bag.
Do not place the computer upright. When the computer receives extremely strong shock
after falling, the hard disk or floppy disk drive, etc., may become inoperable.
Do not carry the computer while the display is open, or carry it by gripping the display.
Do not put anything (e.g., a piece of paper) between the display and keyboard.
Always carry your computer with you. Never check it in with luggage. For use of the computer
inside an aircraft, we recommend asking the airlines regarding their policy on this issue.
It is a good idea to make backup copies on disks and carry them with you.
Do not leave a disk in the drive while transporting your computer.
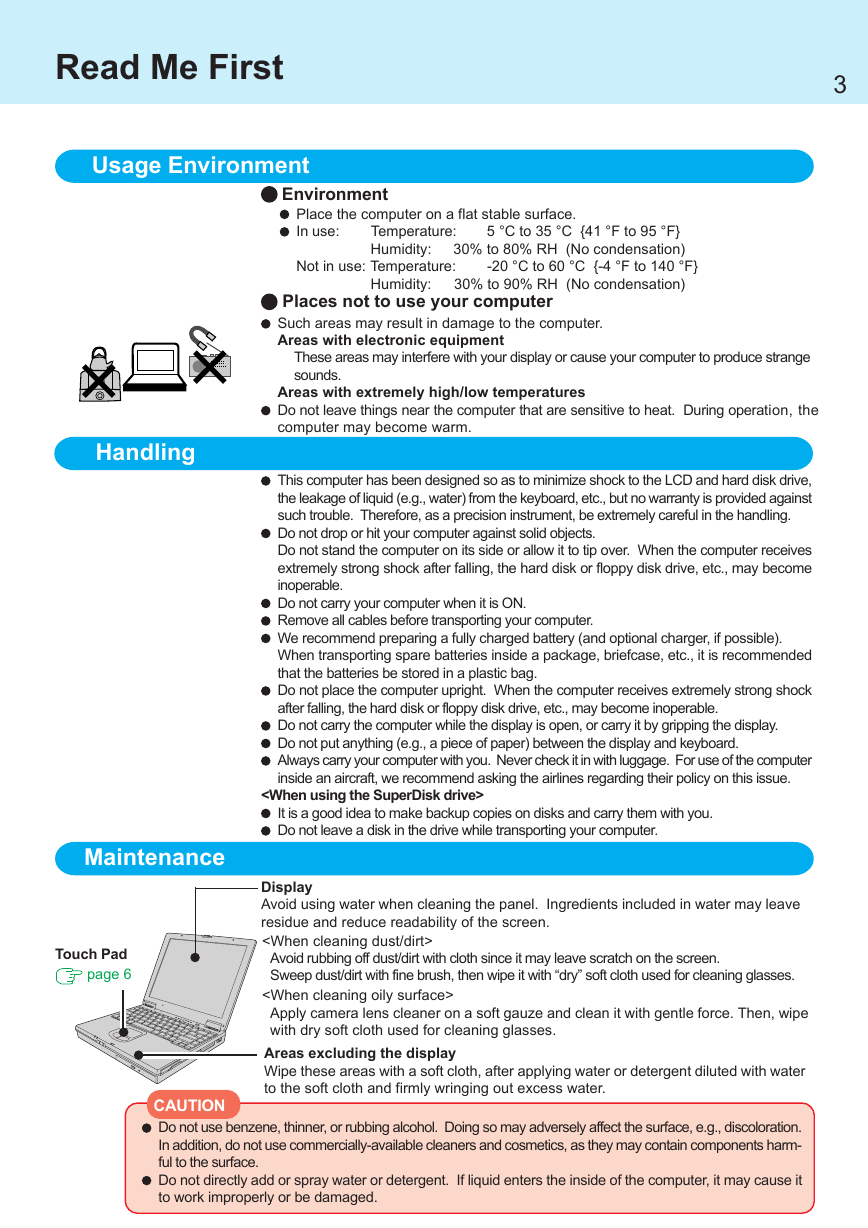
Maintenance
Touch Pad
page 6
Display
Avoid using water when cleaning the panel. Ingredients included in water may leave
residue and reduce readability of the screen.
Avoid rubbing off dust/dirt with cloth since it may leave scratch on the screen.
Sweep dust/dirt with fine brush, then wipe it with “dry” soft cloth used for cleaning glasses.
Apply camera lens cleaner on a soft gauze and clean it with gentle force. Then, wipe
with dry soft cloth used for cleaning glasses.
Areas excluding the display
Wipe these areas with a soft cloth, after applying water or detergent diluted with water
to the soft cloth and firmly wringing out excess water.
CAUTION
Do not use benzene, thinner, or rubbing alcohol. Doing so may adversely affect the surface, e.g., discoloration.
In addition, do not use commercially-available cleaners and cosmetics, as they may contain components harm-
ful to the surface.
Do not directly add or spray water or detergent. If liquid enters the inside of the computer, it may cause it
to work improperly or be damaged.
�
Key Combinations
4
CAUTION
Do not press the following key combinations repeatedly in (quick) succession.
Do not press the following key combinations while using the touch pad (mouse) or other keys.
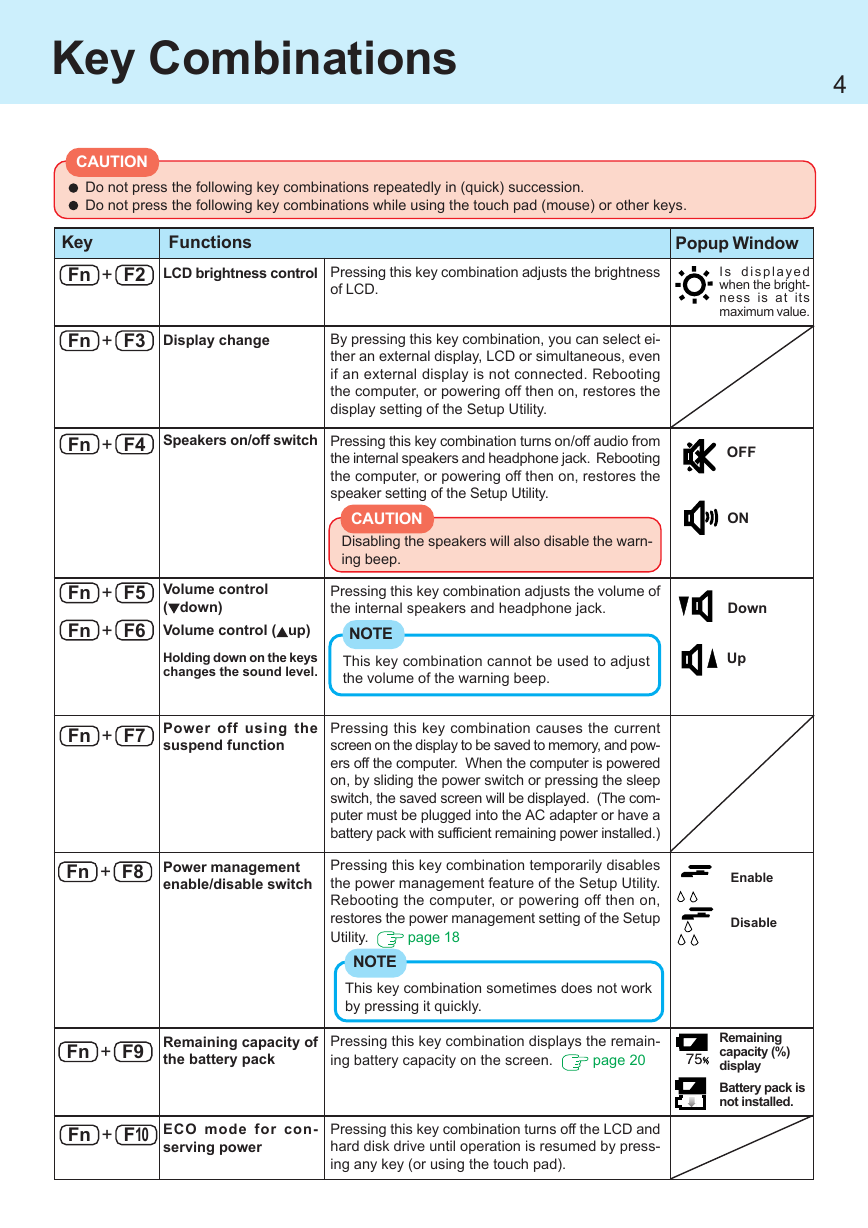
Key
Functions
Fn + F2
LCD brightness control
Pressing this key combination adjusts the brightness
of LCD.
Popup Window
I s d i s p l a y e d
when the bright-
ness is at its
maximum value.
Fn + F3
Display change
Fn + F4
Speakers on/off switch
Fn + F5
Fn + F6
Volume control
( down)
Volume control ( up)
By pressing this key combination, you can select ei-
ther an external display, LCD or simultaneous, even
if an external display is not connected. Rebooting
the computer, or powering off then on, restores the
display setting of the Setup Utility.
Pressing this key combination turns on/off audio from
the internal speakers and headphone jack. Rebooting
the computer, or powering off then on, restores the
speaker setting of the Setup Utility.
CAUTION
Disabling the speakers will also disable the warn-
ing beep.
Pressing this key combination adjusts the volume of
the internal speakers and headphone jack.
NOTE
Holding down on the keys
changes the sound level.
This key combination cannot be used to adjust
the volume of the warning beep.
Fn + F7
Power off using the
suspend function
Fn + F8
Power management
enable/disable switch
Pressing this key combination causes the current
screen on the display to be saved to memory, and pow-
ers off the computer. When the computer is powered
on, by sliding the power switch or pressing the sleep
switch, the saved screen will be displayed. (The com-
puter must be plugged into the AC adapter or have a
battery pack with sufficient remaining power installed.)
Pressing this key combination temporarily disables
the power management feature of the Setup Utility.
Rebooting the computer, or powering off then on,
restores the power management setting of the Setup
Utility.
page 18
NOTE
This key combination sometimes does not work
by pressing it quickly.
Fn + F9
Remaining capacity of
the battery pack
Pressing this key combination displays the remain-
ing battery capacity on the screen.
page 20
Fn + F10
ECO mode for con-
serving power
Pressing this key combination turns off the LCD and
hard disk drive until operation is resumed by press-
ing any key (or using the touch pad).
OFF
ON
Down
Up
Enable
Disable
Remaining
capacity (%)
display
Battery pack is
not installed.
�
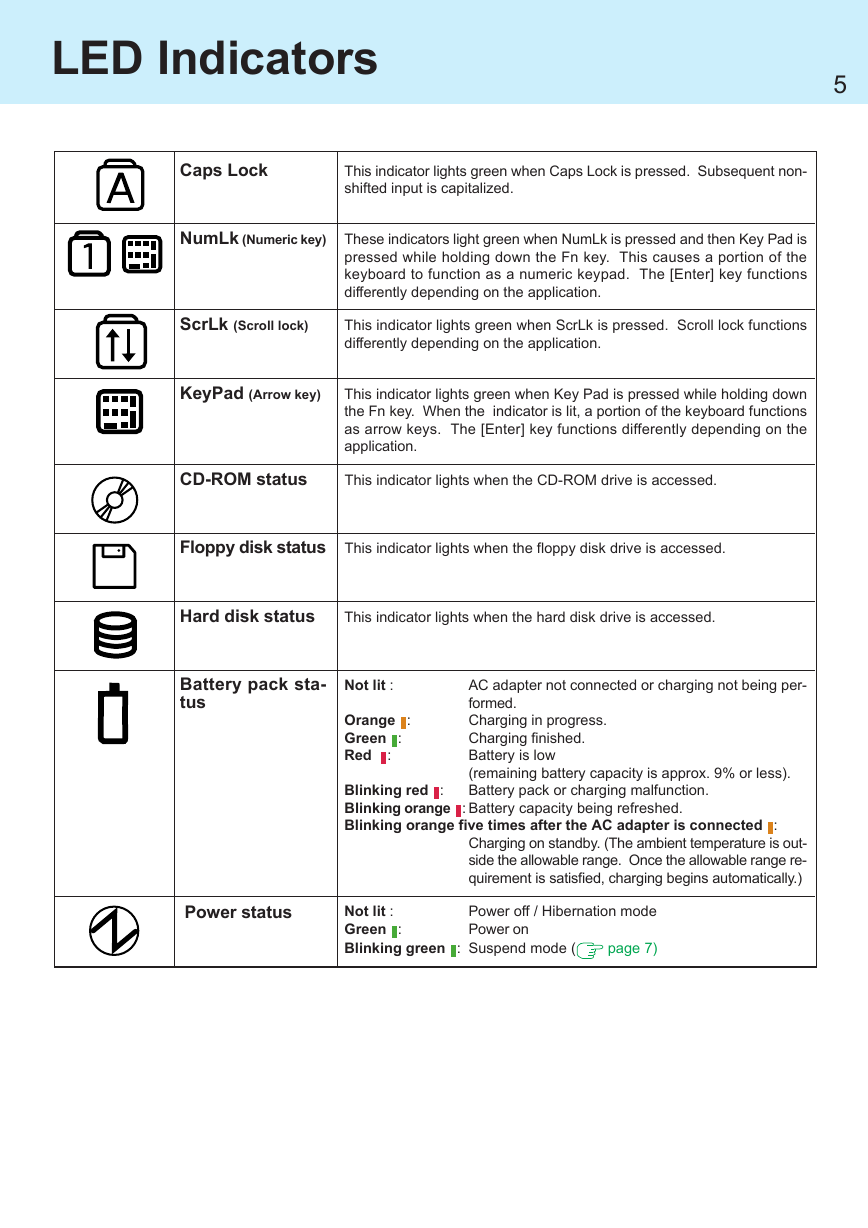
LED Indicators
5
Caps Lock
This indicator lights green when Caps Lock is pressed. Subsequent non-
shifted input is capitalized.
NumLk (Numeric key)
These indicators light green when NumLk is pressed and then Key Pad is
pressed while holding down the Fn key. This causes a portion of the
keyboard to function as a numeric keypad. The [Enter] key functions
differently depending on the application.
ScrLk (Scroll lock)
This indicator lights green when ScrLk is pressed. Scroll lock functions
differently depending on the application.
KeyPad (Arrow key)
This indicator lights green when Key Pad is pressed while holding down
the Fn key. When the indicator is lit, a portion of the keyboard functions
as arrow keys. The [Enter] key functions differently depending on the
application.
CD-ROM status
This indicator lights when the CD-ROM drive is accessed.
Floppy disk status
This indicator lights when the floppy disk drive is accessed.
Hard disk status
This indicator lights when the hard disk drive is accessed.
Battery pack sta-
tus
Not lit :
Orange :
Green :
Red :
AC adapter not connected or charging not being per-
formed.
Charging in progress.
Charging finished.
Battery is low
(remaining battery capacity is approx. 9% or less).
Battery pack or charging malfunction.
Blinking red :
Blinking orange : Battery capacity being refreshed.
Blinking orange five times after the AC adapter is connected :
Charging on standby. (The ambient temperature is out-
side the allowable range. Once the allowable range re-
quirement is satisfied, charging begins automatically.)
Power status
Not lit :
Green :
Blinking green : Suspend mode (
Power off / Hibernation mode
Power on
page 7)
�
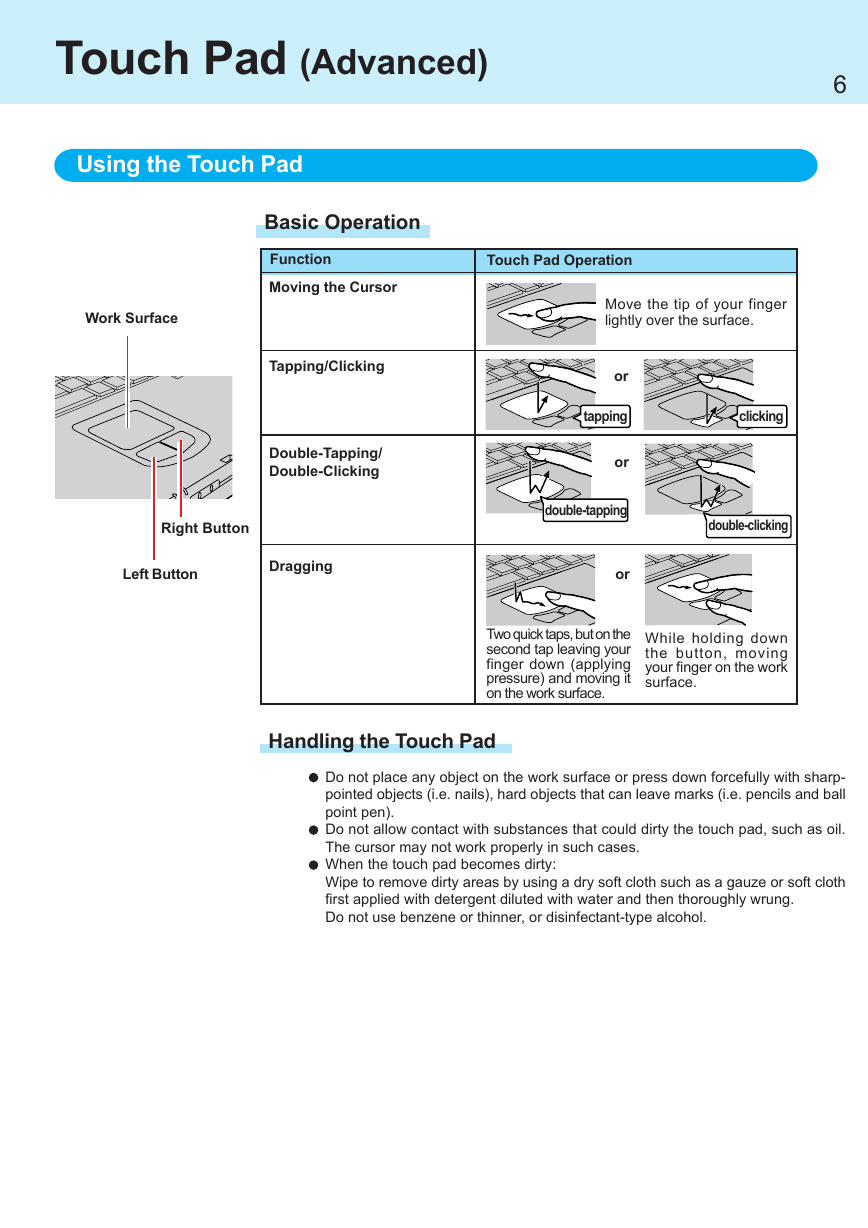
Touch Pad (Advanced)
6
Using the Touch Pad
Work Surface
Basic Operation
Function
Moving the Cursor
Tapping/Clicking
Double-Tapping/
Double-Clicking
Right Button
Left Button
Dragging
Touch Pad Operation
Move the tip of your finger
lightly over the surface.
or
tapping
or
clicking
double-tapping
double-clicking
or
Two quick taps, but on the
second tap leaving your
finger down (applying
pressure) and moving it
on the work surface.
While holding down
the button, moving
your finger on the work
surface.
Handling the Touch Pad
Do not place any object on the work surface or press down forcefully with sharp-
pointed objects (i.e. nails), hard objects that can leave marks (i.e. pencils and ball
point pen).
Do not allow contact with substances that could dirty the touch pad, such as oil.
The cursor may not work properly in such cases.
When the touch pad becomes dirty:
Wipe to remove dirty areas by using a dry soft cloth such as a gauze or soft cloth
first applied with detergent diluted with water and then thoroughly wrung.
Do not use benzene or thinner, or disinfectant-type alcohol.
�
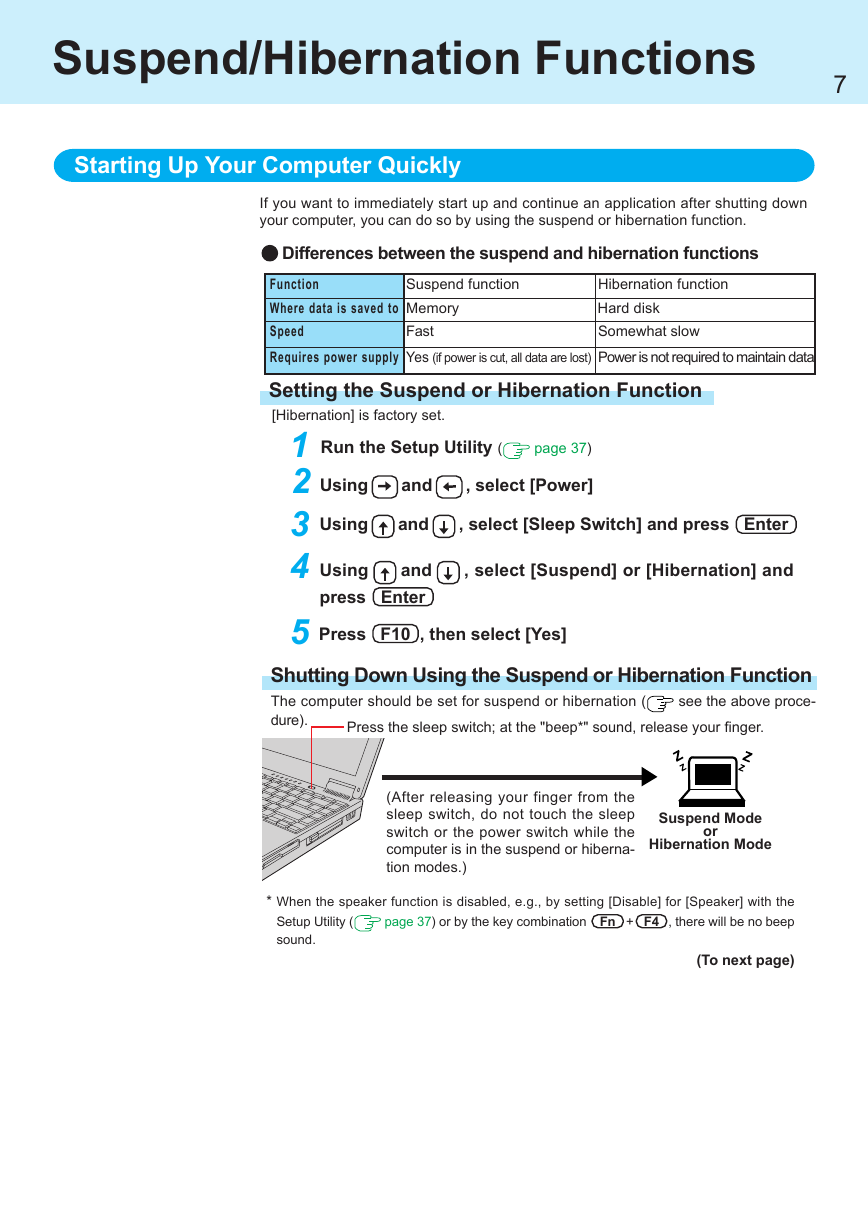
Suspend/Hibernation Functions
7
Starting Up Your Computer Quickly
If you want to immediately start up and continue an application after shutting down
your computer, you can do so by using the suspend or hibernation function.
Differences between the suspend and hibernation functions
Suspend function
Function
Where data is saved to Memory
Speed
Fast
Hibernation function
Hard disk
Somewhat slow
Requires power supply Yes (if power is cut, all data are lost) Power is not required to maintain data
Setting the Suspend or Hibernation Function
[Hibernation] is factory set.
page 37)
and
, select [Power]
1 Run the Setup Utility (
2 Using
3 Using
4
and
and
Using
press Enter
, select [Sleep Switch] and press Enter
, select [Suspend] or [Hibernation] and
Press F10 , then select [Yes]
5
Shutting Down Using the Suspend or Hibernation Function
The computer should be set for suspend or hibernation (
see the above proce-
dure).
Press the sleep switch; at the "beep*" sound, release your finger.
(After releasing your finger from the
sleep switch, do not touch the sleep
switch or the power switch while the
computer is in the suspend or hiberna-
tion modes.)
Suspend Mode
or
Hibernation Mode
* When the speaker function is disabled, e.g., by setting [Disable] for [Speaker] with the
page 37) or by the key combination Fn + F4 , there will be no beep
Setup Utility (
sound.
(To next page)
�
Suspend/Hibernation Functions
8
CAUTION
At the "beep*" sound, release your finger from the sleep switch. If you continue
to press down on the switch and hold it for more than four seconds, the unit will
emit a 2nd "beep*" then power off. Data not previously saved will be lost.
Slide the power switch to power on. Pressing the sleep switch, even if [Sleep
Switch] is set to [No Action] in the Setup Utility, will not power on the unit.
If the computer will not be operated for an extended period of time, it is recom-
mended that hibernation mode be used instead of the suspend mode.
NOTE
With the method below, you can shut down the computer by using the suspend
function.
Fn + F7 (
page 4)
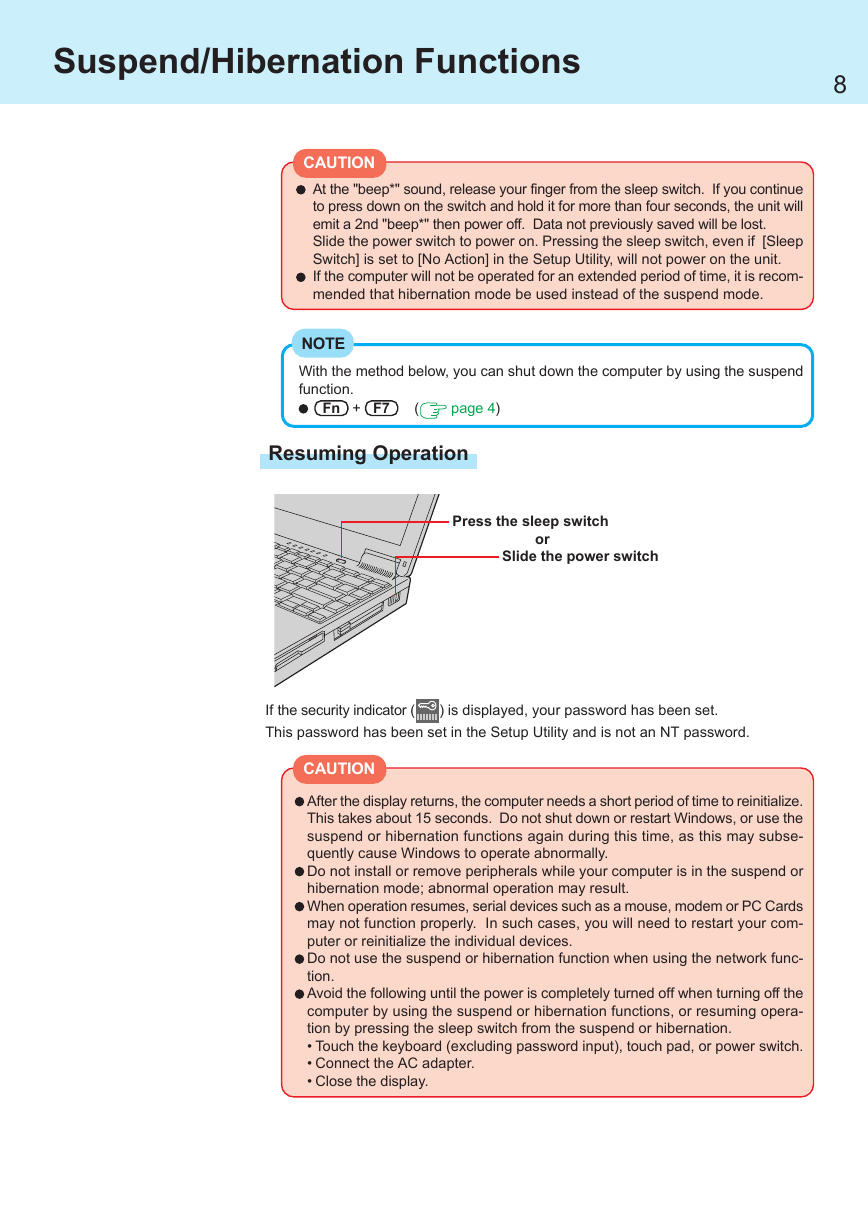
Resuming Operation
Press the sleep switch
or
Slide the power switch
If the security indicator (
This password has been set in the Setup Utility and is not an NT password.
) is displayed, your password has been set.
CAUTION
After the display returns, the computer needs a short period of time to reinitialize.
This takes about 15 seconds. Do not shut down or restart Windows, or use the
suspend or hibernation functions again during this time, as this may subse-
quently cause Windows to operate abnormally.
Do not install or remove peripherals while your computer is in the suspend or
hibernation mode; abnormal operation may result.
When operation resumes, serial devices such as a mouse, modem or PC Cards
may not function properly. In such cases, you will need to restart your com-
puter or reinitialize the individual devices.
Do not use the suspend or hibernation function when using the network func-
tion.
Avoid the following until the power is completely turned off when turning off the
computer by using the suspend or hibernation functions, or resuming opera-
tion by pressing the sleep switch from the suspend or hibernation.
• Touch the keyboard (excluding password input), touch pad, or power switch.
• Connect the AC adapter.
• Close the display.
�


 2023年江西萍乡中考道德与法治真题及答案.doc
 2012年重庆南川中考生物真题及答案.doc
 2013年江西师范大学地理学综合及文艺理论基础考研真题.doc
 2020年四川甘孜小升初语文真题及答案I卷.doc
 2020年注册岩土工程师专业基础考试真题及答案.doc
 2023-2024学年福建省厦门市九年级上学期数学月考试题及答案.doc
 2021-2022学年辽宁省沈阳市大东区九年级上学期语文期末试题及答案.doc
 2022-2023学年北京东城区初三第一学期物理期末试卷及答案.doc
 2018上半年江西教师资格初中地理学科知识与教学能力真题及答案.doc
 2012年河北国家公务员申论考试真题及答案-省级.doc
 2020-2021学年江苏省扬州市江都区邵樊片九年级上学期数学第一次质量检测试题及答案.doc
 2022下半年黑龙江教师资格证中学综合素质真题及答案.doc