Camileo Pro HD
English
Getting Started
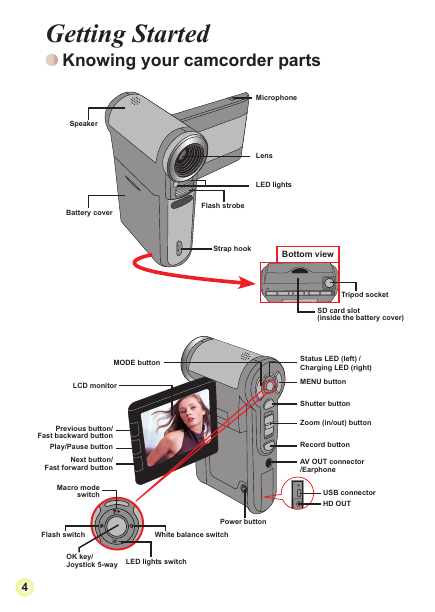
Knowing your camcorder parts
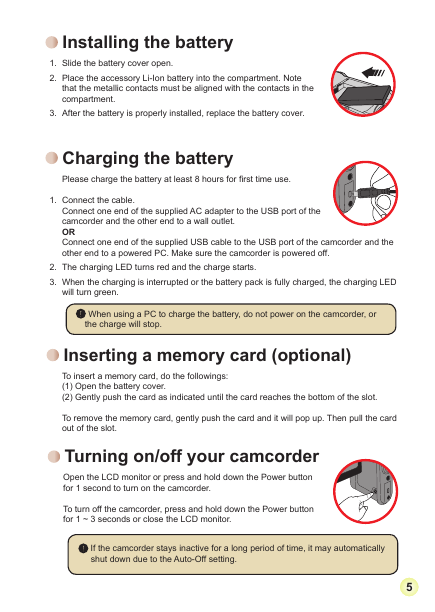
Installing the battery
Charging the battery
Inserting a memory card (optional)
Turning on/off your camcorder
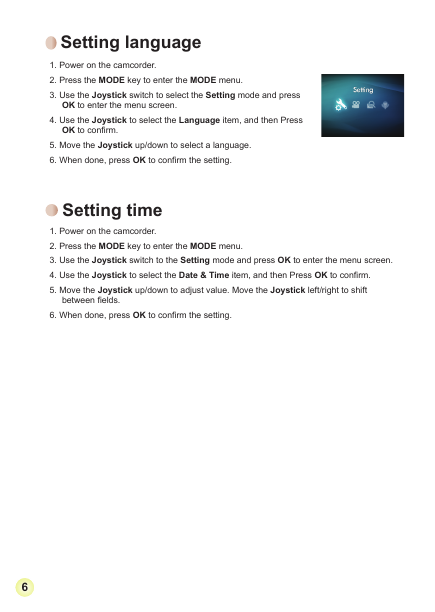
Setting language
Setting time
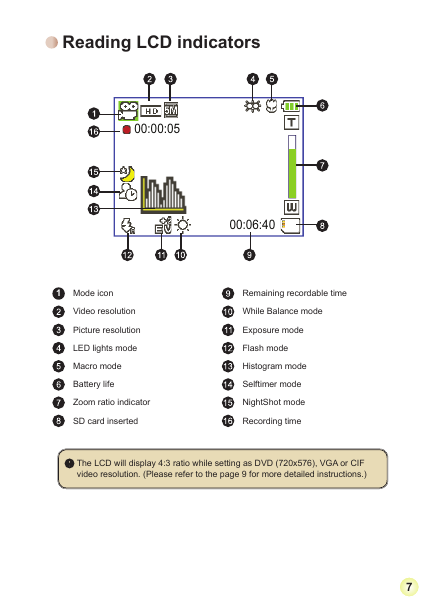
Reading LCD indicators
Basic Operations
Recording a video clip
Recording a voice clip
Taking a still picture
Playing back your recordings
Playing back your recordings on PC
Connecting the camcorder to TV
Advanced Operations
Menu operation
Menu items in Camcorder mode
Menu items in Camcorder mode
Menu items in Playback mode
Menu items in Setting mode
Battery Life Indicator
Battery Life
Storage Capacity
Specifications
Remote Control
Troubleshooting
Deutsch
Erste Schritte
Die Komponenten des Camcorders
Einlegen des Akkus
Aufladen des Akkus
Einstecken einer Speicherkarte (optional)
Ein-/Ausschalten des Camcorders
Einstellen der Sprache
Einstellen der Zeit
Ablesen der LCD-Anzeigen
Grundfunktionen
Aufzeichnen eines Videoclips
Aufzeichnen eines Audioclips
Aufnehmen eines Fotos
Wiedergeben der Aufzeichnungen
Wiedergeben der Aufnahmen auf dem PC
Verbinden des Camcorders mit einem Fernsehgerät
Erweiterte Funktionen
Menübedienung
Menüelemente im Camcorder-Modus
Menüelemente im Camcorder-Modus
Menüelemente im Wiedergabemodus
Menüpunkte im Einstellungsmodus
Akkuladestandanzeige
Akkuladestand
Speicherkapazität
Technische Daten
Fernbedienung
Problembehebung
Español
Procedimientos iniciales
Introducción a las partes de la videocámara
Instalar la batería
Cargar la batería
Insertar una tarjeta de memoria (opcional)
Encender y apagar la videocámara
Establecer el idioma
Establecer la hora
Leer los indicadores LCD
Funcionamiento básico
Grabar un clip de vídeo
Grabar un clip de voz
Capturar una imagen estática
Reproducir las grabaciones
Reproducir las grabaciones en PC
Conectar la videocámara a un televisor
Funcionamiento avanzado
Uso de los menús
Elementos de menú en el modo Videocámara
Elementos de menú en el modo Videocámara
Elementos de menú en el modo Reproducción
Elementos de menú en el modo Configuración
Indicador de carga de la batería
Vida de la batería
Capacidad de almacenamiento
Especificaciones
Mando a distancia
Solucionar problemas
Français
Démarrage
Connaître les parties de votre caméscope
Installer la batterie
Charger la batterie
Insérer une carte mémoire (facultatif)
Allumer/éteindre le caméscope
Régler la langue
Réglage de l’heure
Lire les indicateurs LCD
Utilisation de base
Enregistrer un clip vidéo
Enregistrement d’un clip audio
Prendre une photo
Lire vos enregistrements
Lire vos enregistrements sur PC
Relier le caméscope à un téléviseur
Utilisation avancée
Utilisation du menu
Les éléments de menu du mode Caméscope
Les éléments de menu du mode Caméscope
Les éléments de menu du mode Lecture
Les éléments de menu du mode réglage
Indicateur de niveau des piles
Autonomie de la batterie
Capacité de stockage
Spécifications
Télécommande
Dépannage
Italiano
Preparazione
Conoscere la parti della videocamera
Inserimento della batteria
Caricamento della batteria
Inserimento di una scheda memoria (optional)
Accendere e spegnere la videocamera
Impostazione della lingua
Impostazione dell’ora
Lettura degli indicatori del display LCD
Operazioni di base
Registrazione di una sequenza video
Registrazione di una sequenza vocale
Fotografare
Riproduzione delle registrazioni
Riproduzione delle registrazioni sul PC
Collegamento della videocamera al televisore
Operazioni avanzate
Funzionamento dei menu
Voci del menu in modalità Videocamera
Voci del menu in modalità Videocamera
Voci del menu in modalità Riproduzione
Voci del menu in modalità Impostazioni
Indicatore di carica della batteria
Durata della batteria
Capacità d’archiviazione
Specifiche
Telecomando
Risoluzione dei problemi
Nederlands
Aan de slag
Kennismaken met de onderdelen van uw camcorder
De batterij plaatsen
De batterij opladen
Een geheugenkaart plaatsen (optioneel)
Uw camera in-/uitschakelen
De taal instellen
De tijd instellen
LCD-indicators aflezen
Basisbediening
Een videoclip opnemen
Een spraakopname maken
Een foto maken
Uw opnamen afspelen
Uw opnamen afspelen op een pc
De camcorder aansluiten op een tv
Geavanceerde bewerkingen
Menubediening
Menu-items in de camcordermodus
Menu-items in de camcordermodus
Menu-items in de weergavemodus
Menu-items in de instellingsstand
Indicator levensduur batterij
Levensduur batterij
Opslagcapaciteit
Specificaties
Afstandsbediening
Problemen oplossen
Português
Introdução
Conheça as peças que compõem a sua camcorder
Colocação da bateria
Carregamento da bateria
Introdução de um cartão de memória (opcional)
Ligar/desligar a camcorder
Definição do idioma
Definição da hora
Significado dos ícones apresentados no ecrã LCD
Operações básicas
Gravação de um clip de vídeo
Gravação de um ficheiro de voz
Tirar fotografias
Reprodução das suas gravações
Reprodução das suas gravações no PC
Ligação da camcorder a um televisor
Operações avançadas
Funcionamento dos menus
Itens do menu no modo Camcorder
Itens do menu no modo Camcorder
Itens do menu no modo Reprodução
Itens do menu no modo Definição
Indicador de carga da bateria
Duração da bateria
Capacidade de armazenamento
Especificações
Controlo remoto
Resolução de problemas
TÜRKÇE
Başlarken
Video kameranızın parçalarını tanıyın
Pilin takılması
Pilin şarj edilmesi
Bir bellek kartının takılması (isteğe bağlı)
Video kameranızın açılması/kapatılması
Dil ayarı
Zaman ayarı
LCD göstergelerin okunması
Temel İşlemler
Video klip kaydetme
Ses klibi kaydetme
Harketsiz resim çekme
Kayıtlarınızı oynatma
Kayıtlarınızın bilgisayarda oynatılması
Video kamera-TV bağlantısı
İleri Düzey İşlemler
Menü işlemleri
Video kamera modunda bulunan menü öğeleri
Video kamera modunda bulunan menü öğeleri
Oynatma modunda bulunan menü öğeleri
Ayar modunda bulunan menü öğeleri
Pil Ömrü Göstergesi
Pil ömrü
Bellek Kapasitesi
Teknik Özellikler
Uzaktan Kumanda
Sorun Giderme


 2023年江西萍乡中考道德与法治真题及答案.doc
 2012年重庆南川中考生物真题及答案.doc
 2013年江西师范大学地理学综合及文艺理论基础考研真题.doc
 2020年四川甘孜小升初语文真题及答案I卷.doc
 2020年注册岩土工程师专业基础考试真题及答案.doc
 2023-2024学年福建省厦门市九年级上学期数学月考试题及答案.doc
 2021-2022学年辽宁省沈阳市大东区九年级上学期语文期末试题及答案.doc
 2022-2023学年北京东城区初三第一学期物理期末试卷及答案.doc
 2018上半年江西教师资格初中地理学科知识与教学能力真题及答案.doc
 2012年河北国家公务员申论考试真题及答案-省级.doc
 2020-2021学年江苏省扬州市江都区邵樊片九年级上学期数学第一次质量检测试题及答案.doc
 2022下半年黑龙江教师资格证中学综合素质真题及答案.doc