1.
:XR4041117 2.
3.
80P
,
105mm+-2
105mm+-2
1
5
0
m
m
+
-
2
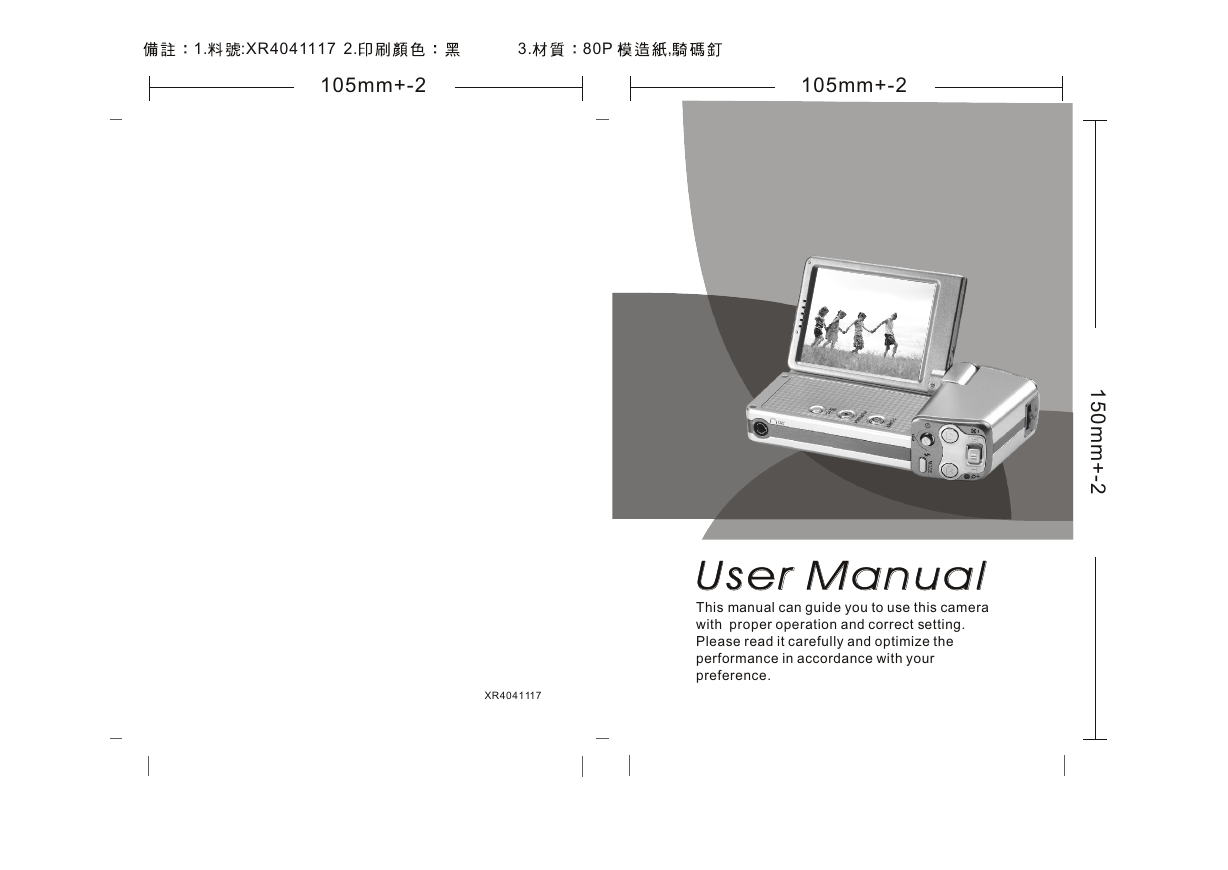
User Manual
User Manual
This manual can guide you to use this camera
with proper operation and correct setting.
Please read it carefully and optimize the
performance in accordance with your
preference.
XR4041117
�
Table Of Contents
Cautions.................................................................................................................
Overall Introduction................................................................................................
Accessories............................................................................................................
External View........................................................................................................
Getting Ready.........................................................................................................
Turn On Or Turn Off The Camera..............................................................................
Loading The Battery................................................................................................
Charging The Battery..............................................................................................
Inserting Or Removing A Memory Card......................................................................
Attaching The Wrist Strap............................................................................................
Modes Introduction...................................................................................................
Others.....................................................................................................................
AV Out.....................................................................................................................
Earphone..............................................................................................................
DV /DSC Mode............................................................................................................
Icon Introduction....................................................................................................
Basic Photography.....................................................................................................
Focus Range.........................................................................................................
Flash Mode...............................................................................................................
Digital Zoom.............................................................................................................
Self-timer Mode.......................................................................................................
How To Record A Video...........................................................................................
How To Take A Picture..............................................................................................
Auto Mode.............................................................................................................
Program Mode.........................................................................................................
Portrait Mode...........................................................................................................
Dawn Mode...............................................................................................................
Backlight Mode........................................................................................................
Fireworks Mode.....................................................................................................
Night Mode.............................................................................................................
Advanced Setting Introduction....................................................................................
Video Size Setting................................................................................................. ...
Image Size Setting....................................................................................................
Mode Set...............................................................................................................
Quality Setting........................................................................................................
EIS..........................................................................................................................
Metering Setting.......................................................................................................
Sharpness Setting....................................................................................................
Effect Setting...........................................................................................................
White Balance Setting..............................................................................................
Photo Frame Setting...............................................................................................
Shooting Setting.....................................................................................................
ISO Setting.............................................................................................................
Setup.......................................................................................................................
Setting File................................................................................................................
Setting Power Saving...............................................................................................
Setting Language......................................................................................................
Setting Format..........................................................................................................
Setting Date............................................................................................................
Setting Time............................................................................................................
Setting Imprint.......................................................................................................
Setting System Sound..............................................................................................
Setting Video System................................................................................................
Setting Quick View..................................................................................................
Setting Reset...........................................................................................................
Setting Start-up Sound.............................................................................................
04
05
05
06
07
07
07
08
09
09
10
11
11
11
12
12
13
13
14
14
15
16
17
18
18
19
19
20
20
21
22
22
22
23
23
24
24
25
25
26
27
28
28
29
29
30
30
30
30
31
31
31
31
32
32
32
Table Of Contents
Setting Start-up Image......................................................................................
32
Album Mode......................................................................................................
33
Press The Mode Button And Choose The Album Mode............................................
33
How To Use Album Mode....................................................................................
33
Things You Can Do With Arcsoft Media Converter.......................................... .......
35
Digital Music Mode..............................................................................................
38
Press The Mode Button And Choose The Digital Music Mode..................................
38
Features...........................................................................................................
40
Voice Recording Mode.......................................................................................
42
Press The Mode Button And Choose The Voice Recording Mode............................
42
Game Mode.........................................................................................................
43
Press The Mode Button And Choose Game Mode.................................................
43
AV In Mode.........................................................................................................
44
Press The Mode Button And Choose The AV In Mode..............................................
44
Playback Mode.....................................................................................................
45
Choose The Playback Mode.................................................................................
45
Icon Introduction................................................................................................
45
Thumbnails......................................................................................................
46
Viewing The Enlarge Still Image And Trimming The Image.....................................
47
Advanced Setting Introduction..............................................................................
48
How To Delete Image(s).......................................................................................
48
How To Play Slideshow........................................................................................
48
Set A File With Protection....................................................................................
49
How To Rotate An Image........................................................................................
49
Copy To Card....................................................................................................
50
DPOF-Standard...............................................................................................
51
DPOF-Index.......................................................................................................
51
DPOF-Size..........................................................................................................
51
DPOF-Cancel......................................................................................................
51
PC Camera...........................................................................................................
52
How To Use PC Camera Function.........................................................................
52
IR Remote Controller............................................................................................
53
You Can Use Remote Controller To Operate The Camera.........................................
53
Printer Connection (PictBridge Mode).....................................................................
54
Connecting The Camera To A PictBridge-Supported Printer.....................................
54
Select Pictures To Print.......................................................................................
55
AUTO SET............................................................................................................
56
CUSTOM SET......................................................................................................
56
DPOF PRINT.........................................................................................................
57
Printing Pictures...................................................................................................
57
Reset....................................................................................................................
58
TV Connection.........................................................................................................
59
PC Connection.....................................................................................................
60
How To Connect With A Computer.........................................................................
60
Installing Camera Driver......................................................................................
61
Installing ArcSoft Media Converter.........................................................................
61
Installing ArcSoft Video Impression.........................................................................
63
Installing PC Camera Driver......................................................................................
65
Installing Ulead Photo Explorer..............................................................................
66
Appendix.................................................................................................................
69
Error Message Table...............................................................................................
69
Specifications.........................................................................................................
70
About ArcSoft ,Inc...................................................................................................
72
Things You Can Do With "ArcSoft VideoImpression"...................................................
73
About Ulead Photo Explorer........................................................................................
74
Things You Can Do In Ulead Photo Explorer 8.5 SE Basic...........................................
75
2
.
3
�
Cautions
Do not try to disassemble the camera by yourself, which may damage the
camera or cause electric shock.
Do not fire the flash in a close distance (less than 1 meter); it may hurt your eyes.
Keep the camera away from the reach of children or animals to prevent them
from swallowing the batteries or small accessories.
Stop using the camera if any kind of liquid or foreign object enters the camera.
If it happens, power off the camera and contact your dealer for help.
Do not operate this camera with wet hands; it may cause electric shock.
The camera may be damaged in an environment of high temperature.
To avoid electricity leakage, please remove the battery if the camera is
expected not to be in use for a long period.
It is normal that the temperature of the camera body rises if the camera works
for a long time.
A message of "Low Light!" appearing on the LCD Monitor is a warning to
remind you to go to the Flash Mode and select Auto Flash or Fill-in flash to get
more light sources so as to compose a superior quality image.
In such cases shown as follows, please release the shutter button, then try to
re-compose the shot and focus again because the Auto Focus function may
be difficult to use with.
The subject is far away from the photographer or in the dark.
The subject is viewed through a piece of glass or window.
A fast-moving or a flashing subject is passing through.
The subject has a reflection attribute like a mirror, a luminous body, or a lustrous
subject.
Do not touch the lens when it is in use.
Small Tip to Save You Big Headache
A digital camera is in a way very similar to a computer. If the digital
camera hangs itself during operation, please follow the procedures
below and most likely the camera can be re-activated.
1. Remove the battery.
2. Reload the battery.
3. Switch on the camera.
Overall Introduction
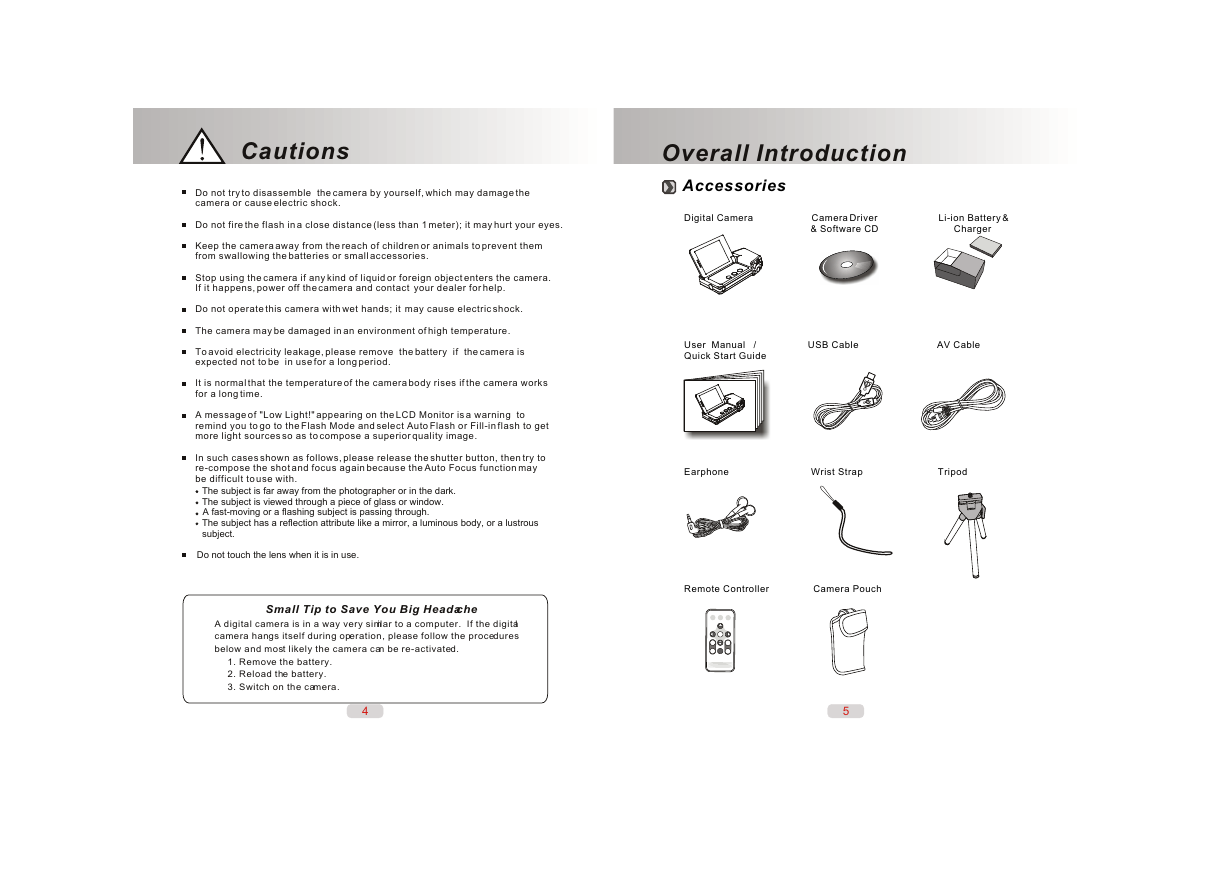
Accessories
Digital Camera Camera Driver Li-ion Battery &
& Software CD Charger
User Manual / USB Cable AV Cable
Quick Start Guide
Earphone Wrist Strap Tripod
Remote Controller Camera Pouch
4
5
�
Overall Introduction
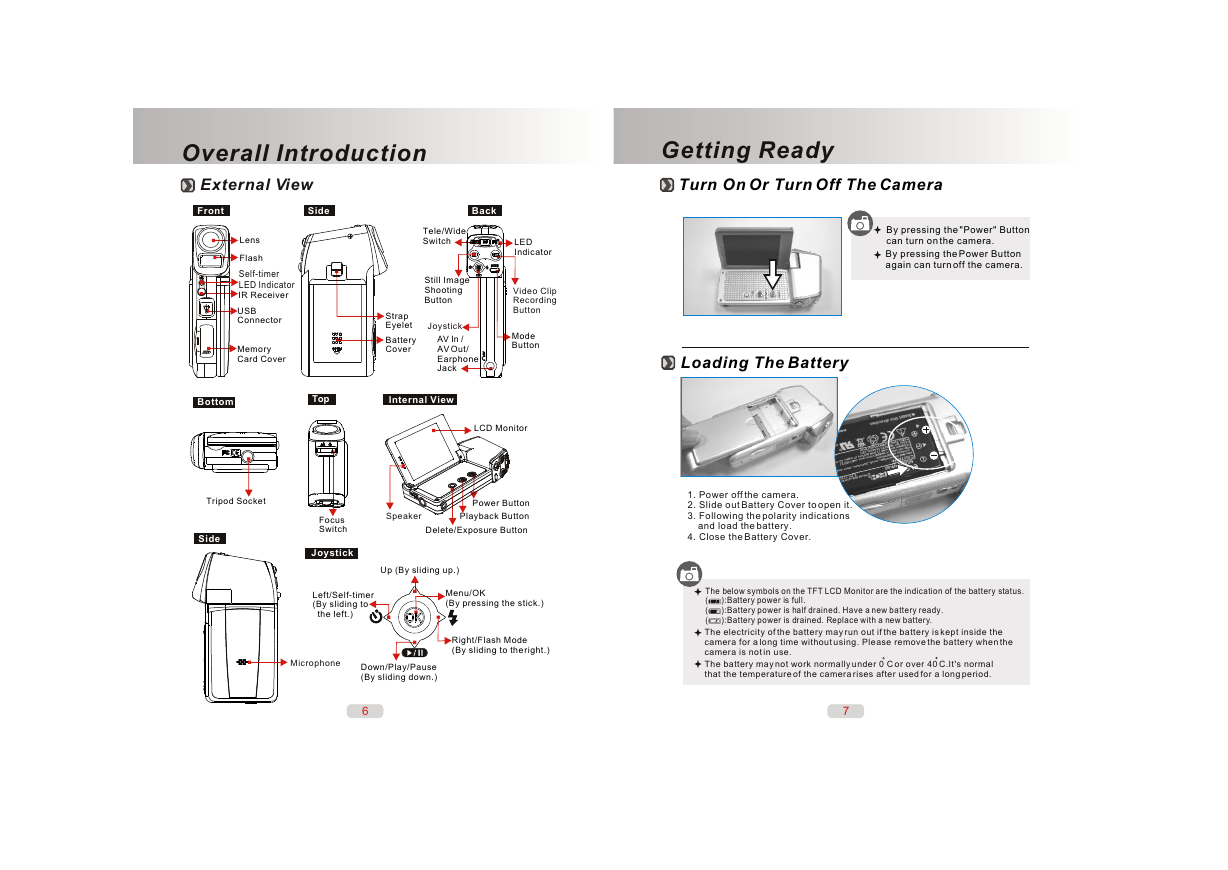
External View
Front
Side
Lens
Flash
Self-timer
LED Indicator
IR Receiver
USB
Connector
Memory
Card Cover
Back
Tele/Wide
Switch
Still Image
Shooting
Button
Strap
Eyelet
Battery
Cover
Joystick
AV In /
AV Out/
Earphone
Jack
LED
Indicator
Video Clip
Recording
Button
Mode
Button
Bottom
Top
Internal View
LCD Monitor
Tripod Socket
Side
Focus
Switch
Joystick
Left/Self-timer
(By sliding to
the left.)
Speaker
Power Button
Playback Button
Delete/Exposure Button
Up (By sliding up.)
Menu/OK
(By pressing the stick.)
Right/Flash Mode
(By sliding to the right.)
Microphone
Down/Play/Pause
(By sliding down.)
6
Getting Ready
Turn On Or Turn Off The Camera
By pressing the "Power" Button
can turn on the camera.
By pressing the Power Button
again can turn off the camera.
Loading The Battery
1. Power off the camera.
2. Slide out Battery Cover to open it.
3. Following the polarity indications
and load the battery.
4. Close the Battery Cover.
The below symbols on the TFT LCD Monitor are the indication of the battery status.
( ):Battery power is full.
( ):Battery power is half drained. Have a new battery ready.
( ):Battery power is drained. Replace with a new batter . y
The electricity of the battery may run out if the battery is kept inside the
camera for a long time without using. Please remove the battery when the
camera is not in use.
The battery may not work normally under 0 C or over 40 C.It's normal
that the temperature of the camera rises after used for a long period.
7
�
Getting Ready
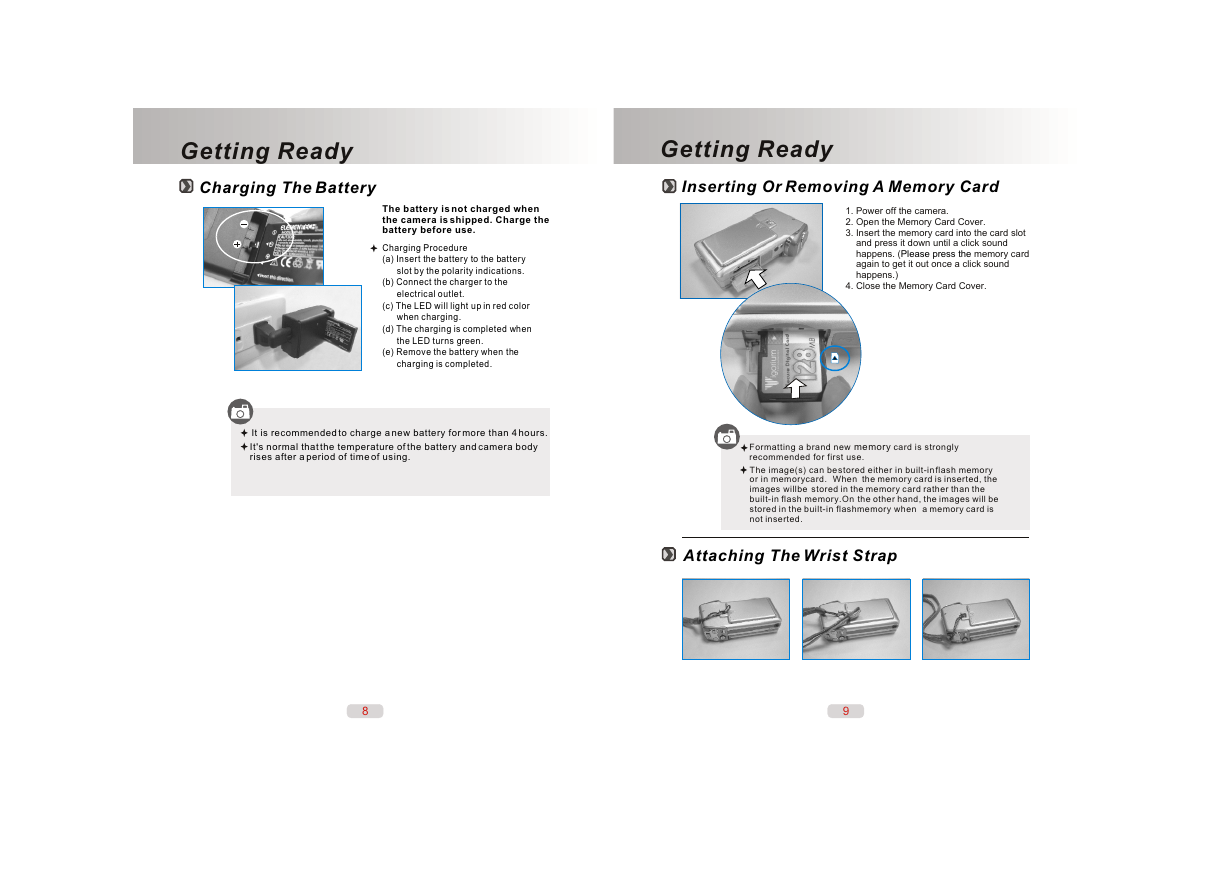
Charging The Battery
Getting Ready
Inserting Or Removing A Memory Card
The battery is not charged when
the camera is shipped. Charge the
battery before use.
Charging Procedure
(a) Insert the battery to the battery
slot by the polarity indications.
(b) Connect the charger to the
electrical outlet.
(c) The LED will light up in red color
when charging.
(d) The charging is completed when
the LED turns green.
(e) Remove the battery when the
charging is completed.
It is recommended to charge a new battery for more than 4 hours.
It's normal that the temperature of the battery and camera body
rises after a period of time of using.
1. Power off the camera.
2. Open the Memory Card Cover.
3. Insert the memory card into the card slot
and press it down until a click sound
happens. (
again to get it out once a click sound
happens.)
4. Close the Memory Card Cover.
Please press the
memory card
Formatting a brand new
recommended
for first use.
memory
card is strongly
The image(s) can be stored either in built-in flash memory
or in memorycard. When the memory card is inserted, the
images willbe stored in the memory card rather than the
built-in flash memory.On the other hand, the images will be
stored in the built-in flashmemory when a memory card is
not inserted.
Attaching The Wrist Strap
1
2
3
8
9
�
105mm+-2
105mm+-2
Modes Introduction
This camera is a multi-functional device which includes
the modes listed below.
1. DV / DSC Mode
At this mode you can take a still image by pressing the Still Image
Shooting Button ( ) or a movie clip by pressing the Video Clip
Recording Button ( ).
2. Album Mode
This mode is to play the still image and movie clips stored in
the built-in flash memory or the memory card no matter if the
files are recorded by this camera or other devices.
3. Digital Music Mode
This mode enables you to play the digital music.
4. Voice Recording Mode
This mode enables you to do the voice recording.
5. Game Mode
This mode offers four games.
6. AV In Mode
This mode enables you to record the videos from TV or DVD
player or devices that have video output.
7. Playback Mode
This mode can only plays the files recorded by this camera.
10
Modes Introduction
8. Others
AV Out
This feature will output audio/video signal from the camera to TV.
AV MODE?
AV MODE?
EARPHONE
AV OUT
AV IN
CONFIRM:OK
CONFIRM:OK
At any mode plug the Video Cable in the
AV In / AV Out / Earphone Jack ( AV ).
Choose AV OUT and press Menu/OK Button.
To cancel this feature, simply disconnect
the video cable from the camera.
Earphone
The audio will come out from the Earphone Jack instead
of the built-in speaker if this feature is chosen.
AV MODE?
AV MODE?
EARPHONE
AV OUT
AV IN
CONFIRM:OK
CONFIRM:OK
At any mode plug the earphone in the
AV In / AV Out / Earphone Jack ( ).
Choose EARPHONE and press
Menu/OK Button.
11
1
5
0
m
m
+
-
2
�
DV / DSC Mode
DV / DSC Mode
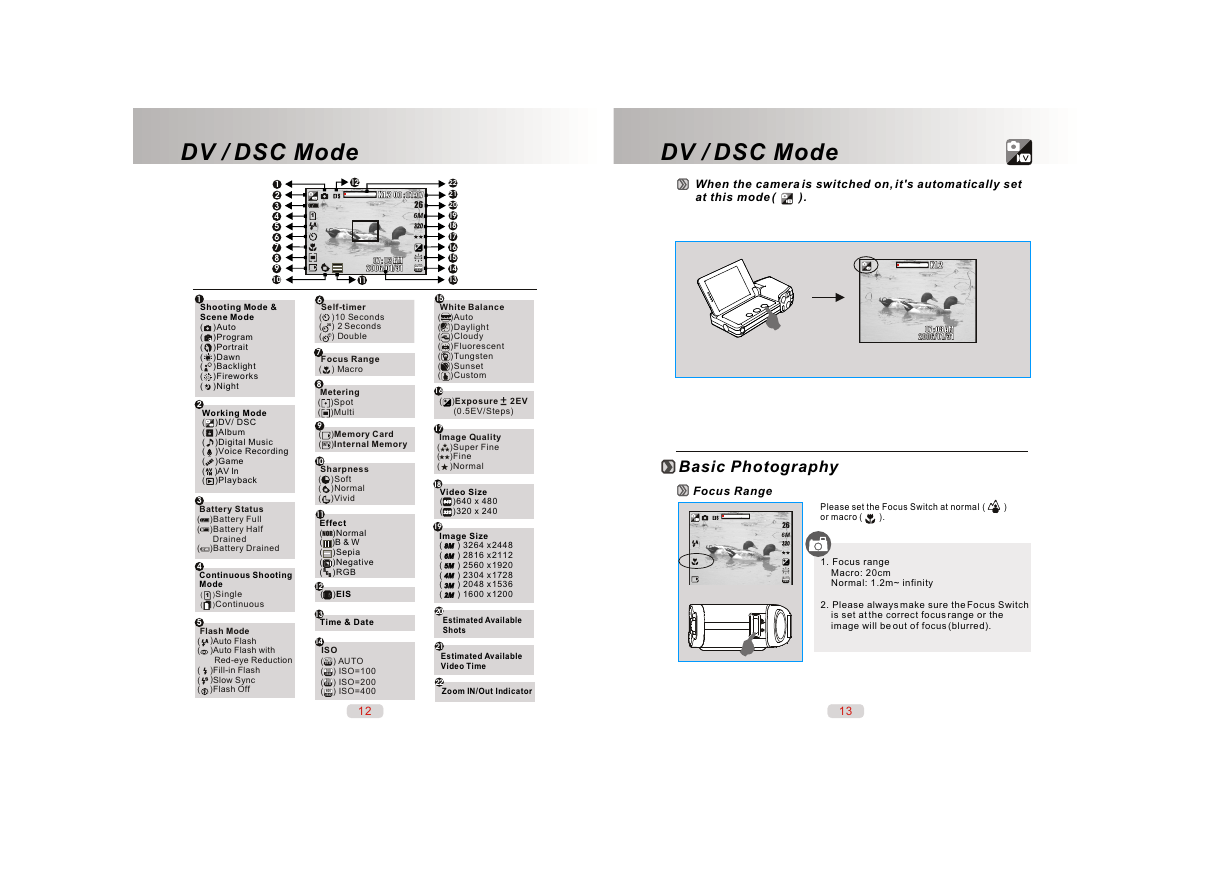
1
2
3
4
5
6
7
8
9
10
12
X1.2X1.2
00 : 01 :07
00 : 01 :07
26
6M
1
07 : 03 AM
07 : 03 AM
2006/01/31
2006/01/31
AUTO
ISO
11
22
21
20
19
18
17
16
15
14
13
1
Shooting Mode &
Scene Mode
( )Auto
( )Program
( )Portrait
( )Dawn
( )Backlight
( )Fireworks
( )Night
2
Working Mode
( )DV/ DSC
( )Album
( )Digital Music
( )Voice Recording
( )Game
( )AV In
( )Playback
3
Battery Status
( )Battery Full
( )Battery Half
Drained
( )Battery Drained
4
Continuous Shooting
Mode
( )Single
1
( )Continuous
5
Flash Mode
( )Auto Flash
( )Auto Flash with
Red-eye Reduction
( )Fill-in Flash
( )Slow Sync
( )Flash Off
2S
6
Self-timer
( )10 Seconds
( ) 2 Seconds
( ) Double
7
Focus Range
( ) Macro
8
Metering
( )Spot
( )Multi
9
( )
( )Internal Memory
INT
Memory Card
10
Sharpness
( )Soft
( )Normal
( )Vivid
11
Effect
( )Normal
NOR
( )B & W
( )Sepia
( )Negative
( )RGB
RGB
12
( )EIS
13
Time & Date
14
ISO
( ) AUTO
AUTO
ISO
( ) ISO=100
100
ISO
( ) ISO=200
200
ISO
( ) ISO=400
400
ISO
12
15
White Balance
( )Auto
( )Daylight
( )Cloudy
( )Fluorescent
( )Tungsten
( )Sunset
( )Custom
16
( )
(0.5EV/Steps)
Exposure 2EV
17
Image Quality
( )Super Fine
( )Fine
( )Normal
18
Video Size
( )640 x 480
( )320 x 240
19
Image Size
( ) 3264 x 2448
( ) 2816 x 2112
( ) 2560 x 1920
( ) 2304 x 1728
( ) 2048 x 1536
( ) 1600 x 1200
20
Estimated Available
Shots
21
Estimated Available
Video Time
22
Zoom IN/Out Indicator
When the camera is switched on, it's automatically set
at this mode ( ).
X1.2X1.2
07 : 03 AM
07 : 03 AM
2006/01/31
2006/01/31
Basic Photography
Focus Range
26
6M
AUTO
ISO
Please set the Focus Switch at normal ( )
or macro ( ).
1. Focus range
Macro: 20cm
Normal: 1.2m~ infinity
2. Please always make sure the Focus Switch
is set at the correct focus range or the
image will be out of focus (blurred).
13
�
DV / DSC Mode
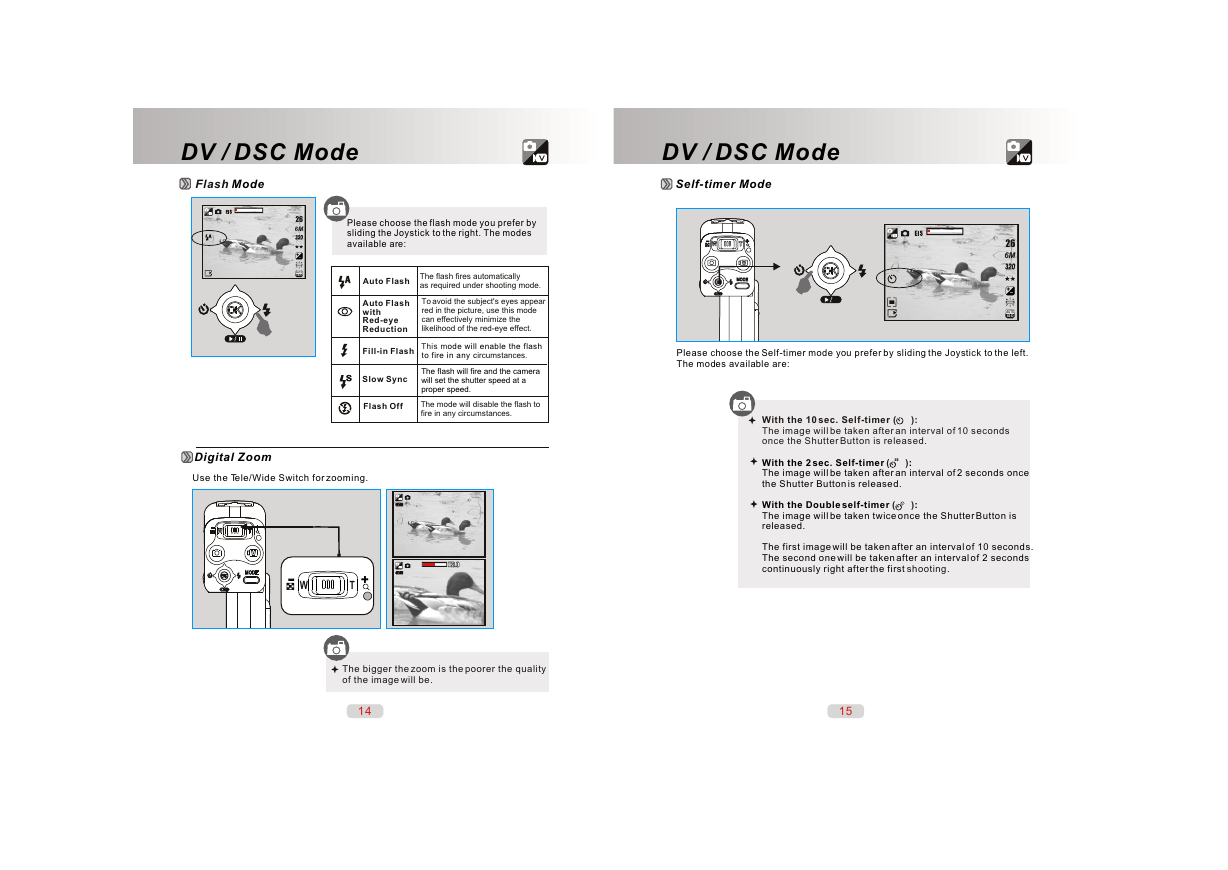
Flash Mode
DV / DSC Mode
Self-timer Mode
26
6M
AUTO
ISO
Please choose the flash mode you prefer by
sliding the Joystick to the right. The modes
available are:
Auto Flash
Auto Flash
with
Red-eye
Reduction
Fill-in Flash
Slow Sync
Flash Off
The flash fires automatically
as required under shooting mode.
To avoid the subject's eyes appear
red in the picture, use this mode
can effectively minimize the
likelihood of the red-eye effect.
ode will enable the flash
This m
to fire in any c
ircumstances.
The flash will fire and the camera
will set the shutter speed at a
proper speed.
The mode will disable the flash to
fire in any circumstances.
Digital Zoom
Use the Tele/Wide Switch for zooming.
W
T
X3.0X3.0
26
6M
AUTO
ISO
Please choose the Self-timer mode you prefer by sliding the Joystick to the left.
The modes available are:
With the 10 sec. Self-timer ( ):
The image will be taken after an interval of 10 seconds
once the Shutter Button is released.
With the 2 sec. Self-timer
The image will be taken after an interval of 2 seconds once
the Shutter Button is released.
( )
:
2S
:
( )
With the Double self-timer
The image will be taken twice once the Shutter Button is
released.
The first image will be taken after an interval of 10 seconds.
The second one will be taken after an interval of 2 seconds
continuously right after the first
shooting
.
The bigger the zoom is the poorer the quality
of the image will be.
14
15
�




 2023年江西萍乡中考道德与法治真题及答案.doc
 2012年重庆南川中考生物真题及答案.doc
 2013年江西师范大学地理学综合及文艺理论基础考研真题.doc
 2020年四川甘孜小升初语文真题及答案I卷.doc
 2020年注册岩土工程师专业基础考试真题及答案.doc
 2023-2024学年福建省厦门市九年级上学期数学月考试题及答案.doc
 2021-2022学年辽宁省沈阳市大东区九年级上学期语文期末试题及答案.doc
 2022-2023学年北京东城区初三第一学期物理期末试卷及答案.doc
 2018上半年江西教师资格初中地理学科知识与教学能力真题及答案.doc
 2012年河北国家公务员申论考试真题及答案-省级.doc
 2020-2021学年江苏省扬州市江都区邵樊片九年级上学期数学第一次质量检测试题及答案.doc
 2022下半年黑龙江教师资格证中学综合素质真题及答案.doc