English ................................
Türkçe
1
................................ 31
............................ 61
............................ 91
................................ 121
P/N: 02PF169000000 Rev.A
�
1
2
3
15
14
13
12
11
10
( )
( )
( )
( )
1
2
3
4
5
6
7
8
9
�
PDE Printed Guide.fm Page 1 Thursday, October 20, 2005 3:34 PM
Congratulations
Zen Vision:M™ is the new digital player from Creative. Read on to learn
how to get started with your new player!
1
Contents
About Your Player ........................................................................ 2
Using the Navigation Controls .................................................... 3
Getting Started ............................................................................ 4
Managing Music and Data ......................................................... 10
Understanding Your Player ....................................................... 11
Managing Your Player ............................................................... 12
Personalizing Your Player ......................................................... 21
Connecting Your Player to a TV (Optional) ................................ 24
FAQ ............................................................................................ 25
Information Diagrams ............................................................... 26
General Specifications ............................................................. 28
Copyright and License ............................................................... 30
�
PDE Printed Guide.fm Page 2 Thursday, October 20, 2005 3:34 PM
2 About Your Player
About Your Player
Unfold the last page of this booklet, and reference the image there against the
names and descriptions below.
1 Power switch
2 Screensaver LED
3 Lock
Connect the USB synchronization
adapter to this connector.
10 Dock connector
Push toward the Lock icon
lock the player and prevent
functions from being accidentally
activated.
to
4 Headphone jack
5 Vertical Touch Pad
See “Using the Navigation
Controls” on page 3.
6 Microphone
7 Play/Pause button
8 Next/Fast Forward button
Press to go to the next track or
menu option.
Press and hold to move forward
within a track.
9 Options button
Press to display more options.
11 Reset hole
See “How do I reset Zen
Vision:M?” on page 25.
12 Menu/Back button
Press to return to the previous
screen or menu.
Press and hold to return to the
main menu.
13 Previous/Rewind button
Press to go to the previous track
or menu option.
Press and hold to move back
within a track.
14 My Shortcut button
See “To assign a menu shortcut
to My Shortcut button” on
page 21.
15 Liquid Crystal Display (LCD)
�
PDE Printed Guide.fm Page 3 Thursday, October 20, 2005 3:34 PM
Using the Navigation Controls 3
Using the Navigation Controls
We use the term “Navigation controls” to mean the following:
Vertical Touch Pad
Previous/Rewind button
Next/Fast Forward button.
We use the term “Select” to mean the following actions:
1 Move your thumb up and down the Vertical Touch Pad to move vertically in a
menu OR press the Previous/Rewind or Next/Fast Forward button to move
horizontally in a menu.
Press the top or bottom edge of the Vertical Touch Pad to move up or down one
menu option.
Press and hold the top or bottom edge of the Vertical Touch Pad to rapidly scroll
through menu options.
2 Firmly tap the Vertical Touch Pad to select the highlighted option.
1
2
OR
To adjust volume with the Vertical Touch Pad
Depending on the menu you are in, move your thumb up and down the Vertical
Touch Pad OR press the Options button
and select Volume.
�
PDE Printed Guide.fm Page 4 Thursday, October 20, 2005 3:34 PM
4 Getting Started
Getting Started
Step 1: Charge Your Player
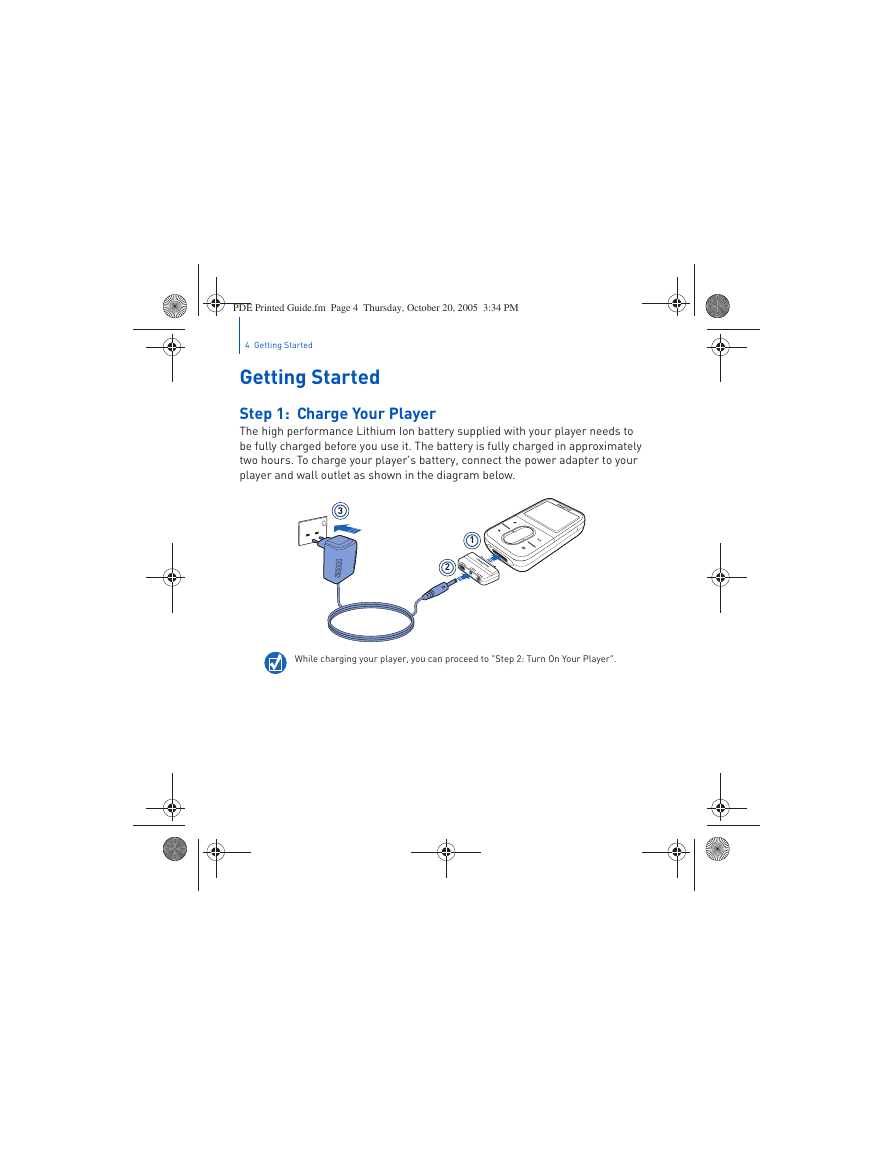
The high performance Lithium Ion battery supplied with your player needs to
be fully charged before you use it. The battery is fully charged in approximately
two hours. To charge your player's battery, connect the power adapter to your
player and wall outlet as shown in the diagram below.
3
1
2
While charging your player, you can proceed to "Step 2: Turn On Your Player".
�
PDE Printed Guide.fm Page 5 Thursday, October 20, 2005 3:34 PM
Step 2: Turn On Your Player
1 Slide the Power switch towards the Power icon
LCD lights up.
Getting Started 5
and hold it there until the
2 When you turn on your player for the first time, the menu is in English. To
change the language:
i. Press and hold the Menu/Back button
ii. Select System → Language → language that you want.
. The main menu appears.
3 After you have finished using your player, slide the Power switch towards
the Power icon
until the Shutting down message appears.
Step 3: Set Up Software
1 Turn on your computer. You must log in as an administrator in Windows®
before you can set up the software. For more information, refer to your
operating system’s online Help.
2 Insert the Installation CD into your CD-ROM/DVD-ROM drive. Your CD
should start automatically. If it does not, follow the steps below:
i. Double-click the My Computer icon.
Alternatively, click Start → My Computer.
ii. Right-click the CD-ROM/DVD-ROM drive icon, and then click Autoplay.
3 Follow the instructions on the screen and when prompted, restart your
computer.
4 When your computer restarts, follow the product registration instructions
on the screen.
You will require an Internet connection to register your product.
�
PDE Printed Guide.fm Page 6 Thursday, October 20, 2005 3:34 PM
6 Getting Started
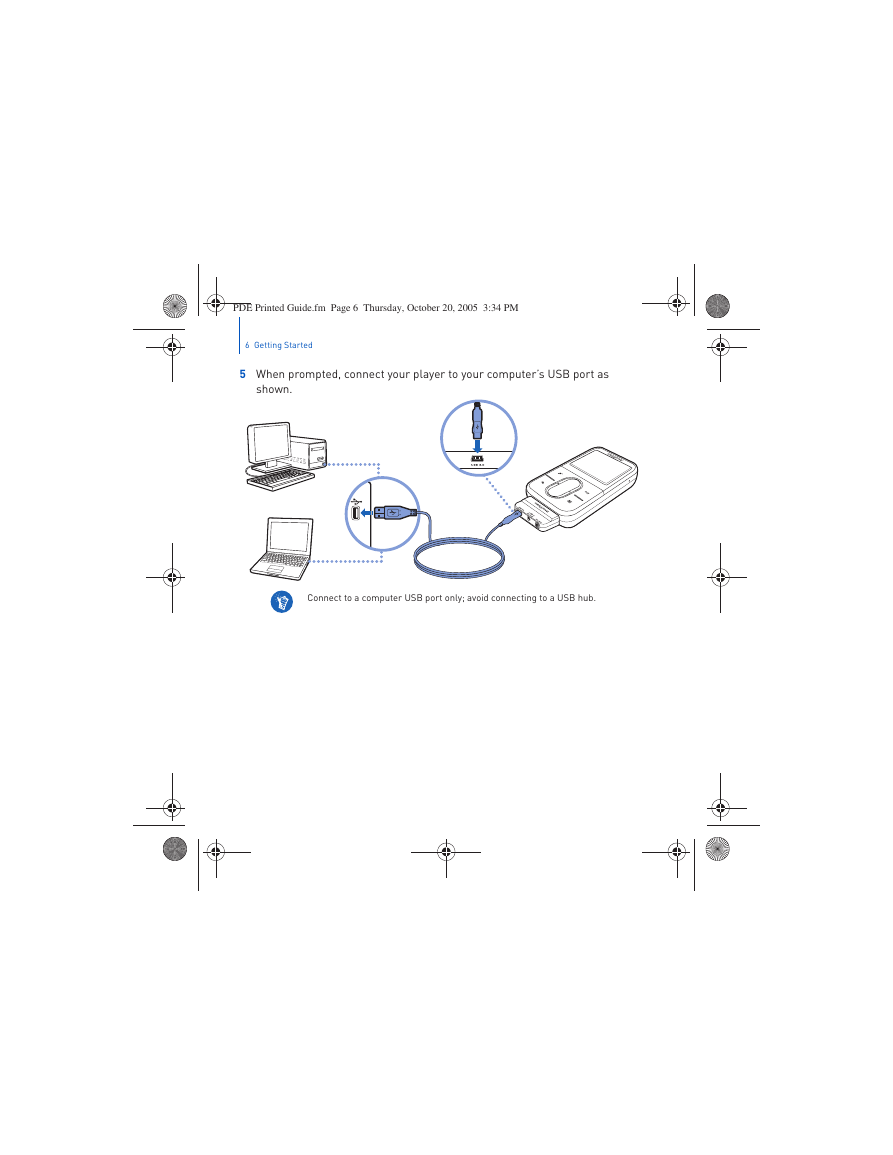
5 When prompted, connect your player to your computer’s USB port as
shown.
Connect to a computer USB port only; avoid connecting to a USB hub.
�




 2023年江西萍乡中考道德与法治真题及答案.doc
 2012年重庆南川中考生物真题及答案.doc
 2013年江西师范大学地理学综合及文艺理论基础考研真题.doc
 2020年四川甘孜小升初语文真题及答案I卷.doc
 2020年注册岩土工程师专业基础考试真题及答案.doc
 2023-2024学年福建省厦门市九年级上学期数学月考试题及答案.doc
 2021-2022学年辽宁省沈阳市大东区九年级上学期语文期末试题及答案.doc
 2022-2023学年北京东城区初三第一学期物理期末试卷及答案.doc
 2018上半年江西教师资格初中地理学科知识与教学能力真题及答案.doc
 2012年河北国家公务员申论考试真题及答案-省级.doc
 2020-2021学年江苏省扬州市江都区邵樊片九年级上学期数学第一次质量检测试题及答案.doc
 2022下半年黑龙江教师资格证中学综合素质真题及答案.doc