Contents_CLA.fm Page i Tuesday, December 6, 2005 2:44 PM
i
English............................................ 1
日本語........................................... 14
简体中文 ....................................... 27
繁體中文 ....................................... 40
한국어........................................... 53
Türkçe........................................... 65
�
Contents_CLA.fm Page ii Tuesday, December 6, 2005 2:44 PM
ii
�
Zen MicroPhoto_CLA.fm Page 1 Wednesday, December 28, 2005 9:37 AM
Getting Started 1
English
Getting Started
Congratulations on your purchase of Zen™ MicroPhoto! Follow the next few
steps to set up the software and your player to enjoy a new level in portable
digital entertainment.
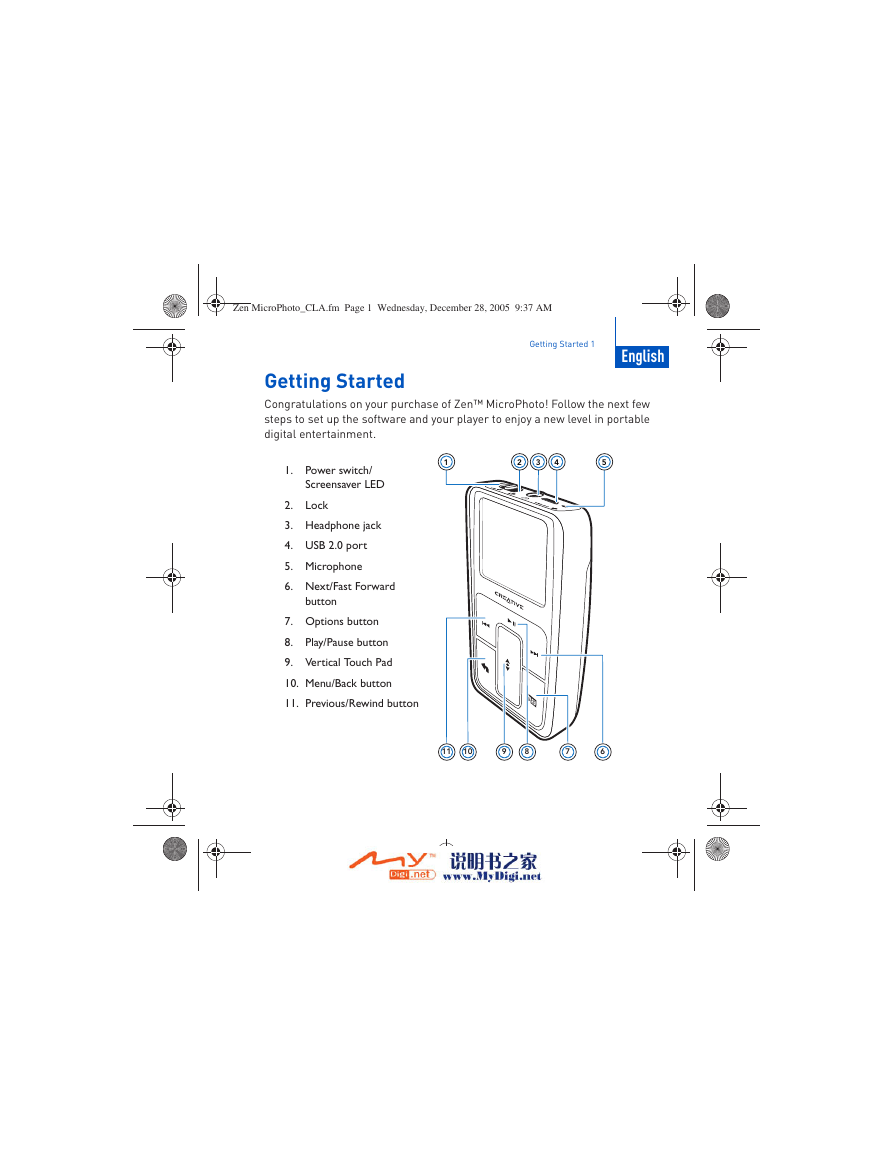
1.
Power switch/
Screensaver LED
2.
Lock
3. Headphone jack
4. USB 2.0 port
5. Microphone
6. Next/Fast Forward
button
7. Options button
8.
Play/Pause button
9. Vertical Touch Pad
10. Menu/Back button
11. Previous/Rewind button
1
2
3
4
5
11
10
9
8
7
6
�
Zen MicroPhoto_CLA.fm Page 2 Wednesday, December 28, 2005 9:37 AM
2 Using the Vertical Touch Pad
Using the Vertical Touch Pad
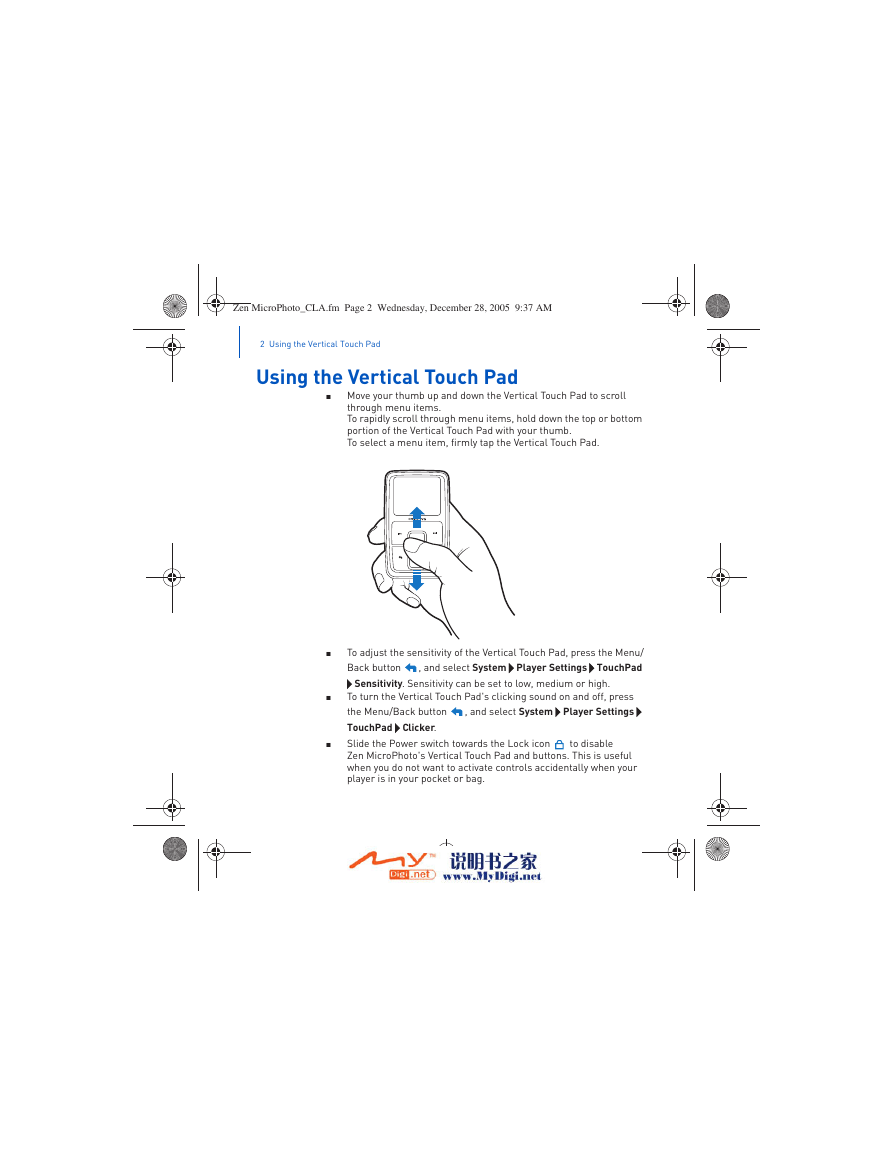
■ Move your thumb up and down the Vertical Touch Pad to scroll
through menu items.
To rapidly scroll through menu items, hold down the top or bottom
portion of the Vertical Touch Pad with your thumb.
To select a menu item, firmly tap the Vertical Touch Pad.
■
■
■
, and select System Player Settings
To adjust the sensitivity of the Vertical Touch Pad, press the Menu/
TouchPad
Back button
Sensitivity. Sensitivity can be set to low, medium or high.
To turn the Vertical Touch Pad's clicking sound on and off, press
Player Settings
the Menu/Back button
TouchPad
Slide the Power switch towards the Lock icon
Zen MicroPhoto's Vertical Touch Pad and buttons. This is useful
when you do not want to activate controls accidentally when your
player is in your pocket or bag.
to disable
, and select System
Clicker.
�
Zen MicroPhoto_CLA.fm Page 3 Wednesday, December 28, 2005 9:37 AM
Insert the battery 3
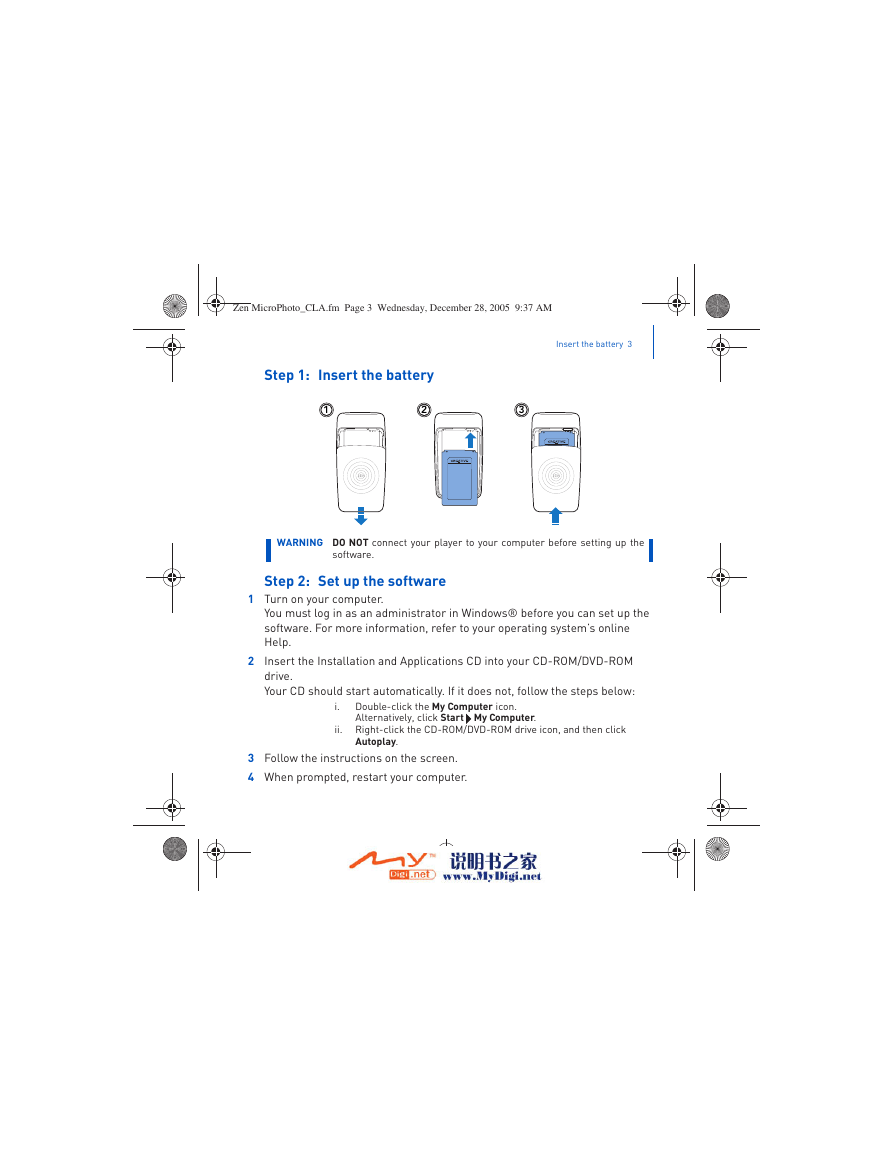
Step 1: Insert the battery
1
2
3
WARNING DO NOT connect your player to your computer before setting up the
software.
Step 2: Set up the software
1 Turn on your computer.
You must log in as an administrator in Windows® before you can set up the
software. For more information, refer to your operating system’s online
Help.
2 Insert the Installation and Applications CD into your CD-ROM/DVD-ROM
drive.
Your CD should start automatically. If it does not, follow the steps below:
Double-click the My Computer icon.
Alternatively, click Start
My Computer.
ii. Right-click the CD-ROM/DVD-ROM drive icon, and then click
i.
Autoplay.
3 Follow the instructions on the screen.
4 When prompted, restart your computer.
�
Zen MicroPhoto_CLA.fm Page 4 Wednesday, December 28, 2005 9:37 AM
4 Charge the battery
Step 3: Charge the battery
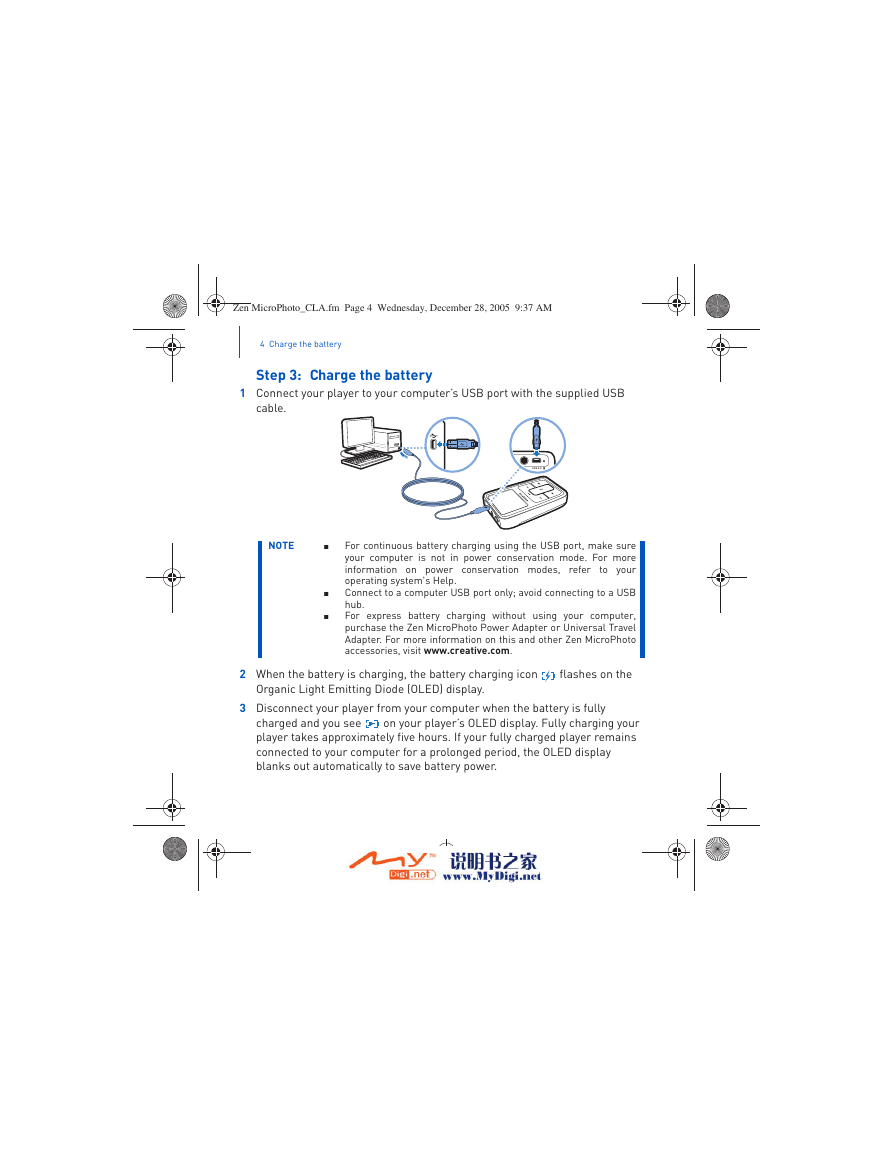
1 Connect your player to your computer’s USB port with the supplied USB
cable.
NOTE
■
■
■
For continuous battery charging using the USB port, make sure
your computer is not in power conservation mode. For more
information on power conservation modes, refer to your
operating system's Help.
Connect to a computer USB port only; avoid connecting to a USB
hub.
For express battery charging without using your computer,
purchase the Zen MicroPhoto Power Adapter or Universal Travel
Adapter. For more information on this and other Zen MicroPhoto
accessories, visit www.creative.com.
2 When the battery is charging, the battery charging icon
Organic Light Emitting Diode (OLED) display.
flashes on the
3 Disconnect your player from your computer when the battery is fully
charged and you see
on your player’s OLED display. Fully charging your
player takes approximately five hours. If your fully charged player remains
connected to your computer for a prolonged period, the OLED display
blanks out automatically to save battery power.
�
Zen MicroPhoto_CLA.fm Page 5 Wednesday, December 28, 2005 9:37 AM
Step 4: Turn On Your player
1 Slide the Power switch towards the Power icon
the OLED display lights up.
Turn On Your player 5
and hold it there until
2 When you turn on Zen MicroPhoto for the first time, the default language is
in English. To change the language:
Press the Menu/Back button
i.
ii. Use the Vertical Touch Pad
. The main menu appears.
to select System
Language, and
then select the language that you want.
3 After you have finished using your player, slide the Power switch towards
the Power icon
until the Shutting down message appears.
Step 5: Transfer Content
Transfer music and other files from your CD collection or computer. For
more details, see “Managing Music and Data” on page 9.
TIP
You can acquire content from many legal sources. Here are some
suggestions:
Audio tracks - ripped from personal audio CDs, home studio
recordings or purchased from online music stores.
Pictures - encoded from your personal digital camera or scanned
from printed photos.
■
■
To transfer or ‘rip’ music from your CD collection
1 Make sure your player is connected to your computer as shown on page 4.
2 Double-click the Zen MicroPhoto Media Explorer icon
on the desktop.
3 Click the Rip Audio CDs button
.
�
Zen MicroPhoto_CLA.fm Page 6 Wednesday, December 28, 2005 9:37 AM
6 Transfer Content
4 Follow the instructions on the screen.
NOTE
Creative Media Explorer uses MusicIDSM from Gracenote® to get artist,
title, track, credits, and other information about the CDs you play. This
service is FREE and automatic. You must be connected to the Internet when
using this service. For more information, refer to the Creative Audio CD
Ripper online Help.
To transfer audio files or pictures from your computer
1 Repeat steps 1 and 2 in "To transfer or ‘rip’ music from your CD collection".
2 Click the Browse Media button
3 Locate your media files and copy them to your player using the
.
drag-and-drop method.
To transfer data files
1 Repeat steps 1 and 2 in "To transfer or ‘rip’ music from your CD collection".
2 Click the Browse Documents button
3 Locate your data files and transfer them to your player using the
.
drag-and-drop method. You can also transfer audio files and pictures using
the Browse Documents button
.
NOTE
Make sure files are transferred to the correct folder, for example
pictures are transferred to Media
Music.
Pictures and music to Media
�



 2023年江西萍乡中考道德与法治真题及答案.doc
 2012年重庆南川中考生物真题及答案.doc
 2013年江西师范大学地理学综合及文艺理论基础考研真题.doc
 2020年四川甘孜小升初语文真题及答案I卷.doc
 2020年注册岩土工程师专业基础考试真题及答案.doc
 2023-2024学年福建省厦门市九年级上学期数学月考试题及答案.doc
 2021-2022学年辽宁省沈阳市大东区九年级上学期语文期末试题及答案.doc
 2022-2023学年北京东城区初三第一学期物理期末试卷及答案.doc
 2018上半年江西教师资格初中地理学科知识与教学能力真题及答案.doc
 2012年河北国家公务员申论考试真题及答案-省级.doc
 2020-2021学年江苏省扬州市江都区邵樊片九年级上学期数学第一次质量检测试题及答案.doc
 2022下半年黑龙江教师资格证中学综合素质真题及答案.doc