1. Safety Precautions
1-1. Repair Precaution
Before attempting any repair or detailed tuning, shield the device from RF noise or static
electricity discharges.
Use only demagnetized tools that are specifically designed for small electronic repairs,
as most electronic parts are sensitive to electromagnetic forces.
Use only high quality screwdrivers when servicing products. Low quality screwdrivers can
easily damage the heads of screws.
Use only conductor wire of the properly gauge and insulation for low resistance, because of the low margin
of error of most testing equipment.
We recommend 22-gauge twisted copper wire.
Hand-soldering is not recommended, because printed circuit boards (PCBs) can be easily
damaged, even with relatively low heat. Never use a soldering iron with a power rating of
more than 100 watts and use only lead-free solder with a melting point below 250°C (482°F).
Prior to disassembling the battery charger for repair, ensure that the AC power is disconnected.
Always use the replacement parts that are registered in the SEC system. Third-party replacement parts
may not function properly.
.
�
1. Safety Precautions
1-2. ESD(Electrostatically Sensitive Devices) Precaution
Many semiconductors and ESDs in electronic devices are particularly sensitive to static discharge and can
be easily damaged by it. We recommend protecting these components with conductive anti-static bags
when you store or transport them.
Always use an anti-static strap or wristband and remove electrostatic buildup or dissipate
static electricity from your body before repairing ESDs.
Ensure that soldering irons have AC adapter with ground wires and that the ground wires are properly
connected.
Use only desoldering tools with plastic tips to prevent static discharge.
Properly shield the work environment from accidental electrostatic discharge before opening
packages containing ESDs.
The potential for static electricity discharge may be increased in low humidity environments,
such as air-conditioned rooms. Increase the airflow to the working area to decrease the
chance of accidental static electricity discharges.
.
�
2. Specification
Not applicable
.
�
3. Product Function
Main Function
Item
OS
RF
SM-R810
Battery
SM-R800
Battery
Base Band
Other RF
Camera
SM-R810
LCD
SM-R800
LCD
RAM
Sensor
Description
Tizen based wearable OS 4.0
N/A
270mAh
472mAh
1.15GHz Dual Core CPU
GPS, Glonass, BT v4.2, NFC, WIFI 802.11 b/g/n
N/A
1.2” Super AMOLED, 360x360, 302ppi
1.3” Super AMOLED, 360x360, 278ppi
4G Bytes (eMMC) + 768M Bytes (LPDDR4) Memory
Accelerometer, Barometer, Gyro, HR, Ambient Light Sensor
Water-Resistance
5ATM
Accessory
Charger: 5V/0.7A
Tx PAD : Wireless charging dock
.
�
6. Level 1 Repair
6-1. S/W Update
6-1-1. Preparation
S/W Update program: Fenrir 5.17.xxxx
Mobile Phone Download Jig
: POGO JIG (SM-R800 : GH81-16173A, SM-R810 : GH81-16174A)
Data Cable
S/W Binary files (downloaded from GSPN)
※ Settings
.
�
6. Level 1 Repair
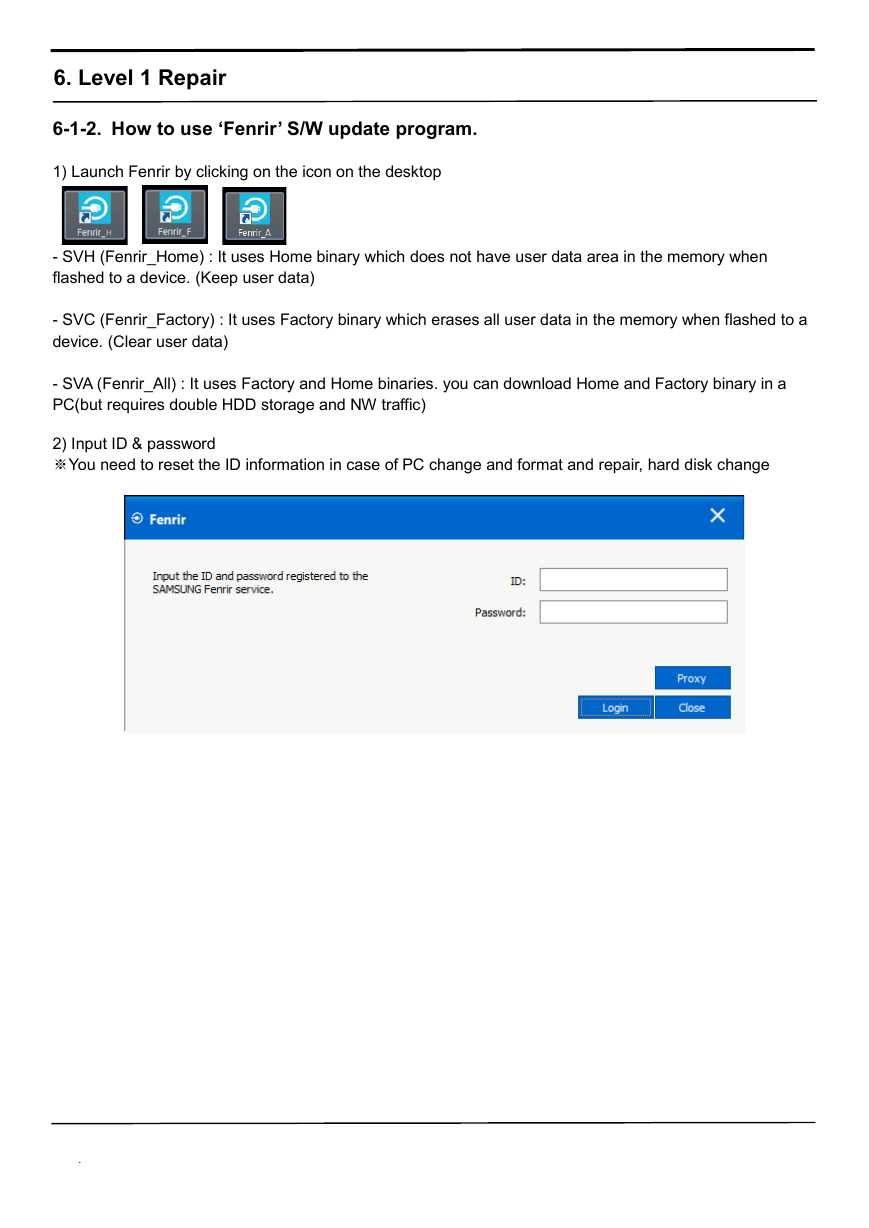
6-1-2. How to use ‘Fenrir’ S/W update program.
1) Launch Fenrir by clicking on the icon on the desktop
- SVH (Fenrir_Home) : It uses Home binary which does not have user data area in the memory when
flashed to a device. (Keep user data)
- SVC (Fenrir_Factory) : It uses Factory binary which erases all user data in the memory when flashed to a
device. (Clear user data)
- SVA (Fenrir_All) : It uses Factory and Home binaries. you can download Home and Factory binary in a
PC(but requires double HDD storage and NW traffic)
2) Input ID & password
※You need to reset the ID information in case of PC change and format and repair, hard disk change
.
�
6. Level 1 Repair
3) Ensure device has sufficient charge (at least 20%) to start firmware update.
4) Connect the device to PC via data cable.
5) Upon USB connection, you will be presented with below screen.
.
�
6. Level 1 Repair
6) Once device is detected, you will be presented with below screen.
To update S/W, select “S/W Update” or to exit select “SVC Connection”. If you select “SVC Connection”,
only Fenrir connection history (record) will be stored in the FUS server to support warranty validation.
(This is known as “Service Connection” history)
7) Once Fenrir starts, application will display the below screen.
And select the Start button & Agree button.
.
�


 2023年江西萍乡中考道德与法治真题及答案.doc
 2012年重庆南川中考生物真题及答案.doc
 2013年江西师范大学地理学综合及文艺理论基础考研真题.doc
 2020年四川甘孜小升初语文真题及答案I卷.doc
 2020年注册岩土工程师专业基础考试真题及答案.doc
 2023-2024学年福建省厦门市九年级上学期数学月考试题及答案.doc
 2021-2022学年辽宁省沈阳市大东区九年级上学期语文期末试题及答案.doc
 2022-2023学年北京东城区初三第一学期物理期末试卷及答案.doc
 2018上半年江西教师资格初中地理学科知识与教学能力真题及答案.doc
 2012年河北国家公务员申论考试真题及答案-省级.doc
 2020-2021学年江苏省扬州市江都区邵樊片九年级上学期数学第一次质量检测试题及答案.doc
 2022下半年黑龙江教师资格证中学综合素质真题及答案.doc