Android XO Tablet
User Manual
�
Features
Parental Controls
Front & Rear Cameras
1.6 GHz Dual-Core Processor
1GB of RAM
Wi-Fi
HDMI
Supports Multiple Users
8GB of Flash Storage (expandable by Micro SD)
High Resolution (1024x600) 7 Inch Display
Extra Long Life Battery
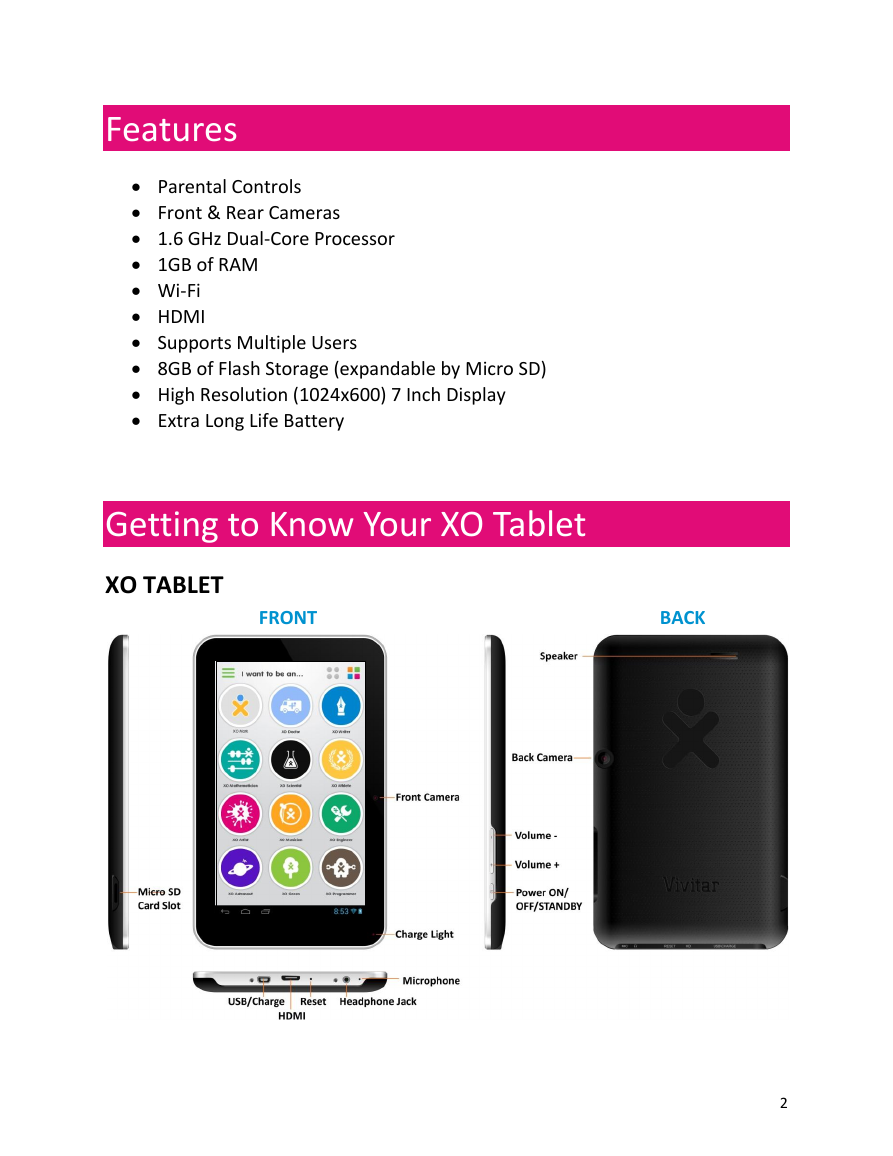
Getting to Know Your XO Tablet
XO TABLET
FRONT
BACK
2
�
UNLOCK
To unlock your XO Tablet in Android mode, touch and hold the Lock icon. When it
turns into a circle drag it towards the right, to the Unlock icon.
Note: To unlock and activate the tablet’s camera, touch and hold the Lock icon
and when it turns into a circle drag it towards the left, to the Camera icon.
Initial Setup
The first time you power on your tablet you will be taken through the initial setup.
Note: It is recommended to fully charge your tablet before first use. For best
results, give your tablet an extended overnight charge before using it for the first
time.
LICENSE AGREEMENT
You may choose to read the End User License Agreement.
To continue, scroll down to the end of the License Agreement and touch I Agree.
3
�
Welcome to Your XO Tablet
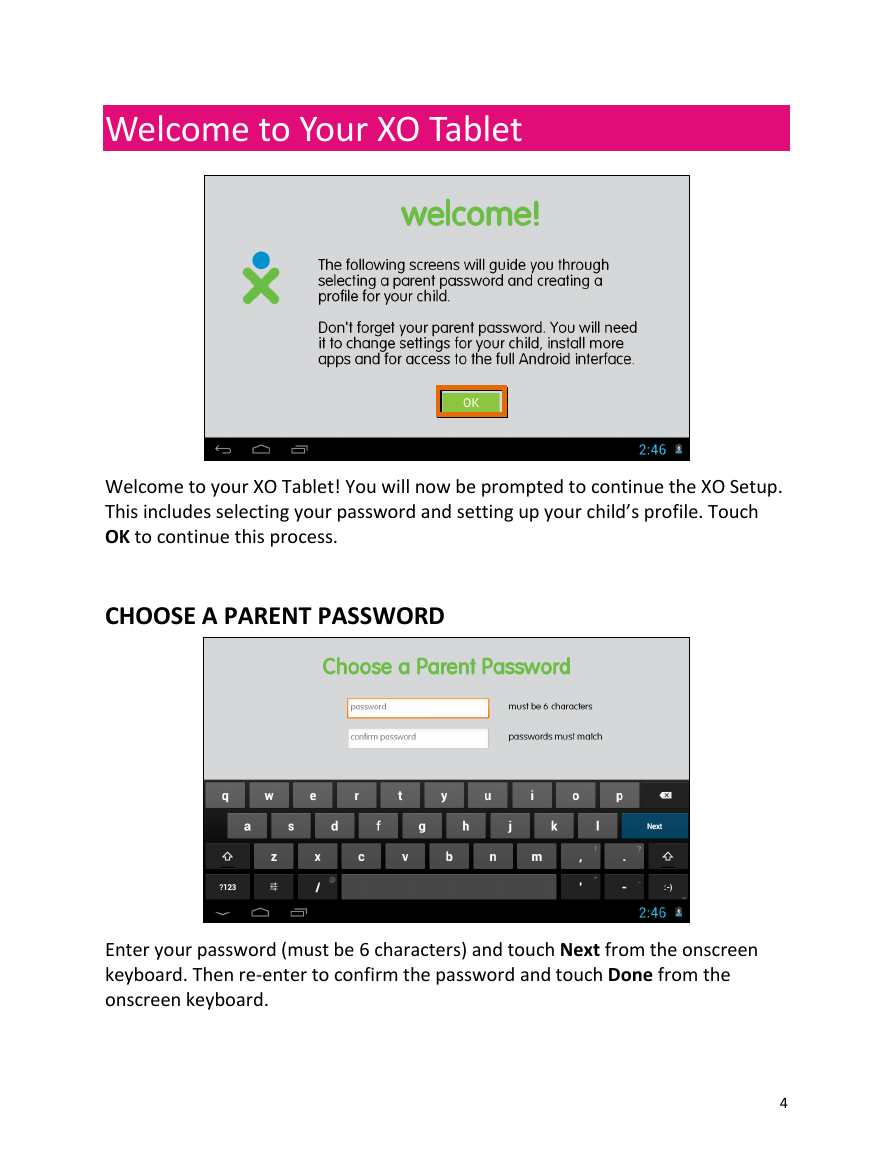
Welcome to your XO Tablet! You will now be prompted to continue the XO Setup.
This includes selecting your password and setting up your child’s profile. Touch
OK to continue this process.
CHOOSE A PARENT PASSWORD
Enter your password (must be 6 characters) and touch Next from the onscreen
keyboard. Then re-enter to confirm the password and touch Done from the
onscreen keyboard.
4
�
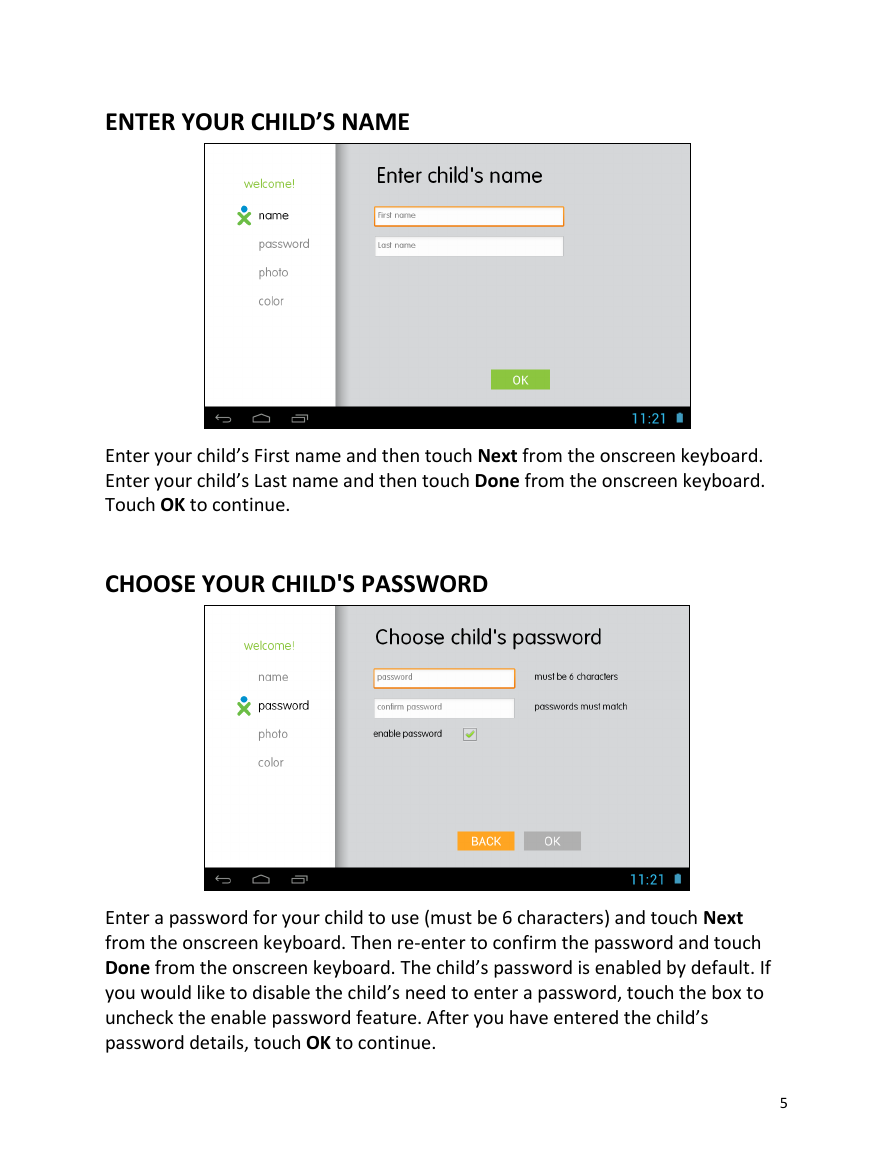
ENTER YOUR CHILD’S NAME
Enter your child’s First name and then touch Next from the onscreen keyboard.
Enter your child’s Last name and then touch Done from the onscreen keyboard.
Touch OK to continue.
CHOOSE YOUR CHILD'S PASSWORD
Enter a password for your child to use (must be 6 characters) and touch Next
from the onscreen keyboard. Then re-enter to confirm the password and touch
Done from the onscreen keyboard. The child’s password is enabled by default. If
you would like to disable the child’s need to enter a password, touch the box to
uncheck the enable password feature. After you have entered the child’s
password details, touch OK to continue.
5
�
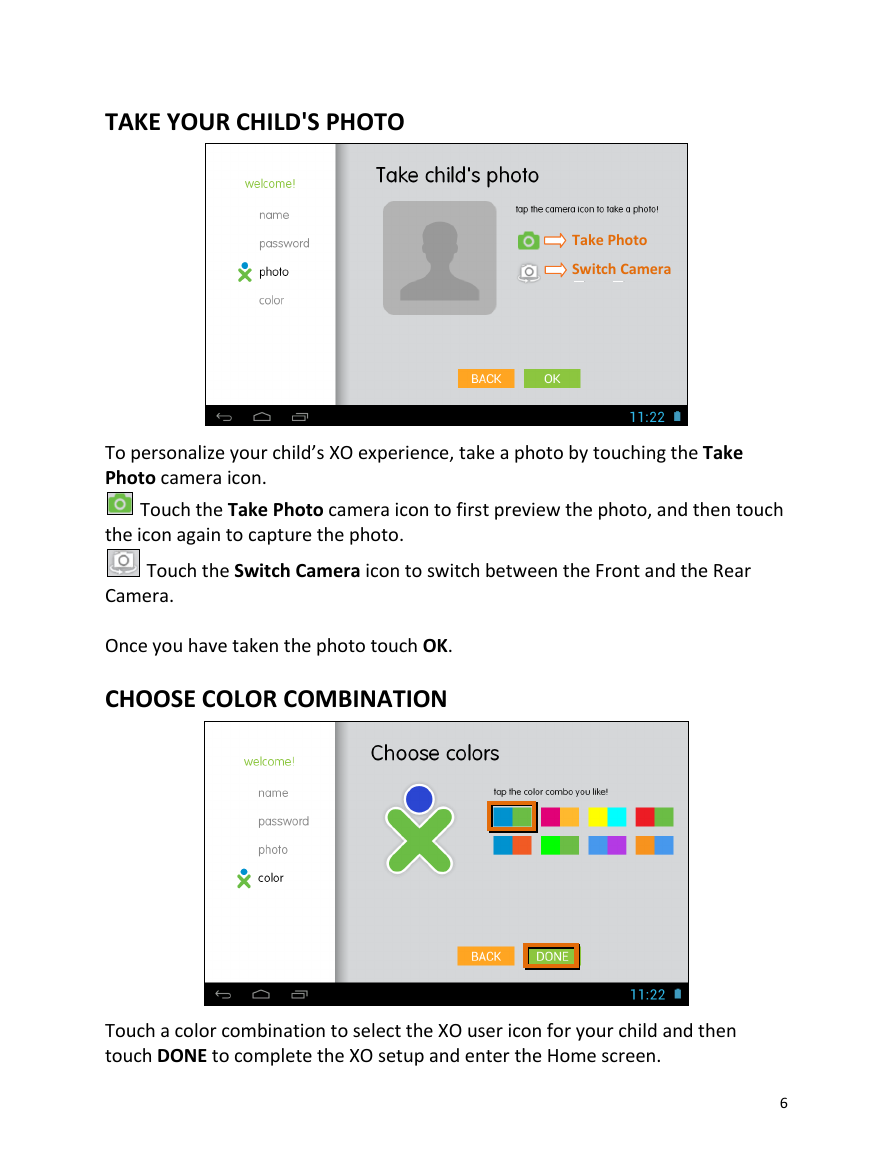
TAKE YOUR CHILD'S PHOTO
Take Photo
Switch Camera
To personalize your child’s XO experience, take a photo by touching the Take
Photo camera icon.
Touch the Take Photo camera icon to first preview the photo, and then touch
the icon again to capture the photo.
Touch the Switch Camera icon to switch between the Front and the Rear
Camera.
Once you have taken the photo touch OK.
CHOOSE COLOR COMBINATION
Touch a color combination to select the XO user icon for your child and then
touch DONE to complete the XO setup and enter the Home screen.
6
�
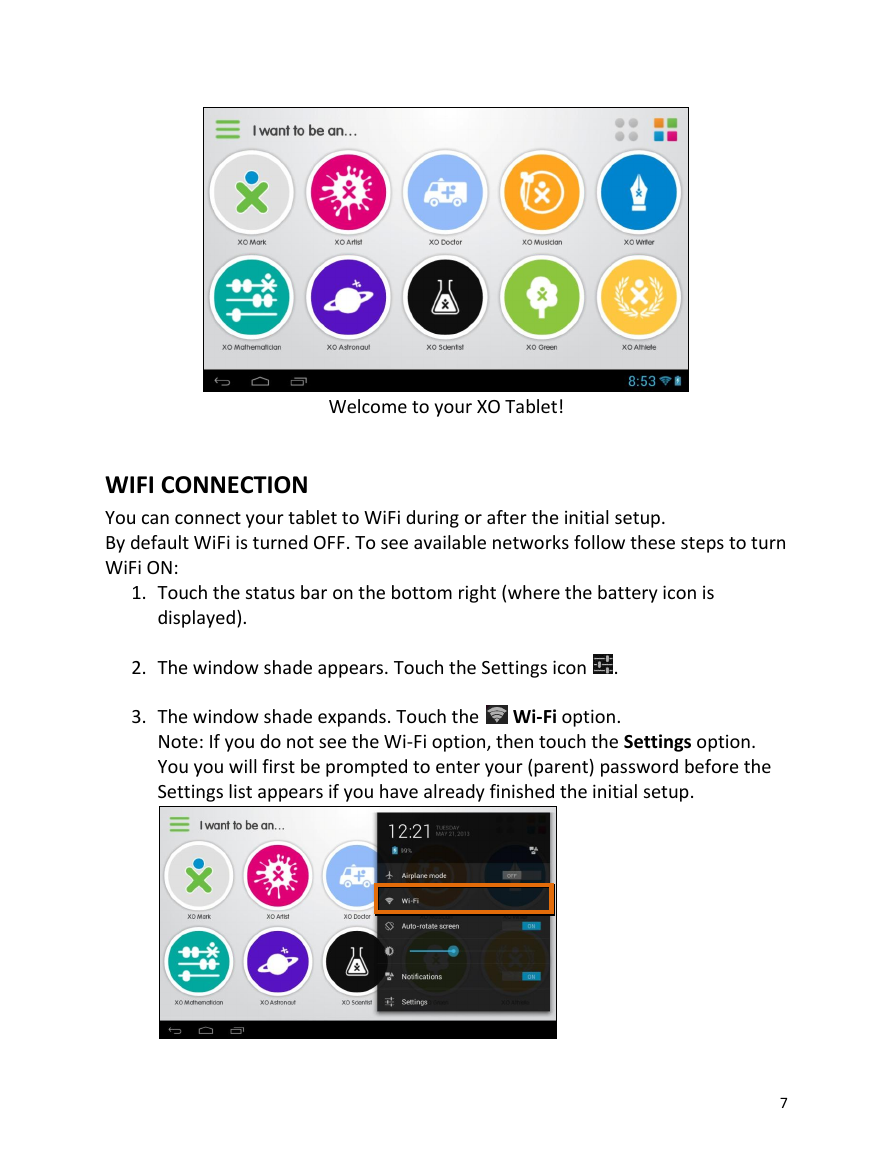
Welcome to your XO Tablet!
WIFI CONNECTION
You can connect your tablet to WiFi during or after the initial setup.
By default WiFi is turned OFF. To see available networks follow these steps to turn
WiFi ON:
1. Touch the status bar on the bottom right (where the battery icon is
displayed).
2. The window shade appears. Touch the Settings icon
.
3. The window shade expands. Touch the
Wi-Fi option.
Note: If you do not see the Wi-Fi option, then touch the Settings option.
You you will first be prompted to enter your (parent) password before the
Settings list appears if you have already finished the initial setup.
7
�
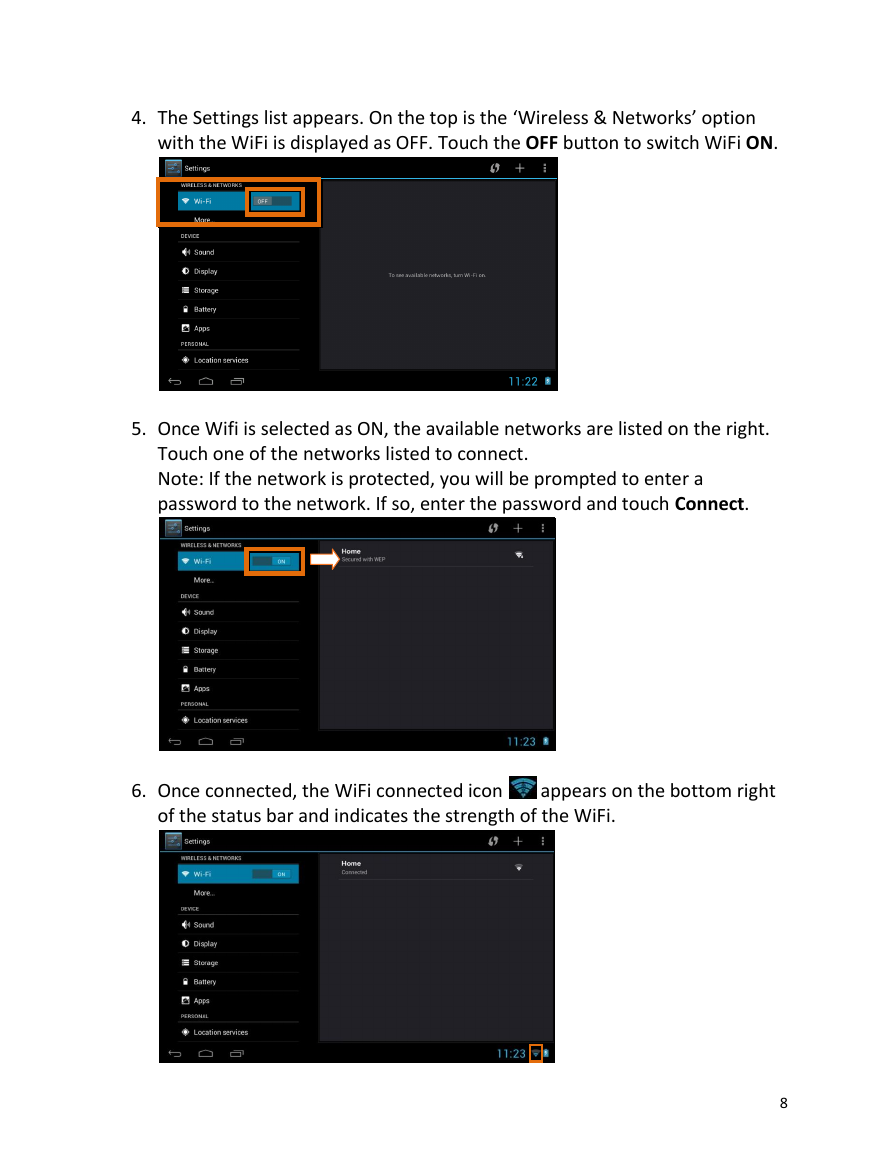
4. The Settings list appears. On the top is the ‘Wireless & Networks’ option
with the WiFi is displayed as OFF. Touch the OFF button to switch WiFi ON.
5. Once Wifi is selected as ON, the available networks are listed on the right.
Touch one of the networks listed to connect.
Note: If the network is protected, you will be prompted to enter a
password to the network. If so, enter the password and touch Connect.
6. Once connected, the WiFi connected icon
appears on the bottom right
of the status bar and indicates the strength of the WiFi.
8
�



 2023年江西萍乡中考道德与法治真题及答案.doc
 2012年重庆南川中考生物真题及答案.doc
 2013年江西师范大学地理学综合及文艺理论基础考研真题.doc
 2020年四川甘孜小升初语文真题及答案I卷.doc
 2020年注册岩土工程师专业基础考试真题及答案.doc
 2023-2024学年福建省厦门市九年级上学期数学月考试题及答案.doc
 2021-2022学年辽宁省沈阳市大东区九年级上学期语文期末试题及答案.doc
 2022-2023学年北京东城区初三第一学期物理期末试卷及答案.doc
 2018上半年江西教师资格初中地理学科知识与教学能力真题及答案.doc
 2012年河北国家公务员申论考试真题及答案-省级.doc
 2020-2021学年江苏省扬州市江都区邵樊片九年级上学期数学第一次质量检测试题及答案.doc
 2022下半年黑龙江教师资格证中学综合素质真题及答案.doc