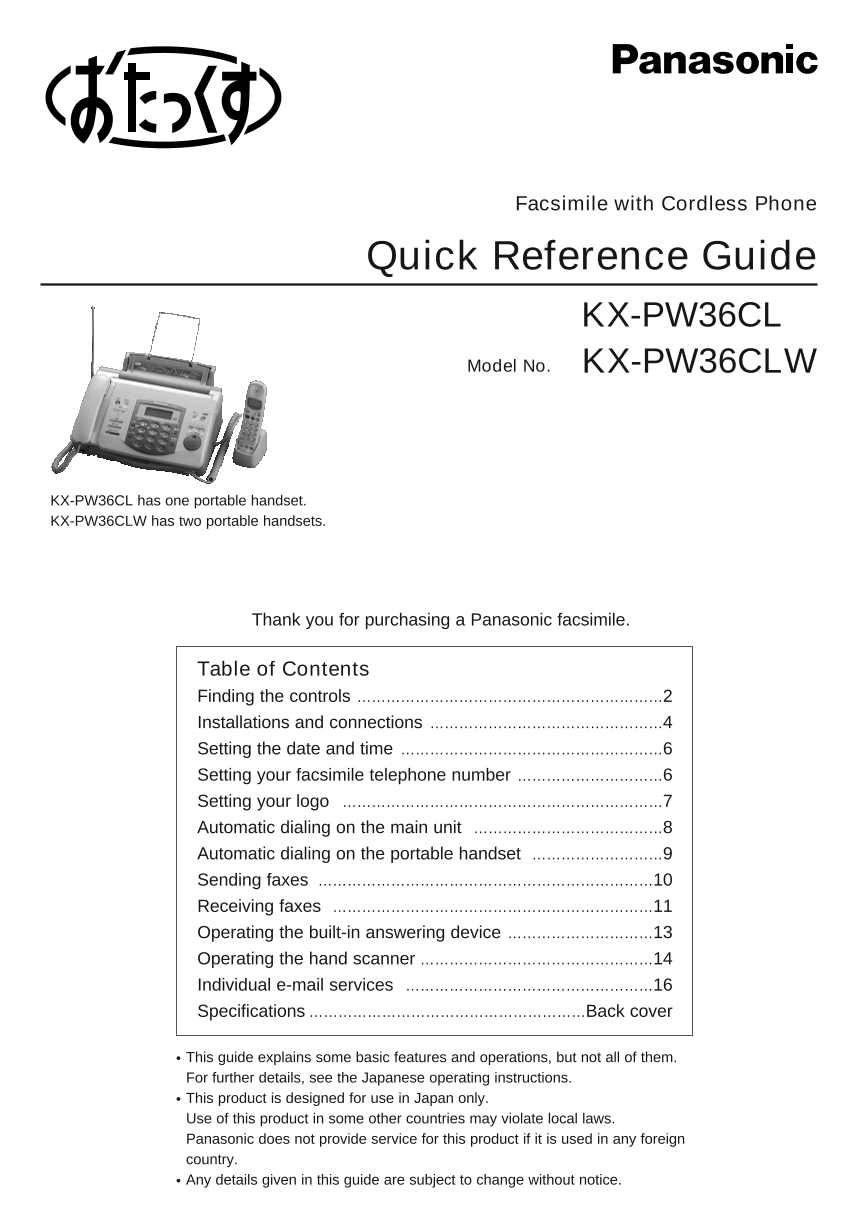
Facsimile with Cordless Phone
Quick Reference Guide
KX-PW36CL
Model No. KX-PW36CLW
KX-PW36CL has one portable handset.
KX-PW36CLW has two portable handsets.
Thank you for purchasing a Panasonic facsimile.
Table of Contents
Finding the controls ………………………………………………………2
Installations and connections …………………………………………4
Setting the date and time ………………………………………………6
Setting your facsimile telephone number …………………………6
Setting your logo …………………………………………………………7
Automatic dialing on the main unit …………………………………8
Automatic dialing on the portable handset ………………………9
Sending faxes ……………………………………………………………10
Receiving faxes …………………………………………………………11
Operating the built-in answering device …………………………13
Operating the hand scanner …………………………………………14
Individual e-mail services ……………………………………………16
Specifications…………………………………………………Back cover
● This guide explains some basic features and operations, but not all of them.
For further details, see the Japanese operating instructions.
● This product is designed for use in Japan only.
Use of this product in some other countries may violate local laws.
Panasonic does not provide service for this product if it is used in any foreign
country.
● Any details given in this guide are subject to change without notice.
Finding the controls
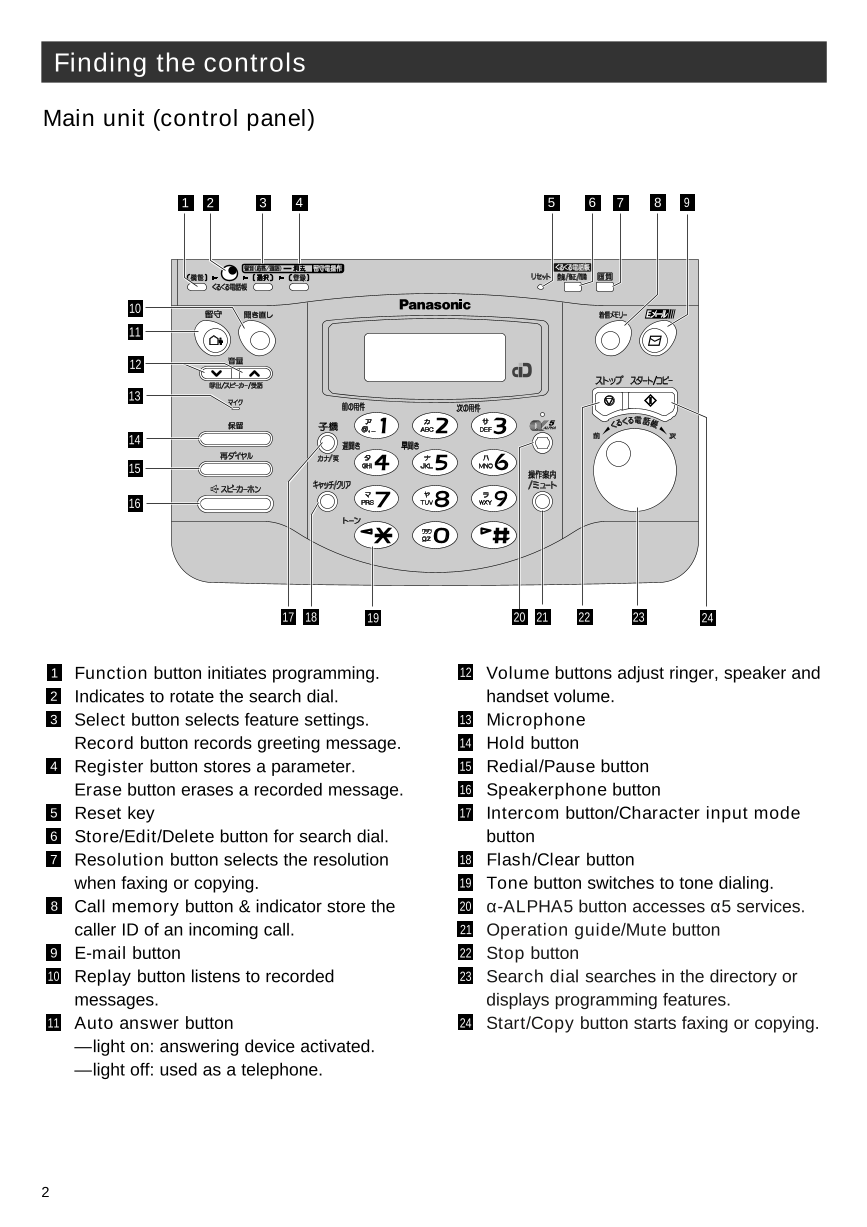
Main unit (control panel)
1 2 3 4 5 6 7 8 9
10
11
12
13
14
15
16
17 18 19 20 21 22 23 24
1 Function button initiates programming. 12 Volume buttons adjust ringer, speaker and
2 Indicates to rotate the search dial. handset volume.
3 Select button selects feature settings. 13 Microphone
Record button records greeting message. 14 Hold button
4 Register button stores a parameter. 15 Redial/Pause button
Erase button erases a recorded message. 16 Speakerphone button
5 Reset key 17 Intercom button/Character input mode
6 Store/Edit/Delete button for search dial. button
7 Resolution button selects the resolution 18 Flash/Clear button
when faxing or copying. 19 Tone button switches to tone dialing.
8 Call memory button & indicator store the 20 α-ALPHA5 button accesses α5 services.
caller ID of an incoming call. 21 Operation guide/Mute button
9 E-mail button 22 Stop button
10 Replay button listens to recorded 23 Search dial searches in the directory or
messages. displays programming features.
11 Auto answer button 24 Start/Copy button starts faxing or copying.
—light on: answering device activated.
—light off: used as a telephone.
2
Finding the controls
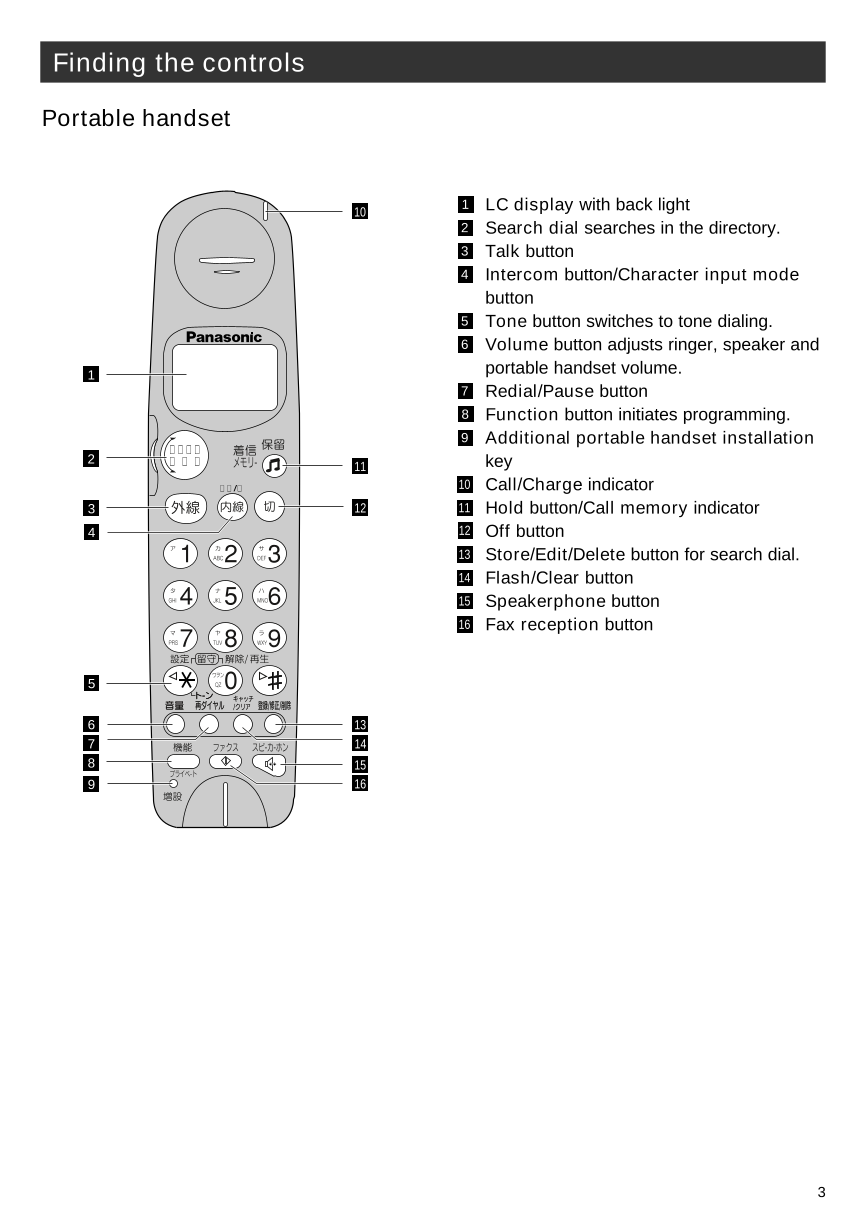
Portable handset
10 1 LC display with back light
2 Search dial searches in the directory.
3 Talk button
4 Intercom button/Character input mode
button
5 Tone button switches to tone dialing.
6 Volume button adjusts ringer, speaker and
1 portable handset volume.
7 Redial/Pause button
8 Function button initiates programming.
9 Additional portable handset installation
くるくる
2 電 話 帳 11 key
カナ/英 10 Call/Charge indicator
3 12 11 Hold button/Call memory indicator
4 12 Off button
13 Store/Edit/Delete button for search dial.
14 Flash/Clear button
15 Speakerphone button
16 Fax reception button
5
6 13
7 14
8 15
9 16
3
Installations and connections
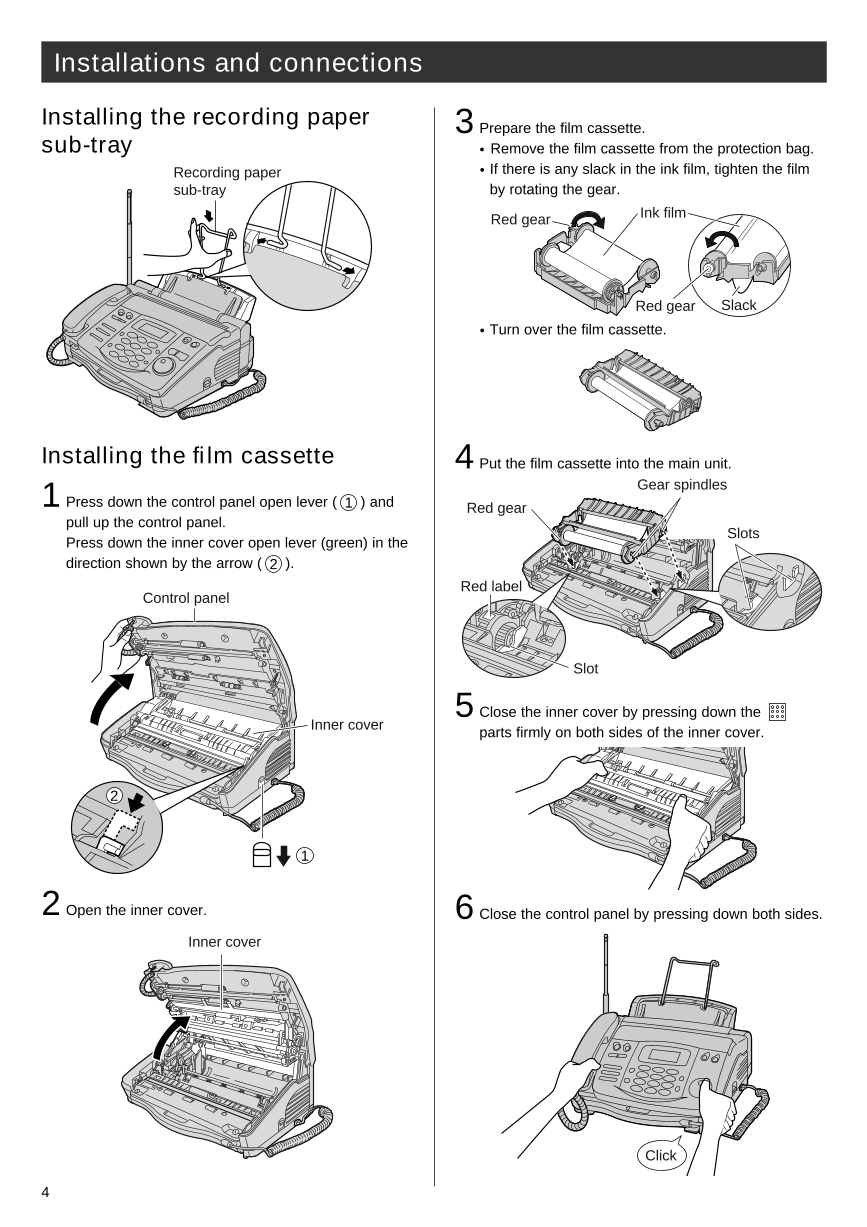
Installing the recording paper 3 Prepare the film cassette.
sub-tray ● Remove the film cassette from the protection bag.
Recording paper ● If there is any slack in the ink film, tighten the film
sub-tray by rotating the gear.
Red gear Ink film
Red gear Slack
● Turn over the film cassette.
Installing the film cassette 4 Put the film cassette into the main unit.
1 Gear spindles
Press down the control panel open lever ( 1 ) and Red gear
pull up the control panel.
Slots
Press down the inner cover open lever (green) in the
direction shown by the arrow ( 2 ).
Red label
Control panel
Slot
5 Close the inner cover by pressing down the
Inner cover parts firmly on both sides of the inner cover.
2
1
2 Open the inner cover. 6 Close the control panel by pressing down both sides.
Inner cover
Click
4
Installations and connections
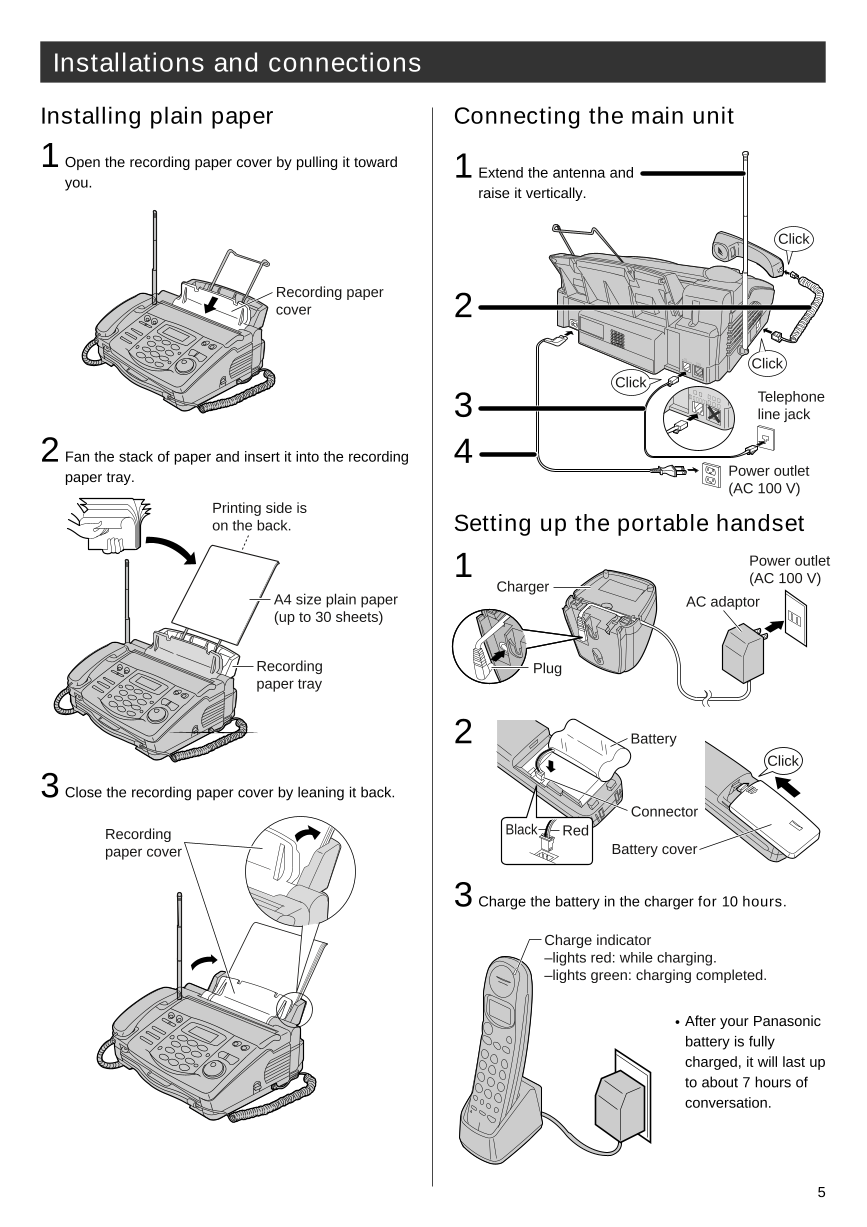
Installing plain paper Connecting the main unit
1 Open the recording paper cover by pulling it toward 1 Extend the antenna and
you.
raise it vertically.
Click
Recording paper
cover 2
( 回電 線
話
回線へ) 停電
電 用
話
機 Click
Click
回
3 (電 線
話回 停線へ 電
)電 用 Telephone
話機
line jack
2 Fan the stack of paper and insert it into the recording 4
paper tray. Power outlet
(AC 100 V)
Printing side is
on the back. Setting up the portable handset
1 Power outlet
Charger (AC 100 V)
A4 size plain paper AC adaptor
(up to 30 sheets)
Recording Plug
paper tray
2 Battery
Click
3 Close the recording paper cover by leaning it back.
Connector
Recording Black Red
paper cover Battery cover
3 Charge the battery in the charger for 10 hours.
Charge indicator
–lights red: while charging.
–lights green: charging completed.
● After your Panasonic
battery is fully
charged, it will last up
to about 7 hours of
conversation.
5
Setting the date and time Setting your facsimile
telephone number
Under the document tray Under the document tray
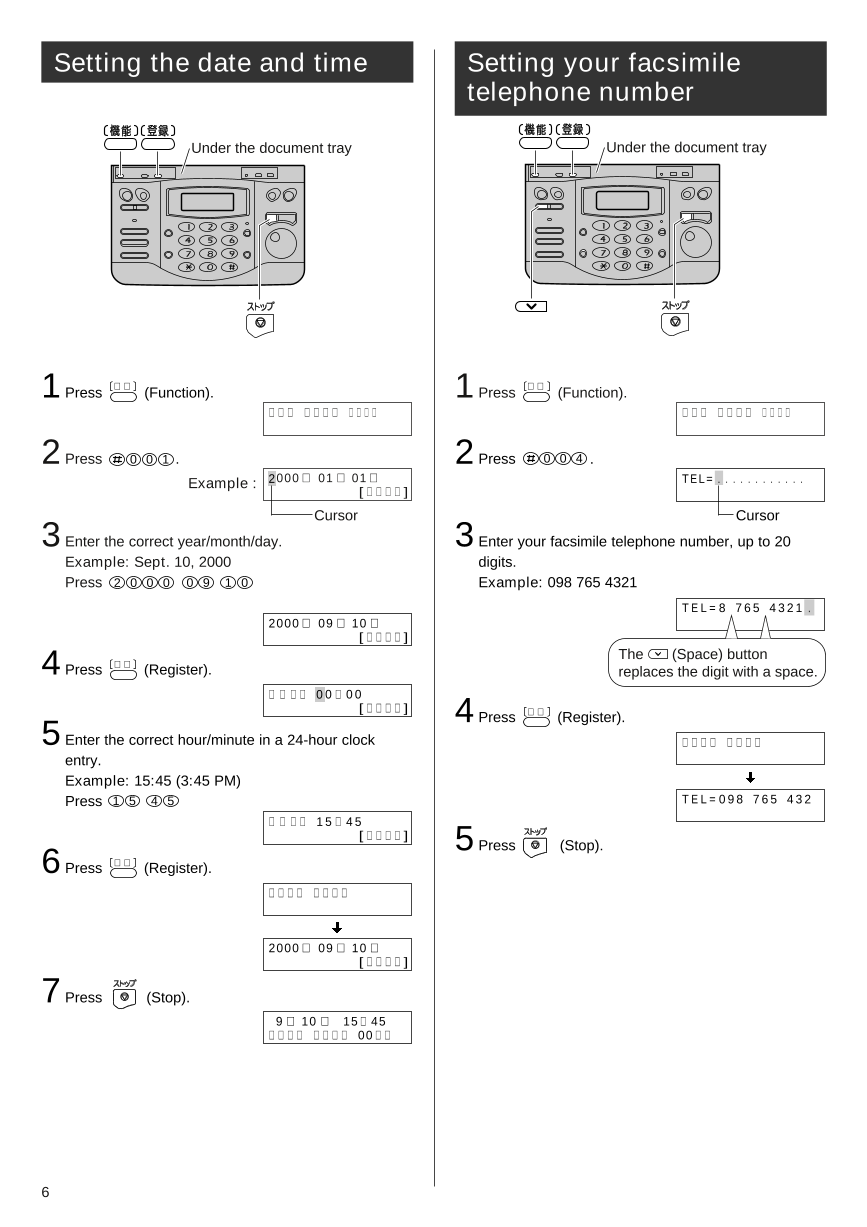
1 Press 機能 (Function). 1 Press 機能 (Function).
キ ノ ウ ト ウ ロ ク モート゛ キ ノ ウ ト ウ ロ ク モート゛
2 Press 0 0 1 . 2 Press 0 0 4 .
Example : 2000年 01 月 01日 TEL= . . . . . . . . . . . .
[ ト ウ ロ ク ]
Cursor Cursor
3 Enter the correct year/month/day. 3 Enter your facsimile telephone number, up to 20
Example: Sept. 10, 2000 digits.
Press 2 0 0 0 0 9 1 0 Example: 098 765 4321
T E L = 8 7 6 5 4 3 2 1 ..
2000年 09 月 10 日
[ ト ウ ロ ク ]
4 The (Space) button
Press 登録 (Register). replaces the digit with a space.
シ ゙ コ ク 0 0 : 0 0
[ ト ウ ロ ク ] 4 Press 登録 (Register).
5 Enter the correct hour/minute in a 24-hour clock ト ウ ロ ク シ マ シ タ
entry.
Example: 15:45 (3:45 PM)
Press 1 5 4 5 T E L = 0 9 8 7 6 5 4 3 2
シ ゙ コ ク 1 5 : 4 5
[ ト ウ ロ ク ] 5 Press (Stop).
6 Press 登録 (Register).
ト ウ ロ ク シ マ シ タ
2000年 09 月 10 日
[ ト ウ ロ ク ]
7 Press (Stop).
9 月 10 日 15: 45
ヨ ウ ケ ン ロ ク オ ン 00 ケ ン
6
Setting your logo
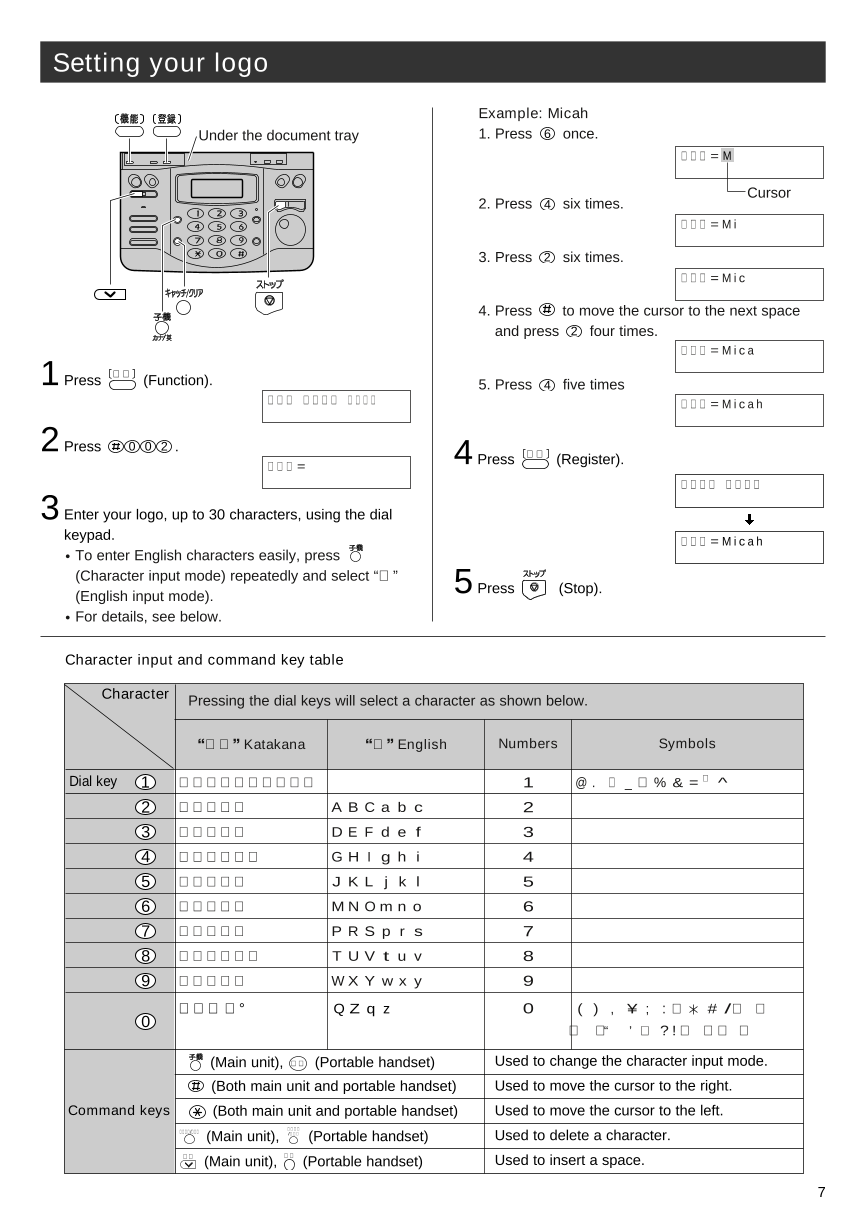
Example: Micah
Under the document tray 1. Press 6 once.
ナ マ エ = M
Cursor
2. Press 4 six times.
ナ マ エ = M i
3. Press 2 six times.
ナ マ エ = M i c
4. Press to move the cursor to the next space
and press 2 four times.
ナ マ エ = M i c a
1 Press 機能 (Function). 5. Press 4 five times
キ ノ ウ ト ウ ロ ク モート゛ ナ マ エ = M i c a h
2 Press 0 0 2 .
ナ マ エ = 4 Press 登録 (Register).
ト ウ ロ ク シ マ シ タ
3 Enter your logo, up to 30 characters, using the dial
keypad. ナ マ エ = M i c a h
● To enter English characters easily, press
(Character input mode) repeatedly and select “英”
(English input mode). 5 Press (Stop).
● For details, see below.
Character input and command key table
Character Pressing the dial keys will select a character as shown below.
ÒカナÓ Katakana Ò英Ó English Numbers Symbols
Dial key 1 アイウエオァィゥェォ 1 @ . ー _ $% & = ~ ^
2 カキクケコ A B C a b c 2
3 サシスセソ D E F d e f 3
4 タチツテトッ G H I g h i 4
5 ナニヌネノ J K L j k l 5
6 ハヒフヘホ MN O m n o 6
7 マミムメモ P R S p r s 7
8 ヤユヨャュョ T U V t u v 8
9 ラリルレロ WX Y w x y 9
ワヲン゛° Q Z q z 0 ( ) , ¥ ; : ・ # /[ ]
0 { }“ ’| ? !〈 〉「 」
(Main unit), 内線 (Portable handset) Used to change the character input mode.
(Both main unit and portable handset) Used to move the cursor to the right.
Command keys (Both main unit and portable handset) Used to move the cursor to the left.
キャッチ/クリア キャッチ
(Main unit), /クリア (Portable handset) Used to delete a character.
音量 (Main unit), 音量 (Portable handset) Used to insert a space.
7
Automatic dialing on the main unit
Storing names and telephone Making a voice call using the
numbers in the search dial search dial
くるくる電話帳
くるくる電話帳
1 くるくる電話帳
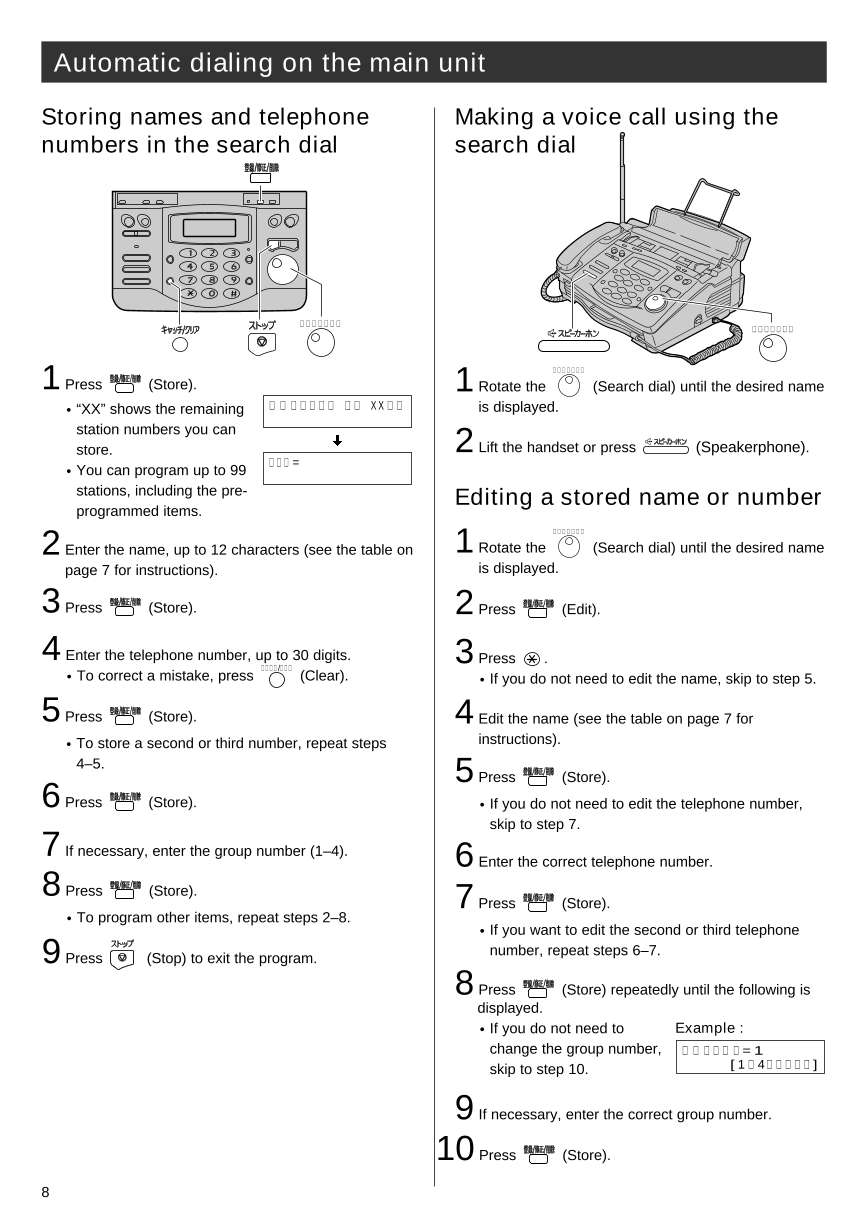
Press (Store). 1 Rotate the (Search dial) until the desired name
● “XX” shows the remaining テ ゙ ン ワ チ ョ ウ ア キ X X ケ ン is displayed.
station numbers you can
store. 2 Lift the handset or press (Speakerphone).
ナ マ エ =
● You can program up to 99
stations, including the pre- Editing a stored name or number
programmed items.
くるくる電話帳
2 Enter the name, up to 12 characters (see the table on 1 Rotate the (Search dial) until the desired name
page 7 for instructions). is displayed.
3 Press (Store). 2 Press (Edit).
4 Enter the telephone number, up to 30 digits. 3 Press .
キャッチ/クリア
● To correct a mistake, press (Clear). ● If you do not need to edit the name, skip to step 5.
5 Press (Store). 4 Edit the name (see the table on page 7 for
● To store a second or third number, repeat steps instructions).
4–5. 5 Press (Store).
6 Press (Store). ● If you do not need to edit the telephone number,
skip to step 7.
7 If necessary, enter the group number (1–4). 6 Enter the correct telephone number.
8 Press (Store). 7 Press (Store).
● To program other items, repeat steps 2–8.
● If you want to edit the second or third telephone
9 Press (Stop) to exit the program. number, repeat steps 6–7.
8 Press (Store) repeatedly until the following is
displayed.
● If you do not need to Example :
change the group number, ク ゙ ル ー フ ゚ = 1
skip to step 10. [ 1 ー 4、 ト ウ ロ ク ]
9 If necessary, enter the correct group number.
10 Press (Store).
8


 2023年江西萍乡中考道德与法治真题及答案.doc
 2012年重庆南川中考生物真题及答案.doc
 2013年江西师范大学地理学综合及文艺理论基础考研真题.doc
 2020年四川甘孜小升初语文真题及答案I卷.doc
 2020年注册岩土工程师专业基础考试真题及答案.doc
 2023-2024学年福建省厦门市九年级上学期数学月考试题及答案.doc
 2021-2022学年辽宁省沈阳市大东区九年级上学期语文期末试题及答案.doc
 2022-2023学年北京东城区初三第一学期物理期末试卷及答案.doc
 2018上半年江西教师资格初中地理学科知识与教学能力真题及答案.doc
 2012年河北国家公务员申论考试真题及答案-省级.doc
 2020-2021学年江苏省扬州市江都区邵樊片九年级上学期数学第一次质量检测试题及答案.doc
 2022下半年黑龙江教师资格证中学综合素质真题及答案.doc