PowerPhase FX+
User Guide
Edition July 2002
Phase One A/S
Roskildevej 39
DK-2000 Frederiksberg
Denmark
Tel +45 36 46 01 11
Fax +45 36 46 02 22
Phase One
24 Woodbine Ave
Northport, New York 11768
USA
Tel +1 631 757 0400
Fax +1 631 757 2217
�
Notice
Phase One“ and PowerPhase® are registered trademarks of Phase One A/S.
The names Apple Macintosh“, FireWire“, iMac®, Adobe“ and Photoshop® are
all registered trademarks of their respective companies.
All specifications are subject to change without notice.
Phase One takes no responsibilities for any loss or damage sustained while
using their products.
This manual ”2002, Phase One A/S Denmark. All rights reserved. No part of this
manual may be reproduced or copied in any way without prior written permission
from Phase One.
Printed in Denmark.
2
�
3
�
Contents
Contents................................................................................................ 4
Getting Started....................................................................................... 6
Software Installation Guide ............................................................................................ 6
Computer Configuration ............................................................................................. 6
Minimum Configuration .............................................................................................. 6
Installing the Software..................................................................................................... 6
PowerPhase FX Hardware Setup ................................................................................... 7
Connecting the PowerPhase FX to the computer................................................... 7
Optical Filters................................................................................................................. 7
Color Management...........................................................................................................8
Capturing Images................................................................................. 10
Film Curves......................................................................................................................10
ISO/File Size Options .....................................................................................................10
Active Power Stabilization.............................................................................................11
Calibrating the Probe .................................................................................................11
Preview Images ...............................................................................................................13
What is a Preview Image?.........................................................................................13
Make a Preview............................................................................................................13
Initial Evaluation..........................................................................................................14
Gray Balance Calibration..........................................................................................19
Optimizing Quality..........................................................................................................21
Introduction..................................................................................................................21
Tonal Range.................................................................................................................21
Adjusting the Tonal Range........................................................................................22
Color Warning..............................................................................................................23
Brightness and Contrast ..........................................................................................23
Changing Brightness and Contrast .......................................................................24
Unsharp Mask.............................................................................................................25
Working With Flat Art Reproduction........................................................ 2 6
Uniform Light Tool..........................................................................................................26
Setting up Uniform Light Tool..................................................................................26
Using Uniform Light Tool..........................................................................................27
Focus Tool........................................................................................................................29
Description and Use...................................................................................................29
4
�
Batch Tool........................................................................................................................31
Basic Batch Scanning...............................................................................................31
Advanced Batch Scanning........................................................................................32
The Scripts Menu ............................................................................................................37
Embed Copyright ............................................................................................................3 8
Scan Progress.................................................................................................................3 8
Custom Grids..................................................................................................................39
Sinar Grid......................................................................................................................39
The Grid Format ..........................................................................................................39
Example ........................................................................................................................40
Preferences.......................................................................................................................41
Tool Preferences..........................................................................................................41
Other Preferences from the Preferences menu......................................................41
Back Panel Description........................................................................ 42
Mounting the Camera Back......................................................................................42
Care and Cleaning ............................................................................... 44
Storage and Handling................................................................................................44
Cleaning the Camera Back Housing ......................................................................44
Cleaning the CCD Sensor .........................................................................................44
Troubleshooting Guide.......................................................................... 4 6
Force terminating a program causing a freeze .....................................................46
Color Problems ...........................................................................................................46
Camera Back Specifications ................................................................ 4 9
5
�
Getting Started
Software Installation Guide
Computer Configuration
In order to run the Phase One Software you must have a computer that meets or
exceeds the listed minimum configuration.
The minimum configuration is recommended only for use as an image capturing
station for taking pictures and then transferring them to a larger, more powerful
computer for processing.
When processing captured images, particularly when using other applications
simultaneously, for example Adobe Photoshop, efficiency and speed will be
greatly improved if the recommended configuration is exceeded.
Minimum Configuration
Power Macintosh with MacOS 9.X and a built in 1394 (Firewire) Port or a 1394 PCI
card installed
The PowerPhase FX requires a total of 11 watts of power from the 1394 bus.
Some computers (notably the Apple iMac) and 1394 cards do not provide the
required power. To use the PowerPhase FX on these computers a Phase One
IEEE1394 Power Conditioner with external power (battery or AC adapter) must be
used.
Installing the Software
1. Place the included CD-ROM into your CD drive.
2. Double-click the item marked “Phase One System Install”
3. Read the software license, and if you agree, click the “Agree” button to continue
with the installation. If you disagree, click “Cancel” to quit the installation
4. Follow the on-screen prompts. When the installation is completed, restart your
computer.
6
�
PowerPhase FX Hardware Setup
Connecting the PowerPhase FX to the computer
Because the PowerPhase FX connects to the computer through IEEE 1394 there
are no ID numbers or termination to worry about.
When you are ready to begin capturing files simply plug the PowerPhase FX into
the built-in FireWire port or a 1394 PCI card in your Macintosh and double click
on the “Phase One Image Capture” program to start the software and connect to
the PowerPhase FX.
Optical Filters
The CCD sensor used in PowerPhase FX back are extra sensitive to infrared light.
Unless infrared light is filtered out before reaching the CCD sensor, there will be an
unnatural color rendering in your pictures. Therefore, you must use a filter that
removes infrared light when you take digital pictures.
Phase One offers the following filters:
• AR1— Infra-red Filter for all lights
The AR1 filter provides adequate infra-red cutoff for all the lights recommended for
use with Phase One camera backs, including fluorescent, HMI, tungsten etc.
• TG1 Tungsten Filter
Phase One has developed the TG1 filter to be used with their digital camera backs
and Tungsten lights. The camera back is “daylight balanced”, so the TG1 filter
makes optical color correction before the digital image is prepared. This results in
pictures with very bright, crystal clear colors and perfect color rendition when
using Tungsten lights.
Furthermore, the TG1 filter has been developed with very low attenuation of light in
the visible range and is very efficient in reducing infrared light. A separate infrared
filter is therefore not necessary when using a TG1 filter.
Both filters are included with the system.
7
�
Color Management
The PowerPhase FX is designed to work as part of an ICC color management
workflow.
The camera, monitor and printer profiles can be specified in the Phase One
application, and the processed image will be customized for that specific input
and output configuration. If the final images are to be printed, then the results, as
they would appear in the final print, can be previewed on screen.
In this way images can be adjusted to give optimal results, and costly errors can
be avoided
To use this feature first set the Profiles in the Preferences window.
For more information on Color Management please refer to the Phase One Color
Management User Guide.
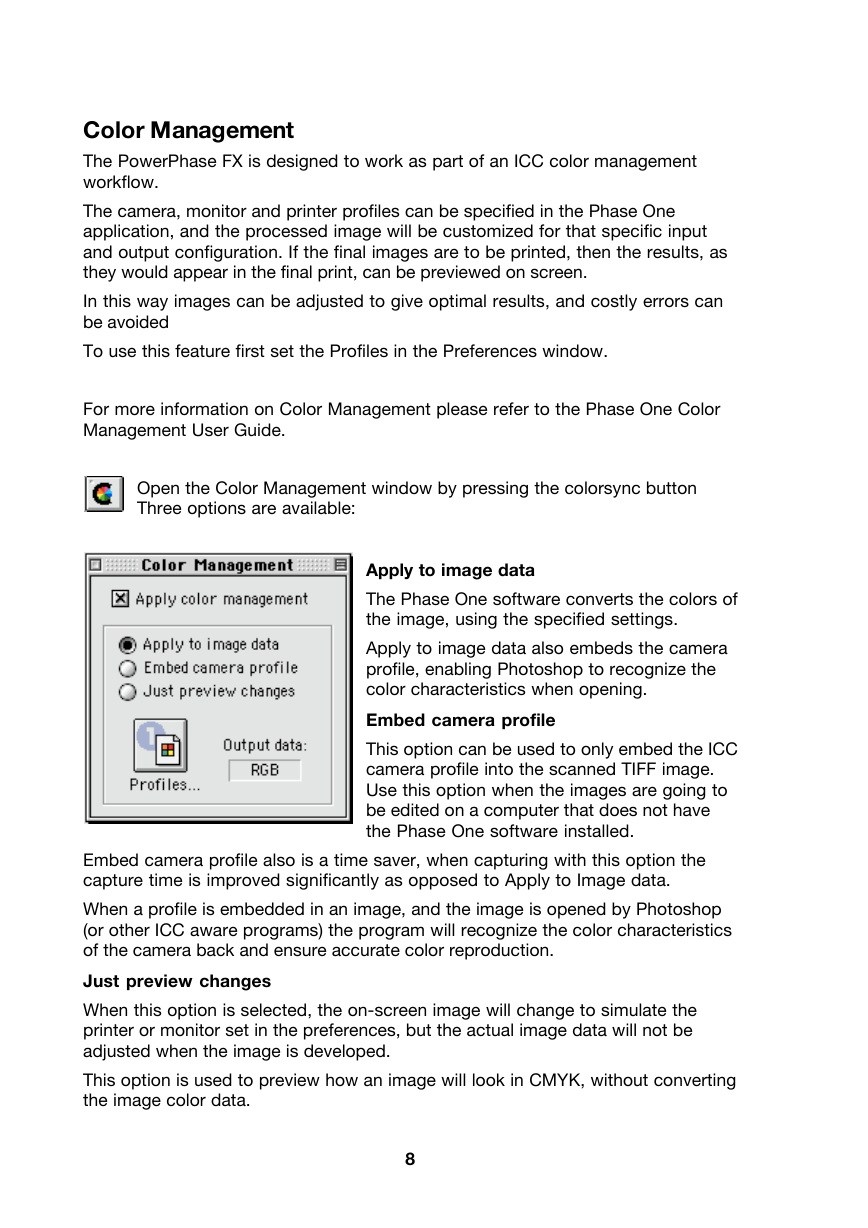
Open the Color Management window by pressing the colorsync button
Three options are available:
Apply to image data
The Phase One software converts the colors of
the image, using the specified settings.
Apply to image data also embeds the camera
profile, enabling Photoshop to recognize the
color characteristics when opening.
Embed camera profile
This option can be used to only embed the ICC
camera profile into the scanned TIFF image.
Use this option when the images are going to
be edited on a computer that does not have
the Phase One software installed.
Embed camera profile also is a time saver, when capturing with this option the
capture time is improved significantly as opposed to Apply to Image data.
When a profile is embedded in an image, and the image is opened by Photoshop
(or other ICC aware programs) the program will recognize the color characteristics
of the camera back and ensure accurate color reproduction.
Just preview changes
When this option is selected, the on-screen image will change to simulate the
printer or monitor set in the preferences, but the actual image data will not be
adjusted when the image is developed.
This option is used to preview how an image will look in CMYK, without converting
the image color data.
8
�





 2023年江西萍乡中考道德与法治真题及答案.doc
 2012年重庆南川中考生物真题及答案.doc
 2013年江西师范大学地理学综合及文艺理论基础考研真题.doc
 2020年四川甘孜小升初语文真题及答案I卷.doc
 2020年注册岩土工程师专业基础考试真题及答案.doc
 2023-2024学年福建省厦门市九年级上学期数学月考试题及答案.doc
 2021-2022学年辽宁省沈阳市大东区九年级上学期语文期末试题及答案.doc
 2022-2023学年北京东城区初三第一学期物理期末试卷及答案.doc
 2018上半年江西教师资格初中地理学科知识与教学能力真题及答案.doc
 2012年河北国家公务员申论考试真题及答案-省级.doc
 2020-2021学年江苏省扬州市江都区邵樊片九年级上学期数学第一次质量检测试题及答案.doc
 2022下半年黑龙江教师资格证中学综合素质真题及答案.doc