Projector
CP-X10000/CP-WX11000/CP-SX12000
User's Manual (detailed) – Operating Guide
Thank you for purchasing this projector.
WARNING
►Before using this product, please read the "User's Manual -
Safety Guide" and related manuals to ensure the proper use of this product.
After reading them, store them in a safe place for future reference.
About this manual
Various symbols are used in this manual. The meanings of these symbols are
described below.
WARNING
CAUTION
This entry warns of a risk of serious personal injury or even
death.
This entry warns of a risk of personal injury or physical damage.
NOTICE This entry notices of fear of causing trouble.
Please refer to the pages written following this symbol.
• The information in this manual is subject to change without notice.
NOTE
• The manufacturer assumes no responsibility for any errors that may appear in
this manual.
• The reproduction, transfer or copy of all or any part of this document is not
permitted without express written consent.
Trademark acknowledgment
• Windows® is a registered trademark of Microsoft Corporation in the U.S. and/or
other countries.
• VESA and DDC are trademarks of the Video Electronics Standard Association.
• Mac® is a registered trademark of Apple Inc.
• DVI is a trademark of Digital Display Working Group.
• HDMI, the HDMI logo and High-Definition Multimedia Interface are trademarks
or registered trademarks of HDMI Licensing LLC.
• Trademark PJLink is a trademark applied
for trademark rights in Japan, the United
States of America and other countries and areas.
All other trademarks are the properties of their respective owners.
1
�
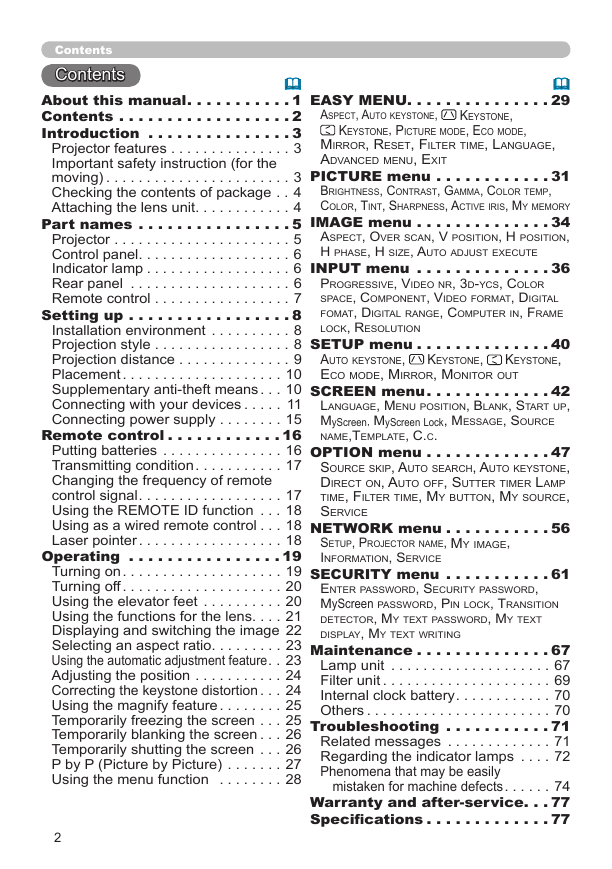
Contents
Contents
About this manual . . . . . . . . . . . 1
Contents . . . . . . . . . . . . . . . . . . 2
Introduction . . . . . . . . . . . . . . . 3
Projector features . . . . . . . . . . . . . . . 3
Important safety instruction (for the
moving) . . . . . . . . . . . . . . . . . . . . . . . 3
Checking the contents of package . . 4
Attaching the lens unit . . . . . . . . . . . . 4
Part names . . . . . . . . . . . . . . . . 5
Projector . . . . . . . . . . . . . . . . . . . . . . 5
Control panel . . . . . . . . . . . . . . . . . . . 6
Indicator lamp . . . . . . . . . . . . . . . . . . 6
Rear panel . . . . . . . . . . . . . . . . . . . . 6
Remote control . . . . . . . . . . . . . . . . . 7
Setting up . . . . . . . . . . . . . . . . . 8
Installation environment . . . . . . . . . . 8
Projection style . . . . . . . . . . . . . . . . . 8
Projection distance . . . . . . . . . . . . . . 9
Placement . . . . . . . . . . . . . . . . . . . . 10
Supplementary anti-theft means . . . 10
Connecting with your devices . . . . . 11
Connecting power supply . . . . . . . . 15
Remote control . . . . . . . . . . . . 16
Putting batteries . . . . . . . . . . . . . . . 16
Transmitting condition . . . . . . . . . . . 17
Changing the frequency of remote
control signal . . . . . . . . . . . . . . . . . . 17
Using the REMOTE ID function . . . 18
Using as a wired remote control . . . 18
Laser pointer . . . . . . . . . . . . . . . . . . 18
Operating . . . . . . . . . . . . . . . . 19
Turning on . . . . . . . . . . . . . . . . . . . . 19
Turning off . . . . . . . . . . . . . . . . . . . . 20
Using the elevator feet . . . . . . . . . . 20
Using the functions for the lens . . . . 21
Displaying and switching the image 22
Selecting an aspect ratio . . . . . . . . . 23
Using the automatic adjustment feature . . 23
Adjusting the position . . . . . . . . . . . 24
Correcting the keystone distortion . . . 24
Using the magnify feature . . . . . . . . 25
Temporarily freezing the screen . . . 25
Temporarily blanking the screen . . . 26
Temporarily shutting the screen . . . 26
P by P (Picture by Picture) . . . . . . . 27
Using the menu function . . . . . . . . 28
2
EASY MENU . . . . . . . . . . . . . . . 29
Aspect, Auto keystone,
keystone,
keystone, picture mode, eco mode,
mirror, reset, Filter time, lAnguAge,
AdvAnced menu, exit
PICTURE menu . . . . . . . . . . . . 31
Brightness, contrAst, gAmmA, color temp,
color, tint, shArpness, Active iris, my memory
IMAGE menu . . . . . . . . . . . . . . 34
Aspect, over scAn, v position, h position,
h phAse, h size, Auto Adjust execute
INPUT menu . . . . . . . . . . . . . . 36
progressive, video nr, 3d-ycs, color
spAce, component, video FormAt, digitAl
FomAt, digitAl rAnge, computer in, FrAme
lock, resolution
SETUP menu . . . . . . . . . . . . . . 40
keystone,
Auto keystone,
eco mode, mirror, monitor out
keystone,
SCREEN menu . . . . . . . . . . . . . 42
lAnguAge, menu position, BlAnk, stArt up,
myScreen, myScreen Lock, messAge, source
nAme,templAte, c.c.
OPTION menu . . . . . . . . . . . . . 47
source skip, Auto seArch, Auto keystone,
direct on, Auto oFF, sutter timer lAmp
time, Filter time, my Button, my source,
service
NETWORK menu . . . . . . . . . . . 56
setup, projector nAme, my imAge,
inFormAtion, service
SECURITY menu . . . . . . . . . . . 61
enter pAssword, security pAssword,
myScreen pAssword, pin lock, trAnsition
detector, my text pAssword, my text
displAy, my text writing
Maintenance . . . . . . . . . . . . . . 67
Lamp unit . . . . . . . . . . . . . . . . . . . . 67
Filter unit . . . . . . . . . . . . . . . . . . . . . 69
Internal clock battery . . . . . . . . . . . . 70
Others . . . . . . . . . . . . . . . . . . . . . . . 70
Troubleshooting . . . . . . . . . . . 71
Related messages . . . . . . . . . . . . . 71
Regarding the indicator lamps . . . . 72
Phenomena that may be easily
mistaken for machine defects . . . . . . 74
Warranty and after-service . . . 77
Specifications . . . . . . . . . . . . . 77
�
Introduction
Introduction
Projector features
This projector has a capability to project various picture signals onto a screen. This
projector requires only a minimal amount of space for installation and can produce
a large projected image from even a short distance. Moreover, the projector has the
following features to extend its potentiality for broad use.
ü The HDMI port can support various image equipment which have digital
interface to get clearer pictures on a screen.
ü The super bright lamp and high quality optical system can fulfill the demands
of professional uses.
ü The selectable optional lens units and the super wide range of the lens shift
feature will give much more chances to install the product wherever you
want.
ü The lens shutter can hide your inside operations and will help your
presentation.
ü The wealth of I/O ports is believed to support any business scene.
ü This projector's network supports the PJLinkTM standard.
ü PJLinkTM is a unified standard for operating and controlling data projectors.
PJLinkTM enables central control of projectors manufactured by different
vendors and projectors can be operated by a controller. PJLinkTM compliant
equipment can be managed and controlled at any time and in any place,
regardless of manufacturer.
For the command of PJLinkTM, see User's Manual (Technical)
For specifications of PJLinkTM, see the web site of the Japan Business
Machine and Information System Industries Association.
URL: http://pjlink.jbmia.or.jp
ü The unique Electric Dust Catcher Air filter system is expected to prevent
air dust from getting into the projector and offers you less maintenance
frequency.
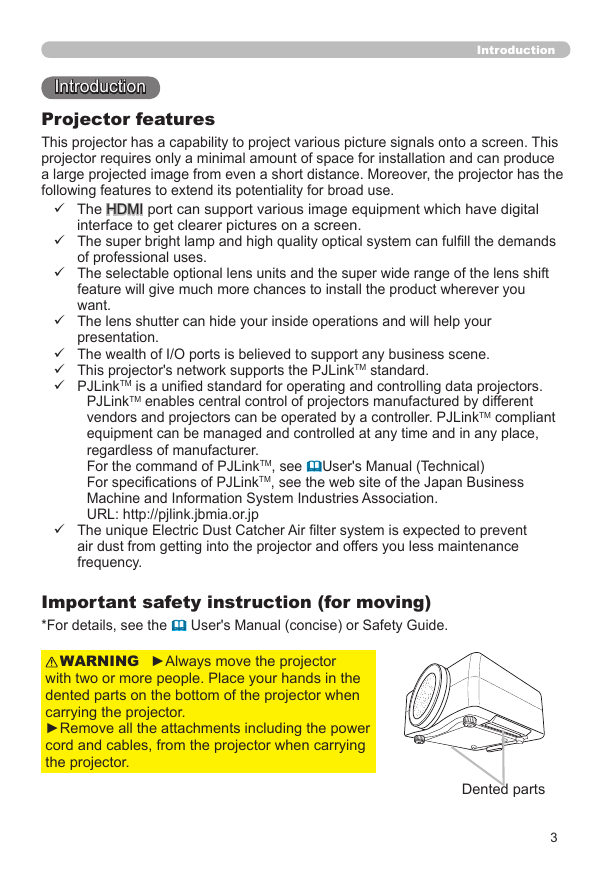
Important safety instruction (for moving)
*For details, see the User's Manual (concise) or Safety Guide.
WARNING
►Always move the projector
with two or more people. Place your hands in the
dented parts on the bottom of the projector when
carrying the projector.
►Remove all the attachments including the power
cord and cables, from the projector when carrying
the projector.
Dented parts
3
�
Introduction
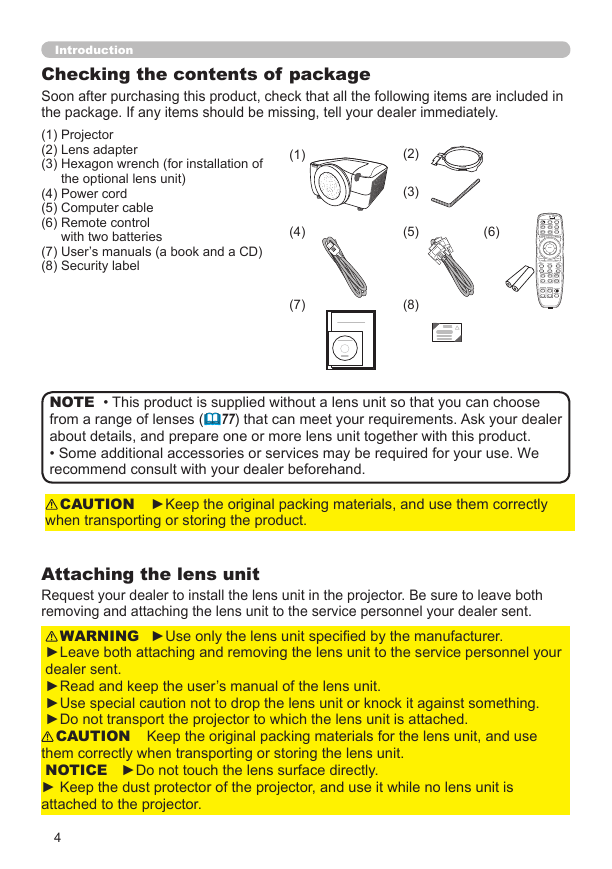
Checking the contents of package
Soon after purchasing this product, check that all the following items are included in
the package. If any items should be missing, tell your dealer immediately.
(1) Projector
(2) Lens adapter
(3) Hexagon wrench (for installation of
(1)
(2)
(3)
(5)
(8)
(6)
LASER
INDICATOR
STANDBY/ON
MY SOURCE
COMPUTER
VIDEO
DIGITAL
ID 1
ID 2
ID 3
ID 4
BLANK
LASER
ENTER
FREEZE
MENU
ASPECT
SHUTTER
RESET
PbyP
AUTO
POSITION
MY BUTTON
3
MAGNIFY
ON
4
OFF
1
2
FOCUS
ZOOM
KEYSTONE
+
-
+
-
LENS SHIFT
(4)
(7)
the optional lens unit)
(4) Power cord
(5) Computer cable
(6) Remote control
with two batteries
(7) User’s manuals (a book and a CD)
(8) Security label
• This product is supplied without a lens unit so that you can choose
NOTE
from a range of lenses (77) that can meet your requirements. Ask your dealer
about details, and prepare one or more lens unit together with this product.
• Some additional accessories or services may be required for your use. We
recommend consult with your dealer beforehand.
CAUTION
►Keep the original packing materials, and use them correctly
when transporting or storing the product.
Attaching the lens unit
Request your dealer to install the lens unit in the projector. Be sure to leave both
removing and attaching the lens unit to the service personnel your dealer sent.
WARNING
►Use only the lens unit specified by the manufacturer.
►Leave both attaching and removing the lens unit to the service personnel your
dealer sent.
►Read and keep the user’s manual of the lens unit.
►Use special caution not to drop the lens unit or knock it against something.
►Do not transport the projector to which the lens unit is attached.
CAUTION
Keep the original packing materials for the lens unit, and use
them correctly when transporting or storing the lens unit.
NOTICE
► Keep the dust protector of the projector, and use it while no lens unit is
attached to the projector.
►Do not touch the lens surface directly.
4
�
Part names
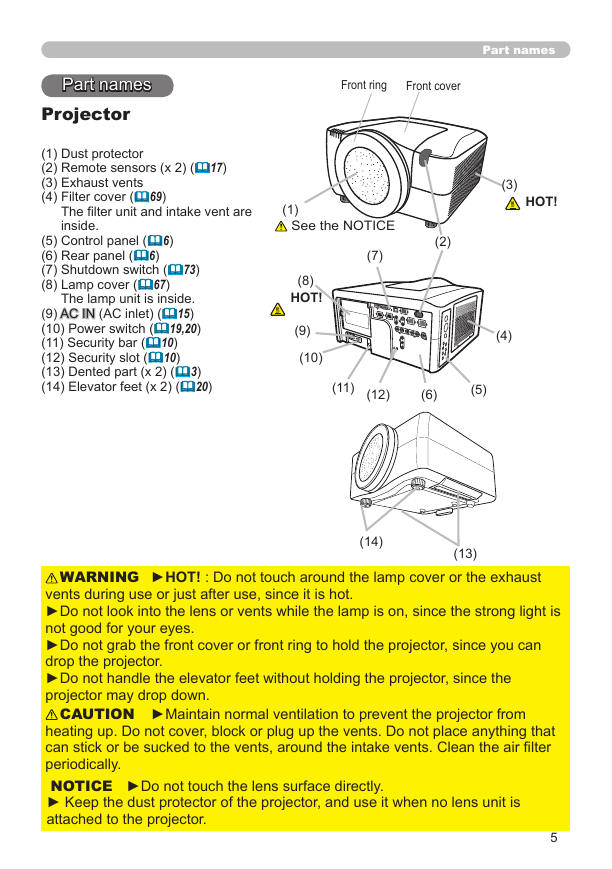
Projector
(1) Dust protector
(2) Remote sensors (x 2) (17)
(3) Exhaust vents
(4) Filter cover (69)
The filter unit and intake vent are
inside.
(5) Control panel (6)
(6) Rear panel (6)
(7) Shutdown switch (73)
(8) Lamp cover (67)
The lamp unit is inside.
(9) AC IN (AC inlet) (15)
(10) Power switch (19,20)
(11) Security bar (10)
(12) Security slot (10)
(13) Dented part (x 2) (3)
(14) Elevator feet (x 2) (20)
Part names
Front ring
Front cover
(3)
HOT!
(4)
(1)
See the NOTICE
(7)
(2)
(8)
HOT!
(9)
(10)
(11)
(12)
(6)
(5)
(14)
(13)
WARNING
►HOT! : Do not touch around the lamp cover or the exhaust
vents during use or just after use, since it is hot.
►Do not look into the lens or vents while the lamp is on, since the strong light is
not good for your eyes.
►Do not grab the front cover or front ring to hold the projector, since you can
drop the projector.
►Do not handle the elevator feet without holding the projector, since the
projector may drop down.
CAUTION
►Maintain normal ventilation to prevent the projector from
heating up. Do not cover, block or plug up the vents. Do not place anything that
can stick or be sucked to the vents, around the intake vents. Clean the air filter
periodically.
NOTICE
► Keep the dust protector of the projector, and use it when no lens unit is
attached to the projector.
►Do not touch the lens surface directly.
5
�
Part names
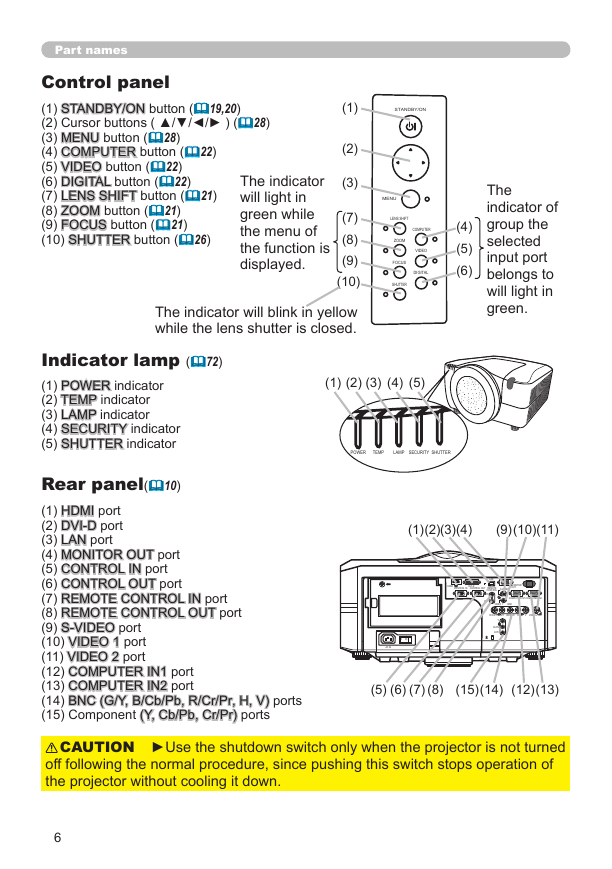
Control panel
(1) STANDBY/ON button (19,20)
(2) Cursor buttons ( ▲/▼/◄/► ) (28)
(3) MENU button (28)
(4) COMPUTER button (22)
(5) VIDEO button (22)
(6) DIGITAL button (22)
(7) LENS SHIFT button (21)
(8) ZOOM button (21)
(9) FOCUS button (21)
(10) SHUTTER button (26)
The indicator
will light in
green while
the menu of
the function is
displayed.
(1)
(2)
(3)
(7)
(8)
(9)
(10)
The indicator will blink in yellow
while the lens shutter is closed.
STANDBY/ON
MENU
LENS SHIFT
ZOOM
FOCUS
SHUTTER
COMPUTER
VIDEO
DIGITAL
(4)
(5)
(6)
The
indicator of
group the
selected
input port
belongs to
will light in
green.
Indicator lamp (72)
(1) POWER indicator
(2) TEMP indicator
(3) LAMP indicator
(4) SECURITY indicator
(5) SHUTTER indicator
Rear panel(10)
(1) HDMI port
(2) DVI-D port
(3) LAN port
(4) MONITOR OUT port
(5) CONTROL IN port
(6) CONTROL OUT port
(7) REMOTE CONTROL IN port
(8) REMOTE CONTROL OUT port
(9) S-VIDEO port
(10) VIDEO 1 port
(11) VIDEO 2 port
(12) COMPUTER IN1 port
(13) COMPUTER IN2 port
(14) BNC (G/Y, B/Cb/Pb, R/Cr/Pr, H, V) ports
(15) Component (Y, Cb/Pb, Cr/Pr) ports
(1) (2) (3) (4) (5)
POWER
TEMP
LAMP SECURITY
SHUTTER
(1)
(2)
(3)
(4)
(9)(10)(11)
LAN
HDMI
DVI-D
CONTROL IN CONTROL OUT REMOTE
CONTROL
IN
MONITOR
OUT
S-VIDEO
OUT
COMPUTER IN1
COMPUTER IN2
VIDEO 1
BNC
R/Cr/Pr
G/Y B/Cb/Pb H
V VIDEO 2
Y
Cb/Pb
Cr/Pr
I O
AC IN
(5)
(6)
(7)
(8)
(15)
(14)
(12)
(13)
CAUTION
►Use the shutdown switch only when the projector is not turned
off following the normal procedure, since pushing this switch stops operation of
the projector without cooling it down.
6
�
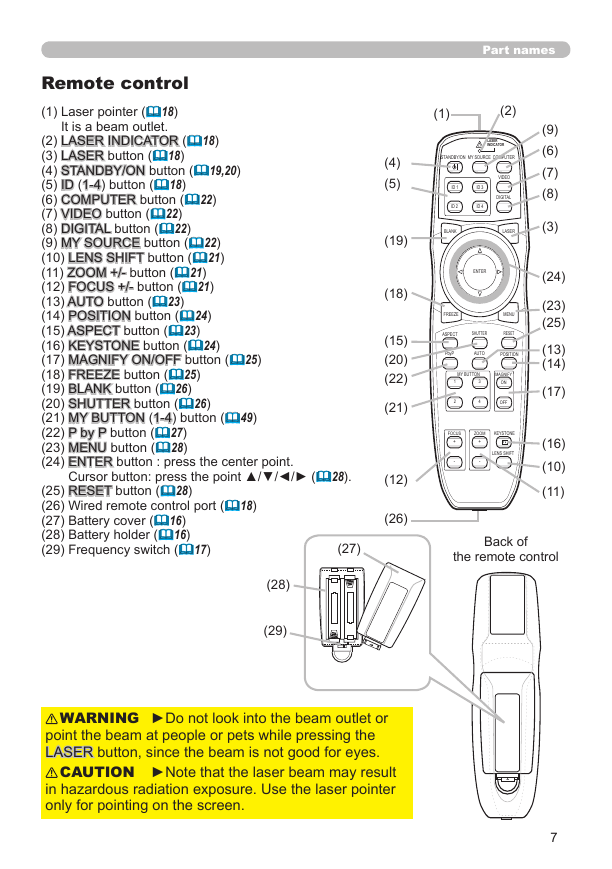
Remote control
(1) Laser pointer (18)
It is a beam outlet.
(2) LASER INDICATOR (18)
(3) LASER button (18)
(4) STANDBY/ON button (19,20)
(5) ID (1-4) button (18)
(6) COMPUTER button (22)
(7) VIDEO button (22)
(8) DIGITAL button (22)
(9) MY SOURCE button (22)
(10) LENS SHIFT button (21)
(11) ZOOM +/- button (21)
(12) FOCUS +/- button (21)
(13) AUTO button (23)
(14) POSITION button (24)
(15) ASPECT button (23)
(16) KEYSTONE button (24)
(17) MAGNIFY ON/OFF button (25)
(18) FREEZE button (25)
(19) BLANK button (26)
(20) SHUTTER button (26)
(21) MY BUTTON (1-4) button (49)
(22) P by P button (27)
(23) MENU button (28)
(24) ENTER button : press the center point.
(25) RESET button (28)
(26) Wired remote control port (18)
(27) Battery cover (16)
(28) Battery holder (16)
(29) Frequency switch (17)
Part names
(1)
(2)
LASER
INDICATOR
STANDBY/ON
MY SOURCE
COMPUTER
VIDEO
DIGITAL
ID 1
ID 2
ID 3
ID 4
BLANK
LASER
ENTER
FREEZE
MENU
ASPECT
SHUTTER
RESET
PbyP
AUTO
POSITION
MY BUTTON
3
MAGNIFY
ON
4
OFF
1
2
FOCUS
ZOOM
KEYSTONE
+
-
+
-
LENS SHIFT
(4)
(5)
(19)
(18)
(15)
(20)
(22)
(21)
(12)
(26)
(9)
(6)
(7)
(8)
(3)
(24)
(23)
(25)
(13)
(14)
(17)
(16)
(10)
(11)
Cursor button: press the point ▲/▼/◄/► (28).
(27)
Back of
the remote control
(28)
(29)
WARNING
►Do not look into the beam outlet or
point the beam at people or pets while pressing the
LASER button, since the beam is not good for eyes.
CAUTION
►Note that the laser beam may result
in hazardous radiation exposure. Use the laser pointer
only for pointing on the screen.
7
�
Setting up
Setting up
Read this chapter through fi rst. Then install the projector into place.
Installation environment
This product requires an installing place that is stable, cool and airy. Check your
installation environment in accordance with the following.
WARNING
►Do not place the product on an unstable surface such as an
uneven, tilted, or vibrating place.
►Do not place the product near water - for example, near a bathtub, washbowl,
kitchen sink, or laundry tub; in a wet basement, near a swimming pool, beach; or
outdoors.
CAUTION
►Do not place the product in a dusty, smoky, or humid place -
►Do not place the product in a place where radio interference may
for example, on a passage, in a smoking space, in a kitchen, or outdoors.
►Do not place the product near heat sources - for example, radiators, heat
registers, stoves, or other product (including amplifi ers) that produces heat.
►Do not place this product in a magnetic fi eld.
NOTICE
be caused.
► Do not place the projector in a place where any strong lights hit the remote
sensors.
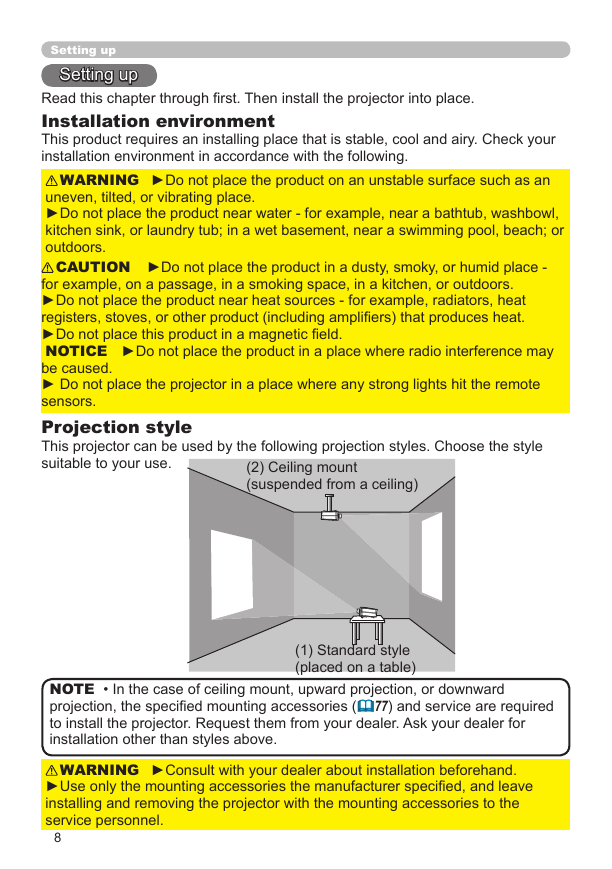
Projection style
This projector can be used by the following projection styles. Choose the style
suitable to your use.
(2) Ceiling mount
(suspended from a ceiling)
(1) Standard style
(placed on a table)
• In the case of ceiling mount, upward projection, or downward
NOTE
projection, the specifi ed mounting accessories ( 77 ) and service are required
to install the projector. Request them from your dealer. Ask your dealer for
installation other than styles above.
WARNING
►Consult with your dealer about installation beforehand.
►Use only the mounting accessories the manufacturer specifi ed, and leave
installing and removing the projector with the mounting accessories to the
service personnel.
8
�



 2023年江西萍乡中考道德与法治真题及答案.doc
 2012年重庆南川中考生物真题及答案.doc
 2013年江西师范大学地理学综合及文艺理论基础考研真题.doc
 2020年四川甘孜小升初语文真题及答案I卷.doc
 2020年注册岩土工程师专业基础考试真题及答案.doc
 2023-2024学年福建省厦门市九年级上学期数学月考试题及答案.doc
 2021-2022学年辽宁省沈阳市大东区九年级上学期语文期末试题及答案.doc
 2022-2023学年北京东城区初三第一学期物理期末试卷及答案.doc
 2018上半年江西教师资格初中地理学科知识与教学能力真题及答案.doc
 2012年河北国家公务员申论考试真题及答案-省级.doc
 2020-2021学年江苏省扬州市江都区邵樊片九年级上学期数学第一次质量检测试题及答案.doc
 2022下半年黑龙江教师资格证中学综合素质真题及答案.doc