Introduction
Welcome to my tutorial on virtual machines. This tutorial will introduce you to the concept of a
virtual machine and then we will, step by step, create our own simple virtual machine in C#. Keep in
mind that a virtual machine is a very complicated thing and even the simplest virtual machine can take
years for a team of programmers to create. With that said, don’t expect to be able to create your own
language or virtual machine that will take over .NET or Java overnight.
In this tutorial, we will first layout the plan for our virtual machine. Then we will create a very
simple intermediate language. An intermediate language is the lowest level language still readable by
humans. It is comparable to assembly language, which is also the lowest level language on most
computers. The first program we will create will be a very simple intermediate compiler that will convert
our intermediate language to bytecode. Bytecode is a set of binary instructions that our virtual machine
will be able to directly execute. It is comparable to machine language, which is a set of binary or
machine instructions that all computers and CPUs understand. This virtual machine will be our second
project. It will be a virtual machine, created from scratch in C# that will execute our bytecode. It will be
very simple at first, but then we will expand it by adding threading support and dual screen outputs
(you’ll find out what I’m talking about later).
All of the code in this tutorial is created using Visual Studio 2008 Professional, targeting the .NET
Framework 2.0. Since I’m targeting the 2.0 framework, you should be able to use Visual Studio 2005 as
well. Since creating a virtual machine really does dive down into the nuts and bolts of how computers
work, I am assuming the reader of this has a pretty good, or a basic knowledge of, programming,
hexadecimal and binary number systems, and threading. It would also really help to know something
about assembly language, although I will try to help you understand things on a need-to-know basis.
If I haven’t scared you off and you’re still interested in how to make a virtual machine, then let’s
begin!
�
How to create your own virtual machine in a step-by-step tutorial
Brought to you by icemanind
2009
Planning it out
As described in the introduction, the first thing we will want to do is draw out a rough blue print
of what our machine will be able to do. I have decided to call our machine, B32 (Binary 32), although, for
simplicity’s sake it will not be a 32-bit machine. It will be a 16-bit machine. B32 will have 64K of memory
and it can be addressed anywhere from $0000 - $FFFF. A B32 executable program can access any part of
that memory. Along with a 64K memory space, we will introduce 5 registers into our virtual machine. All
CPU’s and all virtual machines have what’s called registers. A register is similar to a variable. Registers
hold numbers and depending on how large the register is, determines how large of a number it can
hold. Unlike variables, however, registers do not take up memory space. Registers are “built into” CPUs.
This will make more sense once you see an example, which is coming up real soon.
To keep things simple, we will only implement 5 registers into our virtual machines. These
registers will be called A, B, D, X and Y. The A and B registers are only 8 bits in length, which means each
register can hold any number between 0 and 255 unsigned or between -128 to 127 signed. For now, we
are going to worry only about unsigned integers. We will get into signed later and we will briefly touch
on floating point numbers later. The X, Y and D registers will be 16 bits in length, capable of storing any
number between 0 and 65,535 unsigned or between -32768 to 32767 signed. The D register will be
something of a unique register. The D register will hold the concatenated values of the A and B registers.
In other words, if register A has $3C and register B has $10, than register D will contain $3C10. Anytime
a value in the A or B register is changed, then the value in the D register is also changed. The same is
true if a value in the D register is changed, the A and B registers will be changed accordingly. You will see
later why this is handy to have.
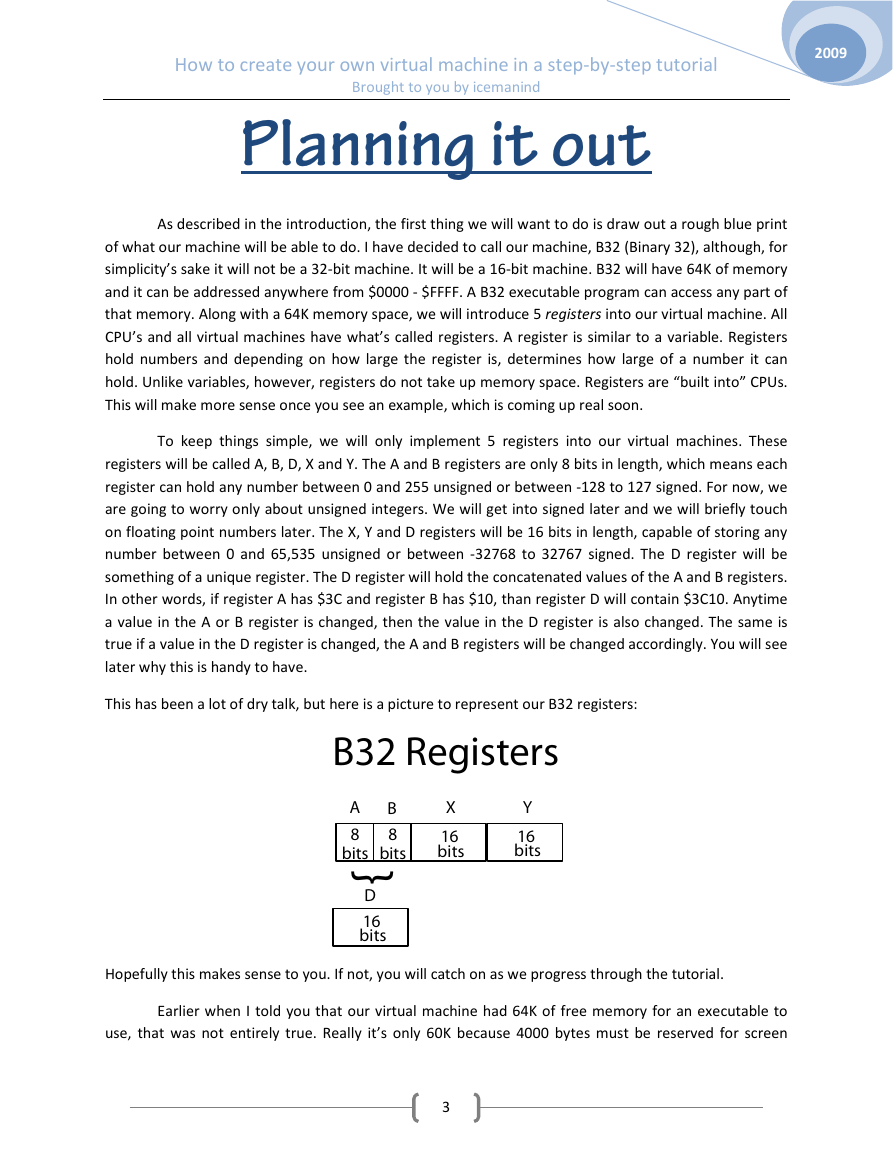
This has been a lot of dry talk, but here is a picture to represent our B32 registers:
B32 Registers
A
8
B
8
bits
bits
{
D
16
bits
X
16
bits
Y
16
bits
Hopefully this makes sense to you. If not, you will catch on as we progress through the tutorial.
Earlier when I told you that our virtual machine had 64K of free memory for an executable to
use, that was not entirely true. Really it’s only 60K because 4000 bytes must be reserved for screen
3
�
2009
How to create your own virtual machine in a step-by-step tutorial
output. I’ve chosen to use $A000 - $AFA0. This area of memory will map to our screen. In most CPUs and
Brought to you by icemanind
most virtual machines, this memory is mapped inside the video card memory, however, for simplicity; I
am going to share our 64K of memory with our video output. This memory will give us an 80x25 screen
(80 columns, 25 rows). You may be thinking right now, “I think your math is off dude. 80 times 25 is only
2000”. This is true; however, the extra 2000 bytes will be for an attribute.
For those of us old enough to remember programming assembly language, back in the old DOS
days, will already be familiar with an attribute byte. An attribute byte defines the foreground and
background color of our text. How it works is the last 3 bits of the byte make up the RGB or Red, Green,
Blue values of our foreground color. The 4th bit is an intensity flag. If this bit is 1 then the color is
brighter. The next 3 bits make up the RGB values of our background color. The last bit is not used (back
in DOS days, this bit was used to make text blink, but in B32, it is ignored). You will see later how colors
are created using this method.
The final part of this section will define the mnemonics and the bytecode that make up a B32
executable. Mnemonics are the building block of our assembly language code that will be assembled to
bytecode. For now, I am only going to introduce enough for us to get started and we will expand on our
list throughout this tutorial. The first mnemonic we will introduce is called “LDA”. “LDA” is short for
“Load A Register” and what it will do is assign a value to the A register. Now in most CPUs and virtual
machines, you have what’s called addressing modes. Addressing modes determine how a register gets
its value. For example, is the value specified directly on the operand (an operand is the data that follows
the mnemonic) or does it pull a value from somewhere in memory or is loaded from a value assigned to
another register? There can be dozens of addressing modes, depending on how complex of a virtual
machine you want to create. For now, our virtual machine will only pull data directly specified in the
operand. We will assign this mnemonic a bytecode value of $01. Since we decided earlier that the A
register can only hold an 8 bit value, we now that the entire length of a “LDA” mnemonic that pulls
direct data from the operand will be 2 bytes in length (1 byte for the mnemonic and 1 byte for the data).
The next mnemonic we will discuss will be called “LDX”. “LDX” is short for “Load X Register” and,
just like “LDA”, it will load a value directly into the X register from the operand. Another difference
between “LDX” and “LDA” is the length. Since our X register can hold 16 bits of data, that means the
total length of the bytecodes will be 3 bytes instead of 2 (1 byte for the mnemonic and 2 bytes for the
data). We will assign this mnemonic a bytecode of $02. If I lost you guys, keep reading and I promise this
will make sense when we look at some examples.
The next mnemonic we will discuss now will be called “STA”. “STA” is short for “Store A
Register” and its function will be to store the value contained in the A register into a location
somewhere in our 64K memory. Unlike our load mnemonics, which pulls the value directly from the
operand, our store mnemonic will pull its data from the value stored in one of the 16 bit registers. We
will assign this mnemonic a bytecode of $03.
The final mnemonic we will discuss is call “END”. “END” will do exactly that. It will terminate the
application. All B32 programs must have an END mnemonic as the last line of the program. The operand
for the END mnemonic will be a label that will point to where execution of our B32 program will begin.
4
�
How to create your own virtual machine in a step-by-step tutorial
Brought to you by icemanind
2009
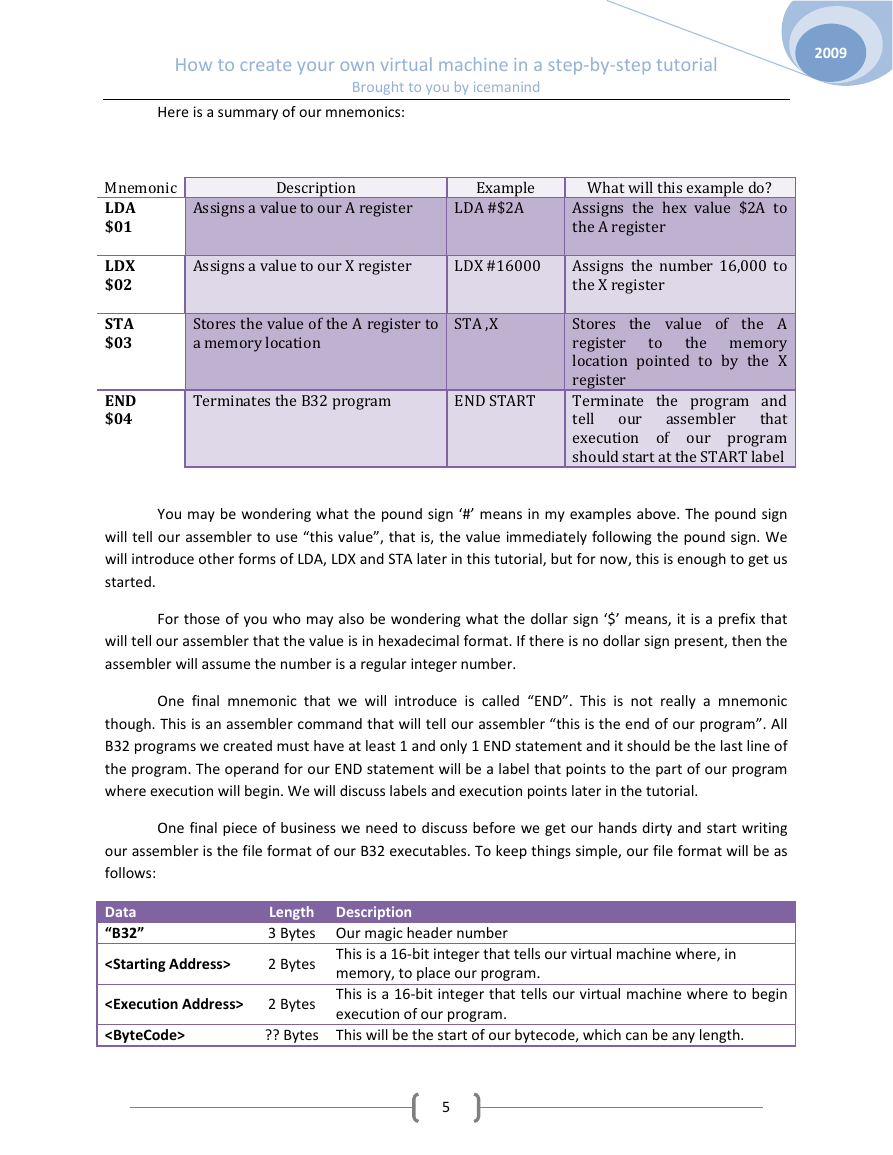
Here is a summary of our mnemonics:
Mnemonic
LDA
$01
LDX
$02
STA
$03
END
$04
Description
Example
What will this example do?
Assigns a value to our A register
LDA #$2A
Assigns a value to our X register
LDX #16000
Assigns the hex value $2A to
the A register
Assigns the number 16,000 to
the X register
Stores the value of the A register to
a memory location
STA ,X
Terminates the B32 program
END START
to
our
Stores the value of the A
register
the memory
location pointed to by the X
register
Terminate the program and
tell
that
execution of our program
should start at the START label
assembler
You may be wondering what the pound sign ‘#’ means in my examples above. The pound sign
will tell our assembler to use “this value”, that is, the value immediately following the pound sign. We
will introduce other forms of LDA, LDX and STA later in this tutorial, but for now, this is enough to get us
started.
For those of you who may also be wondering what the dollar sign ‘$’ means, it is a prefix that
will tell our assembler that the value is in hexadecimal format. If there is no dollar sign present, then the
assembler will assume the number is a regular integer number.
One final mnemonic that we will introduce is called “END”. This is not really a mnemonic
though. This is an assembler command that will tell our assembler “this is the end of our program”. All
B32 programs we created must have at least 1 and only 1 END statement and it should be the last line of
the program. The operand for our END statement will be a label that points to the part of our program
where execution will begin. We will discuss labels and execution points later in the tutorial.
One final piece of business we need to discuss before we get our hands dirty and start writing
our assembler is the file format of our B32 executables. To keep things simple, our file format will be as
follows:
Data
“B32”
Length Description
3 Bytes Our magic header number
2 Bytes
2 Bytes
This is a 16-bit integer that tells our virtual machine where, in
memory, to place our program.
This is a 16-bit integer that tells our virtual machine where to begin
execution of our program.
?? Bytes This will be the start of our bytecode, which can be any length.
5
�
How to create your own virtual machine in a step-by-step tutorial
Brought to you by icemanind
2009
Most binary file formats have a “magic number” as a header. A magic number is one or more
bytes that are unique to that file format. For example, all DOS and Windows executables start with
“MZ”. Java binary class files have 4 bytes for its magic number and start with $CAFEBABE. Our B32
executables will start with “B32”. There are two main purposes for this “magic number”. The first is, our
virtual machine can check to be sure the file it’s trying to execute is, indeed, a B32 binary file. The
second purpose for have magic numbers is some operating systems, such as Linux for example, can
automatically execute files by looking at this magic number in a database, then calling the appropriate
program.
B32 Assembler
Finally! It’s time to get our hands dirty and start working on our assembler. The goal of the
assembler will be to translate our B32 mnemonics into a B32 binary. Our assembler is going to expect
input to be in the following format:
[Optional Label:]
[Optional white space]
A label starts with a letter and is composed of any number of letters or numbers, followed by a
colon. As far as the assembler’s concerned, a label will simply be translated into a 16-bit value defining
an area of memory. A white space is any number of spaces or tabs. Each mnemonic MUST be preceded
by at least 1 space or 1 tab; otherwise, our assembler will treat the mnemonic as a label instead of as a
mnemonic. Likewise, each mnemonic must also have at least 1 space or 1 tab after the mnemonic. To
demonstrate this, we are going to create our very first B32 assembly language program right now. Open
up notepad or some other text editor of your choosing and type the following program EXACTLY as you
see it below and don’t forget to put a single space before each mnemonic and also be sure to end the
last line with a newline:
START:
LDA #65
LDX #$A000
STA ,X
END START
Five points if you can guess what this program will do! That’s right! This program doesn’t do
much except put a capital letter ‘A’ in the upper left hand corner of the screen. The first line is our label.
This is where our execution will begin. The next line loads our A register with the value of 65. The ASCII
value of ‘A’ is 65. The following line loads our X register with hex value $A000. If you remember from our
previous discussion, we said that our video memory will start at $A000, thus defining the upper left
6
�
How to create your own virtual machine in a step-by-step tutorial
hand corner. The next line is the action line that actually stores the value in register A (65, which is the
Brought to you by icemanind
letter ‘A’ in ASCII) at the location pointed to by register X (which is $A000). The final line ends our
program and tells the assembler to start execution at our START label. Hopefully this all makes sense to
you. If not, scroll back up and reread the “Planning it out” section carefully.
2009
Save this file somewhere on your computer. Call it “Test.asm”. We will now create the
assembler that will be able to translate this code into B32 bytecode. Our assembler will work by
assembling in two phases. First the assembler will load the program into memory. Then it will start
phase one of the assemble process. This phase will scan for all labels we have in the program. Each time
the assembler encounters a label, it will store the label as a key in a hash table and the current location
in the program as its value. A hash table is a type of .NET collection that stores values based on unique
keys. This is a perfect collection to use for gather labels, since each label name must be unique in our
program. Once this is complete, the assembler will move onto phase two. Phase two will actually
translate our mnemonics into bytecode.
Okay, fire up Visual Studio and create a new C# Windows Form project called “B32Assembler”.
Target the 2.0 framework or higher. Open up Form1 and change the name to frmMainForm. Resize it so
that the width is 300 and the height is 207. Add the following controls to the form:
Control Type
Label
Label
Label
Label
TextBox
TextBox
TextBox
Button
Button
Button
OpenFileDialog
Autosize
Autosize
Autosize
Autosize
Name
Label1
Label2
Label3
Label4
Location Size
X = 16
Y = 23
X = 20
Y = 52
X = 44
Y = 77
X = 77
Y = 77
txtSourceFileName X = 87
Y = 20
txtOutputFileName X = 87
Y = 49
X = 87
Y = 75
X = 97
Y = 138
X = 193
Y = 17
X = 193
Y = 46
N/A
W = 100
H = 20
W = 100
H = 20
W = 100
H = 20
W = 75
H = 23
W = 75
H = 23
W = 75
H = 23
N/A
btnOutputBrowse
btnSourceBrowse
fdDestinationFile
btnAssemble
txtOrigin
Other properties
Text = “Source File:”
Text = “Output File:”
Text = “Origin:”
Text = “$”
Text = “”
Text = “”
Text = “”
Text = “Assemble!”
Text = “Browse…”
Text = “Browse…”
Filter = “B32 Files|*.B32”
DefaultExt = “B32”
Filename = “”
7
�
How to create your own virtual machine in a step-by-step tutorial
2009
Brought to you by icemanind
OpenFileDialog
fdSourceFile
N/A
N/A
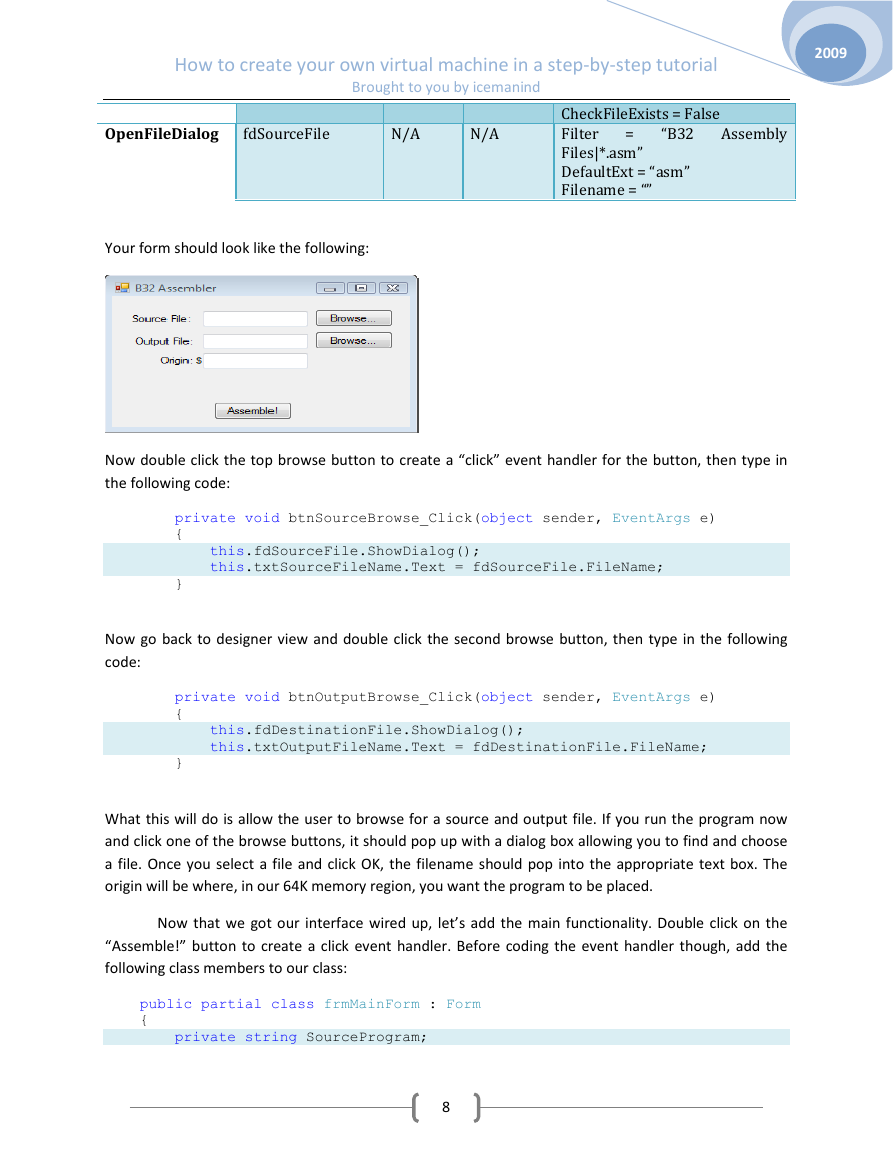
Your form should look like the following:
=
Assembly
“B32
CheckFileExists = False
Filter
Files|*.asm”
DefaultExt = “asm”
Filename = “”
Now double click the top browse button to create a “click” event handler for the button, then type in
the following code:
private void btnSourceBrowse_Click(object sender, EventArgs e)
{
this.fdSourceFile.ShowDialog();
this.txtSourceFileName.Text = fdSourceFile.FileName;
}
Now go back to designer view and double click the second browse button, then type in the following
code:
private void btnOutputBrowse_Click(object sender, EventArgs e)
{
this.fdDestinationFile.ShowDialog();
this.txtOutputFileName.Text = fdDestinationFile.FileName;
}
What this will do is allow the user to browse for a source and output file. If you run the program now
and click one of the browse buttons, it should pop up with a dialog box allowing you to find and choose
a file. Once you select a file and click OK, the filename should pop into the appropriate text box. The
origin will be where, in our 64K memory region, you want the program to be placed.
Now that we got our interface wired up, let’s add the main functionality. Double click on the
“Assemble!” button to create a click event handler. Before coding the event handler though, add the
following class members to our class:
public partial class frmMainForm : Form
{
private string SourceProgram;
8
�
How to create your own virtual machine in a step-by-step tutorial
2009
Brought to you by icemanind
private System.Collections.Hashtable LabelTable;
private int CurrentNdx;
private ushort AsLength;
private bool IsEnd;
private ushort ExecutionAddress;
The SourceProgram variable will hold our program in memory. The B32 assembler will read
our source file and dump the contents into the SourceProgram variable. As described earlier,
LabelTable is a hash table that will hold our labels. The hash table will be populated during the first
stage of the assembly. CurrentNdx will be an integer variable that will be an index pointer to the
current location in the file. AsLength will be an unsigned 16-bit variable that will keep track of how big
our binary program is. IsEnd is simply a flag to determine if the end of the program has been reached.
Finally, ExecutionAddress will hold the value of our execution address. If some of this doesn’t
make sense yet, it will as we code our program.
We are also going to need an enumeration that will store our registers. Add the following
enumeration just below the code you just entered:
private enum Registers
{
Unknown = 0,
A = 4,
B = 2,
D = 1,
X = 16,
Y = 8
}
We will put this enumeration to use later on when we start coding our helper functions. We will
create a function that will read a register from our program and return an enumeration type
representing the register.
Finally, before we start coding our Assemble button handler, add the following lines to the
frmMainForm class constructor. These lines will automatically initialize our variables we added earlier,
assign a default origin, and allocate memory for our hash table:
public frmMainForm()
{
InitializeComponent();
LabelTable = new System.Collections.Hashtable(50);
CurrentNdx = 0;
AsLength = 0;
ExecutionAddress = 0;
IsEnd = false;
SourceProgram = "";
txtOrigin.Text = "1000";
}
9
�



 2023年江西萍乡中考道德与法治真题及答案.doc
 2012年重庆南川中考生物真题及答案.doc
 2013年江西师范大学地理学综合及文艺理论基础考研真题.doc
 2020年四川甘孜小升初语文真题及答案I卷.doc
 2020年注册岩土工程师专业基础考试真题及答案.doc
 2023-2024学年福建省厦门市九年级上学期数学月考试题及答案.doc
 2021-2022学年辽宁省沈阳市大东区九年级上学期语文期末试题及答案.doc
 2022-2023学年北京东城区初三第一学期物理期末试卷及答案.doc
 2018上半年江西教师资格初中地理学科知识与教学能力真题及答案.doc
 2012年河北国家公务员申论考试真题及答案-省级.doc
 2020-2021学年江苏省扬州市江都区邵樊片九年级上学期数学第一次质量检测试题及答案.doc
 2022下半年黑龙江教师资格证中学综合素质真题及答案.doc