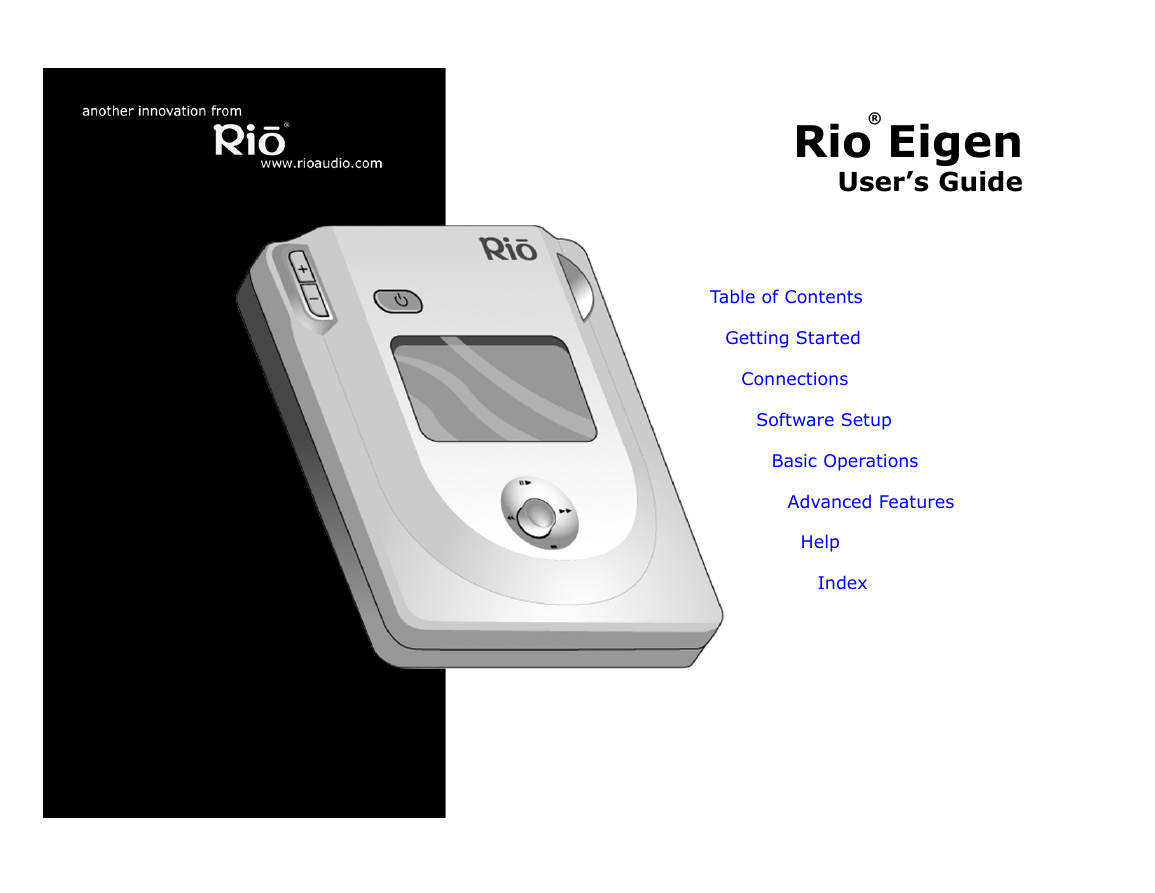
Rio Eigen
User’s Guide
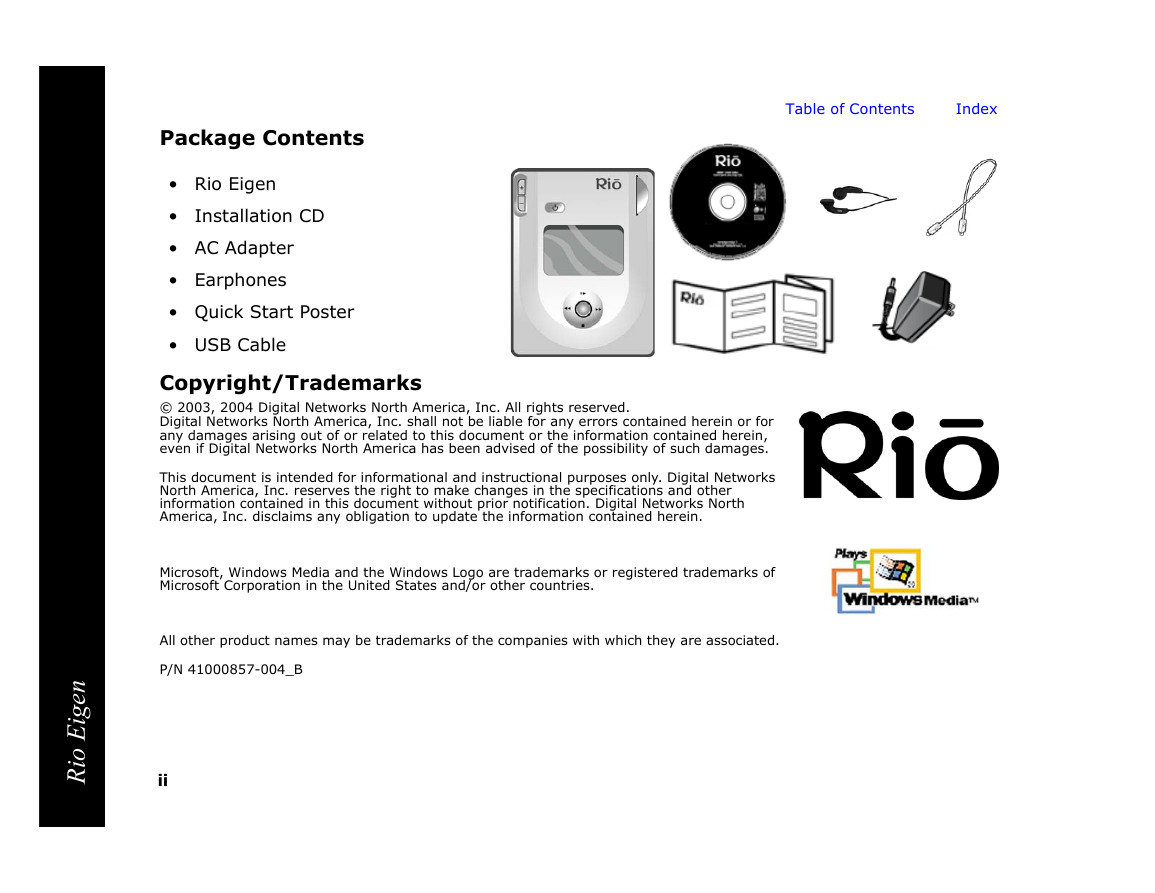
Package Contents
Copyright/Trademarks
Table of Contents
1 - Getting Started
2 - Connections
3 - Software Setup
4 - Basic Operations
5 - Advanced Features
6 - Help
Chapter 1 Getting Started
:: Welcome
Learning More
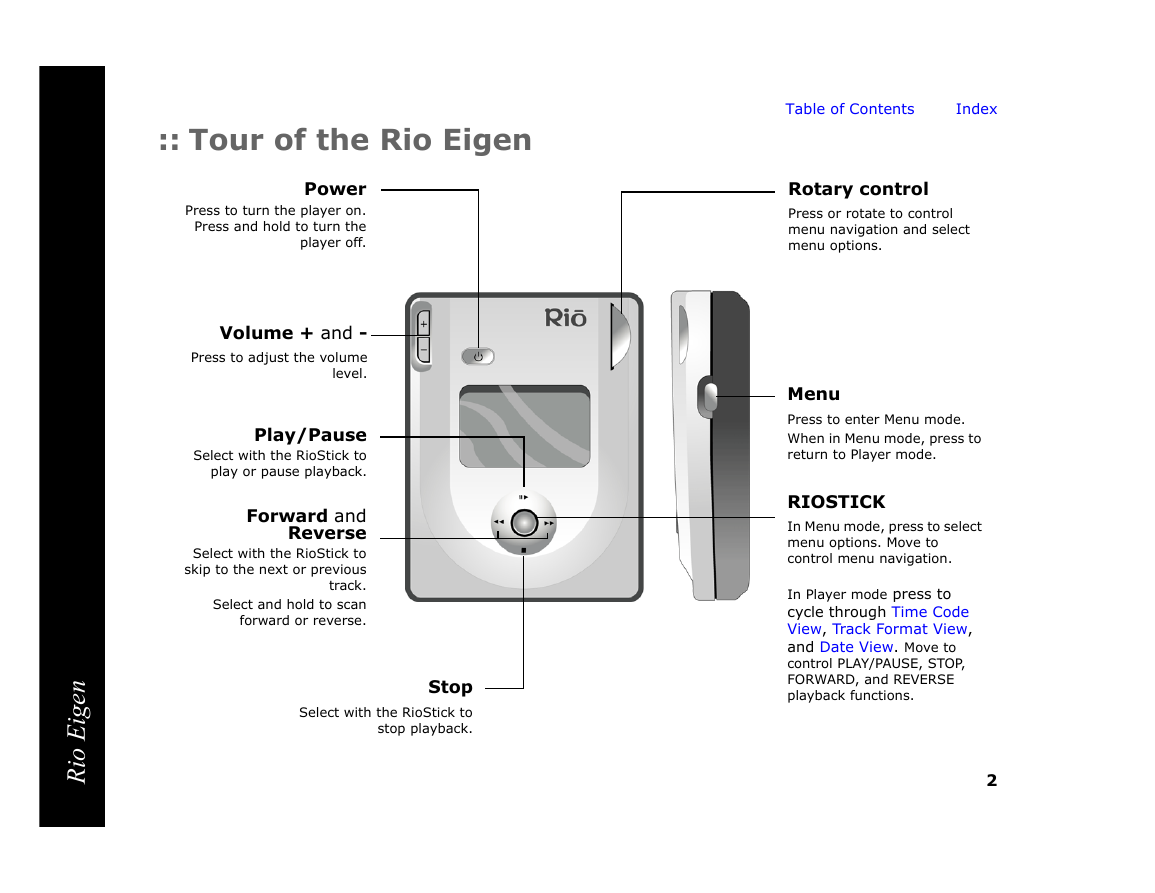
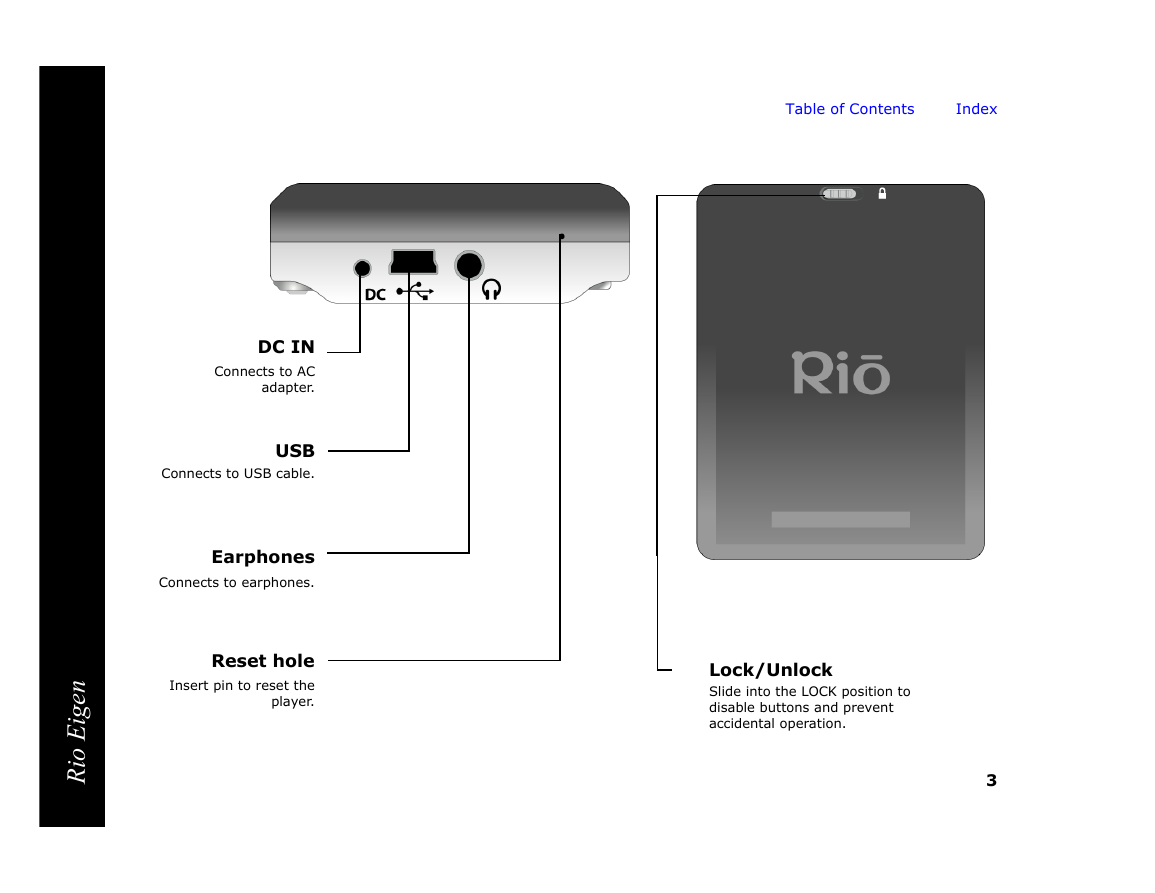
:: Tour of the Rio Eigen
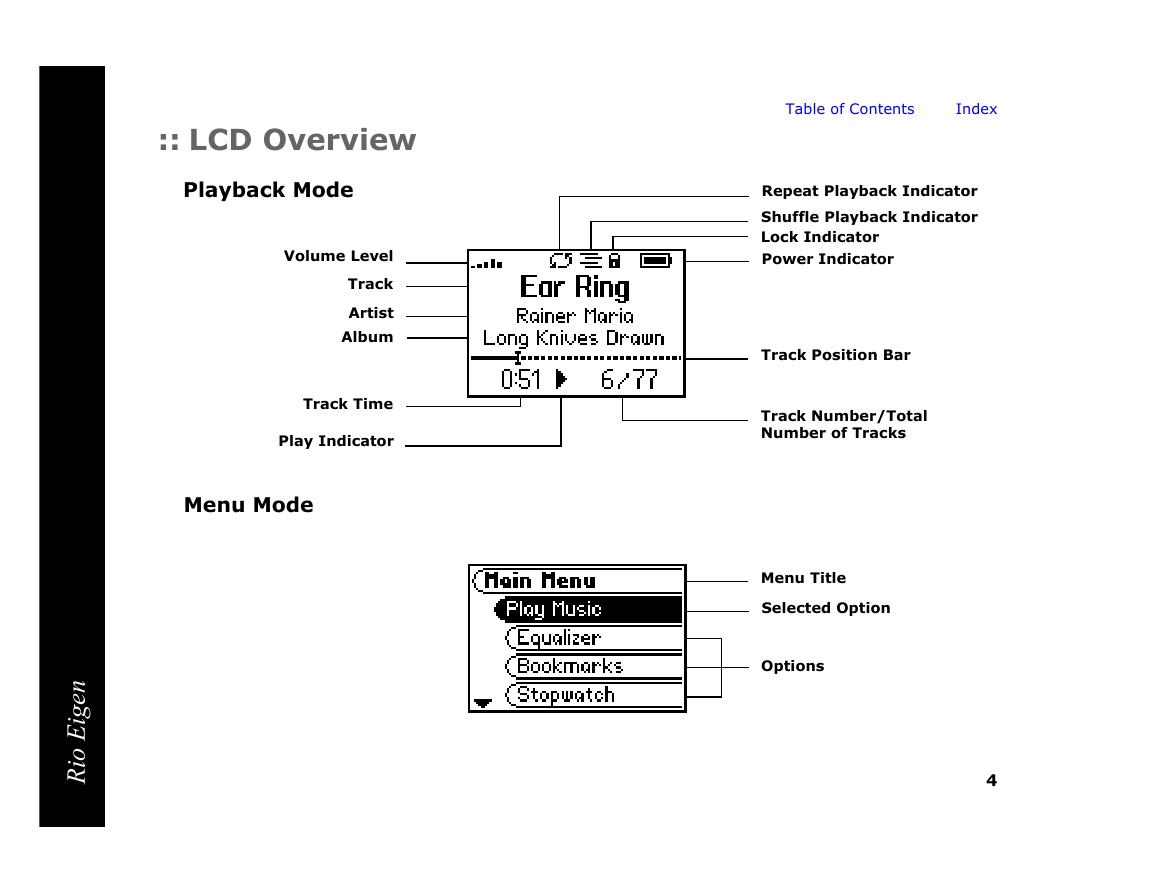
:: LCD Overview
Play Screens
Track Format View
Date View
Playback Mode
Menu Mode
Time Code View
Chapter 2 Connections
:: Basic Connections
AC Power Adapter
1 Plug the AC adapter into an electrical outlet.
2 Connect the AC adapter to the Rio Eigen.
3 After the battery is fully charged, remove the AC adapter from the Rio Eigen.
Batteries
Earphones
USB
USB Detection with the Windows Device Driver
1 Confirm the Rio installation CD is in the computer’s CD-ROM drive.
2 Check the CD-ROM Drives box when the Windows Device Driver Wizard requests the location of the Rio Eigen drivers.
3 Click Next and follow the Windows Device Driver Wizard instructions.
Additional Accessories
Chapter 3 Software Setup
:: Software Installation
1 Place the Rio installation CD label-side up into the computer’s CD-ROM drive. The Rio installation software launches automatically.
2 Click Rio Music Manager INSTALL NOW (required) and follow the on-screen instructions.
3 If prompted, reboot the computer when the installation is complete.
4 Double-click the My Computer icon, , on the Windows desktop.
5 Double-click the CD-ROM icon, .
6 Double-click the Install icon, .
7 Go to Step 2.
Rio Music Manager
Chapter 4 Basic Operations
:: Basic Operations
:: Copy
Copying Tracks with Rio Music Manager
1 Launch the Rio Music Manager.
2 Insert an Audio CD into your CD-ROM drive.
3 Click the CD-ROM icon on the Rio Music Manager Device List.
4 Use any of the following techniques to select tracks:
5 Click to begin copying tracks to your computer.
:: Transfer
Rio Music Manager
1 Launch the Rio Music Manager.
2 Click My Music in the left frame to access tracks. Rio Music Manager will scan the computer’s hard drives for digital audio tr...
3 Select tracks within a category of tracks. Categories include Albums, Artists, Genres, Songs, and Playlists. For example, if y...
4 Use any of the following techniques to select tracks:
5 After the tracks have been selected they can be transferred to the Rio Eigen by clicking .
:: Control
:: Play
Play All
1 Press MENU.
2 Select Play Music.
3 Press ROTARY WHEEL.
4 Select Play All.
5 Press ROTARY WHEEL to begin playback.
Album
1 Press MENU.
2 Select Play Music.
3 Press ROTARY WHEEL.
4 Select Album.
5 Press ROTARY WHEEL.
6 Select an album.
7 Press ROTARY WHEEL to begin playback.
Artist
1 Press MENU.
2 Select Play Music.
3 Press ROTARY WHEEL.
4 Select Artist.
5 Press ROTARY WHEEL.
6 Select an artist.
7 Press ROTARY WHEEL to begin playback.
Genre
1 Press MENU.
2 Select Play Music.
3 Press ROTARY WHEEL.
4 Select Genre.
5 Press ROTARY WHEEL.
6 Select a genre.
7 Press ROTARY WHEEL to begin playback.
Track
1 Press MENU.
2 Select Play Music.
3 Press ROTARY WHEEL.
4 Select Track.
5 Press ROTARY WHEEL.
6 Select a track.
7 Press ROTARY WHEEL to begin playback.
Year
1 Press MENU.
2 Select Play Music.
3 Press ROTARY WHEEL.
4 Select Year.
5 Press ROTARY WHEEL.
6 Select a year (or none).
7 Press ROTARY WHEEL to begin playback.
New Music
1 Press MENU.
2 Select Play Music.
3 Press ROTARY WHEEL.
4 Select New Music.
5 Press ROTARY WHEEL.
6 Select a set amount of time.
7 Press ROTARY WHEEL to begin playback.
Playlist
1 Press MENU.
2 Select Play Music.
3 Press ROTARY WHEEL.
4 Select Playlist.
5 Press ROTARY WHEEL.
6 Select a playlist.
7 Press ROTARY WHEEL to begin playback.
Chapter 5 Advanced Features
:: Advanced Features
:: Equalizer
Custom
1 Press MENU.
2 Select Equalizer.
3 Press ROTARY WHEEL.
4 Select Custom.
5 Press ROTARY WHEEL.
6 Adjust 5-band equalizer. Move the RioStick left or right to navigate between frequencies. Move the RioStick up or down to boost or reduce the Gain of the frequency.
7 Press RIOSTICK to set the Custom equalizer setting and return to player mode.
Normal
1 Press MENU.
2 Select Equalizer.
3 Press ROTARY WHEEL.
4 Select Normal.
5 Press ROTARY WHEEL to set the Normal equalizer option and return to Player mode.
Rock
1 Press MENU.
2 Select Equalizer.
3 Press ROTARY WHEEL.
4 Select Rock.
5 Press ROTARY WHEEL to set the Rock equalizer option.
Jazz
1 Press MENU.
2 Select Equalizer.
3 Press ROTARY WHEEL.
4 Select Jazz.
5 Press ROTARY WHEEL to set the Jazz equalizer option.
Classical
1 Press MENU.
2 Select Equalizer.
3 Press ROTARY WHEEL.
4 Select Classical.
5 Press ROTARY WHEEL to set the Classical equalizer option.
Pop
1 Press MENU.
2 Select Equalizer.
3 Press ROTARY WHEEL.
4 Select Pop.
5 Press ROTARY WHEEL to set the Pop equalizer option.
Trance
1 Press MENU.
2 Select Equalizer.
3 Press ROTARY WHEEL.
4 Select Trance.
5 Press ROTARY WHEEL to set the Trance equalizer option.
:: Bookmarks
1 Press MENU.
2 Select Bookmarks.
3 Press ROTARY WHEEL.
4 Select a Bookmark option.
5 Press ROTARY WHEEL.
:: Stopwatch
1 Press MENU.
2 Select Stopwatch.
3 Press ROTARY WHEEL.
:: Settings
Playback
1 Press MENU.
2 Select Settings.
3 Press ROTARY WHEEL.
4 Select Playback.
5 Press ROTARY WHEEL.
6 Adjust Shuffle and Repeat settings.
7 Press RIOSTICK to apply settings return to Player mode.
Power
1 Press MENU.
2 Select Settings.
3 Press ROTARY WHEEL.
4 Select Power.
5 Press ROTARY WHEEL.
6 Select Pwr Save options.
7 Press RIOSTICK to apply settings and return to Player mode.
Resume
1 Press MENU.
2 Select Settings.
3 Press ROTARY WHEEL.
4 Select Resume.
5 Press ROTARY WHEEL.
6 Adjust Track and Timecode settings.
7 Press RIOSTICK to apply settings and return to Player mode.
Display
1 Press MENU.
2 Select Settings.
3 Press ROTARY WHEEL.
4 Select Display.
5 Press ROTARY WHEEL.
6 Adjust Backlight and Contrast settings.
7 Press RIOSTICK to apply settings and return to Player mode.
Time
1 Press MENU.
2 Select Settings.
3 Press ROTARY WHEEL.
4 Select Time.
5 Press ROTARY WHEEL.
6 Adjust Set Time, Set Date, or Time/Date Mode settings.
7 Press RIOSTICK to apply settings and return to Player mode.
Language
1 Press MENU.
2 Select Settings.
3 Press ROTARY WHEEL.
4 Select Language.
5 Press ROTARY WHEEL.
6 Select a Language setting.
7 Press ROTARY WHEEL.
Lock Setup
1 Press MENU.
2 Select Settings.
3 Press RIOSTICK.
4 Select Lock Setup.
5 Press RIOSTICK.
6 Adjust Lock Volume and RioStick settings.
7 Press RIOSTICK to apply settings and return to Player mode.
:: About
1 Press MENU.
2 Select About.
3 Press ROTARY WHEEL.
4 Select Player or Storage.
5 Press ROTARY WHEEL.
Chapter 6 Help
:: Troubleshooting
Customer Service Information
Web:
Technical Support Telephone (United States):
Technical Support Telephone (United Kingdom):
Technical Support Telephone (Canada):
Customer Service (United States):
Customer Service (United Kingdom):
Customer Service (Canada):
Customer Sales/Presales (United States):
Customer Sales/Presales (United Kingdom):
Customer Sales/Presales (Canada):
With every Rio product you receive the following support services:
Frequently Asked Questions
1 Reset the player by inserting a pin or needle into the Reset hole next to the DC IN port.
2 Press POWER. The player should power on as normal. If the player continues to lock up or does not display properly:
1 Reset the player by inserting a pin or needle into the RESET HOLE next to the DC IN port.
2 Press and hold MENU + POWER until UPGRADER is displayed on the screen.
3 Connect the Rio Eigen player to the computer using the USB cable. Proceed with the Firmware upgrade.
1 Connect the Rio Eigen to the computer using the USB cable.
2 Connect to the secure service where the DRM encoded files came from. The Rio Eigen’ clock should reset. DRM files should now play correctly.
1 Click on the following link: Firmware Upgrade.
2 Click on the link to the Rio Eigen.
3 Locate UPDATES and click Firmware. Select and download the latest software. Download the software that is specific to the oper...
1 Connect the player to your computer with the USB cable.
2 Turn the player on. Waiting will display on the player screen.
3 Double-click the file that you downloaded from the Rio website. The update should take approximately 30 seconds to load.
:: Glossary of Digital Audio Terms
Bass
Bitrate
Codec
Firmware
Gain
ID3 Tag
MP3
Rip and Encode
Synchronize
Treble
VBR
WMA
:: Limited Warranty and Software License
Warranty
Warranty Service
Scope of and Limitation on Warranty
:: FCC and Industry Canada Compliance
Federal Communications Commission (FCC)
1 This device may not cause harmful interference, and
2 This device must accept any interference received, including interference that may cause undesired operation.
Industry Canada
:: Safety
Warning
CAUTION
Index
Symbols
A
B
C
D
E
F
G
H
I
L
M
N
P
R
S
T
U
V
W
Y


 2023年江西萍乡中考道德与法治真题及答案.doc
 2012年重庆南川中考生物真题及答案.doc
 2013年江西师范大学地理学综合及文艺理论基础考研真题.doc
 2020年四川甘孜小升初语文真题及答案I卷.doc
 2020年注册岩土工程师专业基础考试真题及答案.doc
 2023-2024学年福建省厦门市九年级上学期数学月考试题及答案.doc
 2021-2022学年辽宁省沈阳市大东区九年级上学期语文期末试题及答案.doc
 2022-2023学年北京东城区初三第一学期物理期末试卷及答案.doc
 2018上半年江西教师资格初中地理学科知识与教学能力真题及答案.doc
 2012年河北国家公务员申论考试真题及答案-省级.doc
 2020-2021学年江苏省扬州市江都区邵樊片九年级上学期数学第一次质量检测试题及答案.doc
 2022下半年黑龙江教师资格证中学综合素质真题及答案.doc