KODAK Mini HD Video Camera
Extended user guide
Model Zm2
www.kodak.com
For interactive tutorials:
www.kodak.com/go/howto
For help with your camera:
www.kodak.com/go/support
�
Eastman Kodak Company
Rochester, New York 14650
© Kodak, 2010
All screen images are simulated.
Kodak is a trademark of Eastman Kodak Company.
MICROSD and MICROSDHC are trademarks of the SD Card Association.
4H7258_en
�
Front view, Bottom view
Speaker
Lens
Product features
Microphone
USB
USB
release
Card
Reset
button
www.kodak.com/go/support
i
�
Product features
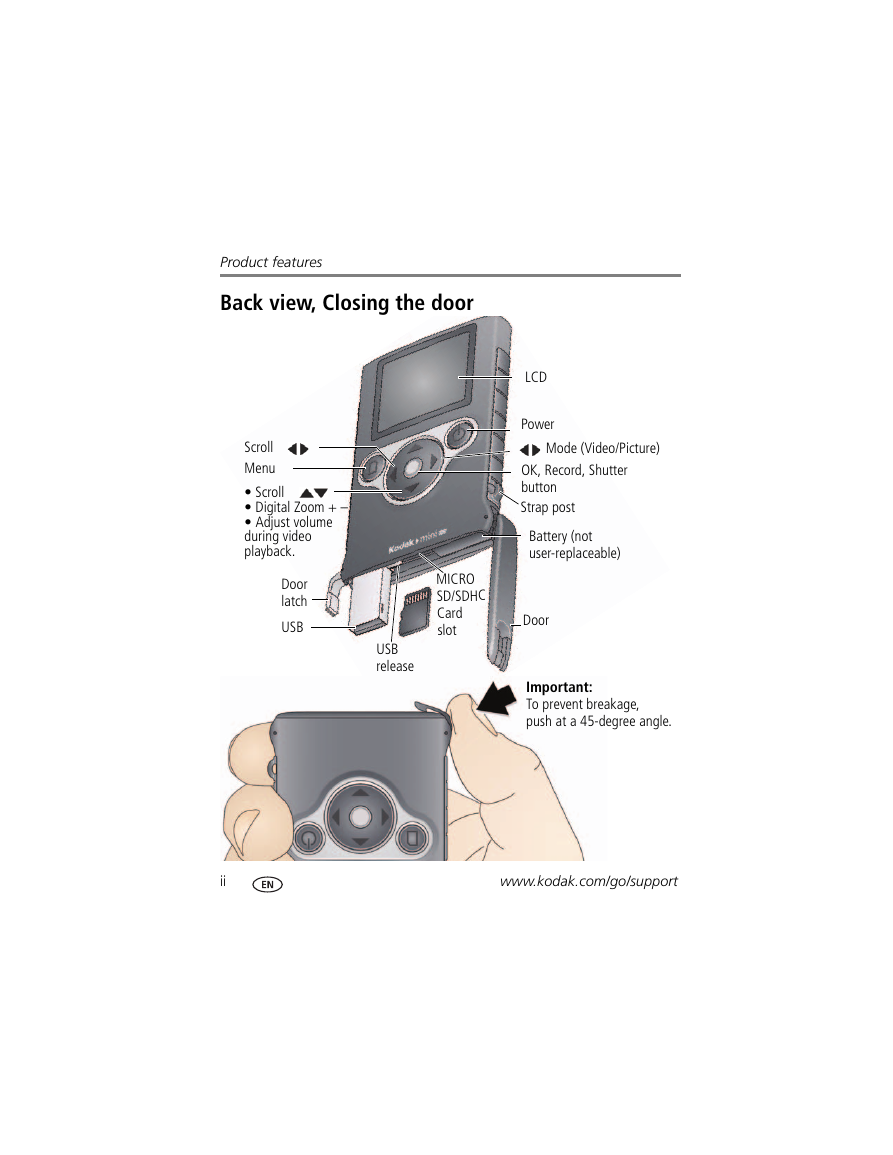
Back view, Closing the door
Scroll
Menu
• Scroll
• Digital Zoom + –
• Adjust volume
during video
playback.
Door
latch
USB
LCD
Power
Mode (Video/Picture)
OK, Record, Shutter
button
Strap post
Battery (not
user-replaceable)
MICRO
SD/SDHC
Card
slot
Door
USB
release
Important:
To prevent breakage,
push at a 45-degree angle.
ii
www.kodak.com/go/support
�
Product features
Understanding the status icons
Elapsed time
Recording
Recording
Battery level
Capture mode
Elapsed time
Playback
Zoom level
Card inserted
Battery level
Volume level
www.kodak.com/go/support
iii
�
1
Table of contents
1 Setting up your camera .........................................................................1
Charging the battery (1 – 2 hours).................................................................1
Inserting a MICROSD or MICROSDHC Card....................................................2
Connecting the strap.....................................................................................3
Turning on the camera ..................................................................................4
Setting the date/time.....................................................................................4
2 Using your camera ................................................................................5
Taking videos and pictures ............................................................................5
Reviewing, deleting pictures and videos.........................................................6
Changing settings .........................................................................................7
Transferring, editing, sharing online...............................................................8
3 Getting help ..........................................................................................9
Troubleshooting............................................................................................9
Getting help on the Web .............................................................................11
4 Appendix .............................................................................................12
Specifications..............................................................................................12
Safety .........................................................................................................13
Care and maintenance ................................................................................14
Limited warranty .........................................................................................15
Regulatory compliance ................................................................................16
iv
www.kodak.com/go/support
�
1 Setting up your camera
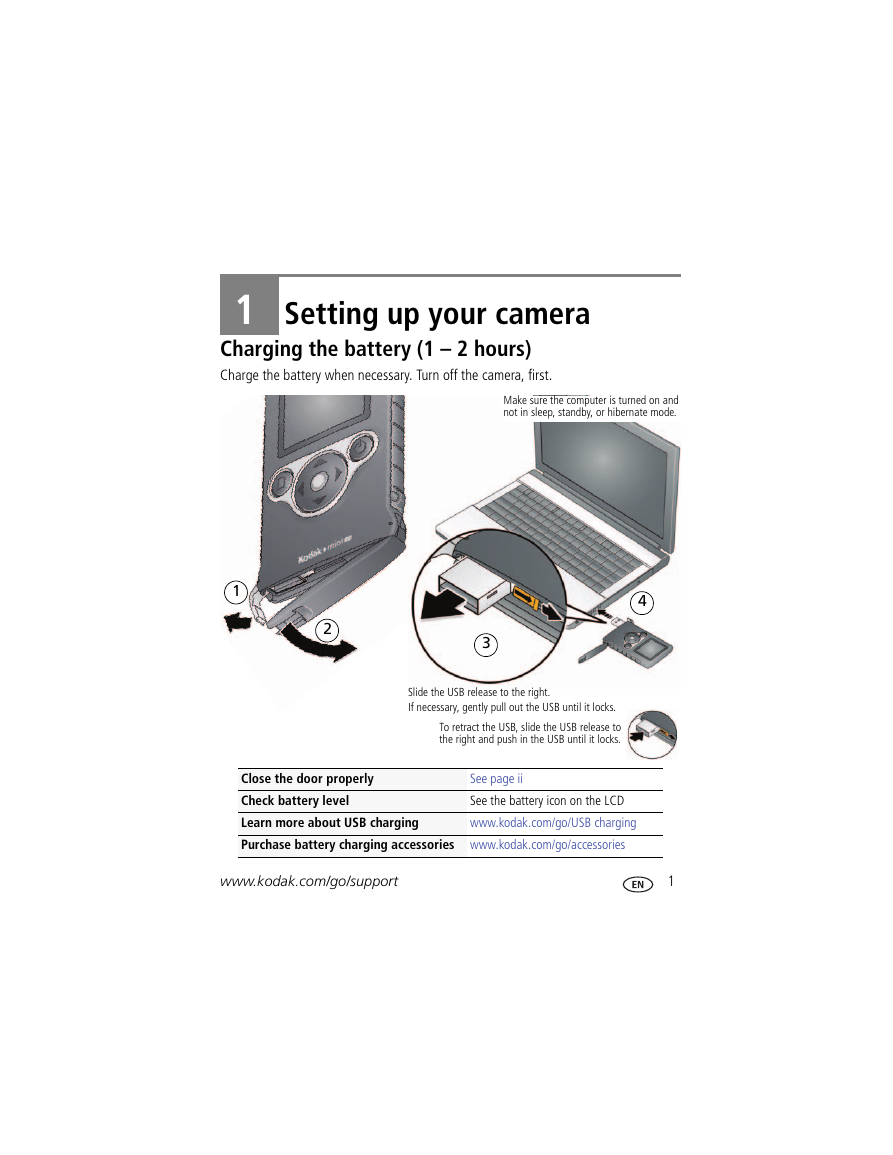
Charging the battery (1 – 2 hours)
Charge the battery when necessary. Turn off the camera, first.
Make sure the computer is turned on and
not in sleep, standby, or hibernate mode.
1
4
2
3
Slide the USB release to the right.
If necessary, gently pull out the USB until it locks.
To retract the USB, slide the USB release to
the right and push in the USB until it locks.
Close the door properly
Check battery level
Learn more about USB charging
Purchase battery charging accessories www.kodak.com/go/accessories
See page ii
See the battery icon on the LCD
www.kodak.com/go/USB charging
www.kodak.com/go/support
1
�
Setting up your camera
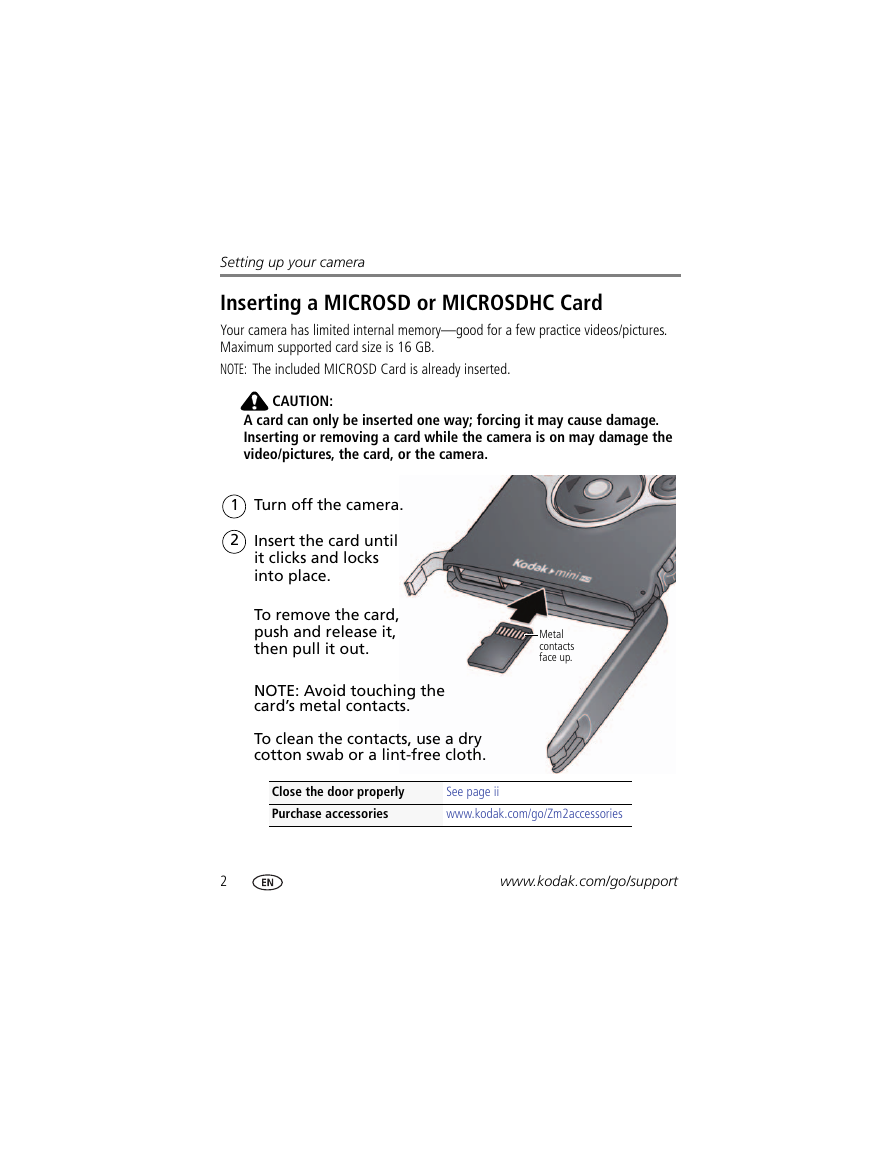
Inserting a MICROSD or MICROSDHC Card
Your camera has limited internal memory—good for a few practice videos/pictures.
Maximum supported card size is 16 GB.
NOTE: The included MICROSD Card is already inserted.
CAUTION:
A card can only be inserted one way; forcing it may cause damage.
Inserting or removing a card while the camera is on may damage the
video/pictures, the card, or the camera.
1 Turn off the camera.
2 Insert the card until
it clicks and locks
into place.
To remove the card,
push and release it,
then pull it out.
Metal
contacts
face up.
NOTE: Avoid touching the
card’s metal contacts.
To clean the contacts, use a dry
cotton swab or a lint-free cloth.
Close the door properly
Purchase accessories
See page ii
www.kodak.com/go/Zm2accessories
2
www.kodak.com/go/support
�





 2023年江西萍乡中考道德与法治真题及答案.doc
 2012年重庆南川中考生物真题及答案.doc
 2013年江西师范大学地理学综合及文艺理论基础考研真题.doc
 2020年四川甘孜小升初语文真题及答案I卷.doc
 2020年注册岩土工程师专业基础考试真题及答案.doc
 2023-2024学年福建省厦门市九年级上学期数学月考试题及答案.doc
 2021-2022学年辽宁省沈阳市大东区九年级上学期语文期末试题及答案.doc
 2022-2023学年北京东城区初三第一学期物理期末试卷及答案.doc
 2018上半年江西教师资格初中地理学科知识与教学能力真题及答案.doc
 2012年河北国家公务员申论考试真题及答案-省级.doc
 2020-2021学年江苏省扬州市江都区邵樊片九年级上学期数学第一次质量检测试题及答案.doc
 2022下半年黑龙江教师资格证中学综合素质真题及答案.doc