iGPS-BT User Manual
�
FCC Notices
This device complies with Part 15(b and c) of the FCC Rules. Operation is subject to
the following conditions:
• This device may not cause harmful interference.
• This device must accept any interference received, including interference that
may cause undesired operation.
CAUTION: Change or modification not expressly approved by the party responsible
for compliance could void the user’s authority to operate this equipment.
Class B
This equipment has been tested and found to comply with the limits for a Class B
digital device pursuant to Part 15 of the FCC Rules. These limits are designed to
provide reasonable protection against harmful interference in a residential
installation. This equipment generates, uses, and can radiate radio frequency
energy and, if not installed and used in accordance with the manufacturer’s
instruction manual, may cause interference with radio communications. However,
there is no guarantee that interference will not occur in a particular installation. If this
equipment does cause harmful interference to radio or television reception, which
can be determined by turning the equipment off and on, you are encouraged to try to
correct the interference by one or more of the following measures:
• Reorient or relocate the receiving antenna.
•
• Connect the equipment into an outlet on a circuit different from that to which
Increase the separation between the equipment and the receiver.
the receiver is connected.
• Consult the dealer or an experienced radio/television technician for help.
FCC ID# Q7M-IGPS-BT
CE Notices
This device has been tested and found to comply with CE marking according to the
R&TTE Directive, 99/5/EEC. The test standards are listed below:
CE/LVD
CE/EMC
Radio Spectrum
EN60950: 1992+A1+A2+A3+A4+A11
EN301 489-17 V 1.1.1: 09-2000
EN301 489-1 V 1.3.1: 09-2001
EN300 328-1 V 1.3.1: 12-2001
EN300 328-2 V 1.2.1: 12-2001
1
�
I.
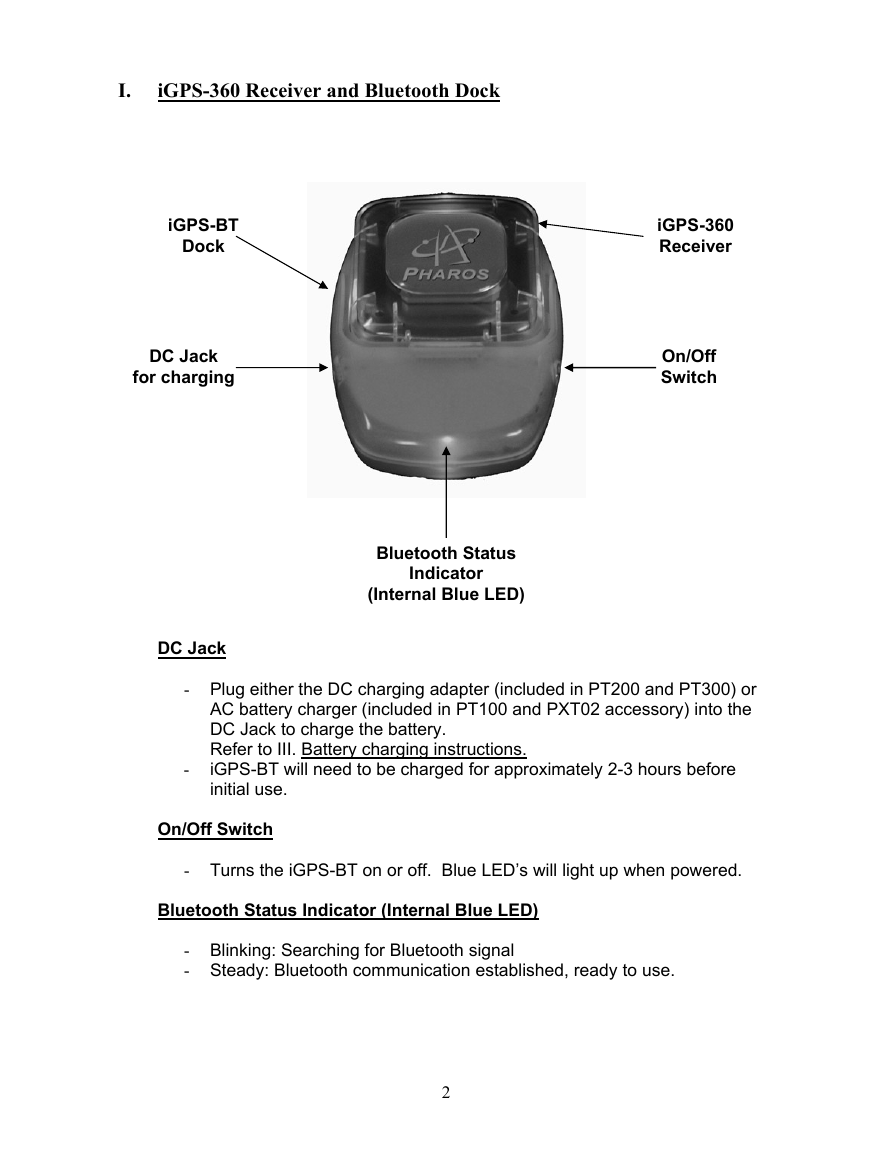
iGPS-360 Receiver and Bluetooth Dock
iGPS-BT
Dock
DC Jack
for charging
Bluetooth Status
Indicator
(Internal Blue LED)
DC Jack
iGPS-360
Receiver
On/Off
Switch
- Plug either the DC charging adapter (included in PT200 and PT300) or
AC battery charger (included in PT100 and PXT02 accessory) into the
DC Jack to charge the battery.
Refer to III. Battery charging instructions.
iGPS-BT will need to be charged for approximately 2-3 hours before
initial use.
-
On/Off Switch
- Turns the iGPS-BT on or off. Blue LED’s will light up when powered.
Bluetooth Status Indicator (Internal Blue LED)
- Blinking: Searching for Bluetooth signal
- Steady: Bluetooth communication established, ready to use.
2
�
use.
Bluetooth connection.
2. Turn on the iGPS-BT. The status indicator will blink as it searches for a
3. Launch the Bluetooth configuration software on your mobile device. (This
should be provided by the manufacturer of your Bluetooth device)
4. Have the Bluetooth configuration software search for any Bluetooth
devices present. It should detect the iGPS-BT and list it as an available
device (a “Pharos iGPS-BT” icon should be displayed).
5. Select the “Pharos iGPS-BT” device. Depending on your Bluetooth
software, this should bring up a screen that will ask for a PIN Code or
Security PIN. Enter the following PIN code:
IMPORTANT
PIN Code: 12345678
(Please memorize this code for future use)
6. After the PIN number is entered, a connection between your mobile device
and the iGPS-BT should be established. The blue LED on the iGPS-BT
dock will change from blinking to a steady glow.
7. Once a connection is established, check the properties of the iGPS-BT in
the Bluetooth configuration software and make a note as to what number
COM port is assigned to it. The navigation software that will be used will
require this COM port number. Or check the COM port setting for your
Pocket PC in the Quick Start Guide.
For more information regarding the iGPS-BT setup, please visit our
Support Product Support Bluetooth Setup page at
www.pharosgps.com.
II. iGPS-BT Setup (see walkthrough guides at the end of this section)
1. The iGPS-BT will need to be charged for two to three hours before initial
Hints & Tips
•
• GPS receiver must have a direct view to the sky. GPS receiver does
not work well indoors.
If possible, make sure the GPS is stationary when getting the initial
satellite position lock. Allow 1-2 minutes at initial start-up for the GPS
receiver to acquire a satellite lock for tracking.
• Make sure that the communication (COM) port is configured correctly
in the navigation software being used to ensure proper functioning of
the GPS system.
3
�
Walkthrough Guides
iGPS-BT Setup for Pocket PCs with built-in Bluetooth Technology running the
Windows Mobile Pocket PC OS
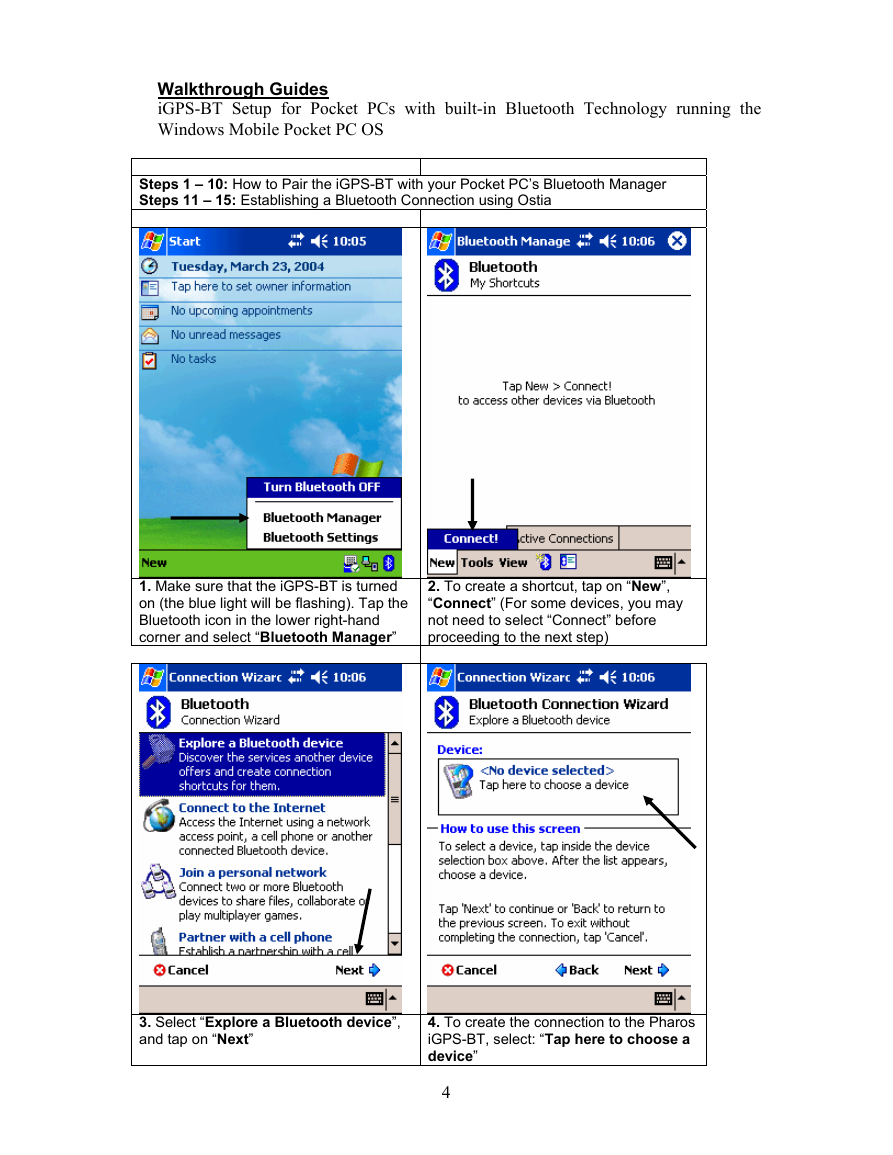
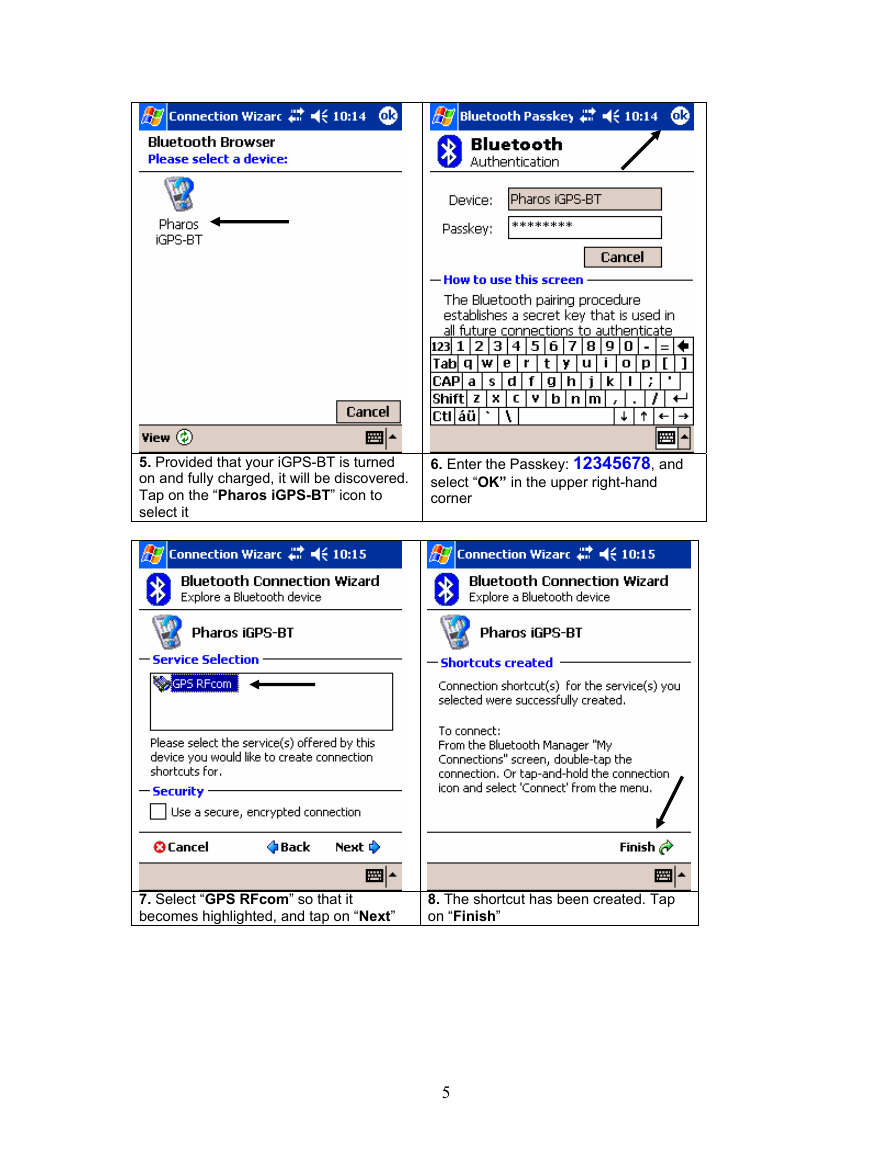
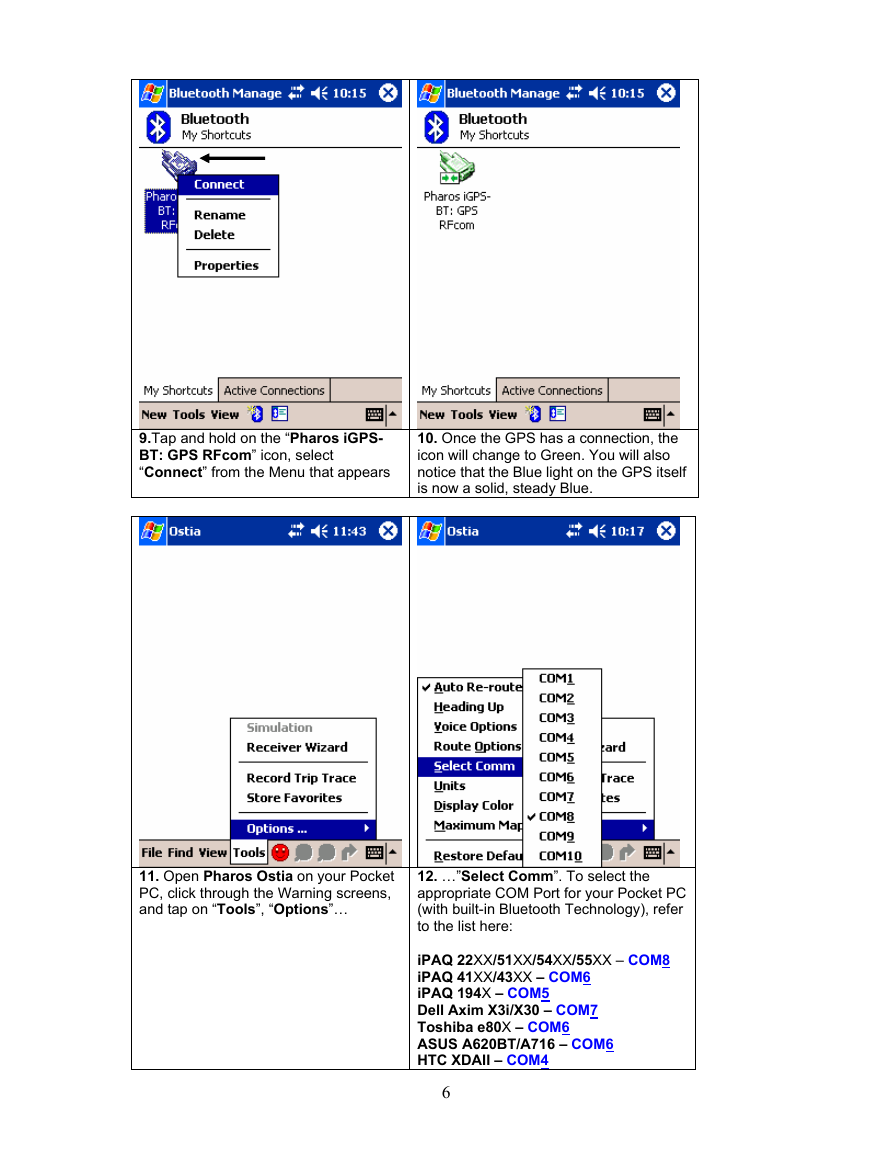
Steps 1 – 10: How to Pair the iGPS-BT with your Pocket PC’s Bluetooth Manager
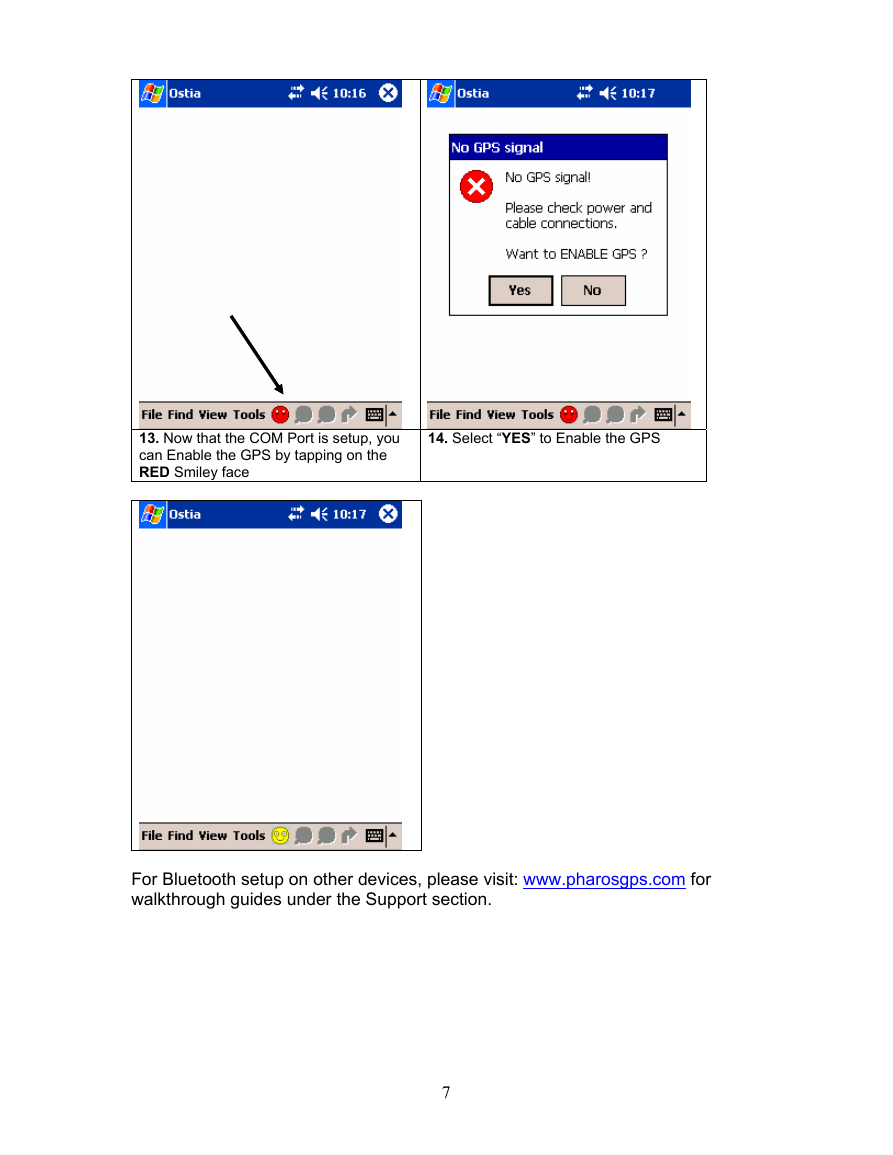
Steps 11 – 15: Establishing a Bluetooth Connection using Ostia
1. Make sure that the iGPS-BT is turned
on (the blue light will be flashing). Tap the
Bluetooth icon in the lower right-hand
corner and select “Bluetooth Manager”
2. To create a shortcut, tap on “New”,
“Connect” (For some devices, you may
not need to select “Connect” before
proceeding to the next step)
3. Select “Explore a Bluetooth device”,
and tap on “Next”
4. To create the connection to the Pharos
iGPS-BT, select: “Tap here to choose a
device”
4
�
5. Provided that your iGPS-BT is turned
on and fully charged, it will be discovered.
Tap on the “Pharos iGPS-BT” icon to
select it
6. Enter the Passkey: 12345678, and
select “OK” in the upper right-hand
corner
7. Select “GPS RFcom” so that it
becomes highlighted, and tap on “Next”
8. The shortcut has been created. Tap
on “Finish”
5
�
9.Tap and hold on the “Pharos iGPS-
BT: GPS RFcom” icon, select
“Connect” from the Menu that appears
10. Once the GPS has a connection, the
icon will change to Green. You will also
notice that the Blue light on the GPS itself
is now a solid, steady Blue.
11. Open Pharos Ostia on your Pocket
PC, click through the Warning screens,
and tap on “Tools”, “Options”…
12. …”Select Comm”. To select the
appropriate COM Port for your Pocket PC
(with built-in Bluetooth Technology), refer
to the list here:
iPAQ 22XX/51XX/54XX/55XX – COM8
iPAQ 41XX/43XX – COM6
iPAQ 194X – COM5
Dell Axim X3i/X30 – COM7
Toshiba e80X – COM6
ASUS A620BT/A716 – COM6
HTC XDAII – COM4
6
�
13. Now that the COM Port is setup, you
can Enable the GPS by tapping on the
RED Smiley face
14. Select “YES” to Enable the GPS
For Bluetooth setup on other devices, please visit: www.pharosgps.com for
walkthrough guides under the Support section.
7
�


 2023年江西萍乡中考道德与法治真题及答案.doc
 2012年重庆南川中考生物真题及答案.doc
 2013年江西师范大学地理学综合及文艺理论基础考研真题.doc
 2020年四川甘孜小升初语文真题及答案I卷.doc
 2020年注册岩土工程师专业基础考试真题及答案.doc
 2023-2024学年福建省厦门市九年级上学期数学月考试题及答案.doc
 2021-2022学年辽宁省沈阳市大东区九年级上学期语文期末试题及答案.doc
 2022-2023学年北京东城区初三第一学期物理期末试卷及答案.doc
 2018上半年江西教师资格初中地理学科知识与教学能力真题及答案.doc
 2012年河北国家公务员申论考试真题及答案-省级.doc
 2020-2021学年江苏省扬州市江都区邵樊片九年级上学期数学第一次质量检测试题及答案.doc
 2022下半年黑龙江教师资格证中学综合素质真题及答案.doc